# Distributed Jobs
The cnvrg platform supports the running of distributed jobs, which allows a user to run a single job using more than one Kubernetes node. This enables users to achieve optimized utilization of their resources and perform customized compute methodologies according to job requirements.
The cnvrg platform supports the following forms of distributed jobs:
The topics in this page:
# Open MPI
Open MPI technology allows the running of distributed jobs over multiple Kubernetes nodes. The cnvrg platform fully supports this use case to simplify DevOps, allowing users to easily run Open MPI jobs.
To run an Open MPI job, a user must use Open MPI compatible code, an Open MPI compute template, and a compatible Open MPI container.
WARNING
A cnvrg Open MPI job requires both an Open MPI compute template and an Open MPI container.
# Open MPI compute templates
An Open MPI compute template represents a master node and a certain number of worker nodes. The template sets the resources for the master nodes and workers separately.
Users can create their own custom Open MPI compute templates.
For example, a template named Open-MPI-medium, with resources 2 CPUs 4 GB + 2 Workers: 4 CPUs 16.0 GB 1 GPUs, indicates the Open MPI master node has 2 CPUs and 4 GB of memory. It also indicates that when the mpirun command is called, 2 new worker pods are created with 4 CPUs and 16 GB of memory and 1 GPU each.
# Open MPI master and worker nodes
When running a job using an Open MPI compute template and a compatible Open MPI container, cnvrg simultaneously runs both the master node and the worker nodes (executors).
The code (Git repository and Files) as well as the selected datasets are cloned to the master node and the worker nodes, so they can be accessed in the same manner as a regular cnvrg job.
When the job concludes, cnvrg releases all the resources.
# More Open MPI information
For more information on how to leverage Open MPI within code, refer to the Open MPI documentation.
# PyTorch Distributed
The PyTorch native module torch.distributed allows data scientists to easily parallelize their computations across multiple nodes. To accomplish this, it leverages messaging passing semantics, enabling each process to communicate data to any of the other processes. The cnvrg platform fully supports this method of using PyTorch without users having to perform any of the DevOps or MLOps work themselves.
To run a PyTorch Distributed job, you must use a compatible PyTorch container and an PyTorch Distributed compute template.
WARNING
A cnvrg PyTorch Distributed job requires both a PyTorch container and a PyTorch Distributed compute template.
# PyTorch Distributed compute templates
A PyTorch Distributed compute template represents a certain number of worker nodes (executors). The template sets the resources for the workers.
Users can create their own custom PyTorch Distributed compute templates.
For example, a template named PyTorch-Dist-medium, with resources 4 Workers: 4 CPUs 16.0 GB 1 GPUs, indicates the worker nodes have 4 CPUs and 16 GB of memory and 1 GPU each.
# PyTorch Distributed worker nodes
When running a job using a PyTorch Distributed compute template and compatible PyTorch container, cnvrg runs the defined worker nodes (executors).
The code (Git repository and Files) as well as the selected datasets are cloned to the worker nodes, so they can be accessed in the same manner as a regular cnvrg job.
When the job concludes, cnvrg releases all the resources.
# PyTorch Distributed commands
After selecting a compatible PyTorch Distributed template, run the code using a regular Python command, such as python my_script.py. Cnvrg automatically adds the required flags to the rest of the command to ensure it runs correctly.
NOTE
Typically, the following full line is required to run the Python code:
python -m torch.distributed.launch --nproc_per_node=1 --nnodes=2 --node_rank=0 --master_addr="localhost" --master_port=3000" my_script.py.
However, cnvrg automatically injects the extra code snippet into the command, so all that is needed is python my_script.py.
# More PyTorch Distributed information
For more information on how to leverage PyTorch Distributed within code, refer to the torch.distributed documentation.
# Spark on Kubernetes
The cnvrg platform supports managed Spark on Kubernetes to simplify Spark’s usage and accessibility and eliminate implementation challenges, operational overhead, and maintenance requirements. The platform offers this Spark setup and includes additional integration with other developer tools such as Bash terminal, cnvrg Flows, Jupyter Notebooks, Visual Studio Code workspace, and other integrated developer environments (IDEs).
The cnvrg Spark capability includes front-end controls and optimization to increase Spark speed and efficiency and improve cloud cost savings.
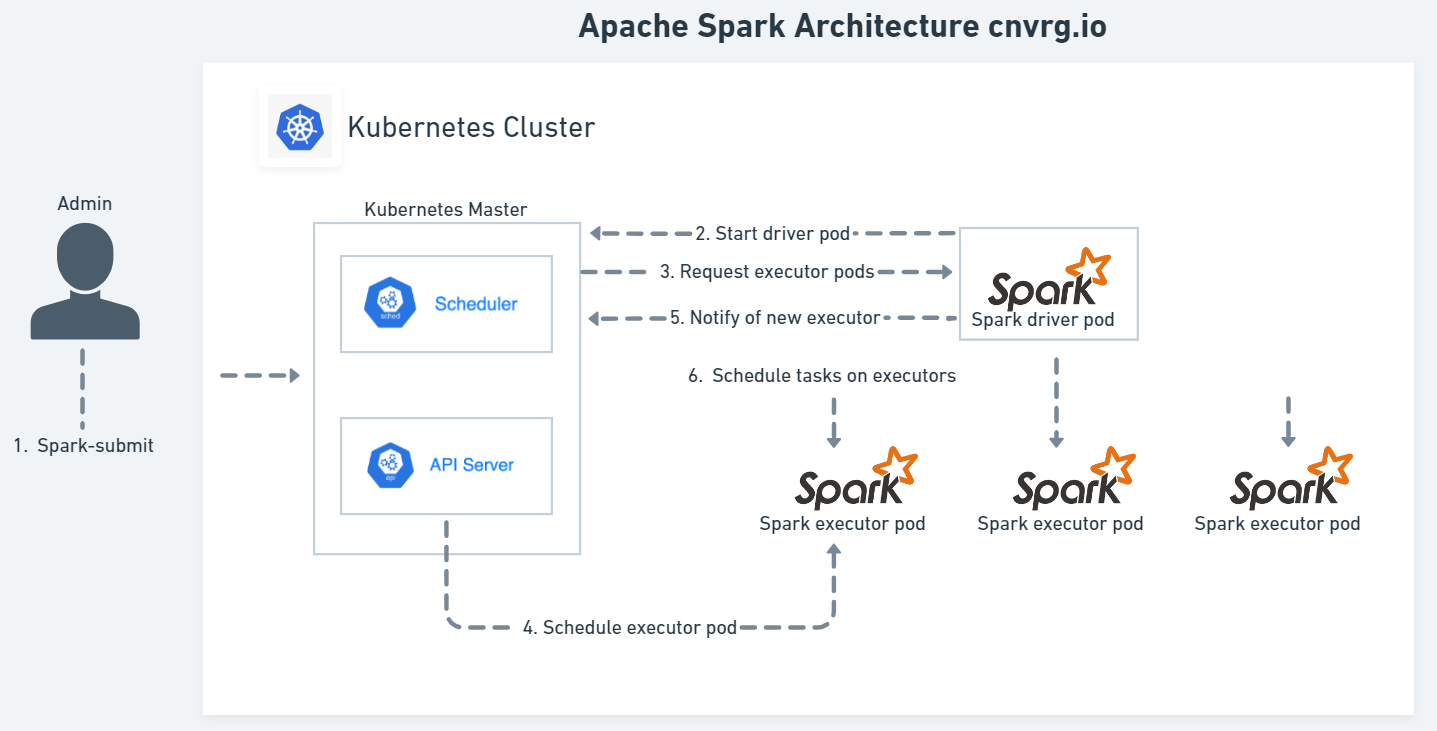
Submitting a Spark application with a spark-submit to a Kubernetes cluster starts a Spark driver within a Kubernetes pod. The driver creates the Spark executor pods within the Kubernetes cluster to execute one pod per executor. For more information, refer to Spark Cluster Overview.
If Dynamic allocation is enabled, the executor number dynamically evolves based on the load. Otherwise, an allocated static number is defined. Refer to Spark on Kubernetes.
Spark applications can run locally or distributed across a cluster, either by using an interactive shell or by submitting an application, with the following options:
- Submit a
client-modeinteractive computational environment through a developer tool such as Jupyter Notebooks with PySpark. - Run in
cluster-modewith thespark-submitscript in the/bindirectory on a remote Spark driver (gateway host). Use APIs to create a Spark application that runs interactively or in batch mode using Scala, Python, R, or Java by launching an interactive shell for Scala (spark-shell), Python (PySpark), or SparkR.
NOTE
Each interactive shell automatically creates SparkContext in an sc variable and SparkSession in a spark variable.
For details about spark-submit, see Spark Application Submissions.
# Spark configuration
To start working with Spark, first define compute templates to optimize the Spark pod sizes and avoid wasting capacity. For more information, refer to the cnvrg Compute Template options.
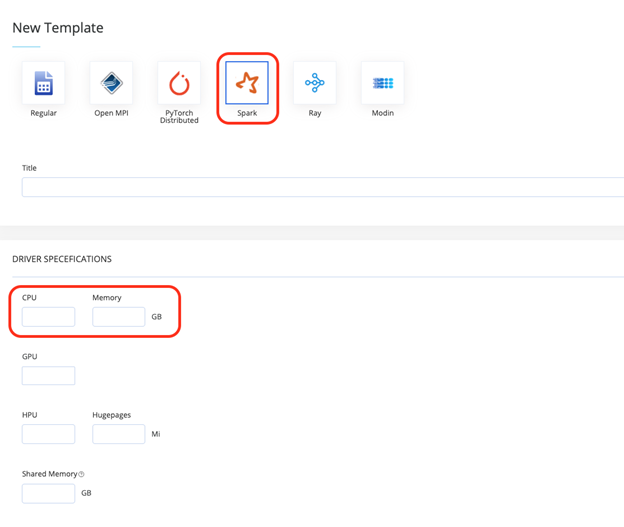
Complete the following steps to add a new Spark compute template:
Click Compute and then click Templates.
Click Add Compute Template and select the required resource for the template.
Select the Spark template mode option.
Set the required CPU and Memory resources. Refer to Set spark.executor.cores.
Configure the
spark-defaults.confproperties in the Spark Configurations section (below shows an examplespark-defaults.conffile) using the following guidelines: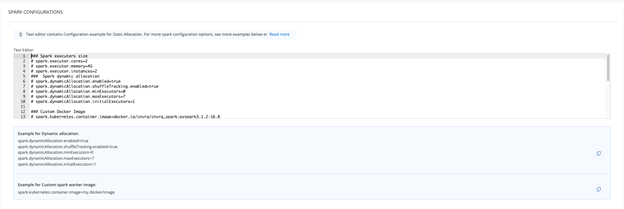
- Specify the properties in the
spark-defaults.conffile in the form of property-value pairs. - Add a comment with a hashtag (#) at the beginning of a line.
TIP
It is recommended to set up the configuration properties in spark-defaults.conf to use for every application.
# Set spark.executor.cores
When setting the spark.executor.cores, users must account for a pod’s reserved system daemons capacity. For example, say a Kubernetes node has four CPUs, and one Spark template must precisely fit the executor pod, so the user submits a Spark job with the configuration spark.executor.cores=4. This is incorrect because the Spark application cannot fit in the allocated nodes resource due to the unaccounted capacity required for reserved system daemons, and consequently, cannot run.
Typically, allocatable resources represent 95% of the node capacity. The resources the DaemonSet requests are used to deliver networking, provide security, and collect logs and metrics information. After accounting for the DaemonSet requirements, about 90% of the node capacity remains with Spark executors of 3.6 CPUs. Therefore, for this use case, the following configuration is recommended:
spark.executor.cores=4spark.kubernetes.executor.request.cores=3600m
This means that the Spark executors will request precisely 3.6 CPUs and Spark will schedule up to four tasks on parallel executor jobs.
For more information on creating custom Spark compute templates, click here.
# Jupyter Notebooks (Spark)
Jupyter Notebooks is one of the most popular tools available for developers who use Python. To use Jupyter Notebooks within cnvrg, navigate to Projects > Workspaces > Start a Workspace.
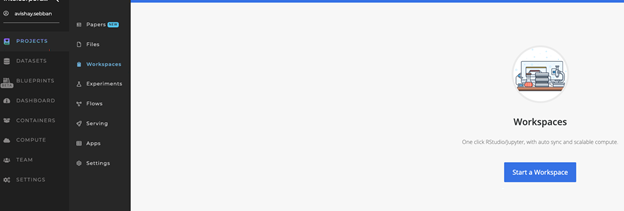
The New Workspace dialog displays. Complete the following steps to start a new Spark-compatible Jupyter workspace:
- Select Jupyter for workspace type.
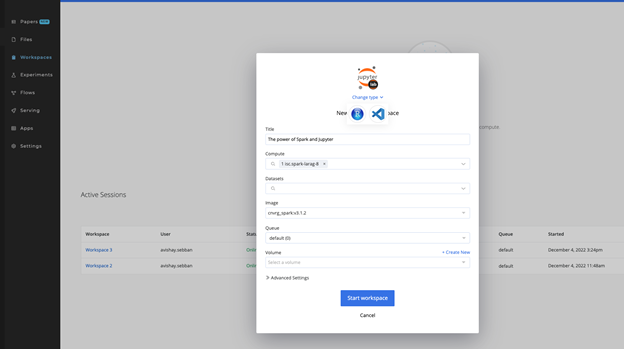
- Select the relevant Spark Compute template created previously.
- Select the relevant Spark-compatible Image.
- Click the Start workspace button.
NOTE
You can use your own Spark image or the cnvrg-included spark-image:v3.1.2.
WARNING
A Spark job requires both a Spark compute and a Spark container image.
# PySpark Jobs
PySpark comes bundled with the cnvrg Spark image so there’s no need to install it. If required, PySpark can be installed with added dependencies like Spark SQL or Pandas for Spark as a separate installation using the Python package manager.
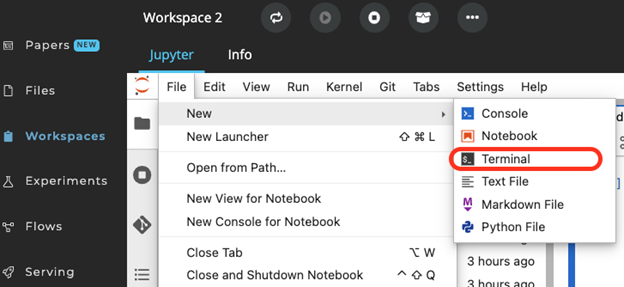
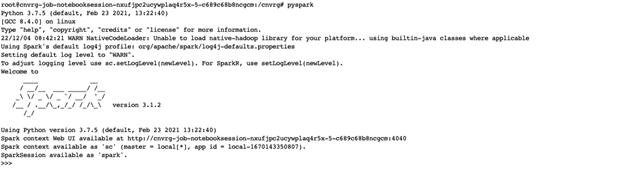
Once the workspace is active, PySpark can be launched by running the $pyspark command in the cnvrg Terminal, accessed using the File > New drop-down list shown below.
Run a Spark application using the Scala or Python shells.
The example below shows a simple Python script that uses PySpark libraries and creates a dataframe with a test dataset.
# Import Libraries
import findspark
import os
import pyspark
from pyspark import SQLContext
from pyspark.sql import SparkSession
from pyspark.sql.types import StructType, StructField, FloatType, BooleanType
from pyspark.sql.types import DoubleType, IntegerType, StringType
from pyspark.sql import SQLContext, Row, SparkSession

findspark.init("/spark")

spark = SparkSession.builder.getOrCreate()
sc = spark.sparkContext
conf = pyspark.SparkConf()

spark_context = SparkSession.builder.config(conf=conf).getOrCreate()
sqlcontext = SQLContext(sc)

# Setup the Schema
schema = StructType([
StructField("User ID", IntegerType(),True),
StructField("Username", StringType(),True),
StructField("Browser", StringType(),True),
StructField("OS", StringType(),True),
])
# Add Data
data = ([(1580, "Barry", "FireFox", "Windows" ),
(5820, "Sam", "MS Edge", "Linux"),
(2340, "Harry", "Vivaldi", "Windows"),
(7860, "Albert", "Chrome", "Windows"),
(1123, "May", "Safari", "macOS")
])
# Setup the Data Frame
user_data_df = sqlcontext.createDataFrame(data,schema=schema)

user_data_df.show()
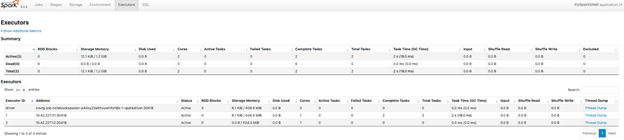
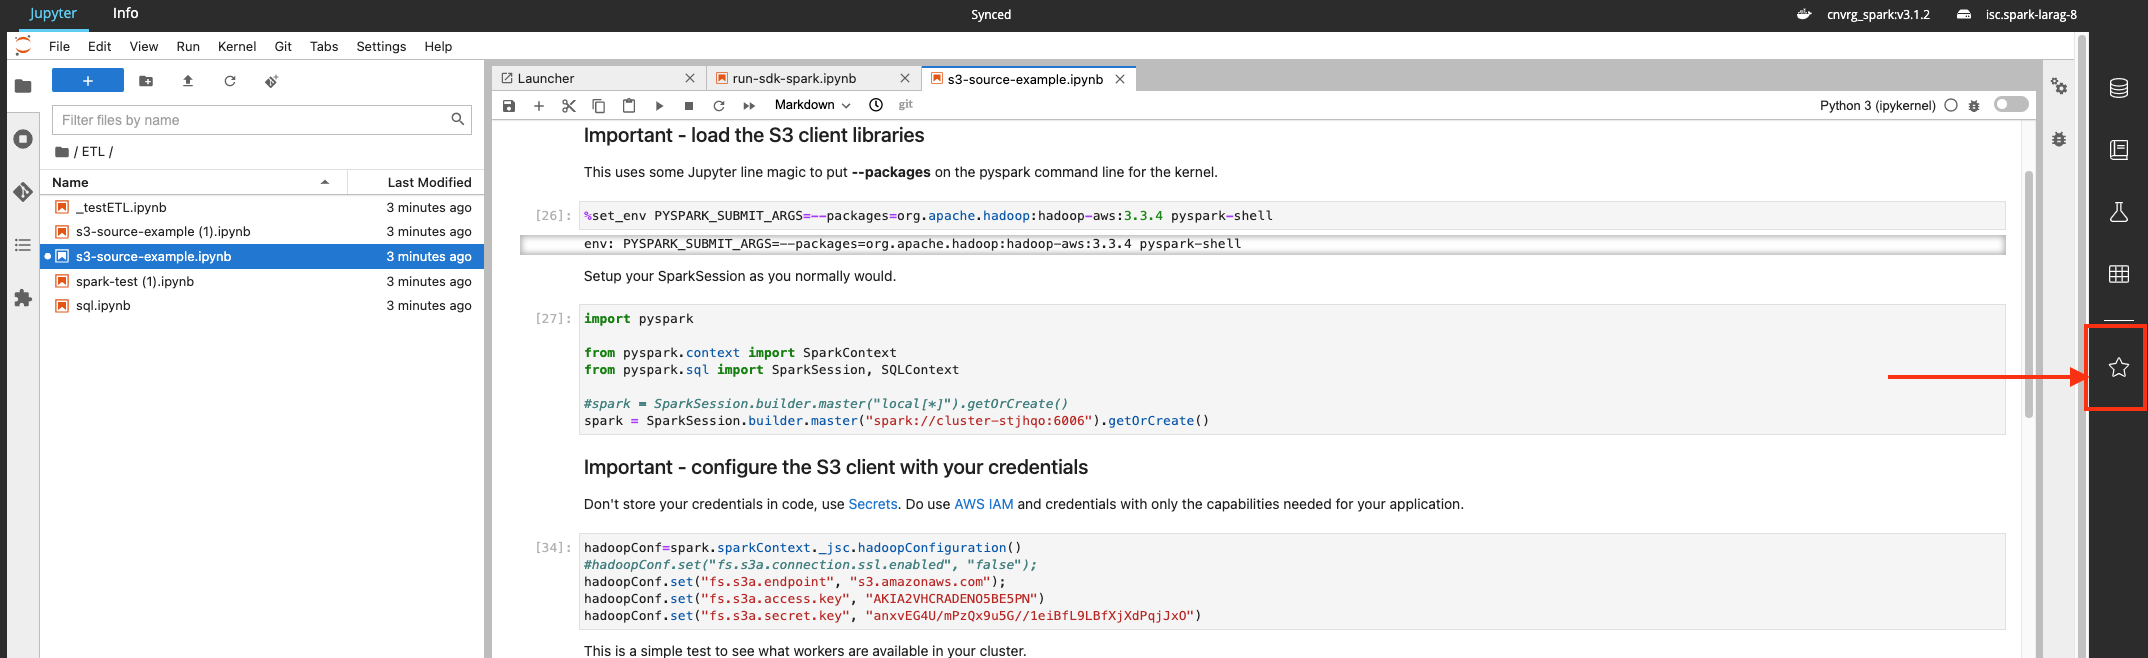
The PySpark web UI is accessible using the Spark icon on the right. Here, the script execution job details can be viewed, as shown in the image below.
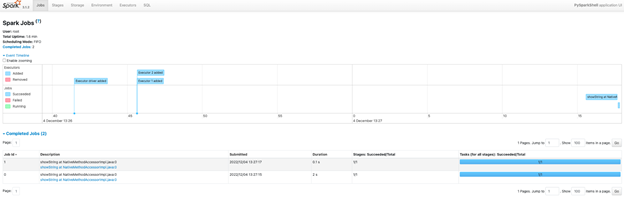
The following image shows the executors details.
# SparkUI
When creating a SparkSession, whether in an experiment or a workspace, a user gains access to the SparkUI.
Access SparkUI in a workspace or experiment by by clicking the SparkUI button on the right sidebar.
TIP
SparkUI is only available while the Spark context is live.
# Data Use with Spark
When using Spark, a Spark compute template, and a compatible Spark container, the data to be processed must be available to all the Spark workers.
Therefore, use a remote link to the data to train on rather than a mounted dataset. Instead of running your Spark session with data from /data, use the link to the actual file.
The following code snippet provides an example:
spark = SparkSession.builder.getOrCreate()
df = spark.read.csv("s3a://link-to-file")
If using cnvrg datasets, obtain the correct link by navigating to the dataset's file viewer, locating the file, and then copying the link.