# Text Detection AI Blueprint -deprecated from 11/2024
# Batch-Inference
Text detection uses a trained model to convert typed and printed text into machine-encoded text, whether from a scanned document, a photographed document, a scene photograph, or an image’s superimposed subtitled text.
NOTE
This blueprint is not recommended for handwritten text.
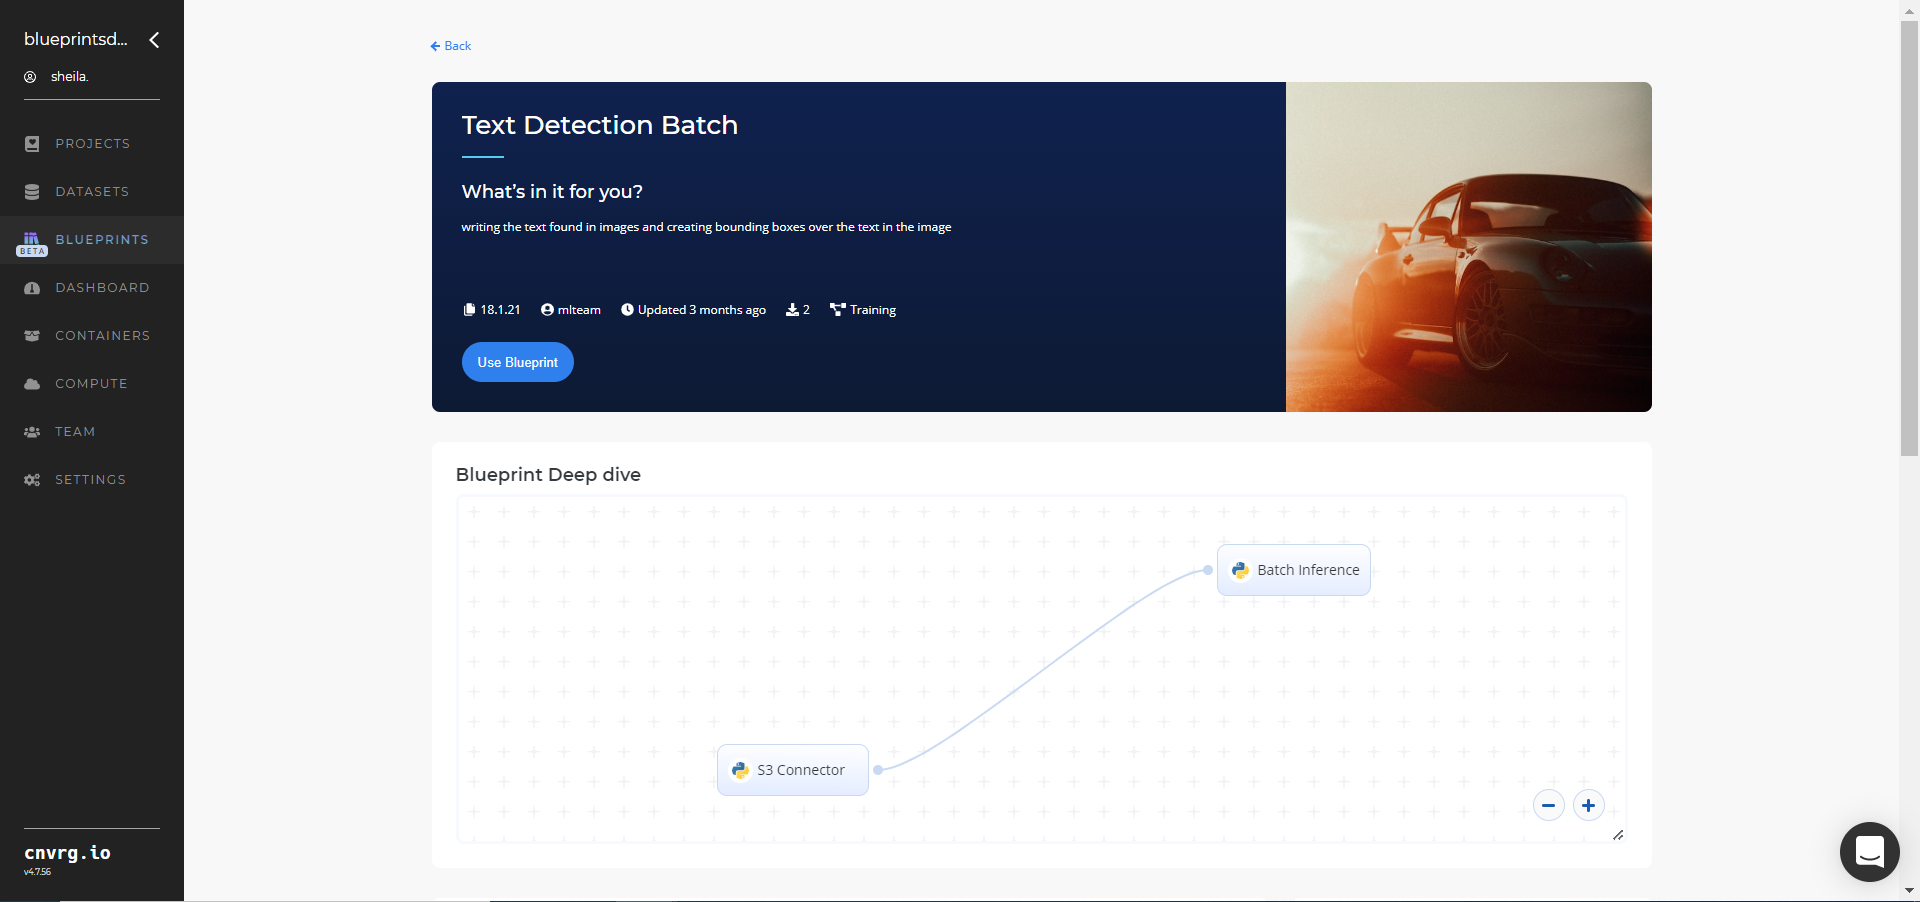
# Purpose
Use this batch blueprint to detect text elements in a batch of images. To use this blueprint, provide one img_dir folder in the S3 Connector containing the images on which to detect the text.
The text-detection algorithm can be fine-tuned for custom fonts in the event the default text-detector model does not recognize a user’s desired font. For more information, see this counterpart’s training blueprint.
# Deep Dive
The following flow diagram illustrates this batch-predict blueprint’s pipeline:
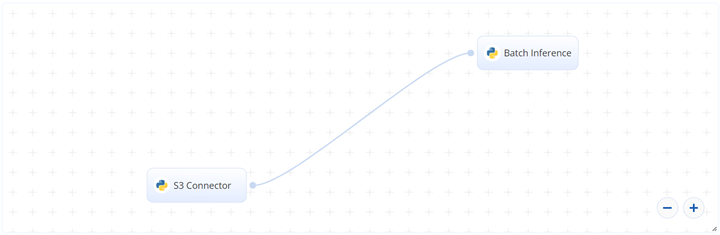
# Flow
The following list provides a high-level flow of this blueprint’s run:
- In the S3 Connector, provide the data bucket name and the directory path where the images are located.
- In the Batch Inference task, provide the
img_dirpath to the S3 Connector’s image directory. - Also in the Batch Inference task, provide the
--lang_listfor the recognized language code and the--decoderfor the decoder algorithm.
# Arguments/Artifacts
For more information on this blueprint’s tasks, its inputs, and outputs, click here.
# Inputs
--retrained_model_pathis the path to provide if using a retrained model for batch predict. Otherwise, do not enter this argument. NOTE: The following three files need to be downloaded from the output artifacts of the train task from the Training Blueprint:custom_model.py,custom_model.yaml,custom_model.pth--imagesis the name of the path of the directory where the images are stored.--lang_listlists the language code to recognize, for example 'ch_sim','en'. For a list of supported language code, click here.--decoderis the decoder algorithm. Options aregreedy,beamsearch, andwordbeamsearch. Default:wordbeamsearch.--beamWidthis the beam number to keep when the decoder equals 'beamsearch' or 'wordbeamsearch'. Default:5.--contrast_thsis the text box’s contrast. Lower than this value passes into the model two times. First is with an original image and second is with its contrast adjusted toadjust_contrastvalue. The one with more confident level is returned as a result. Default:0.1.--adjust_contrast(float) is the target contrast level for low contrast text box. Default:0.5.--text_thresholdis the certainty required for a something to be classified as a letter. The higher this value, the clearer characters need to appear.--link_thresholdis the distance allowed between two characters for them to be seen as a single word. The greater the distance, the higher probability of different sentences to be classified as a single sentence.--mag_ratiois the image magnification ratio.--height_thsis the maximum box height difference. Boxes with significantly different text size should not be merged. Default:0.5.--width_thsis the maximum horizontal distance to merge boxes. Default:0.5.
# Outputs
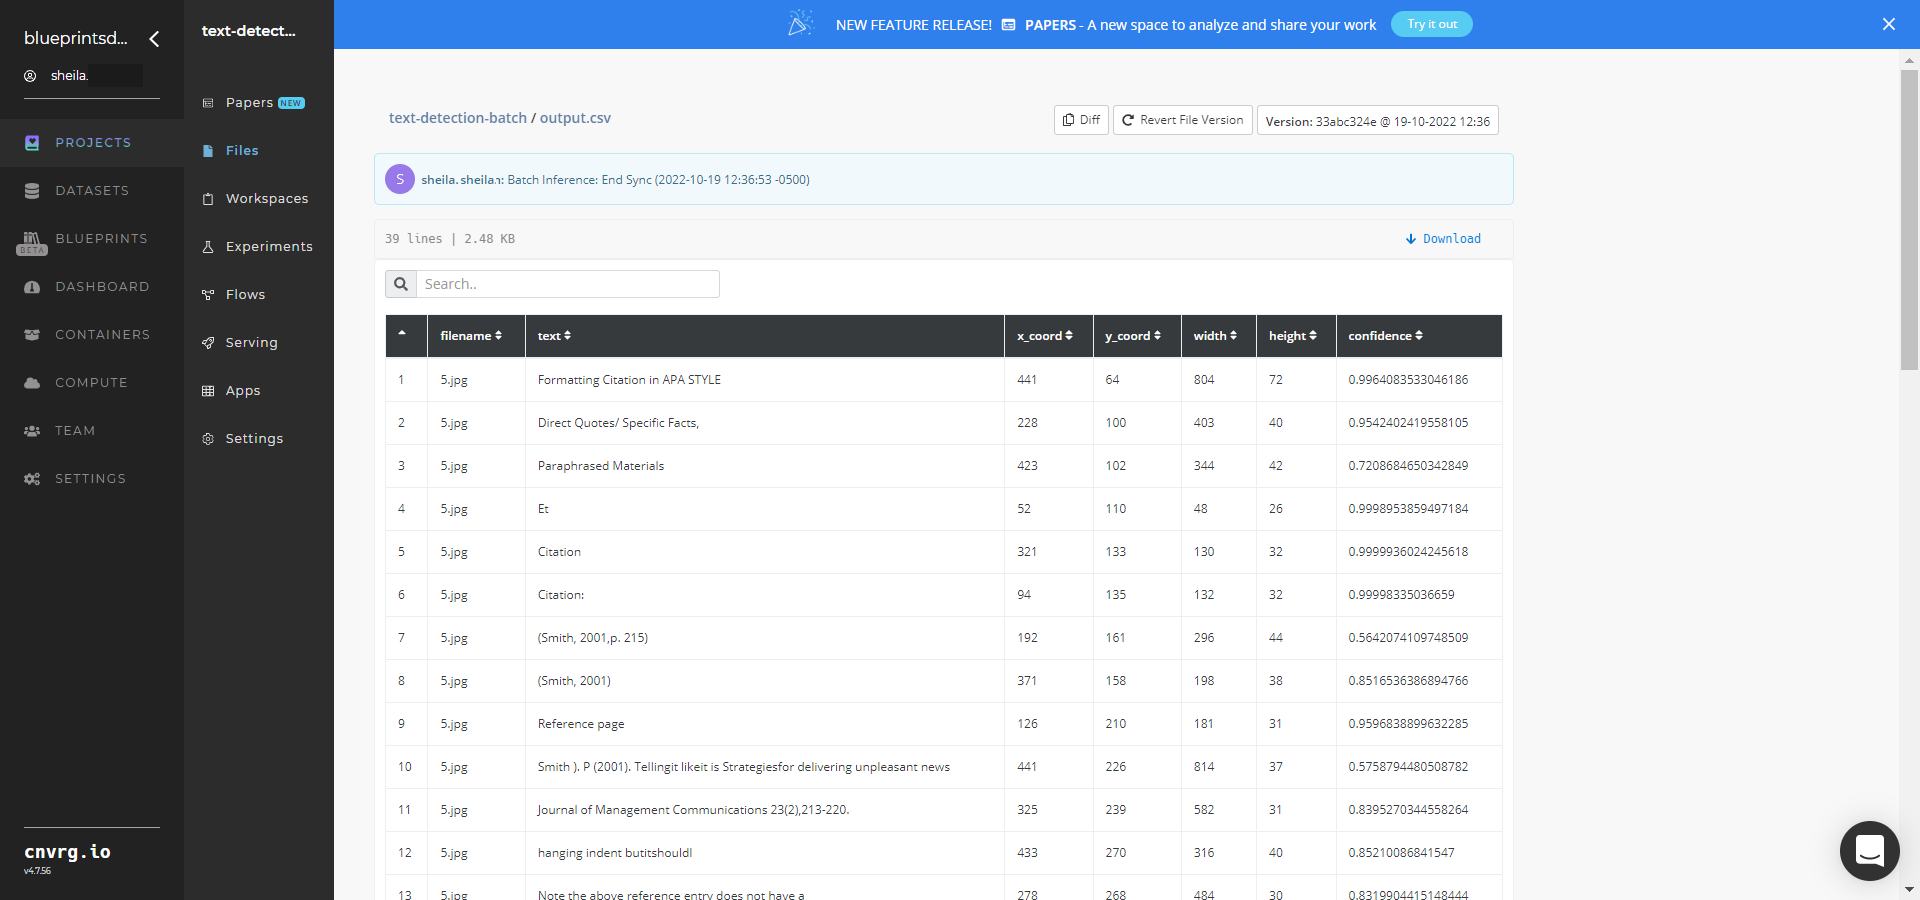
--output.csvis the name of the file that contains the detected text and the bounding box coordinates, arranged by their file names (and the count of detection). An example output.csv file can be found here.--img1.jpgis an example name of one image with a bounding boxes drawn over the text. Other images are named accordingly.
# Instructions
NOTE
The minimum resource recommendations to run this blueprint are 3.5 CPU and 8 GB RAM.
NOTE
This blueprint’s performance can benefit from using GPU as its compute.
Complete the following steps to run the text-detector model in batch mode:
- Click the Use Blueprint button. The cnvrg Blueprint Flow page displays.
- Click the S3 Connector task to display its dialog.
- Within the Parameters tab, provide the following Key-Value pair information:

- Key:
bucketname− Value: provide the data bucket name - Key:
prefix− Value: provide the main path to the images folders
- Key:
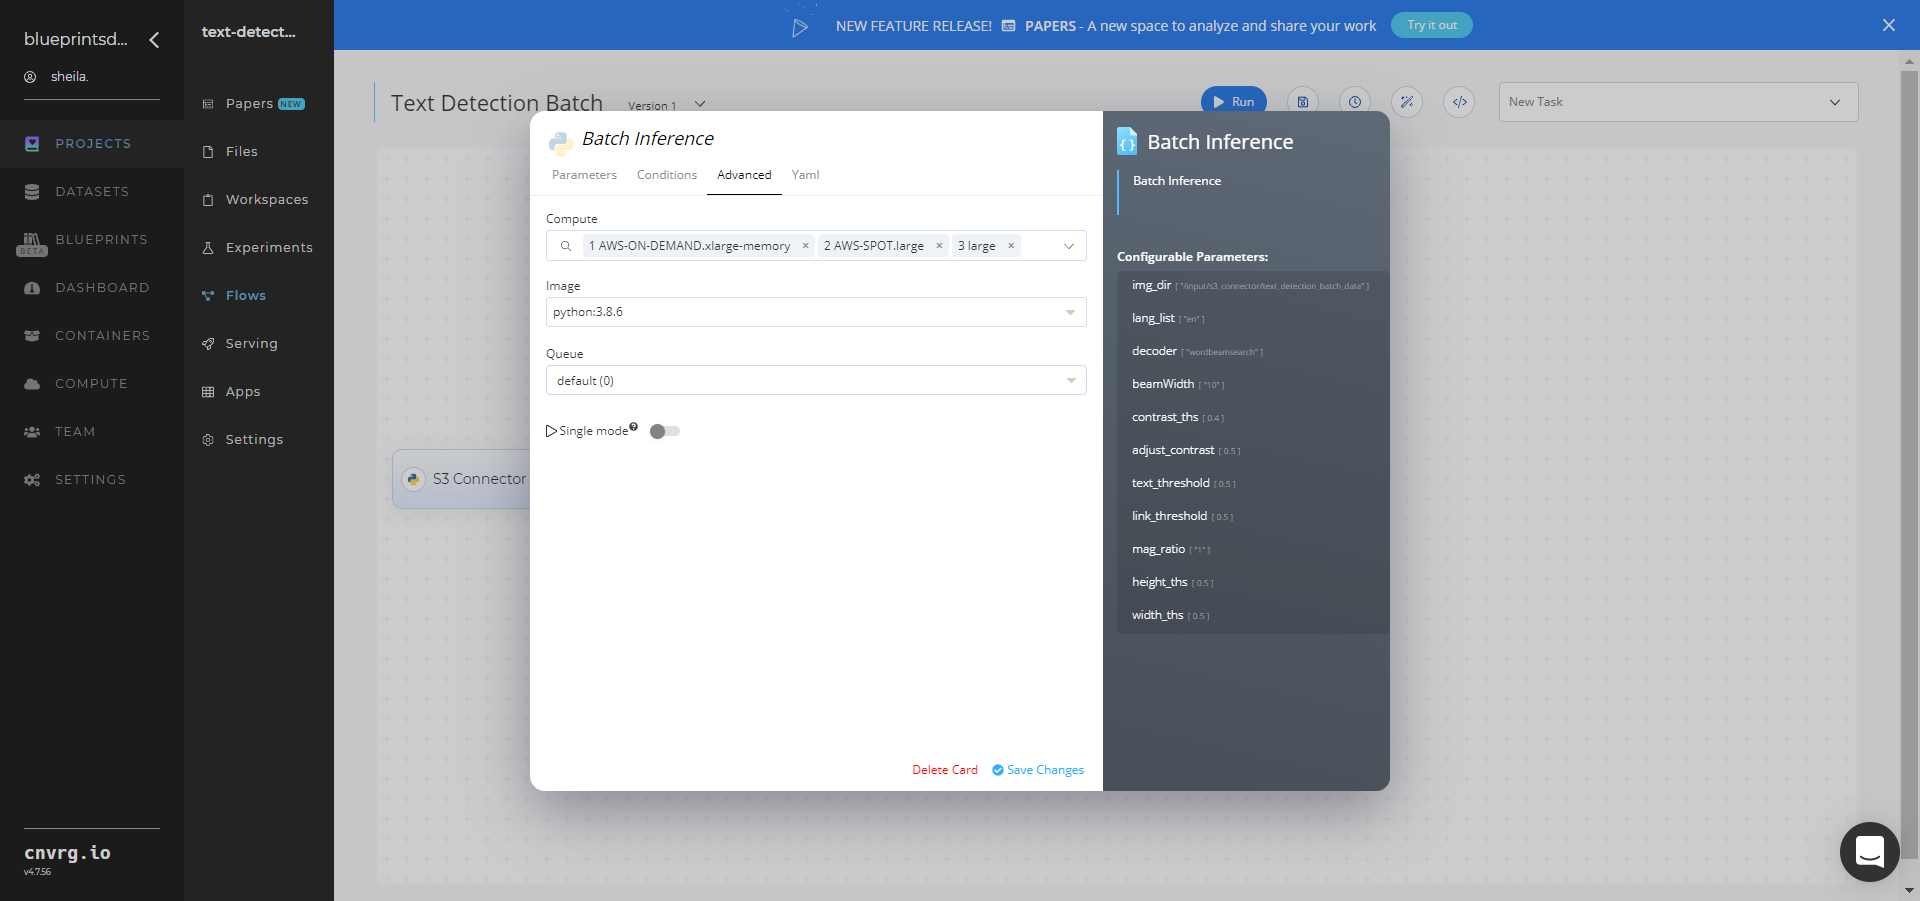
- Click the Advanced tab to change resources to run the blueprint, as required.

- Within the Parameters tab, provide the following Key-Value pair information:
- Click the Batch-Inference task to display its dialog.
Within the Parameters tab, provide the following Key-Value pair information:
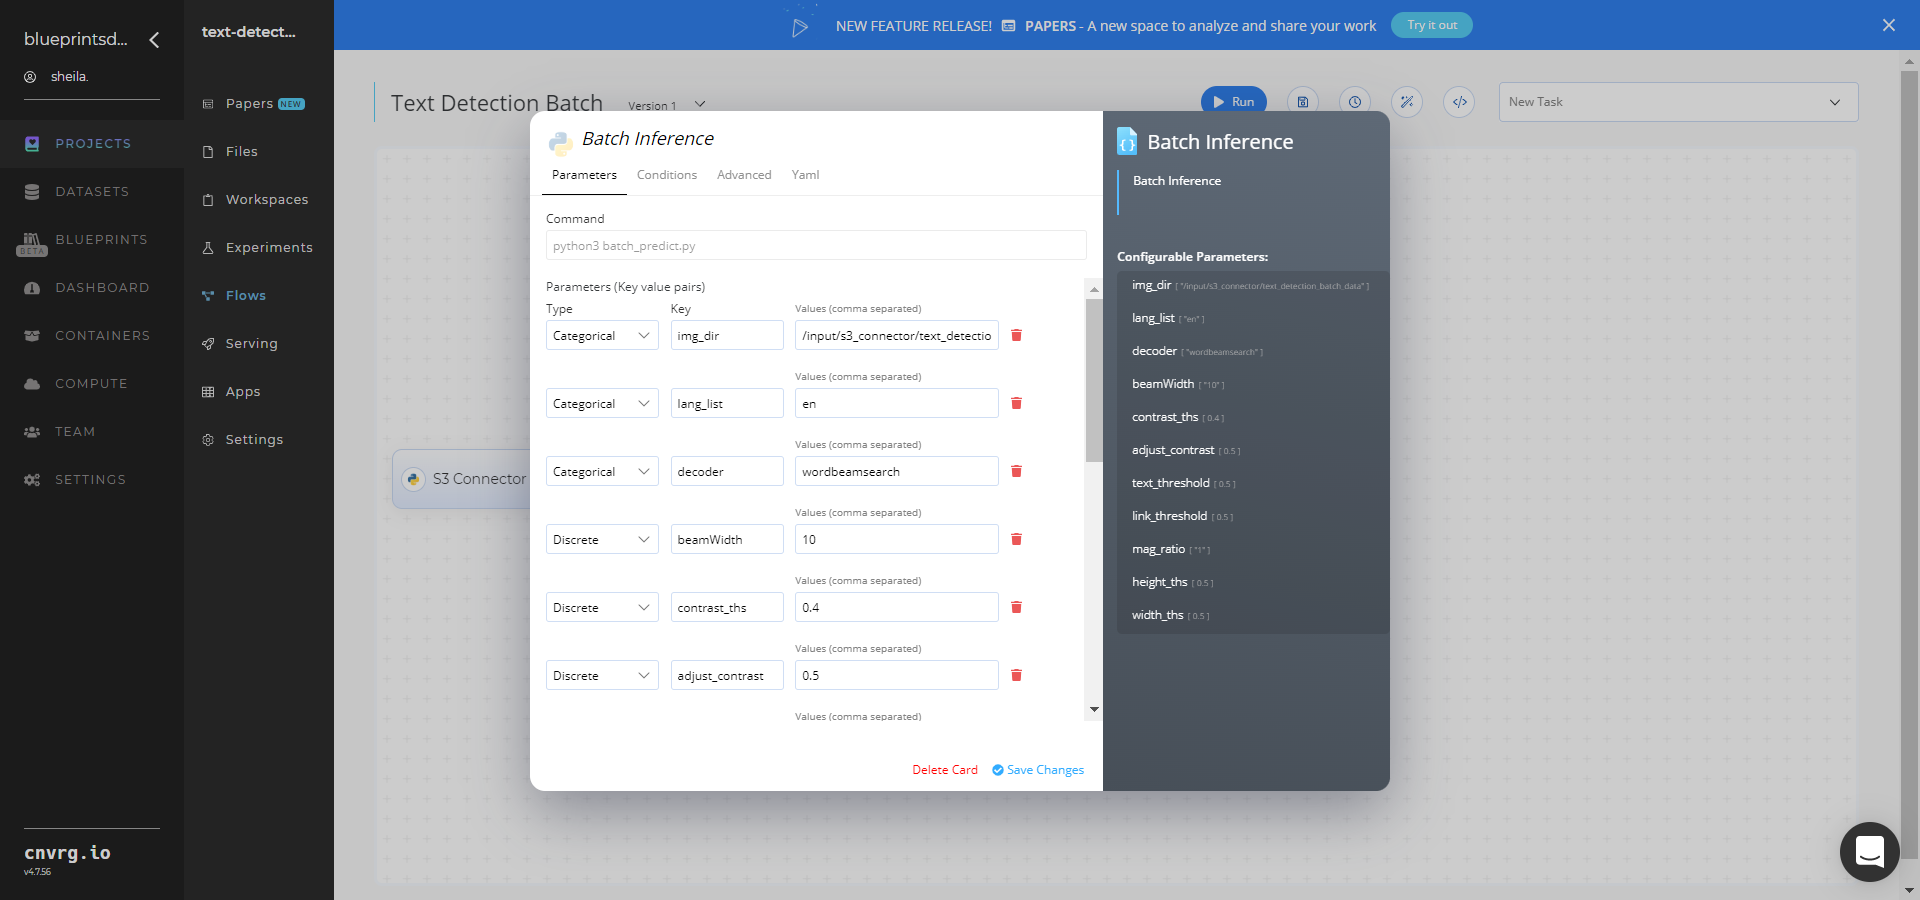
- Key:
img_dir− Value: provide the path to the images directory including the S3 prefix in the following format:/input/s3_connector/text_detection_batch_data - Key:
--lang_list− Value: list the language code to recognize, for exampleen - Key:
--decoder− Value: provide the decoder algorithm, for examplewordbeamsearch(default)
NOTE
You can use the prebuilt example data paths provided.
- Key:
Click the Advanced tab to change resources to run the blueprint, as required.
- Click the Run button.
 The cnvrg software deploys a text-detector model that detects text in a batch of images and downloads a CSV file with the information on the text and bounding boxes.
 - Track the blueprint’s real-time progress in its Experiments page, which displays artifacts such as logs, metrics, hyperparameters, and algorithms.
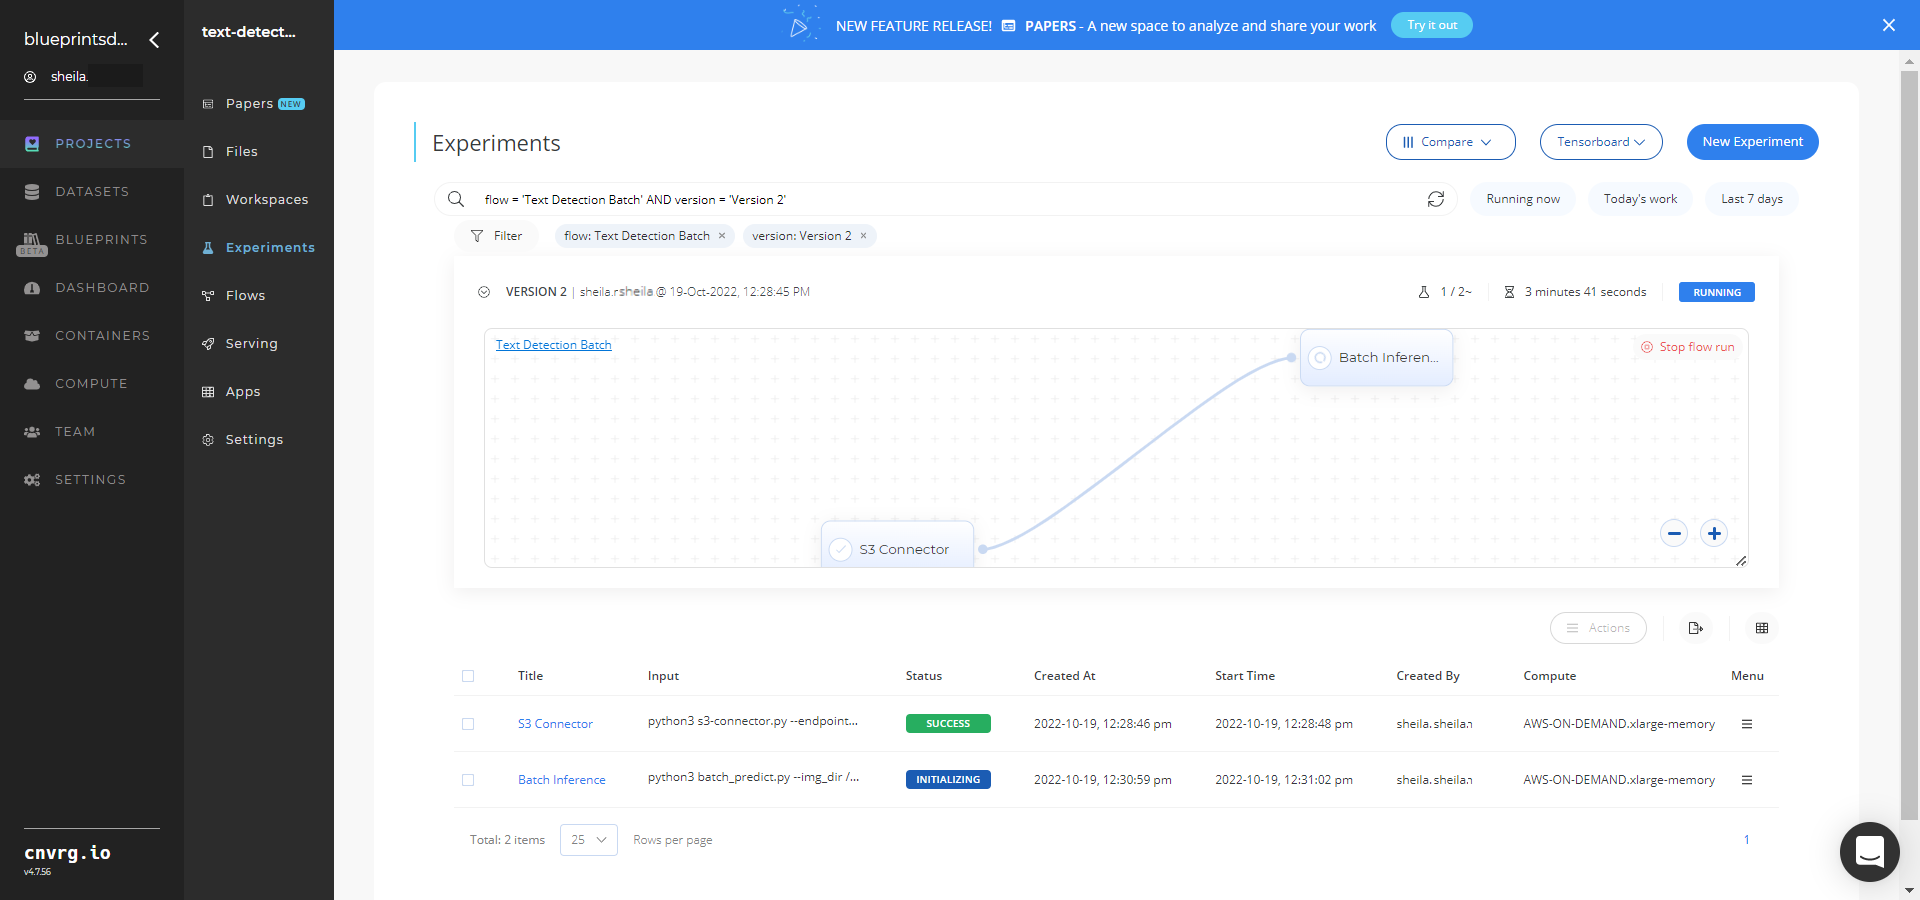
- Select Batch Inference > Experiments > Artifacts and locate the bounding box images and output CSV file.
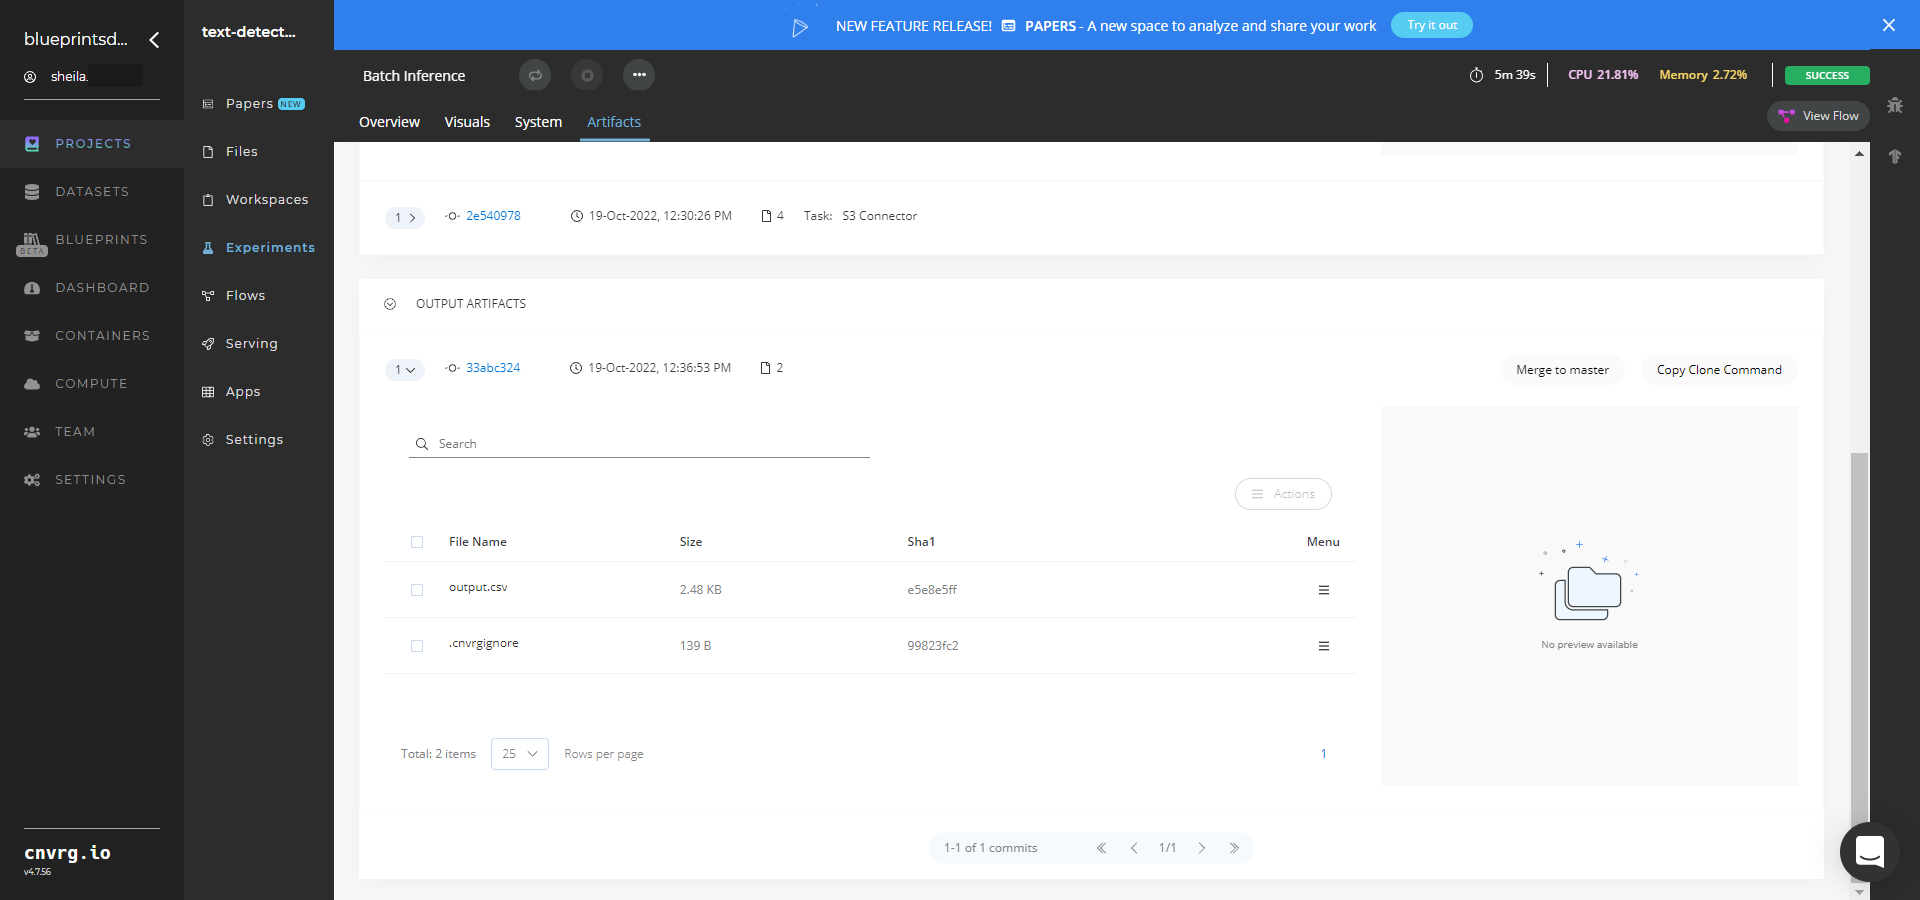
- Click the output.csv File Name, click the right Menu icon, and click Open File to view the output CSV file.
A custom model that detects text in a batch of images has now been deployed. For information on this blueprint's software version and release details, click here.
# Connected Libraries
Refer to the following libraries connected to this blueprint:
# Related Blueprints
Refer to the following blueprints related to this batch blueprint:
# Inference
Text detection uses a trained model to detect text elements in images. It converts typed or printed text into machine-encoded text, whether from a scanned document, a photographed document, a scene photograph, or an image’s superimposed subtitled text.
NOTE
This blueprint is not recommended for handwritten text.
# Purpose
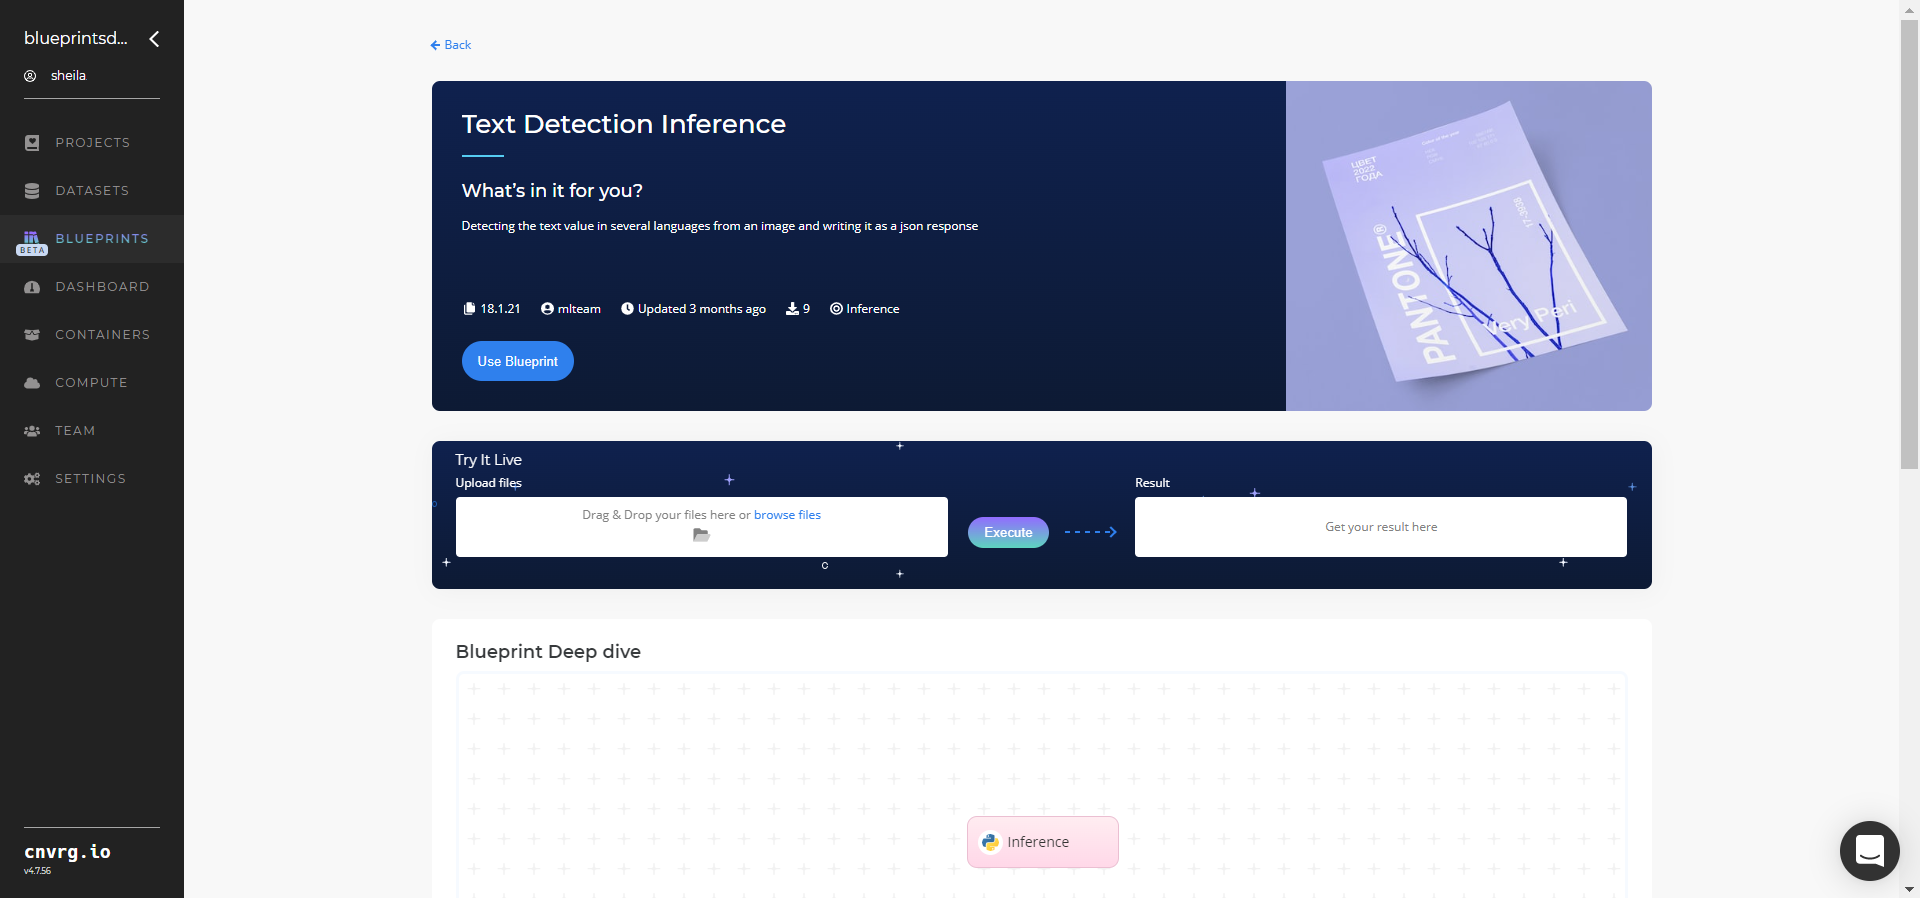
Use this inference blueprint to immediately detect and convert text in images. To use this pretrained text-detector model, create a ready-to-use API-endpoint that can be quickly integrated with your data and application.
This inference blueprint’s model was trained using English language data. To use custom language data according to your specific business and/or geographic region, run this counterpart’s training blueprint, which trains the model and establishes an endpoint based on the newly trained model.
# Instructions
NOTE
The minimum resource recommendations to run this blueprint are 3.5 CPU and 8 GB RAM.
NOTE
This blueprint’s performance can benefit from using GPU as its compute.
Complete the following steps to deploy a text-detector API endpoint:
Click the Use Blueprint button.
In the dialog, select the relevant compute to deploy the API endpoint and click the Start button.
The cnvrg software redirects to your endpoint. Complete one or both of the following options:
- Use the Try it Live section with any text-containing image to check the model.
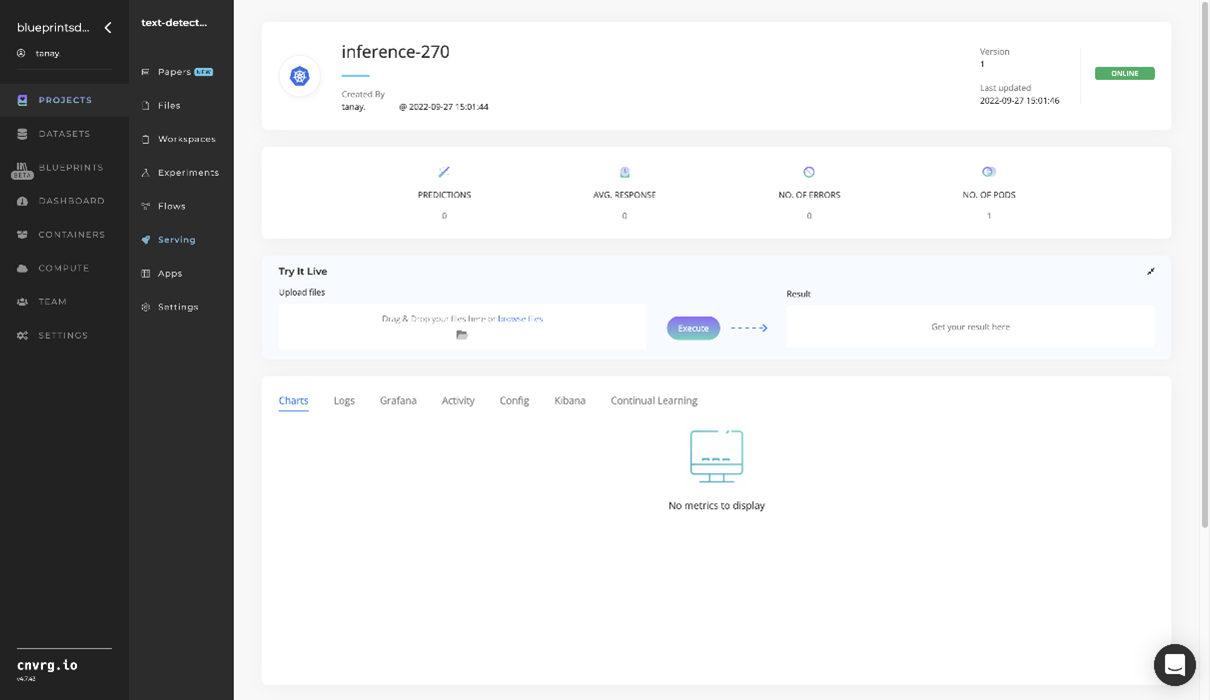
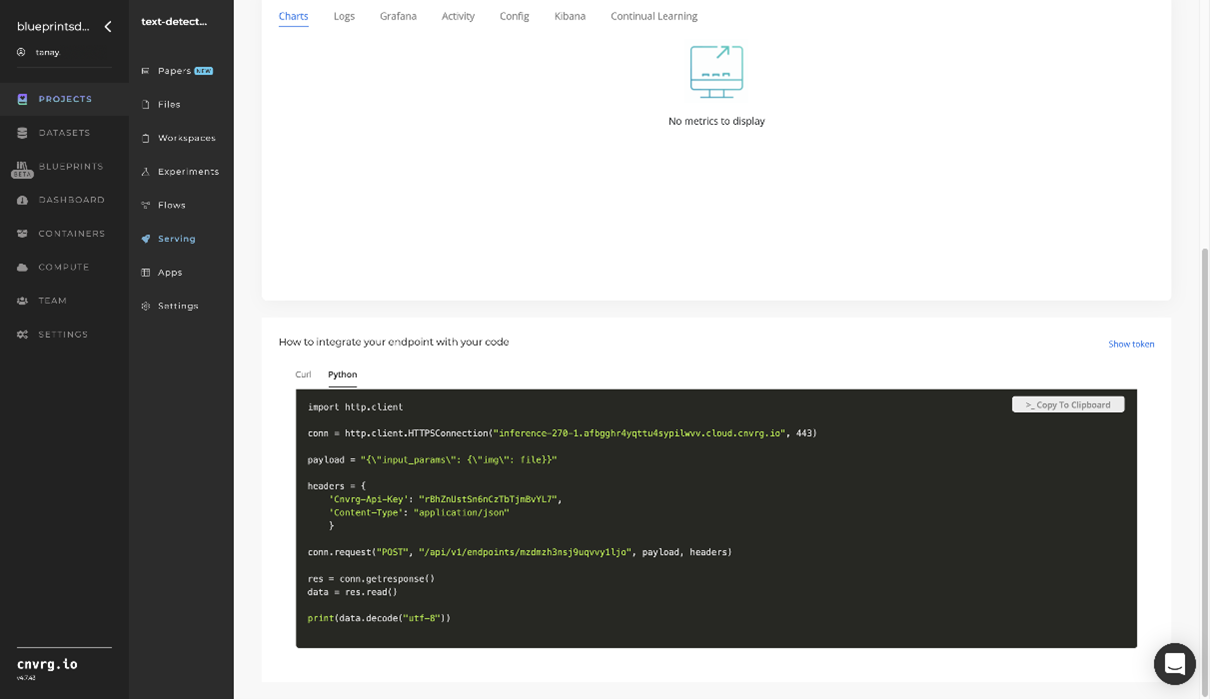
- Use the bottom integration panel to integrate your API with your code by copying in the code snippet.
- Use the Try it Live section with any text-containing image to check the model.
An API endpoint that detects English text has now been deployed. For information on this blueprint's software version and release details, click here.
# Related Blueprints
Refer to the following blueprints related to this inference blueprint:
# Training
Text detection uses a trained model to convert typed or printed text into machine-encoded text, whether from a scanned document, a photographed document, a scene photograph, or an image’s superimposed subtitled text. The text-detection algorithm can be fine-tuned for custom fonts in the event the default text-detector model does not recognize a user’s desired font. It can also be configured for different languages.
NOTE
This blueprint is not recommended for handwritten text.
# Overview
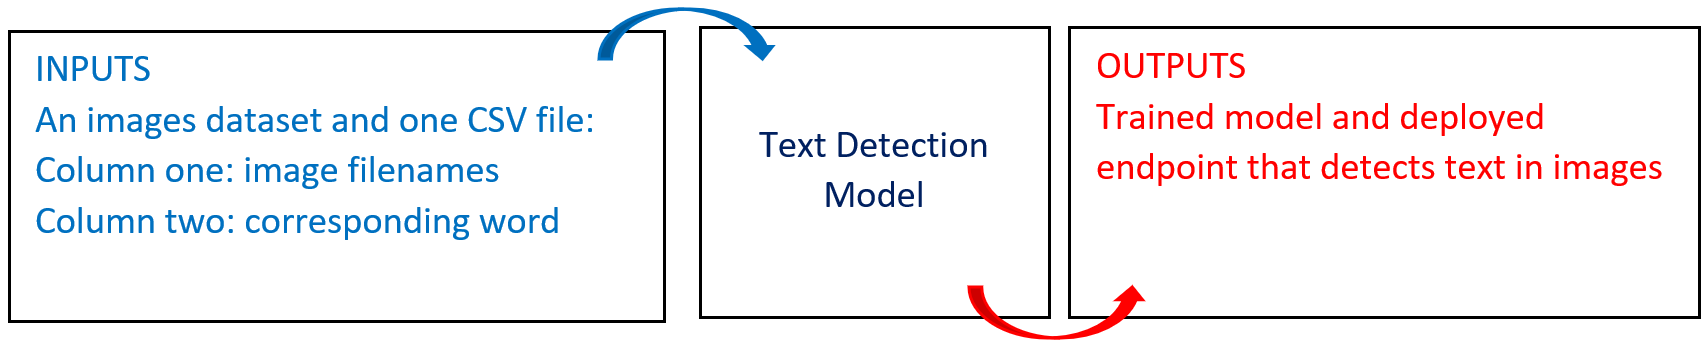
The following diagram provides an overview of this blueprint’s inputs and outputs.
# Purpose
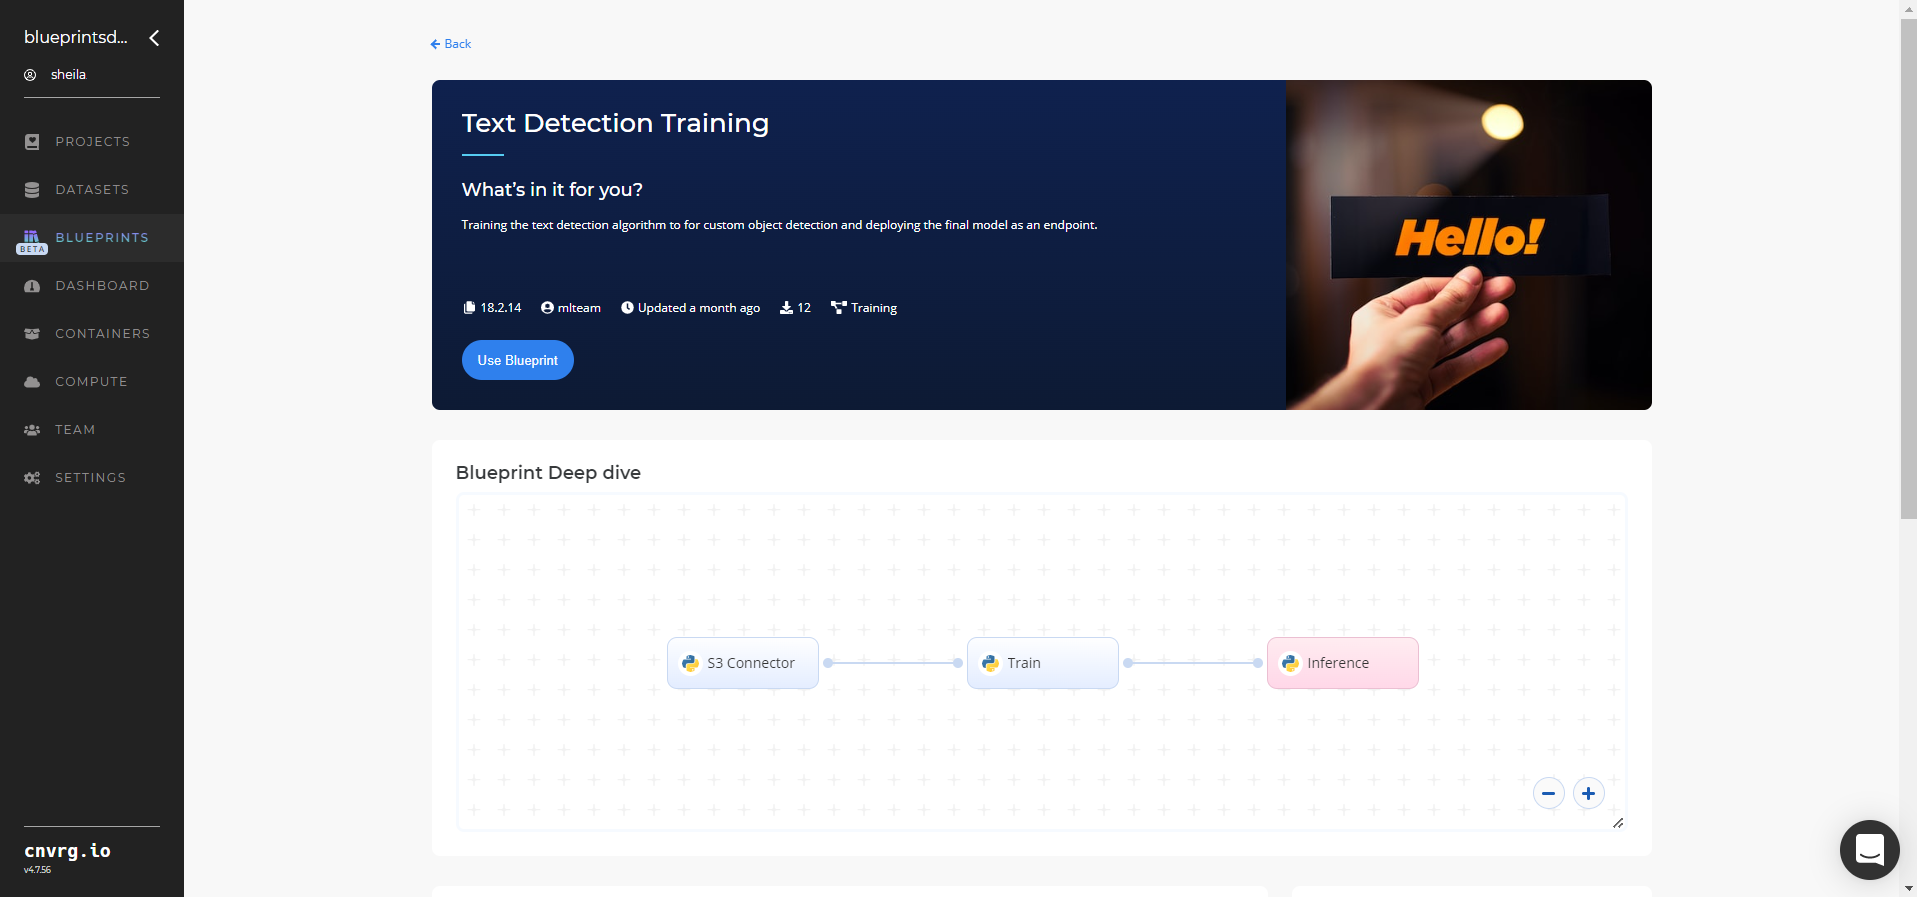
Use this training blueprint with your custom data to train a model that detects text elements in images. This blueprint trains and deploys a fine-tuned model to use for inference with API calls on the endpoint the blueprint also generates.
This blueprint trains a text-detection algorithm on custom fonts. If the default model performs poorly on a set of images due to the font or background, the algorithm can be retrained on your custom images dataset. To fine-tune the model for specific fonts, provide the training dataset containing images of the desired text font.
The input dataset requires only about 1500 images, which are essentially cutouts of the words written in the desired font. The dataset consists of images and a single, two-column labels.csv file, with the first column containing the image filename and the second column containing the corresponding word. Each image in the training dataset must have an associated entry in the labels.csv file.
# Deep Dive
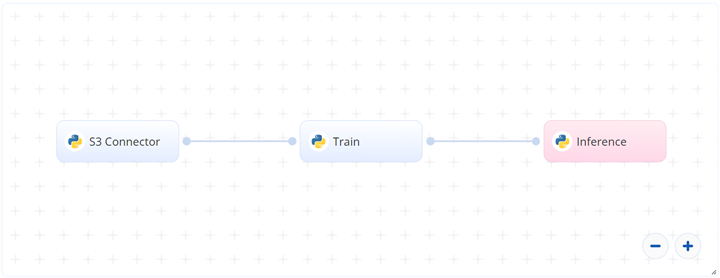
The following flow diagram illustrates this blueprint’s pipeline:
# Flow
The following list provides a high-level flow of this blueprint’s run:
- In the S3 connector, the user uploads the training dataset in the form of images and a single, two-column
labels.csvfile. - In the Train task, the user provides the path to the images including the S3 prefix.
- The blueprint trains the model with the user-provided data and deploys a text-detector endpoint.
# Arguments/Artifacts
For more information on this blueprint’s tasks, its inputs, and outputs, click here.
# Inputs
--languageis the language code on which the model retrains.--iterationsis the number of iterations to retrain the model. Default value is300000. A greater value results in higher accuracy, but too high a number can lead to an overfitted and ungeneralized model. The number of iterations set depends on the training and validation error. As the training progresses, ideally both the losses should decline. After a certain point, when the validation error starts increasing, the training should be stopped. Usually, larger-sized datasets require more iterations.--datais the folder location containing the images and the labels file as specified previously.
# Outputs
The final outputs comprise custom_model.pth, custom_model.py and custom_model.yaml files. These three files are used to load the new model and run inferences.
# Instructions
NOTE
The minimum resource recommendations to run this blueprint are 3.5 CPU and 8 GB RAM.
NOTE
This blueprint’s performance can benefit from using GPU as its compute.
Complete the following steps to train the text-detector model:
Click the Use Blueprint button. The cnvrg Blueprint Flow page displays.
In the flow, click the S3 Connector task to display its dialog.
- Within the Parameters tab, provide the following Key-Value pair information:
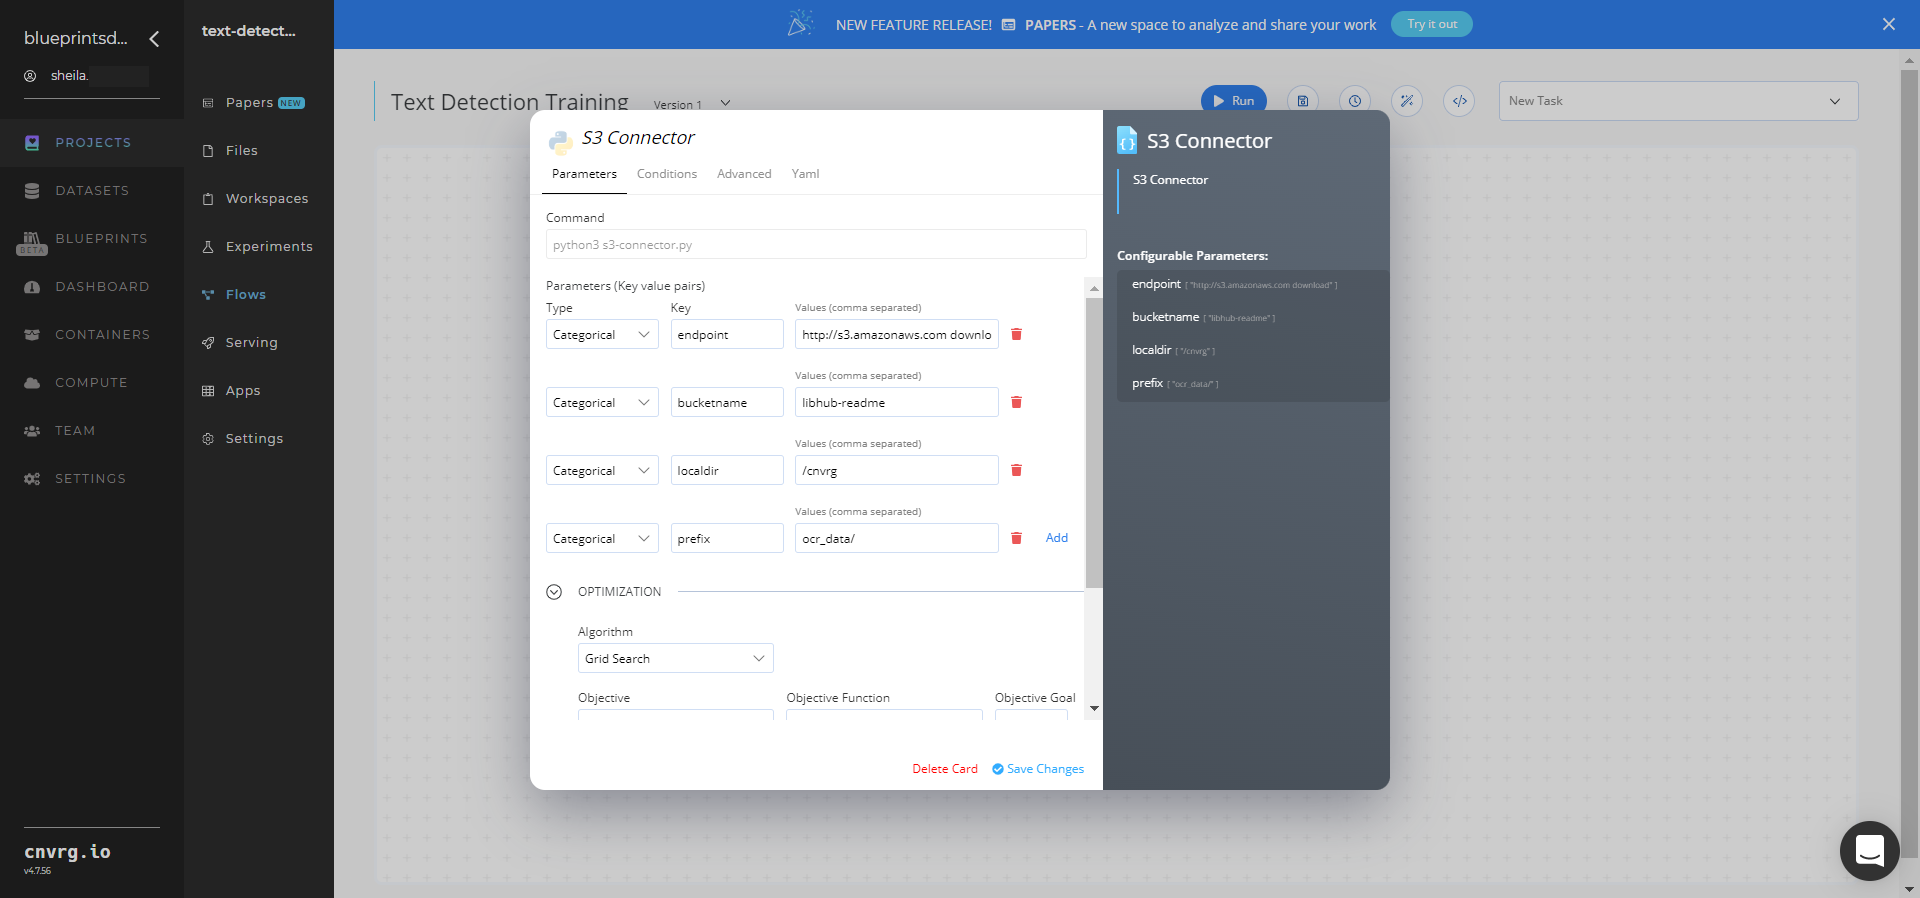
- Key:
bucketname− Value: enter the data bucket name - Key:
prefix− Value: provide the main path to the images folder
- Key:
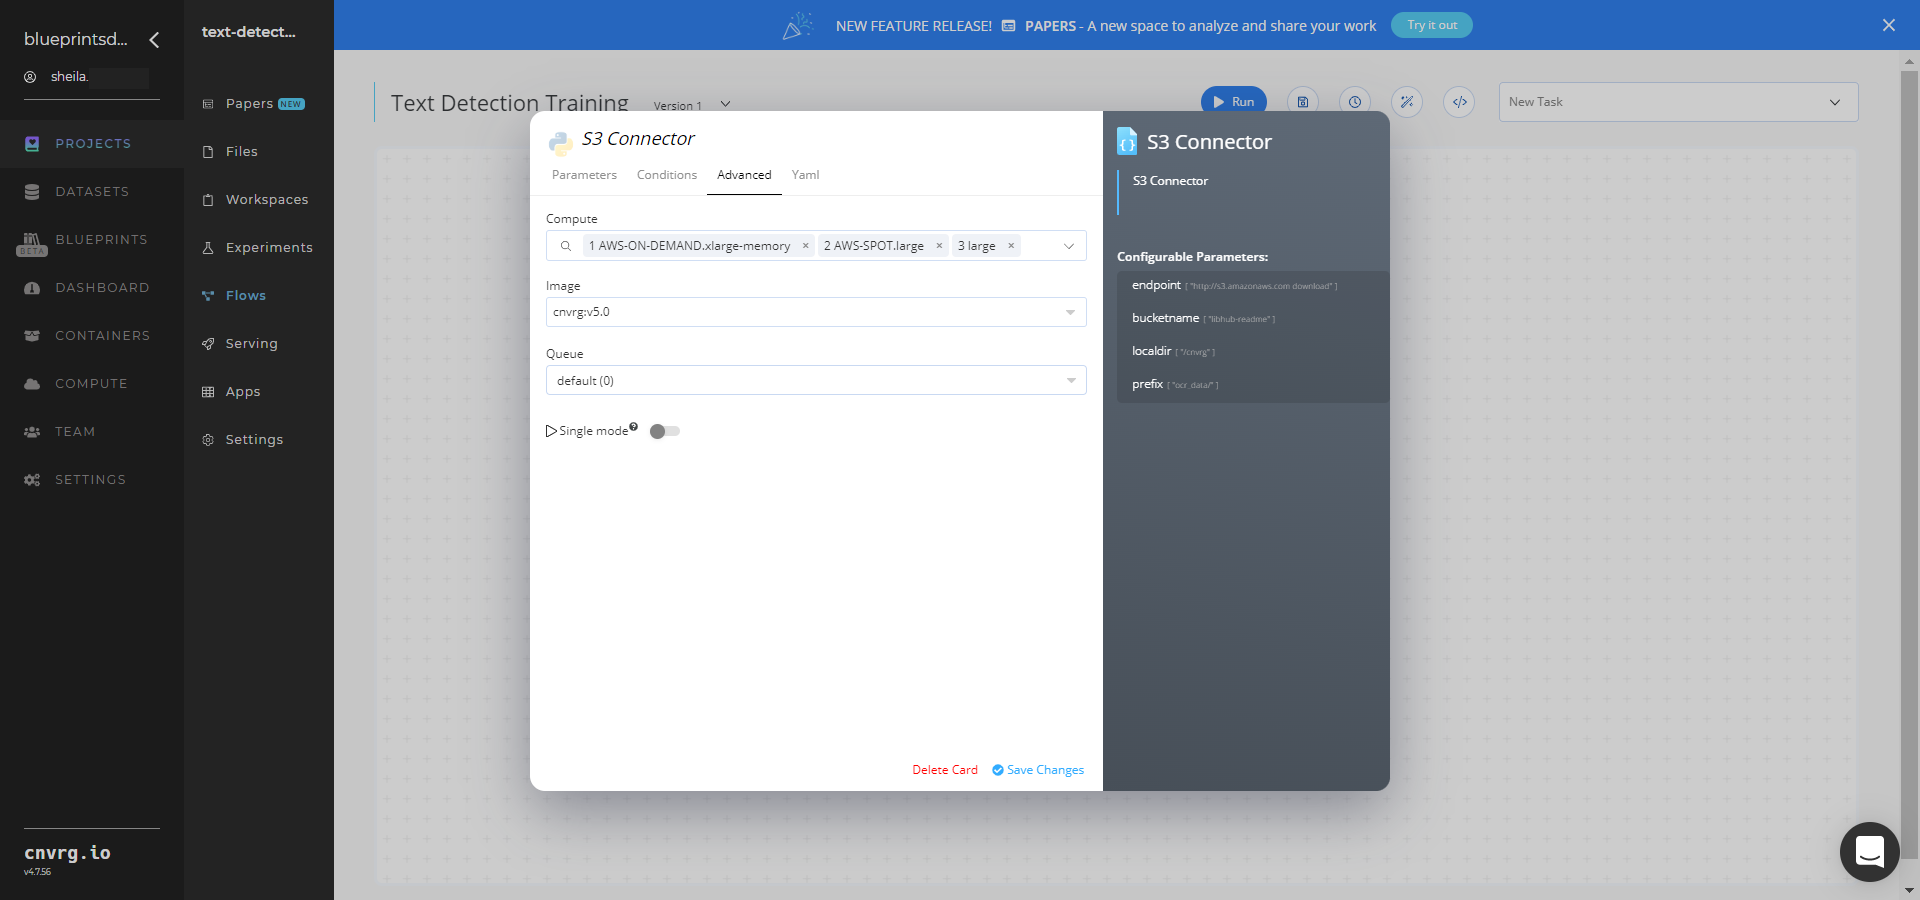
- Click the Advanced tab to change resources to run the blueprint, as required.
- Within the Parameters tab, provide the following Key-Value pair information:
Return to the flow and click the Train task to display its dialog.
Within the Parameters tab, provide the following Key-Value pair information:

- Key:
language− Value: enter the language code on which to train the model - Key:
data− Value: provide the path to the images folder including the S3 prefix in the following format:/input/s3_connector/<prefix>/ocr_data
NOTE
You can use the prebuilt example data paths provided.
- Key:
Click the Advanced tab to change resources to run the blueprint, as required.

Click the Run button.
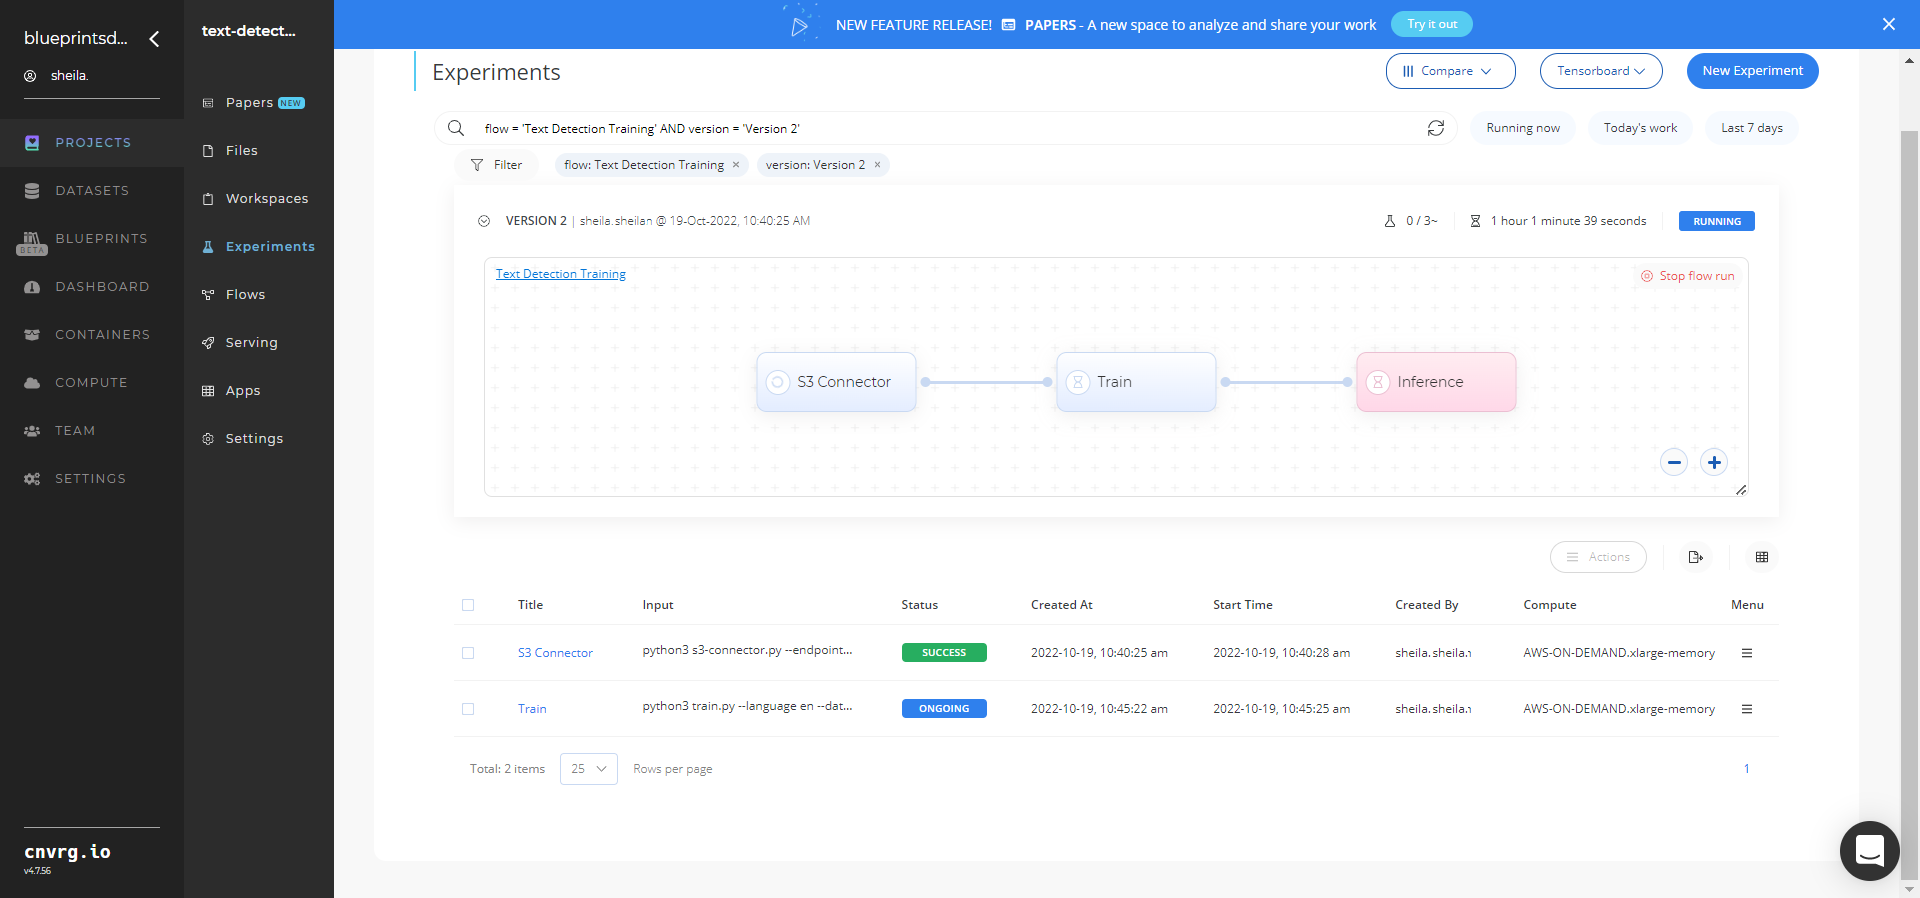
 The cnvrg software launches the training blueprint as set of experiments, generating a trained text-detector model and deploying it as a new API endpoint.
NOTE
The time required for model training and endpoint deployment depends on the size of the training data, the compute resources, and the training parameters.
For more information on cnvrg endpoint deployment capability, see cnvrg Serving.
Track the blueprint's real-time progress in its Experiments page, which displays artifacts such as logs, metrics, hyperparameters, and algorithms.
Click the Serving tab in the project and locate your endpoint.
Complete one or both of the following options:
- Use the Try it Live section with any text-containing image to check the model.
- Use the bottom integration panel to integrate your API with your code by copying in the code snippet.
- Use the Try it Live section with any text-containing image to check the model.
A custom model and API endpoint, which can detect an image's text elements, have now been trained and deployed. For information on this blueprint's software version and release details, click here.
# Connected Libraries
Refer to the following libraries connected to this blueprint:
# Related Blueprints
Refer to the following blueprints related to this training blueprint: