# AI Studio SDK v2
# Getting Started
The AI Studio SDK was developed in Python and is designed to help data scientists to interact with AI Studio from their code, experiments and models. Through the SDK, you can create experiments, manage models, automate your machine learning pipeline and more.
The topics in this page:
- Prerequisites
- Download and Install the AI Studio SDK
- Authenticating the AI Studio SDK
- User Operations
- Project Operations
- Datasource Operations
- Dataset Operations
- Workspaces operations:
- Experiment Operations
- Experiment slug
- Fetch the experiment object
- Create a new experiment
- Create a grid of experiments
- Get an existing experiment
- list all experiment in the project
- Delete experiment
- Stop a running experiment
- Get experiment's system utilization
- Track an experiment manually
- Examples
- Metadata operations on experiments
- Get the experiment's last 40 logs:
- Upload artifacts
- Fetch a list of experiment's artifacts:
- Download the experiment's artifacts
- Merge experiment's commit into project files
- Download the experiment's artifacts
- Merge experiment's commit into project files
- Create a Tag
- Charts
- Operate a Tensorboard
- Flow Operations
- Endpoint Operations
- Create Endpoint
- Endpoint slug
- Get Endpoint object
- List Endpoints
- Stop running Endpoints
- Start a stopped Endpoint
- Delete Endpoints
- Endpoint Attributes
- Update The Endpoint's version
- Update the Endpoint's replica set
- Rollback version
- Get sample code
- Send prediction
- Log metrics
- Poll charts
- Add logs to a running endpoint
- Set feedback loop
- Add Continual Learning rules
- Control batch Endpoint
- Webapps Operations
- Resource Operations
- Templates Operations
- Advanced Volumes Operations
- Registry commands
- Image commands
# Prerequisites
In order to run the pip commands, Python (version 3.6 or later) should be installed on the system.
# Download and Install the AI Studio SDK
# Install options
When on self-hosted AI Studio environemnt, you can specify an option for cnvrgv2, to fit the object storage you intend to work with in your AI Studio environment.
For Metacloud, we'll use the default installation without any option.
Add the options to the install command as needed, you can add multiple options by separating with comma:
pip install "cnvrgv2[options]"
available options are:
azure- Install packages relevant for Azure storage clientgoogle- Install packages relevant for GCP storage clientpython3.6- Install specific dependencies for python version 3.6
# SDK Operations
# Authenticating the AI Studio SDK
You can can authenticate when credentials as parameters:
from cnvrgv2 import Cnvrg
cnvrg = Cnvrg(domain="https://app.cnvrg.io",
              email="Johndoe@acme.com",
              password="123123",
              )
Login command parameters
| Parameter | Value Type | Description | required | default |
|---|---|---|---|---|
| domain | Text | AI Studio domain/url starting from http/s, excluding the organization slug e.g. https://app.cnvrgdomain.com/ | Yes | |
| Text | User email | Yes | ||
| password | Text | authenticate using password | Password or token are required | |
| token | Text | authenticate using the API Token | Password or token are required | |
| organization | Text | AI Studio organization, this can be used when the user is a member of multiple organizations | No | First organization the user was added to |
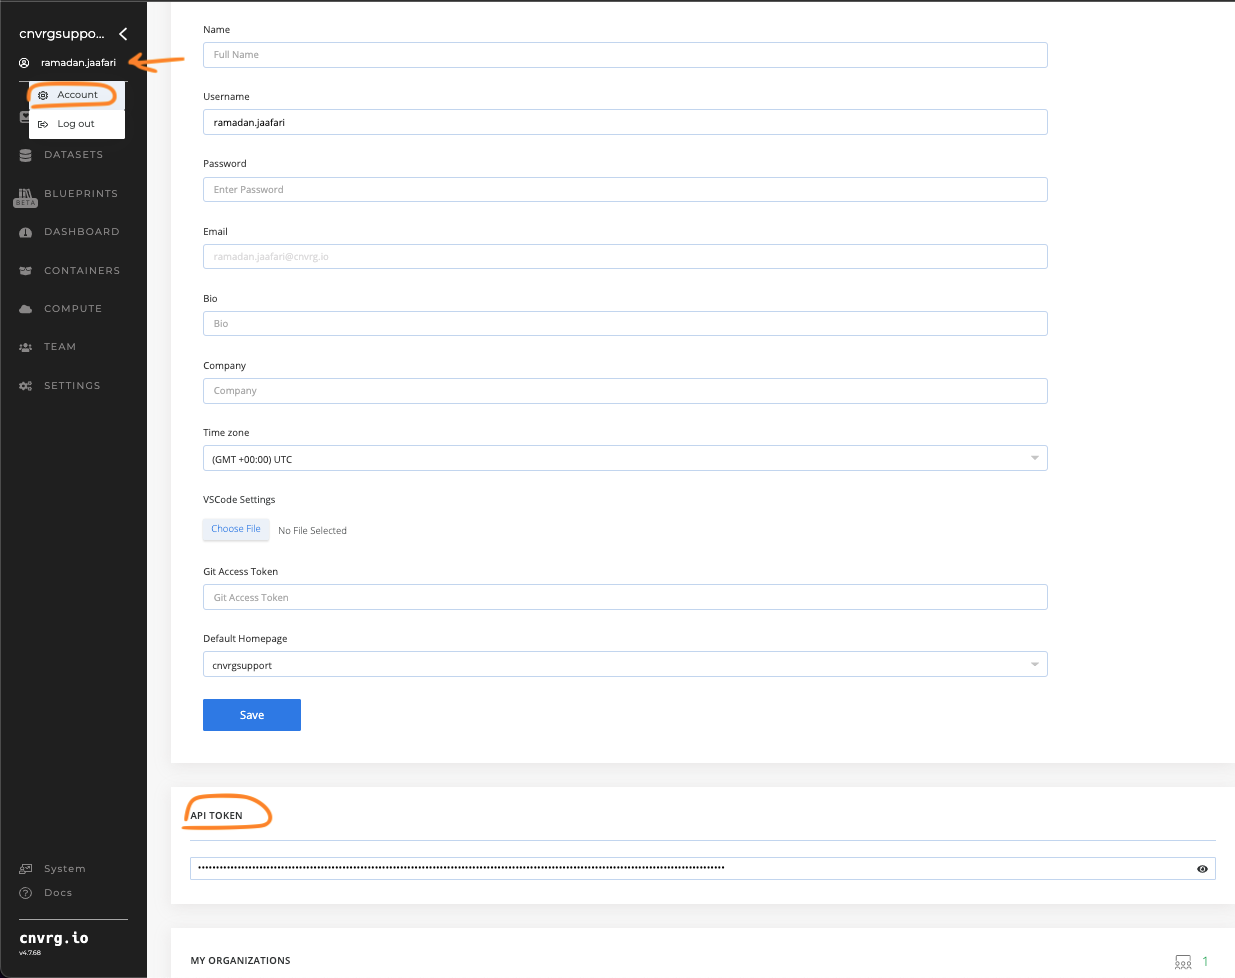
For Metacloud and self-hosted AI Studio environments with SSO authentication, The user's API Token must be used instead of the Password, with the token parameter. the token can be retrieved from the user settings page, under API Token field:
from cnvrgv2 import Cnvrg
cnvrg = Cnvrg(domain="https://app.domain.metacloud.cnvrg.io",
              email="Johndoe@acme.com",
              token="YOUR API KEY")
NOTE
As a security measure, please do not put your credentials into your code.
# Inside a AI Studio job scope
The AI Studio SDK will already be initialized and authenticated with cnvrgv2 using the account that is logged in. You can start using AI Studio SDK functions immediately by running:
from cnvrgv2 import Cnvrg
cnvrg = Cnvrg()
# Authenticate using a local configuration file
You can authenticate to the AI Studio SDK by creating a configuration file in your working directory
- In your working directory create a directory called
.cnvrgmkdir .cnvrg - Inside the directory .cnvrg create a configuration file named
cnvrg.config - Edit the file and insert the following:
check_certificate: <false/true> domain: <cnvrg_full_domain> keep_duration_days: null organization: <organiztion_name> token: <user_access_token> user: <user_email> version: null - Once you finish editing, save the file Now you can simply run the following in your code and it will log you in automatically:
from cnvrgv2 import Cnvrg
cnvrg = Cnvrg()
# Authenticate using environment variables
You can authenticate to the AI Studio SDK by setting the following environment variable:
CNVRG_TOKEN: Your API token ( You can find it in your user settings page)CNVRG_URL: Your cnvrg url that you use to view AI Studio through the browser, for example: https://app.prod.cnvrg.ioCNVRG_USER: Your email that you use to log in to AI StudioCNVRG_ORGANIZATION: The organization name you use Once you set those environment variables, you can simply run the following and it will log you in automatically:
from cnvrgv2 import Cnvrg
cnvrg = Cnvrg()
NOTE
The following documentation assume you have successfully logged in to the SDK and loaded the AI Studio object
# User Operations
# Verify you are logged in
To get the logged in user object you can simply run:
from cnvrgv2 import Cnvrg
cnvrg = Cnvrg()
user = cnvrg.me()
Once you have the user object you can get the user fields like: email, username, organizations, git_access_token, name, time_zone and more.
For example:
from cnvrgv2 import Cnvrg
cnvrg = Cnvrg()
user = cnvrg.me()
email = user.email
# Set the default organization
from cnvrgv2 import Cnvrg
cnvrg = Cnvrg()
cnvrg.set_organization("my-org")
NOTE
As a default, your current organization will be used
# Project Operations
# Create a new project
from cnvrgv2 import Cnvrg
cnvrg = Cnvrg()
myproj = cnvrg.projects.create("myproject")
# Get the project's object:
from cnvrgv2 import Cnvrg
cnvrg = Cnvrg()
myproj = cnvrg.projects.get("myproject")
Once you have the project object you can get the project fields like: title, slug, git_url, git_branch, last_commit, num_files and more.
For example:
from cnvrgv2 import Cnvrg
cnvrg = Cnvrg()
myproj = cnvrg.projects.get("myproject")
title = myproj.title
NOTE
You can also reference the current project from within a job scope:
from cnvrgv2 import Project
p = Project()
# List all the projects in the organization:
List all projects that the current user is allowed to view
from cnvrgv2 import Cnvrg
cnvrg = Cnvrg()
myproj = cnvrg.projects.list()
To order the projects list by created_at run the following:
from cnvrgv2 import Cnvrg
cnvrg = Cnvrg()
myproj = cnvrg.projects.list(sort="-created_at")
TIP
sort the list by: -key -> DESC | key -> ASC
# Delete a project:
from cnvrgv2 import Cnvrg
cnvrg = Cnvrg()
myproj = cnvrg.projects.get("myproject")
myproj.delete()
# Project File Operations
# Clone the project to the current working directory
myproj.clone()
Available Parameters:
| Parameter | type | description | required | default |
|---|---|---|---|---|
| commit | string | Sha1 of the commit to clone | No | latest |
| override | boolean | re-clone even if the project already cloned | No | False |
| current_dir | boolean | Whether to clone to the current dir or not | No | clone into a directory created with the project name |
| fullpath_filter | string | Filter on path of file by part of the path | No | None |
| threads | integer | number of threads that will be used in order to clone the project | No | 40 |
# Download project's latest commit
In order to fetch latest project commit to your local directory, use following command:
myproj.download()
WARNING
The Project must be cloned first
# upload all file changes from local project directory
In order to upload all file changes to your cnvrg project, use following command:
import os
from cnvrgv2 import Cnvrg
cnvrg = Cnvrg()
myproj = cnvrg.projects.get("myproject")
myproj.clone()
os.chdir("myproject")
myproj.upload()
Available Parameters:
| Parameter | type | description | required | default |
|---|---|---|---|---|
| message | string | The commit message | No | "" |
| output_dir | string | will only sync the files in the output_dir specified | No | file changes from current dir |
| git_diff | boolean | upload files from git diff output in addition to the given paths | No | Only upload files mentioned in the paths |
WARNING
- This command must be used from a directory linked to a AI Studio project
- Folder/file names must not contain special characters, which are - +?!@#$%&^*(){}[]
# Upload specific files to a project
myproj.put_files(paths=['/files_dir/file1.txt', '/files_dir/file2.txt'])
Available Parameters:
| Parameter | type | description | required | default |
|---|---|---|---|---|
| paths | List | The list of file paths that will be uploaded to the project | Yes | |
| message | string | The commit message | No | "" |
| override | boolean | Upload every file specified, even if it already exists in the latest commit | No | False |
| force | boolean | Create a new commit with only the files included in the current upload | No | False |
| fullpath_filter | string | Filter on path of file by part of the path | No | None |
| git_diff | boolean | upload files from git diff output in addition to the given paths | No | False (Only upload files mentioned in the paths) |
NOTE
- Files will get uploaded with their relative path as specified in the put_files command for example: myproj.put_files(paths=['/files_dir/file1.txt', '/files_dir/file2.txt']) file1.txt and file2.txt will be under files_dir directory in the Storage.
- Reference to parent paths ('../../path') is not supported
WARNING
Folder/file names must not contain special characters, which are - +?!@#$%&^*(){}[]
# Sync project
Sync local file changes into the project using following command:
myproj.sync()
Available Parameters:
| Parameter | type | description | required | default |
|---|---|---|---|---|
| message | string | The commit message | No | "" |
| output_dir | string | will only sync the files in the output_dir specified | No | file changes from current dir |
| git_diff | boolean | upload files from git diff output in addition to the given paths | No | Only upload files mentioned in the paths |
# Remove files from a project
You can remove files from the project using following command:
myproj.remove_files(paths='*',
          message='This will delete everything!')
Available Parameters:
| Parameter | type | description | required | default |
|---|---|---|---|---|
| paths | List | The list of file/folder paths that will be deleted (regex and wilfcard are allowed) | Yes | |
| message | string | The commit message | No | "" |
# List the project's content
You can list all of the files and folders that are in the project:
myproj.list_files()
myproj.list_folders(commit_sha1='xxxxxxxxx')
Available Parameters:
| Parameter | type | description | required | default |
|---|---|---|---|---|
| commit_sha1 | string | Sha1 string of the commit to list the files from | No | None |
| sort | string | Key to sort the list by (-key -> DESC / key -> ASC) | No | "-id" |
| query_raw | string | query to be filtered with wild card (for example: 'filename*' or '*.png') | No | None |
# List project's commits
You can list all of the files and folders that are in the project:
myproj.list_commits(sort="-key -> DESC")
# Update the project's settings
You can change any of the project's settings by passing them as keyword arguments. For example, to change the project title
myproj.settings.update(title='NewProjectTitle')
To update project's collaborators
myproj.settings.update(
    privacy='private',
    collaborators=['person1@email.com', 'person2@email.com']
)
Available Parameters:
| Parameter | type | description |
|---|---|---|
| title | string | The name of the project |
| default_image | string | The name of the image to set to be the project's default image |
| default_computes | List | The list of the project's default compute template names |
| privacy | string | The project's privacy set to either 'private' or 'public' |
| mount_folders | List | Paths to be mounted to the docker container |
| env_variables | List | KEY=VALUE pairs to be exported as environment variables to each job |
| check_stuckiness | boolean | Idle experiment behaviour (Stop (False) or Restart (True)) |
| max_restarts | int | When "check_stuckiness" is True this sets how many times to repeatedly restart a single experiment each time it idles |
| stuck_time | int | The duration (in minutes) that an experiment must be idle for before it is stopped or restarted |
| autosync | boolean | Whether or not to preform periodic automatic sync |
| sync_time | int | The interval (in minutes) between each automatic sync of jobs |
| collaborators | List | The complete and updated list of collaborators' email addresses on the project |
| command_to_execute | string | The project's default command to execute when starting a new job |
| run_tensorboard_by_default | boolean | Whether or not to run Tensorboard by default with each launched experiment |
| run_jupyter_by_default | boolean | Whether or not to run Jupyter by default with each launched experiment |
| requirements_path | string | The default path to the requirements.txt file that will run with every job |
| is_git | boolean | Whether if the project is linked to a git repo or not |
| git_repo | string | The address of the git repo |
| git_branch | string | The default branch |
| private_repo | boolean | Whether the repo is private or not |
| email_on_success | boolean | If email should be sent when the experiment finishes successfully |
| email_on_error | boolean | If email should be sent when the experiment finishes with an error |
# Setup Git Integrations in project settings
For a public git repository
myproj.settings.update(is_git=True, git_repo="MyGitRepo", git_branch="MyBranch")
For a private git repository using Oauth Token First make sure that the git Oauth Token is saved in your profile and then run
myproj.settings.update(is_git=True, git_repo="PrivateGitRepo", git_branch="MyBranch", private_repo=True)
To disable git integrations
myproj.settings.update(is_git=False)
# Configure secrets
In order to edit an existing secret from your project's settings, or add a secret, use following command:
myproj.settings.update_secret(secret_key="KEY", secret_value="VALUE")
In order to delete secrets from your project's settings, use following command:
## Delete single secret
myproj.settings.delete_secret("KEY")

## Delete multiple secrets
myproj.settings.delete_secret(["KEY1","KEY2"])
# Datasource Operations
# Create a Datasource
You can create a new Datasource in AI Studio:
from cnvrgv2 import Cnvrg
cnvrg = Cnvrg()
dsource = cnvrg.datasource.create(name="mybucket",storage_type=StorageTypes.S3)
Available Parameters:
| Parameter | type | description | required |
|---|---|---|---|
| storage_type | string | The storage type (s3/Minio) | Yes |
| name | string | The name of the new Datasource | Yes |
| bucket_name | string | The name of the bucket | Yes |
| path | string | Path in the bucket | No |
| endpoint | string | Endpoint URL | No |
| region | string | The region determines where your data is physically stored | Yes |
| descripton | string | Typically includes information about the purpose and use of the bucket, along with any relevant configuration details | Yes |
| credentials | dict | Access key ID and Secret access key. In this format(for s3 compatibles): {'access_key_id': '***', "secret_access_key": "***"} | Yes |
| collaborators | list | The complete and updated list of collaborators email addresses for this Datasource | No |
| public | bool | Permissions: public or private | No |
Note
- Only an admin can create datasources.
- By default, datasource is created as private.
- For Minio, endpoint_url is mandatory
# Get a Datasource
To fetch a Dataset from AI Studio you can use:
dsource = cnvrg.datasources.get(slug='datasource_slug')
Note
A non-admin user can only perform Get requests on Datasources they are explicitly assigned to, as well as on public Datasources accessible to all users.
# Access Datasource attributes
You can access the Datasource attributes by using regular dot notation:
from cnvrgv2 import Cnvrg
cnvrg = Cnvrg()
dsource = cnvrg.datasources.get(slug='dsource_slug')
dsource.slug
dsource.collaborators
dsource.storage_type
Available attributes:
| Attribute | type | description |
|---|---|---|
| slug | string | The unique slug value of the Datasource |
| storage_type | string | The bucket storage type for the Datasource |
| name | string | The name of the Datasource |
| admin | string | The admin of the Datasource (the creator) |
| path | string | The path in the storage bucket |
| endpoint | string | Endpoint URL |
| region | int | The region determines where your data is physically stored |
| public | bool | Permissions: public or private |
| collaborators | list | The complete and updated list of collaborators email addresses for this Datasource |
Note
- The AI Studio platform does not return credentials in response to
GETrequests for security and privacy reasons. GETrequests with a faulty slug should throw an error (pattern = r'^[a-z0-9-]+$').
# List all existing Datasources
You can list all the Datasources in the current organization:
from cnvrgv2 import Cnvrg
cnvrg = Cnvrg()
datasources = e2e_client.datasources.list(filter=filter, sort="id")
for data_source in datasources:
    print(data_source.name)
- Optional Filtering and Sorting
In the context of dataset retrieval, both filtering and sorting are optional parameters that can enhance data management.
Filtering allows users to narrow down results based on specific criteria. It operates similarly to dataset or project filters.
For example: You can filter by storage type: StorageTypes.S3, StorageTypes.MINIO etc:
s3_filter = {'operator': "AND",
             'conditions':[{'key': "type", 'operator': "is", 'value': StorageTypes.S3}]}
TIP
Helper function: list_count returns the total count of Datasources
cnvrg.datasources.list_count(filter=filter, sort="id")
# Delete a Datasource
To delete a Datasource call the delete() function on it's instance:
from cnvrgv2 import Cnvrg
cnvrg = Cnvrg()
dsource = cnvrg.datasources.get("slug")
dsource.delete()
# Adding and Removing Collaborators for a Private Datasource
- Adding a Collaborator:
dsource.add_collaborator('abc@efg.com')
- Removing a Collaborator:
dsource.remove_collaborator('abc@efg.com')
While adding/removing Collaborators. An error will be received in the following cases:
- If user does not exist in the Organization.
- If user is Admin (it can’t be removed from Datasource).
- If user is not Admin and not assigned.
- Authorization error to perform action if current user is not Admin.
# Datasource File Operations
- For the following operations, if a path is set on the Datasource, the ALWAYS path will be added to the request.
# List Files
Lists the objects in the bucket path and returns a list of object keys:
for file_name in datasource.list_objects():
  print(file_name)
Note
If the Datasource has a path, files will be listed for the given path only.
# Files Downloader
This is a helper function which downloads page by page for better performance.
downloader = ds.get_files_downloader(page_size=page_size, max_workers=max_workers, destination_folder=dest_dir)
for page in downloader.page_iterator:
    downloader.download_objects(page)
- This will download page by page to the destination_dir.
- If no destination is sent, it will download to the current directory.
- Page size default is 100
# Downloading single file
Downloads a single file from the bucket.
download_file(file_path, destination_path)
file_path:The path of the file you wish to download from the bucket. ( This is the actual file path in the bucket)destination_path:The destination file path where the file will be downloaded. This might be a relative or absolute path. In any case, all the folders in the tree should be existing folders (if the path in a/b/c.txt -> a/ and b/ should be existing folders)
Note
If the datasource has a path in backet, the file_path is appended to the path.
Example: For instance, if the datasource has ‘path1’ then : datasource.download_file("path_to/file.txt", "destination/directory/file_name.txt") this will download the following path from the bucket: "path1/path_to/file.txt"
WARNING
When downloading a file within a job (workspace or experiment), ensure that you save the datasource files to a designated folder /data. This precaution prevents the unintended upload of these files to project files during periodic synchronization or end-of-job synchronization processes.
# File Upload
Upload a single file to the bucket.
upload_file(file_path, destination_path)
file_path:The path of the file you wish to upload to the bucket.destination_path:The destination path in the bucket.
Note
If destination is not specified, the base name of the file is used.
- For example:
- without destination:
datasource.upload(file_path='abc.txt')
this will be uploaded to ‘path1/abc.txt’ in the bucket
BUCKET:
path1/file1
path1/file2
path1/abc.txt
- with destination:
datasource.upload(file_path='abc.txt', destination_path='myfolder/abc.txt')
this will be uploaded to ‘path1/myfolder/abc.txt’ in the bucket
BUCKET:
path1/file1
path1/file2
path1/myfolder/abc.txt
- with duplicate destination:
datasource.upload(file_path='abc.txt', destination_path='path1/myfolder/abc.txt')
this will be uploaded to ‘path1/path1/myfolder/abc.txt’
BUCKET:
path1/file1
path1/file2
path1/path1//myfolder/abc.txt
# Removing a file
Removes a file from the bucket.
datasource.remove_file(file_path)
file_path:The path of the file you wish to remove from the bucket.
Note:
If the datasource has a path, the file_path is appended to the file_path.
# Cloning a datasource
Clones the contents of the datasource to the current directory.
datasource.clone(page_size=100, max_workers=os.cpu_count(), skip_if_exists=False, force=False)
page_size:The number of files to download per page.max_workers:The maximum number of parallel workers for downloading files.skip_if_exists:Whether to skip cloning if the directory already exists.force:Whether to force cloning by overwrite the existing directory.
Important Notes:
- If
skip_if_existsisTrueand the directory exists, the method will return without cloning. - If
forceisTrueand the directory exists, it will be removed before cloning. - If the datasource has a path, files will be listed for the given path only.
# Datasources Additions to Jobs
The Datasource will be adding to the job at Workspace or Experiment startup.
When a Datasource is attached to a job, it will be cloned BEFORE the job starts.
The datasource will be cloned to the /data directory
# For Worcspaces:
p = cnvrg.projects.get('myproject')
p.clone()
# (create workspace must be done within a project context)
os.chdir(p.slug)
w = p.workspaces.create(
        title='My Workspace',
        templates=["small","medium"],
        overriding_datasources=[datasources_slugs_list],
        datasources=[datasources_slugs_list])
    )
The params are useful in the case the datasource may have already been clone (pvc etc)
datasources:For these Datasources, if the Datasource has already been cloned it will be skipped.overriding_datasources:For these Datasources, if the Datasource has already been cloned, the folder will be deleted and the Datasource will be cloned again
# For Experiments:
p = cnvrg.projects.get('myproject')
p.clone()
# (create experiment must be done within a project context)
os.chdir(p.slug)
e = p.experiments.create(
        title="my new exp",
        template_names=["small","medium"],
        command="python3 test.py",
        sync_before=False,
        sync_after=False,
        overriding_datasources=[datasources_slugs_list],
        datasources=[datasources_slugs_list])
    )
The params are useful in the case the datasource may have already been clone (pvc etc)
datasources:For these Datasources, if the Datasource has already been cloned it will be skipped.overriding_datasources:For these Datasources, if the Datasource has already been cloned, the folder will be deleted and the Datasource will be cloned again
Validations:
- If the Datasource does not exist: throw an error and do not create job.
- If the current user is not assigned to one of the Datasources: it throws an error and does not create the job.
# Datasources attached to the job check:
To retrieve and display the datasources associated with a specific job within the experiment and workspace contexts:
print(experiment.datasources)
print(workspace.datasources)
# Dataset Operations
# Create a Dataset
You can create a new Dataset in AI Studio:
from cnvrgv2 import Cnvrg
cnvrg = Cnvrg()
ds = cnvrg.datasets.create(name="MyDataset",category='general')
Available Parameters:
| Parameter | type | description | required | default |
|---|---|---|---|---|
| name | string | The name of the new Dataset | Yes | |
| category | string | The type of dataset. options are: general, images, audio, video, text, tabular | No | "general" |
# Dataset ID
In some methods, you will need to use a dataset ID. The dataset ID is the unique name of the dataset, as seen in its URL.
For example, if you have a dataset that lives at: https://app.cnvrg.io/my_org/datasets/mydataset, the dataset ID is mydataset.
# Get a Dataset
To fetch a Dataset from AI Studio you can use:
from cnvrgv2 import Cnvrg
cnvrg = Cnvrg()
ds = cnvrg.datasets.get('dataset-id')
# Access Dataset attributes
You can access the Dataset attributes by using regular dot notation:
from cnvrgv2 import Cnvrg
cnvrg = Cnvrg()
ds = cnvrg.datasets.get('dataset-id')
ds.slug
ds.members
ds.last_commit
Available attributes:
| Attribute | type | description |
|---|---|---|
| slug | string | The unique slug value of the Dataset |
| size | int | The size of the Dataset |
| title | int | The name of the Dataset |
| members | List | List of collaborators on this Dataset |
| category | string | The data structure category |
| description | string | Description of the Dataset |
| num_files | int | The number of files in the Dataset |
| last_commit | string | The last commit on this Dataset |
| current_commit | string | The current commit on this Dataset object |
# List all existing Datasets
You can list all the datasets in the current organization:
from cnvrgv2 import Cnvrg
cnvrg = Cnvrg()
ds = cnvrg.datasets.list(sort="-created_at")
TIP
sort the list by: -key -> DESC | key -> ASC
# Delete a Dataset
To delete a Dataset call the delete() function on it's instance:
from cnvrgv2 import Cnvrg
cnvrg = Cnvrg()
ds = cnvrg.datasets.get("dataset-id")
ds.delete()
# Dataset File Operations
# Clone the dataset to the current working directory
In order to clone dataset into your working directory, use following command:
from cnvrgv2 import Cnvrg
cnvrg = Cnvrg()
ds = cnvrg.datasets.get('dataset-id')
ds.clone()
Available Parameters:
| Parameter | type | description | required | default |
|---|---|---|---|---|
| commit | string | Sha1 of the commit to clone | No | latest |
| override | boolean | re-clone even if the dataset already cloned | No | False |
| query_slug | string | slug of a query to clone | No | None |
| fullpath_filter | string | Filter on path of file by part of the path | No | None |
| use_cached | boolean | whether to use nfs cache link or not | No | False |
| threads | integer | number of threads that will be used in order to clone the project | No | 40 |
| check_disk_space | boolean | check there is enough space to clone dataset. clone won't execute if there isn't enough available space (leaving at least 5% of free space after clone) | No | True |
TIP
The dataset will be cloned into a directory with its name, and the directory will be associated with the AI Studio dataset
# Download dataset latest commit
In order to fetch dataset's data, use following command:
from cnvrgv2 import Cnvrg
cnvrg = Cnvrg()
ds = cnvrg.datasets.get('dataset-id')
ds.download()
WARNING
The Dataset must be cloned first
# Upload files to a dataset
# upload all file changes from local dataset directory
Upload all file changes from remote directory using following commad:
import os
from cnvrgv2 import Cnvrg
cnvrg = Cnvrg()
ds = cnvrg.datasets.get('dataset-id')
ds.clone()
os.chdir("dataset-id")
ds.upload()
Available Parameters:
| Parameter | type | description | required | default |
|---|---|---|---|---|
| message | string | The commit message | No | "" |
WARNING
- This command must be used from a directory linked to a AI Studio Dataset
- Folder/file names must not contain special characters, which are - +?!@#$%&^*(){}[]
# upload specific files from remote directory
ds.put_files(paths=['/files_dir/file1.txt', '/files_dir/file2.txt'])
Available Parameters:
| Parameter | type | description | required | default |
|---|---|---|---|---|
| paths | List | The list of file paths that will be uploaded to the dataset | Yes | |
| message | string | The commit message | No | "" |
| override | boolean | Upload every file specified, even if it already exists in the latest commit | No | False |
| force | boolean | Create a new commit with only the files included in the current upload | No | False |
| git_diff | boolean | upload files from git diff output in addition to the given paths | No | Only upload files mentioned in the paths |
WARNING
Folder/file names must not contain special characters, which are - +?!@#$%&^*(){}[]
NOTE
If a folder is given all the relevant files in that folder (that answers to the regex pattern) will be uploaded.
# Remove files from a dataset
You can remove files from the dataset:
ds.remove_files(paths='*',
          message='This will delete everything!')
Available Parameters:
| Parameter | type | description | required | default |
|---|---|---|---|---|
| paths | List | The list of file/folder paths that will be deleted (regex and wildcard are allowed) | Yes | |
| message | string | The commit message | No | "" |
NOTE
- When deleting files from a dataset
pathsparameter can be both a list of file paths or a string pattern like'*' - In order to delete an enitre folder, specify its name followed by / for example: paths=["folder/"]
# List Dataset content
You can list all of the files and folders that are in the dataset:
ds.list_files(query_raw='{"color": "yellow"}',
              sort='-id')
ds.list_folders(commit_sha1='xxxxxxxxx')
Available Parameters:
| Parameter | type | description | required | default |
|---|---|---|---|---|
| commit_sha1 | string | Sha1 string of the commit to list the files from | No | None |
| query | string | Query slug to list files from | No | None |
| query_raw | string | Raw query to list files according to Query language syntax | No | None |
| sort | string | Key to sort the list by (-key -> DESC / key -> ASC) | No | "-id" |
# Dataset Commits
Every Dataset in AI Studio may contain multiple data commits that you can interact with in the following manner:
from cnvrgv2 import Cnvrg
cnvrg = Cnvrg()
ds = cnvrg.datasets.get("dataset-id")  # Get the Dataset object

# Get A specific commit by its sha1 value
cm = ds.get_commit('xxxxxxxxx')
# OR list all available commits
commits = [cm for cm in ds.list_commits()]

# Last commits is available as attributes
last_commit = ds.last_commit
# Checking Dataset Commit Indexing Status
To ascertain whether a dataset commit has completed its indexing process, execute the following code snippet:
from cnvrgv2 import Cnvrg
cnvrg = Cnvrg()
ds = cnvrg.datasets.get('dataset-id')
ds.get_commit('commit_sha1').is_indexed
# Dataset Caching
# Cache commit
In order to cache a dataset commit, use following command:
from cnvrgv2 import Cnvrg
cnvrg = Cnvrg()
ds = cnvrg.datasets.get("dataset-id")
dc= ds.get_commit("sha1")
dc.cache_commit('nfs-name')
NOTE
NFS connection needs to be configured in order to cache dataset commmits
# Uncache Commit
In order to clear cached commit, use following command:
dc.clear_cached_commit('nfs-name')
# Dataset Queries
You can create and use queries directly from AI Studio SDK to filter and use the Dataset exectly the way you want it by using Query language syntax
# Create a new Query:
from cnvrgv2 import Cnvrg
cnvrg = Cnvrg()
ds = cnvrg.datasets.get("MyDataset")  # Get the Dataset object
ds.queries.create(name='OnlyPngFiles',
                  query='{"fullpath":"*.png"}',
            commit_sha1='xxxxxxxxx')
Available Parameters:
| Parameter | type | description | required | default |
|---|---|---|---|---|
| name | string | The name of the query | Yes | |
| query | string | The query string according to Query language syntax | Yes | |
| commit_sha1 | string | The sha1 value of the commit that this query will be based on | No | None |
# List all of the Dataset queries:
ds.queries.list(sort="-created_at")
TIP
sort the list by: -key -> DESC | key -> ASC
# Get a specific query
q = ds.queries.get('slug')
# Delete a query
q.delete()
# Workspaces operations:
# Workspace ID
In some methods, you will need to use the workspace ID(slug). The ID(slug) can be found in the last part of the workspace's URL .
For example, if you have a dataset that lives at: https://app.cnvrg.io/my_org/my_project/notebook_sessions/show/xaqn2mozyuivzwd7ajso, the ID is xaqn2mozyuivzwd7ajso.
# Fetch the workspace object
Once you have the workspace'd id(slug) you can fetch it with the 'get' command:
from cnvrgv2 import Cnvrg
cnvrg = Cnvrg()
myproj = cnvrg.projects.get("myproject")
ws = myproj.workspaces.get("workspace-id")
NOTE
You can also reference the current running workspace from within its job scope:
from cnvrgv2 import Workspace
ws = Workspace()
# Create a new workspace
from cnvrgv2 import Cnvrg
cnvrg = Cnvrg()
myproj = cnvrg.projects.get("myproject")
ws = myproj.workspaces.create(title="My Workspace",
                              templates=["small","worker.medium"],
                              notebook_type='jupyterlab')
If no parameters are provided, then the default values are used to further customize the created workspace you pass use the following parameters
Available Parameters:
| Parameter | type | description | required | default |
|---|---|---|---|---|
| title | string | The name of the workspace | No | None |
| templates | list | A list containing the names of the desired compute templates. when specifiying a compute template which is not on the default resource, add the name of the resouce followed by name of the template. for example: "intel.small" | No | project's default template |
| notebook_type | string | The notebook type (options are: "jupyterlab", "r_studio", "vscode") | No | 'jupyterlab' |
| volume | string | The volume that will be attached to the workspace | No | None |
| datasets | list | A list of datasets to be connected and used in the workspace | No | None |
| image | object | Object of the image to be used for the workspace environment. for example: image=cnvrg.images.get(name="cnvrg", tag="v6.0") | No | project's default image |
| queue | string | Name of the queue to run on | No | default queue |
# Access workspace attributes
You can access the workspace attributes by using regular dot notation:
ws_slug = ws.slug
ws_title = ws.title
ws_datasets = ws.datasets
ws_notebook = ws.notebook_type
# Sync workspace's file changes
To trigger sync in the running workspace:
from cnvrgv2 import Cnvrg
cnvrg = Cnvrg()
ws = myproj.workspaces.get("workspace-slug")
ws.sync_remote()
Available Parameters:
| Parameter | type | description | required | default |
|---|---|---|---|---|
| commit_msg | string | The commit message | No | None |
# Stop a running workspace
Stop a running workspace and sync it (the default is sync=False):
from cnvrgv2 import Cnvrg
cnvrg = Cnvrg()
ws = myproj.workspaces.get("workspace-slug")
ws.stop(sync=True)
Stop multiple workspaces at once:
from cnvrgv2 import Cnvrg
cnvrg = Cnvrg()
myproj = cnvrg.projects.get("myproject")
myproj.workspaces.stop(['workspace-slug1','workspace-slug2'],sync=True)
# Start a stopped workspace
Start a stopped workspace:
from cnvrgv2 import Cnvrg
cnvrg = Cnvrg()
myproj = cnvrg.projects.get("myproject")
ws = myproj.workspaces.get("workspace-slug")
ws.start()
# List all of the workspaces
You can list all the workspaces in the current project, as well as sort them by a key in ASC or DESC order:
from cnvrgv2 import Cnvrg
cnvrg = Cnvrg()
myproj = cnvrg.projects.get("myproject")
wslist = myproj.workspaces.list(sort="-created_at")
TIP
sort the list by: -key for DESC or key for ASC
# Delete workspaces
from cnvrgv2 import Cnvrg
cnvrg = Cnvrg()
myproj = cnvrg.projects.get("myproject")
ws = myproj.workspaces.get("workspace-slug")
ws.delete()
Delete multiple workspaces by listing their slugs:
from cnvrgv2 import Cnvrg
cnvrg = Cnvrg()
myproj = cnvrg.projects.get("myproject")
myproj.workspaces.delete(['workspace-slug1','workspace-slug2'])
# Operate a Tensorboard
Start a Tensorboard session for an ongoing workspace
from cnvrgv2 import Cnvrg
cnvrg = Cnvrg()
myproj = cnvrg.projects.get("myproject")
ws = myproj.workspaces.get("workspace-slug")
ws.start_tensorboard()
Get the Tensorboard url:
ws.tensorboard_url
Stop the Tensorboard session:
ws.stop_tensorboard()
# Experiment Operations
# Experiment slug
In many commands, you will need to use an experiment slug. The experiment slug can be found in the URL for the experiment.
For example, if you have an experiment that lives at: https://app.cnvrg.io/my_org/projects/my_project/experiments/kxdjsuvfdcpqkjma5ppq, the experiment slug is kxdjsuvfdcpqkjma5ppq.
# Fetch the experiment object
Once you have the experiment's slug you can fetch it with the 'get' command:
from cnvrgv2 import Cnvrg
cnvrg = Cnvrg()
myproj = cnvrg.projects.get("myproject")
e = myproj.experiments.get("experiment-slug")
NOTE
You can also reference the current running experiment from within its job scope:
from cnvrgv2 import Experiment
e = Experiment()
print(e.slug) # Get the current running experiment's slug
# Create a new experiment
from cnvrgv2 import Cnvrg
cnvrg = Cnvrg()
myproj = cnvrg.projects.get("myproject")
e = myproj.experiments.create(title="my new exp",
                              templates=["medium", "small"],
                              command="python3 test.py")
Available Parameters:
| Parameter | type | description | required | default |
|---|---|---|---|---|
| title | string | The name of the experiment | No | None |
| templates | List | list of the compute templates to be used in the experiment (if the cluster will not be able to allocate the first template, then it will try the one after and so on..) | No | None |
| local | boolean | whether or not to run the experiment locally | No | False |
| local_arguments | dict | If local experiment and command is a function, local_arguments is a dictionary of the arguments to pass to the experiment's function | No | None |
| command | string | the starting command for the experiment (example: command='python3 train.py') | Yes | |
| datasets | List | A list of dataset objects to use in the experiment | No | None |
| volume | Volume | Volume to be attached to this experiment | No | None |
| sync_before | boolean | Wheter or not to sync the environment before running the experiment | No | True |
| sync_after | boolean | Wheter or not to sync the environment after the experiment has finished | No | True |
| image | object | The image to run on (example: image=cnvrg.images.get(name="cnvrg", tag="v5.0") | No | project's default image |
| git_branch | string | The branch to pull files from for the experiment, in case project is git project | No | None |
| git_commit | string | The specific commit to pull files from for the experiment, in case project is git project | No | None |
| queue | string | Name of the queue to run on | No | default queue |
# Create a grid of experiments
from cnvrgv2 import Cnvrg
cnvrg = Cnvrg()
myproj = cnvrg.projects.get("myproject")
e = myproj.experiments.create_grid(title="my new grid",
                              command="python3 train.py",
                              parameters=[{'key': 'learning_rate', 'type': 'discrete', 'values': [0.1, 0.01]}])
Available Parameters:
| Parameter | type | description | required | default |
|---|---|---|---|---|
| title | string | The name of the experiment | No | None |
| templates | List | list of the compute templates to be used in the experiment (if the cluster will not be able to allocate the first template, then it will try the one after and so on..) | No | None |
| parameters | list of dict | List of dictioneries of parameters to be passed to the grid. syntax is parameters=[{"key":"KEY", "type":"TYPE","value":"VALUE"},{..}]. example bellow | Yes | |
| command | string | the starting command for the experiment (example: command='python3 train.py') | Yes | |
| datasets | List | A list of dataset objects to use in the experiment | No | None |
| volume | Volume | Volume to be attached to this experiment | No | None |
| sync_before | boolean | Wheter or not to sync the environment before running the experiment | No | True |
| sync_after | boolean | Wheter or not to sync the environment after the experiment has finished | No | True |
| image | object | The image to run on (example: image=cnvrg.images.get(name="cnvrg", tag="v5.0") | No | project's default image |
| git_branch | string | The branch to pull files from for the experiment, in case project is git project | No | None |
| git_commit | string | The specific commit to pull files from for the experiment, in case project is git project | No | None |
| queue | string | Name of the queue to run on | No | default queue |
Example of different types or parameters:
import yaml
params = """
    - key: "learning_rate"
      type: "discrete" # An array of numerical values
      values: [0.1, 0.01]

    - key: "kernel"
      type: "categorical" # An array of string values
      values: ["linear", "rbf"]

    - key: "epochs"
      type: "integer"
      min: 10 # inclusive
      max: 20 # not inclusive
      scale: "linear"
      steps: 2 # The number of linear steps to produce.
"""
e = myproj.experiments.create_grid(command="python3 train.py", parameters=yaml.safe_load(params))


### OR
e = myproj.experiments.create_grid(command="python3 train.py", parameters=[{'key': 'learning_rate', 'type': 'discrete', 'values': [0.1, 0.01]}, {'key': 'kernel', 'type': 'categorical', 'values': ['linear', 'rbf']}, {'key': 'epochs', 'type': 'integer', 'min': 10, 'max': 20, 'scale': 'linear', 'steps': 2}])
# Get an existing experiment
You can get the experiment object by using the experiment's slug:
from cnvrgv2 import Cnvrg
cnvrg = Cnvrg()
myproj = cnvrg.projects.get("myproject")
e = myproj.experiments.get("experiment-slug")
# list all experiment in the project
To get a list of all of the experiments in the project:
experiments = [e for e in myproj.experiments.list(sort="-created_at")]
TIP
sort the list by: -key for DESC or key for ASC
# Delete experiment
You can delete a Experiment from a project by its slug value
from cnvrgv2 import Cnvrg
cnvrg = Cnvrg()
myproj = cnvrg.projects.get("myproject")
e = myproj.experiments.get("experiment-slug")
e.delete()

# Do bulk delete on multiple experiments
myproj.experiments.delete(['experiment-slug1','experiment-slug2'])
Available Parameters:
| Parameter | type | description | required | default |
|---|---|---|---|---|
| delete_artifacts | boolean | Delete experiment's artifacts from storage | No | False |
# Stop a running experiment
Stop a running Experiment by passing its slug value (also All Experiment must be running)
from cnvrgv2 import Cnvrg
cnvrg = Cnvrg()
myproj = cnvrg.projects.get("myproject")
e = myproj.experiments.get("experiment-slug")
e.stop()

# Do bulk stop on multiple experiments
myproj.experiments.stop(['experiment-slug1','experiment-slug2'])
Available Parameters:
| Parameter | type | description | required | default |
|---|---|---|---|---|
| sync | boolean | sync experiment's file changes before stopping | No | True |
# Get experiment's system utilization
You can access the experiment's system resources usage data. For example, let's get the 5 last records for memomry utilization percentage:
utilization = e.get_utilization()
utilization.attributes['memory']['series'][0]['data'][-5:]
[[1626601529000, 7.7], [1626601559000, 19.85], [1626601589000, 48.05], [1626601620000, 49.26]]
NOTE
The data syntax is [unix_timestamp, metric]
# Track an experiment manually
You can initialize an empty Experiment in AI Studio:
cnvrg = Cnvrg()
myproj = cnvrg.projects.get("myproject")
e = myproj.experiments.init("experiment-title")
Now that the Experiment is initialized, its status is ONGOING and you can preform operations from within your code like with regular AI Studio Experiments in order to track
If you have initialized an Experiment object, you should conclude the experiment with the e.finish() command.
To conclude an experiment object:
exit_status = 0
e.finish(exit_status=exit_status)
NOTE
Options for exit_status: 0 for success, -1 for aborted, 1 and higher is error
# Examples


# Metadata operations on experiments
Add logs to a running experiment:
from datetime import datetime
e.log("my first log")
e.log(["my first log","my second log"])
Available Parameters:
| Parameter | type | description | required | default |
|---|---|---|---|---|
| logs | array | Logs to be added to the experiment | Yes | |
| timestamp | timestemp | timestemp to be added on | No | UTC Now |
| log_level | string | Log level. options are: "output", "error" ,"info", "warning" | No | "info" |
# Get the experiment's last 40 logs:
logs = e.logs()
for i in logs.attributes['logs']:
    print(i['message'])
Available Parameters:
| Parameter | type | description | required | default |
|---|---|---|---|---|
| offset | integer | offset of logs chunk | No | -1 (latest) |
# Upload artifacts
You can add local files to the Experiments artifacts and create a new commit for it:
paths = ['output/model.h5']
e.log_artifacts(paths=paths)
Available Parameters:
| Parameter | type | description | required | default |
|---|---|---|---|---|
| paths | list | list of paths of artifacts to save | Yes | |
| git_diff | boolean | upload files from git diff output in addition to the given paths | No | False |
| work_dir | string | path to files. For example: when needed files are in dir ROOT/B. instead of sending paths B/., set working_dir="B", and send path as . | No | ROOT |
Files will be uploaded to the experiment as output artifacts.
NOTE
Log only images available in the choosen path with log_images(file_paths=['*'])
Images logged with this function will be displayed in the "Visuals" tab in the experiment's show page
# Fetch a list of experiment's artifacts:
In order to see existing artifacts of your experiment, use following command:
cnvrg = Cnvrg()
myproj = cnvrg.projects.get("myproject")
e = myproj.experiments.get("experiment-slug")
a = e.list_artifacts()
for i in a:
    print(i.fullpath)
# Download the experiment's artifacts
You can download the artifacts to your local working directory
e.pull_artifacts(wait_until_success=True, poll_interval=5)
Available Parameters:
| Parameter | Type | Description | required | default |
|---|---|---|---|---|
| wait_until_success | boolean | Wait until current experiment is done before pulling artifacts | No | False |
| poll_interval | int | If wait_until_success is True, poll_interval represents the time between status poll loops in seconds | No | 10 |
# Merge experiment's commit into project files
In order to merge experiments artifacts into project's master branch, use following command:
e.merge_to_master()
Available Parameters:
| Parameter | Type | Description | required | default |
|---|---|---|---|---|
| commit_sha1 | string | Specific commit to be merges | No | latest commit created by the experiment |
# Create a Tag
To log a parameter to a running experiment, use:
e.log_param("key","value")
Parameters can be seen in the "Config and Metrics" section of the experiment's show page
# Charts
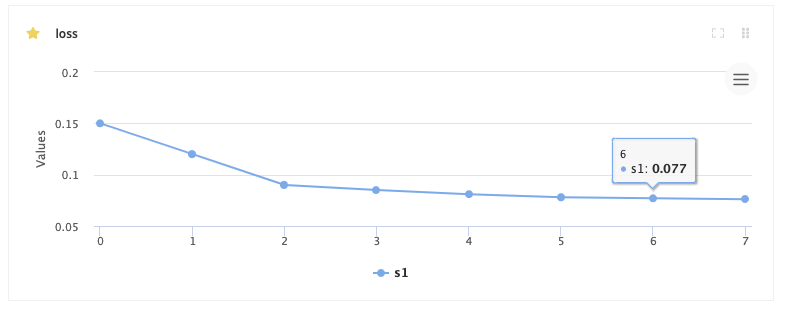
You can create various charts by using the sdk, for example create a linechart showing the experiments loss:
from cnvrgv2 import Cnvrg, LineChart
cnvrg = Cnvrg()
myproj = cnvrg.projects.get("myproject")
e = myproj.experiments.get("exp-slug")

loss_vals = []
# experiment loop:
for epoch in range(8):
    loss_vals.append(loss_func())

# attach the chart to the experiment
loss_chart = LineChart('loss')
loss_chart.add_series(loss_vals, 's1')
e.log_metric(loss_chart)
You will immediately see the chart on the experiment's page:
WARNING
chart_name can't include "/"
# Update existing chart:
Use following command to update existing chart with added values:
e.update_chart(key="loss",data=[1,2,3,4],series_name='s1')
You can create all different types of charts:
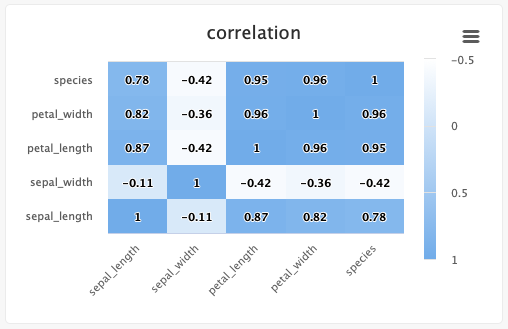
# Heatmap:
In case of Heatmap, list of tuples that form a matrix. e.g, 2x2 matrix: [(0.5,1),(1,1)]
from cnvrgv2 import Heatmap
heatmap_chart = Heatmap('heatmap_example2',
                        x_ticks=['x', 'y'], y_ticks=['a', 'b'], min=0,max=10)
heatmap_chart.add_series([(0.5,1),(1,1)])
e.log_metric(heatmap_chart)
Typing information: x_ticks and y_ticks must be a List and matrix is a list of tuples in struct (x,y,z). color_stops is optional and is a List of Lists with size 2, where the nested first value is a float 0 <= X <= 1, and the second value is the hex value for the color to represent matrix values at that point of the scale. min and max are optional and should be numbers corresponding to the minimum and a maximum values for the key (scaling will be done automatically when these values are not submitted).
Each struct corresponds to a row in the matrix and to a label from the y_ticks list. The matrix is built from the bottom up, with the first struct and y_tick at the bottom edge. Each value inside the struct corresponds to each x_tick.
Using steps and groups allow you to submit the same heatmap across different steps and visualize it in a single chart with a slider to easily switch between the charts. step should be an integer and group should be a string.
Steps and groups:
Using steps and groups allow you to submit heatmaps across different steps and visualize it in a single chart with a slider to easily move between the steps. step should be an integer and group should be a string. The group parameter requires the step parameter.
# Bar chart:
Single bar:
from cnvrgv2 import BarChart
bar_chart = BarChart('bar_example', x_ticks=['bar1', 'bar2'])
bar_chart.add_series([1, 2],'s1')
e.log_metric(bar_chart)
Multiple bars:
from cnvrgv2 import BarChart
bar_chart = BarChart('bar_example1', x_ticks=['bar1', 'bar2'])
bar_chart.add_series([1, 2, 3],'s2')
bar_chart.add_series([3, 4],'s3')
e.log_metric(bar_chart)
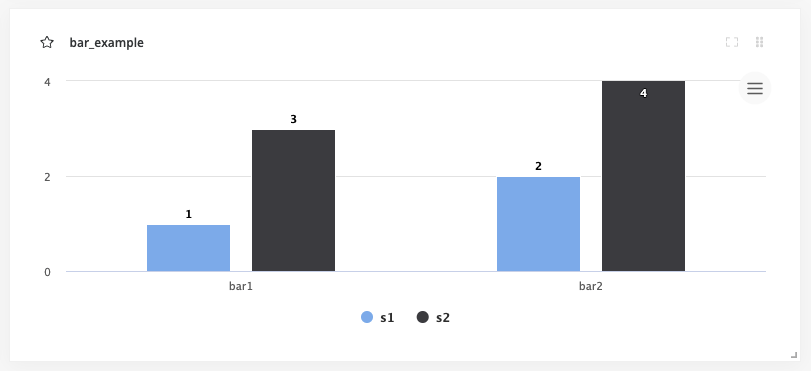
The x_ticks list will populate the labels for the bars, and the corresponding series values will dictate the value of the bar for that category. min and max are optional and are numbers that correspond the lower and upper bounds for the y values. Optionally, you can set each bar to be a specific color using the colors list of hex values, with each hex value corresponding to each x value.
Steps and groups:
Using steps and groups allow you to submit bar charts across different steps and visualize it in a single chart with a slider to easily move between the steps. step should be an integer and group should be a string. The group parameter requires the step parameter.
# Operate a Tensorboard
Start a Tensorboard session for an ongoing experiment
from cnvrgv2 import Cnvrg
cnvrg = Cnvrg()
myproj = cnvrg.projects.get("myproject")
e = myproj.experiments.get("experiment-slug")
e.start_tensorboard()
Get the Tensorboard url:
e.tensorboard_url
Stop the Tensorboard session:
e.stop_tensorboard()
# Flow Operations
Flows can be created and run from any environment using the SDK. Creating flows requires using a flow configuration YAML file.
# Create a Flow
You can use a flow YAML to create a flow inside a project. You can use either the absolute path to a YAML file or include the YAML content directly. Use the flows.create command:
from cnvrgv2 import Cnvrg
cnvrg = Cnvrg()
proj = cnvrg.projects.get("myproject")
flow = proj.flows.create(yaml_path='PATH/TO/YAML')
Available Parameters:
| Parameter | type | description | required | default |
|---|---|---|---|---|
| yaml_path | string | A path to the YAML configuration file | No | None |
| yaml_string | string | string of the yaml to create flow with | No | None |
For example:
flow = """
---
flow: Flow 1
recurring:
next_run_utc:
tasks:
- input: python3 train.py
  params: []
  computes:
  - mini
  image: cnvrg:v5.0
  description: Task 1
  type: exec
  git_commit:
  git_branch:
  mount_folders: []
  icon:
  output_dir: output
  confirmation: false
  standalone_mode: false
  notify_on_error: false
  notify_on_success: false
  emails: []
  objective:
  objective_goal:
  objective_function: min
  max_jobs: -1
  parallel_jobs: -1
  algorithm: GridSearch
  queue_slug: c9rlzkv5zazkdyxg7esg
  title: Task 1
  top: 50
  left: 50
  conditions: []
  commit: 908eea8c3aaa5059c55b4e3716a5bd96431c06b0
relations: []
"""

myproj.flows.create(yaml_string=flow)
# Access Flow attributes
You can access the Flow's attributes by using regular dot notation:
Example:
>>> flow.title
'Training Task'
# Flow Attributes:
| Parameter | type | description |
|---|---|---|
| title | string | The name of the Flow |
| slug | string | The flow slug value |
| created_at | datetime | The time that the Flow was created |
| updated_at | datetime | The time that the Flow was last updated |
| cron_syntax | string | The schedule Cron expression string (If the Flow was scheduled) |
| webhook_url | string | |
| trigger_dataset | string | A dataset that with every change will trigger this Flow |
# Flow slug
In some commands, you will need to use an Flow slug. The Flow slug can be found in the Flow page URL.
For example, if you have an Flow that lives at: https://app.cnvrg.io/my_org/projects/my_project/flows/iakzsmftgewhpxx9pqfo, the Flow slug is iakzsmftgewhpxx9pqfo.
# Get a Flow
Get an existing Flow by passing its slug value or title
from cnvrgv2 import Cnvrg
cnvrg = Cnvrg()
proj = cnvrg.projects.get("myproject")
flow = proj.flows.get("slug/title")
# List Flows
You can list all existing flows:
from cnvrgv2 import Cnvrg
cnvrg = Cnvrg()
proj = cnvrg.projects.get("myproject")
flows = proj.flows.list()
for flow in flows:
    print(flow.title)
# Run a Flow
To run The Flow's latest version:
flow.run()
# Update Flow
You can update the existing Flow's title:
from cnvrgv2 import Cnvrg
cnvrg = Cnvrg()
proj = cnvrg.projects.get("myproject")
flow = proj.flows.get("slug/title")
flow.update(title="My Updated Flow")
# Delete Flow
You can delete an existing Flow:
from cnvrgv2 import Cnvrg
cnvrg = Cnvrg()
proj = cnvrg.projects.get("myproject")
flow = proj.flows.get("slug/title")
flow.delete()
Or multiple Flows at once by listing all of the Flows slug values:
proj.flows.delete(["FLOW1_SLUG", "FLOW2_SLUG"])
# Schedule a Flow
You can make the Flow run on schedule by using Cron expression syntax.
# Set a new schedule:
from cnvrgv2 import Cnvrg
cnvrg = Cnvrg()
proj = cnvrg.projects.get("myproject")
flow = proj.flows.get("slug/title")
flow.set_schedule("* * * * *")  # Run every minute
Disable it with:
flow.clear_schedule()
# Trigger webhook
You can create a webhook that will trigger the Flow run.
Toggle it on/off by setting the toggle parameter to True or False:
from cnvrgv2 import Cnvrg
cnvrg = Cnvrg()
proj = cnvrg.projects.get("myproject")
flow = proj.flows.get("slug/title")
flow.toggle_webhook(True)
Get the webhook url:
flow.webhook_url
NOTE
If you just toggled the webhook use flow.reload() before fetching the webhook_url
# Toggle dataset update trigger
You can toggle the option to trigger on dataset update on/off, by setting the toggle parameter to True or False:
from cnvrgv2 import Cnvrg
cnvrg = Cnvrg()
ds = cnvrg.datasets.get("myds")
proj = cnvrg.projects.get("myproject")
flow = proj.flows.get("slug/title")

flow.toggle_dataset_update(True, cnvrg.datasets.get("dataset-slug"))
# Flow versions
Every Flow have multiple versions and you can access them:
List all the flow versions:
from cnvrgv2 import Cnvrg
cnvrg = Cnvrg()
proj = cnvrg.projects.get("myproject")
flow = proj.flows.get("slug/title")
flow_versions = flow.flow_versions.list()
for fv in flow_versions:
    print(fv.title)
Get a specific flow version object by slug or title:
from cnvrgv2 import Cnvrg
cnvrg = Cnvrg()
proj = cnvrg.projects.get("myproject")
flow = proj.flows.get("slug/title")
flow_version = flow.flow_versions.get("Version 1")
Get info of a flow version status:
info = flow_version.info()
Stop a running Flow version:
flow_version.stop()
#
# Endpoint Operations
# Create Endpoint
Use the following command to create a new endpoint:
from cnvrgv2 import Cnvrg
from cnvrgv2 import EndpointKind, EndpointEnvSetup
cnvrg = Cnvrg()
proj = cnvrg.projects.get("myproject")
ep = proj.endpoints.create(title="myendpoint",
               templates=["small","medium"],
               kind=EndpointKind.WEB_SERVICE,
               file_name="predict.py",
               stream=True,
               function_name="predict")
Available Parameters:
| Parameter | type | description | required | default |
|---|---|---|---|---|
| title | string | Name of the Endpoint | Yes | |
| kind | int | The kind of endpoint to deploy. options are: [WEB_SERVICE, STREAM, BATCH, TGI, GENERIC]) | No | EndpointKind.WEB_SERVICE |
| templates | List | List of template names to be used | No | Default compute from project's settings |
| image | Image | Image object to create endpoint with | No | Default image from project's settings |
| file_name | string | The file containing the endpoint function | Yes | |
| function_name | string | The name of the function the endpoint will route to | Yes | |
| prep_file | string | The file containing the preprocess functions | No | None |
| prep_function | string | The name of the preprocess function | No | None |
| commit | string | Commit sha1 to use | No | latest |
| git_branch | string | Git branch to use | No | Default git branch from project's settings |
| git_commit | string | Git commit to use | No | latest |
| desired_percentage | integer | Traffic ratio for canary rollout | No | 100 (full transition) |
| gunicorn_config | List | Gunicorn configurations in the following format: ["key=value", "key=value"] | No | None |
| flask_config | List | flask configurations in the following format: ["key=value", "key=value"] | No | None |
| input_file | boolean | Does endpoint accepts file | No | False |
| env_setup | string | The interpreter to use. options: [PYTHON2, PYTHON3, PYSPARK, RENDPOINT]) | No | EndpointEnvSetup.PYTHON3 |
| kafka_brokers | List | List of kafka brokers | No | None |
| kafka_input_topics | List | List of topics to register as input | No | None |
| queue | List | Name of the queue to run this job on | No | None |
| kafka_output_topics | List | List of topics to register as input | No | None |
| model_id | string | Name of the model id | No | None |
| stream | boolean | Does endpoint returns stream output | No | False |
| generic_command | string | Command for starting a generic endpoint | No | None |
NOTE
Stream output is supported only at web service endpoints.
# Endpoint slug
In many commands, you will need to use an endpoint slug. The endpoint slug can be found in the URL for the endpoint.
For example, if you have an endpoint that lives at: https://app.cnvrg.io/my_org/projects/my_project/endpoints/show/j46mbomoyyqj4xx5f53f, the endpoint slug is j46mbomoyyqj4xx5f53f.
# Get Endpoint object
You can get Endpoints by passing their slug value:
from cnvrgv2 import Cnvrg
cnvrg = Cnvrg()
proj = cnvrg.projects.get("myproject")
ep = proj.endpoints.get('slug')
NOTE
You can also reference the current running endpoint from within its job scope:
from cnvrgv2 import Endpoint
ep = Endpoint()
# List Endpoints
ep_list = proj.endpoints.list(sort='-created_at') # Descending order
TIP
sort the list by: -key -> DESC | key -> ASC
# Stop running Endpoints
Stop a running Endpoint using following command:
from cnvrgv2 import Cnvrg
cnvrg = Cnvrg()
myproj = cnvrg.projects.get("myproject")
ep = myproj.endpoints.get("endpoint-slug")
ep.stop()

# Do bulk stop on multiple endpoints
myproj.endpoints.stop(['endpoint-slug1','endpoint-slug2'])
# Start a stopped Endpoint
from cnvrgv2 import Cnvrg
cnvrg = Cnvrg()
myproj = cnvrg.projects.get("myproject")
ep = myproj.endpoints.get("endpoint-slug")
ep.start()
# Delete Endpoints
You can delete a Endpoint from a project by its slug value
from cnvrgv2 import Cnvrg
cnvrg = Cnvrg()
myproj = cnvrg.projects.get("myproject")
ep = myproj.endpoints.get("endpoint-slug")
ep.delete()

# Do bulk delete on multiple endpoints
myproj.endpoints.delete(['endpoint-slug1','endpoint-slug2'])
# Endpoint Attributes
You can access the Endpoint attributes by using regular dot notation, for example:
>>> ep.api_key
'43iVTWTp55N7p62iSZYZLyuk'
| Attribute | type | description |
|---|---|---|
| title | string | Name of the Endpoint |
| kind | int | The kind of endpoint (webservice, stream, batch) |
| updated_at | string | when was this Endpoint last updated |
| last_deployment | dict | details about the Endpoint's last deployment |
| deployments | List | list of dictionaries containing details about all of the Endpoint's deployments |
| deployments_count | int | The number of deployments that the Endpoint had |
| templates | List | List of compute templates that are assigned to the Endpoint |
| endpoint_url | string | The Endpoint's requests URL |
| url | string | The Endpoint's base URL |
| current_deployment | dict | The active deployment's data |
| compute_name | string | The name of the current compute template that is being used for the Endpoint to run |
| image_name | string | Name of the Endpoint's environment that is currently deployed |
| image_slug | string | The slug value of the Endpoint's deployed image |
| api_key | string | API key to access the Endpoint securely |
| created_at | string | The time that this endpoint was created |
| max_replica | int | Maximum number of pods to run this endpoint on |
| min_replica | int | Minimum number of pods0 to run this endpoint on |
| export_data | boolean | whether to export data or not |
| conditions | dict | conditions attached to this Endpoint and trigger a Flow/email every time one of them is met |
# Update The Endpoint's version
You can deploy a new version to the Endpoint and change some of its settings, for example:
from cnvrgv2 import Cnvrg
cnvrg = Cnvrg()
myproj = cnvrg.projects.get("myproject")
ep = myproj.endpoints.get("endpoint-slug")
ep.update_version(file_name="new_predict.py", commit="q7veenevzd83rewxgncx")
Available Parameters:
| Parameter | type | description | required | default |
|---|---|---|---|---|
| title | string | Name of the Endpoint | Yes | |
| kind | int | The kind of endpoint to deploy. options are: [WEB_SERVICE, STREAM, BATCH, TGI, GENERIC]) | No | EndpointKind.WEB_SERVICE |
| templates | List | List of template names to be used | No | Default compute from project's settings |
| image | Image | Image object to create endpoint with | No | Default image from project's settings |
| file_name | string | The file containing the endpoint function | Yes | |
| function_name | string | The name of the function the endpoint will route to | Yes | |
| prep_file | string | The file containing the preprocess functions | No | None |
| prep_function | string | The name of the preprocess function | No | None |
| commit | string | Commit sha1 to use | No | latest |
| git_branch | string | Git branch to use | No | Default git branch from project's settings |
| git_commit | string | Git commit to use | No | latest |
| desired_percentage | integer | Traffic ratio for canary rollout | No | 100 (full transition) |
| gunicorn_config | List | Gunicorn configurations in the following format: ["key=value", "key=value"] | No | None |
| flask_config | List | flask configurations in the following format: ["key=value", "key=value"] | No | None |
| input_file | boolean | Does endpoint accepts file | No | False |
| env_setup | string | The interpreter to use. options: [PYTHON2, PYTHON3, PYSPARK, RENDPOINT]) | No | EndpointEnvSetup.PYTHON3 |
| kafka_brokers | List | List of kafka brokers | No | None |
| kafka_input_topics | List | List of topics to register as input | No | None |
| queue | List | Name of the queue to run this job on | No | None |
| kafka_output_topics | List | List of topics to register as input | No | None |
| model_id | string | Name of the model id | No | None |
| stream | boolean | Does endpoint returns output stream | No | False |
| generic_endpoint | string | Command for starting a generic endpoint | 'No' for all kinds other than 'generic' | False |
# Update the Endpoint's replica set
You can update the minimum and maximum number of pods to run the Endpoint on:
ep.update_replicas(min_replica=2, max_replica=5)
# Rollback version
If you want to rollback the Endpoint version to a previous one you just need to pass the current version's slug value, for example:
ep.current_deployment['title']
3  # current version is 3
last_version_slug = ep.current_deployment["slug"]
ep.rollback_version(version_slug=last_version_slug)
ep.reload()
ep.current_deployment['title']
2  # after the rollback the Endpoint's version is now 2
NOTE
To fetch the most updated attributes of the Endpoint, use ep.reload()
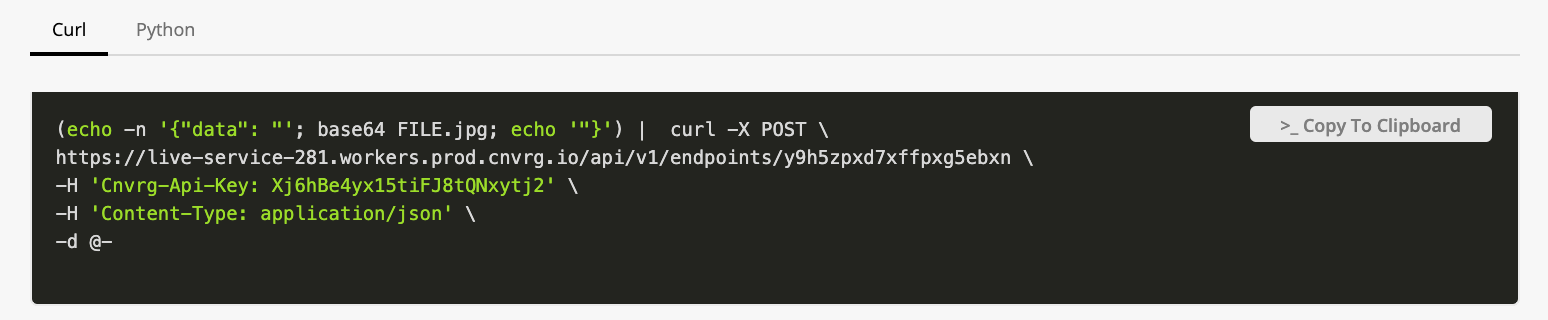
# Get sample code
You can fetch the sample code to query the Endpoint (as shown in the Endpoint's main screen):
 example:
sample_code = ep.get_sample_code()
sample_code['curl']
'curl -X POST \\\n    http://endpoint_title.cnvrg.io/api/v1/endpoints/q7veenevzd83rewx...'
# Send prediction
In order to send a request to a running endpoint and get a prediction, use following command:
ep.predict(input_params)
# Log metrics
To log mertics to an endpoint, use following command within the endpoint function:
### predict.py
from cnvrgv2 import Endpoint
def predict(data):
    ep = Endpoint()
    ep.log_metric("key",0.1)
    return(data)
# Poll charts
You can fetch a dictionary with data about the Endpoint's latency performance, number of requests and user generated metrics from the Endpoint's charts:
>>> ep.poll_charts()
# Add logs to a running endpoint
from datetime import datetime
ep.log("my first log")
ep.log(["my first log","my second log"])
Available Parameters:
| Parameter | type | description | required | default |
|---|---|---|---|---|
| logs | array | Logs to be added to the experiment | Yes | |
| timestamp | timestemp | timestemp to be added on | No | UTC Now |
| log_level | string | Log level. options are: "output", "error" ,"info", "warning" | No | "info" |
# Set feedback loop
You can grab all inbound data and feed it into a dataset for various uses, such as continuous learning for your models, for example:
from cnvrgv2 import Cnvrg
from cnvrgv2.modules.workflows.endpoint.endpoint import FeedbackLoopKind
cnvrg = Cnvrg()
myproj = cnvrg.projects.get("myproject")
ep = myproj.endpoints.get("endpoint-slug")
ds_slug = "dataset-name"
ep.configure_feedback_loop(dataset_slug=ds_slug,
                           scheduling_type=FeedbackLoopKind.IMMEDIATE)
Available Parameters:
| Parameter | type | description | required | default |
|---|---|---|---|---|
| dataset_slug | string | slug of the receiving dataset | No | None |
| scheduling_type | integer | whether if the feedback loop is immediate (for every request) or recurring (for every time interval) (use FeedbackLoopKind.IMMEDIATE or FeedbackLoopKind.RECURRING) | No | FeedbackLoopKind.IMMEDIATE |
| cron_string | string | Cron syntax string if scheduling type is recurring | No | None |
Disable the feedback loop:
ep.stop_feedback_loop()
NOTE
The data will be automatically uploaded to your dataset under predict/predictions.csv

# Add Continual Learning rules
In order to set alerts to trigger email notification or flow execution, based on model behaviour in the endpoint, use following command:
rule = ep.add_rule(
    title="new-tule",
    description="some description",
    action={"type": "email","emails": ["EMAIL"]},
    metric="key",
    operation="lt",
    threshold="1",
    severity="info"
)
Available Parameters:
| Parameter | type | description | required | default |
|---|---|---|---|---|
| title | string | title of the rule | Yes | |
| description | string | rule description | No | None |
| metric | string | The cnvrg SDK metric used for the trigger. (Only tags with numeric values are supported) | Yes | |
| threshold | float/integer | metric value to compare to trigger the alert | Yes | |
| operation | string | The type of comparison used for comparing with your set value. options are: "gt" (greater than) or "lt" (less than) | Yes | |
| action | json | Action to occur when the alert is triggered (a json of: type, webhook slug, flow_slug and emails) | Yes | |
| severity | string | An indication of the importance of this alert (Info, Warning or Critical) | Yes | |
| min_events | integer | Minimum number of events before triggering action | No | 1 |
| frequency | integer | How often to run condition (in minutes) | No | 1 |
Disable the feedback loop:
ep.update_rule(rule.slug,is_active=False)
Delete feedback loop:
ep.delete_rule(rule.slug)
# Control batch Endpoint
If the Endpoint is of batch type, then you can control it straight from the SDK:
from cnvrgv2 import Cnvrg
cnvrg = Cnvrg()
myproj = cnvrg.projects.get("myproject")
ep = myproj.endpoints.get("endpoint-slug")

# Check if it is running
ep.batch_is_running()

# Scale it up or down
ep.batch_scale_up()
ep.batch_scale_down()
#
# Webapps Operations
# Create a webapp
from cnvrgv2 import Cnvrg
cnvrg = Cnvrg()
myproj = cnvrg.projects.get("myproject")
w = myproj.webapps.create(title="mywebapp",
                          templates=["small","medium"],
                          webapp_type="dash",
                          file_name="app.py")
Available Parameters:
| Parameter | type | description | required | default |
|---|---|---|---|---|
| webapp_type | string | The type of webapp to create ("shiny", "dash", "voila", "generic") | Yes | |
| file_name | string | File name of the main app script | Yes (Except Generic type) | |
| generic_command | string | The Generic command | No | |
| title | string | Name of the webapp | No | None |
| templates | list | List of template names to be used | No | None |
| datasets | list | List of datasets to connect with the webapp | No | None |
| image | object | obgect of the image to be used (for example: image=cnvrg.images.get(name="cnvrg", tag="v6.0") | No | default image from project's settings |
| queue | string | Name of the queue to run this job on | No | default queue |
Available attributes: You can access the WebApp attributes by using regular dot notation, for example:
>>> wb.webapp_type
'dash'
| Attribute | type | description |
|---|---|---|
| webapp_type | string | The type of webapp ("shiny", "dash" or "voila") |
| template_ids | List | The size of the Dataset |
| title | int | The name of the Dataset |
| members | List | List of collaborators on this Dataset |
| category | string | The data structure category |
| description | string | Description of the Dataset |
| num_files | int | The number of files in the Dataset |
| last_commit | string | The last commit on this Dataset |
| current_commit | string | The current commit on this Dataset object |
# Webapp's slug
In many commands, you will need to use an webapp's slug. The webapp slug can be found in the URL of it.
For example, if you have an webapp that lives at: https://app.cnvrg.io/my_org/projects/my_project/webapps/kth1zj9xfh3gfvhfnh5k, the experiment slug iskth1zj9xfh3gfvhfnh5k`.
# Get webapp object
Get a specific Webapp by its slug value
from cnvrgv2 import Cnvrg
cnvrg = Cnvrg()
myproj = cnvrg.projects.get("myproject")
wb = myproj.webapps.get("webapp-slug")
NOTE
You can also reference the current running webapp from within its job scope:
from cnvrgv2 import Webapp
w = Webapp()
# List all the webapps in the project
from cnvrgv2 import Cnvrg
cnvrg = Cnvrg()
myproj = cnvrg.projects.get("myproject")
# sort them by decending order
wb = myproj.webapps.list(sort="-created_at")
TIP
sort the list by: -key -> DESC | key -> ASC
# Delete webapp
You can delete a WebApp from a project by its slug value
from cnvrgv2 import Cnvrg
cnvrg = Cnvrg()
myproj = cnvrg.projects.get("myproject")
wb = myproj.webapps.get("webapp-slug")
wb.delete()

# Do bulk delete on multiple webapps
myproj.webapps.delete(['webapp-slug1','webapp-slug2'])
# Stop running webapp
Stop a running WebApp by passing its slug value (sync=False by default, also All WebApps must be running)
from cnvrgv2 import Cnvrg
cnvrg = Cnvrg()
myproj = cnvrg.projects.get("myproject")
wb = myproj.webapps.get("webapp-slug")
wb.stop(sync=False)

# Do bulk stop on multiple webapps
myproj.webapps.stop(['webapp-slug1','webapp-slug2'])
# Share and Permissions
Share a running WebApp by using share and update_privacy commands
from cnvrgv2 import Cnvrg
cnvrg = Cnvrg()
myproj = cnvrg.projects.get("myproject")
wb = myproj.webapps.get("webapp-slug")
wb.share(public_url_suffix="mysuffix")
wb.update_privacy(is_public=True) # to make the wb public
or in order to make the webapp only for project scope, the default is false:
wb.update_privacy(is_public=False)
# Resource Operations
# Connect your existing Kubernetes cluster
from cnvrgv2 import Cnvrg
cnvrg = Cnvrg()
mycluster = cnvrg.clusters.create(resource_name="kubernetes_cluster",
                                  kube_config_yaml_path="kube_config.yaml",
                                  domain="https://app.cnvrg.io")
Available Parameters:
| Parameter | type | description | required | default |
|---|---|---|---|---|
| resource_name | string | Name of the resource | Yes | |
| kube_config_yaml_path | string | path to kubeconfig file | Yes | |
| domain | string | domain url of existing kubernetes_cluster | Yes | |
| provider_name | string | the provider name (options are: "aws","gke","eks","ics"...) | No | None |
| scheduler | string | supported schedulers to deploy cnvrg jobs | No | cnvrg_scheduler |
| namespace | string | the namespace to use inside the cluster | No | cnvrg |
| https_scheme | boolean | resource supports HTTP/S urls when accessing jobs from the browser | No | False |
| persistent_volumes | boolean | resource can dynamically create PVCs when running jobs | No | False |
| gaudi_enabled | boolean | the cluster support HPU devices | No | False |
# Build managed EKS cluster (Supported on MetaCloud)
from cnvrgv2 import Cnvrg
cnvrg = Cnvrg()
mycluster = cnvrg.clusters.create(build_yaml_path="aws.yaml", provider_name="aws")
Available Parameters:
| Parameter | type | description | required | default |
|---|---|---|---|---|
| network | string | if left blank cnvrg will automatically provision the network for your cluster | No | istio |
Yaml example:
name: mycluster
version: '1.21'
roleARN: arn:aws:iam::123456789101:role/cnvrg_role
region: us-west-2
vpc: null
publicSubnets:
  - ''
privateSubnets:
  - ''
securityGroup: ''
nodeGroups:
  - availabilityZones:
      - us-west-2a
      - us-west-2b
      - us-west-2d
      - us-west-2c
    autoScaling: false
    instanceType: m5.metal
    desiredCapacity: 2
    minSize: 0
    maxSize: 2
    spotInstances: false
    volumeSize: 100
    privateNetwork: true
    securityGroups:
      - ''
    tags:
      - key: ''
        value: ''
    taints:
      - key: ''
        value: ''
    labels:
      - key: ''
        value: ''
    attachPolicies:
      - ''
    addonPolicies:
      - key: ''
        value: ''
# Get an existing resource
You can get the resource object by using the resource's slug:
from cnvrgv2 import Cnvrg
cnvrg = Cnvrg()
mycluster = cnvrg.clusters.get(slug="cluster-slug")
You can also get all of the resources in the organization:
clusters = [c for c in cnvrg.clusters.list()]
# Update an existing resource
from cnvrgv2 import Cnvrg
cnvrg = Cnvrg()
mycluster = cnvrg.clusters.get(slug="cluster-slug")
mycluster.update(resource_name="new-name")
List of optional parameters:
| Parameter | type | description | required |
|---|---|---|---|
| resource_name | string | Name of the resource | No |
| kube_config_yaml_path | string | path to kubeconfig file | No |
| domain | string | domain url of existing kubernetes_cluster | No |
| scheduler | string | supported schedulers to deploy cnvrg jobs | No |
| namespace | string | the namespace to use inside the cluster | No |
| https_scheme | boolean | resource supports HTTP/S urls when accessing jobs from the browser | No |
| persistent_volumes | boolean | resource can dynamically create PVCs when running jobs | No |
| gaudi_enabled | boolean | the cluster support HPU devices | No |
# Delete a resource
from cnvrgv2 import Cnvrg
cnvrg = Cnvrg()
mycluster = cnvrg.clusters.delete(slug="cluster-slug")
or
from cnvrgv2 import Cnvrg
cnvrg = Cnvrg()
mycluster = cnvrg.clusters.get(slug="cluster-slug")
mycluster.delete()
# Templates Operations
# Create a new template
# Get an existing template
You can get the template object by using the template's slug:
from cnvrgv2 import Cnvrg
cnvrg = Cnvrg()
cluster = cnvrg.clusters.get("cluster_slug")
template = cluster.templates.get("template_slug")
# List all existing templates
List all templates that the current user is allowed to view
from cnvrgv2 import Cnvrg
cnvrg = Cnvrg()
cluster = cnvrg.clusters.get("cluster_slug")
templates = cluster.templates.list()
for template in templates:
    print("Template Details: title: {} , slug: {} , cpu: {} , memory: {} "
          .format(template.title, template.slug, template.cpu, template.memory))
# Update an existing template
You can update the existing template attributes:
from cnvrgv2 import Cnvrg
cnvrg = Cnvrg()
cluster = cnvrg.clusters.get("cluster_slug")
template = cluster.templates.get("template_slug")
template.update(title="new title",cpu=3)
Parameters Available for Update:
| Parameter | type | description |
|---|---|---|
| title | string | The name of the template |
| cpu | float | Number of CPUs |
| memory | float | Amount of Memory |
| gpu | integer | Number of GPUs |
| is_private | boolean | Does the template are private and not all users have access |
| users | array | the users that can use this template, if private (Administrators have permissions to all compute resources) |
| labels | string | Labels for the node pools the template should use. For example, gputype=v100.To specify several, separate them with commas. |
| taints | string | Taints for the node pools the template should use. For example, value1=NoSchedule.To specify several, separate them with commas. |
WARNING
If you change the template's status from public to private, you must specify a list of authorized users. Failure to do so will result in an error message indicating that authorization is required. Please ensure that all specified users have the appropriate permissions to access the private template.
# Delete an existing template
You can delete an existing template:
from cnvrgv2 import Cnvrg
cnvrg = Cnvrg()
cluster = cnvrg.clusters.get("cluster_slug")
template = cluster.templates.get("template_slug")
template.delete()
# Advanced Volumes Operations
# Storage Class Management
# Create a New NFS Storage Class
To add a New NFS Storage Class, use the following command:
cnvrg.storage_class.create(title, host_ip, host_path)
Available Parameters:
| Parameter | Type | Description | Required | Default |
|---|---|---|---|---|
| title | Text | Title of the storage class to create | Yes | |
| host-ip | Text | Storage class host ip | Yes | |
| host-path | Text | Storage class host path | Yes | |
| cluster-slug | Text | Cluster slug to create storage class on. If not sent, will use the default cluster. | No | None |
| wait | Boolean | Will cause the command to wait until the storage class is ready to use | No | False |
# Registry commands
# Create a registry
To create a registry in the cnvrg environment, use the following command:
from cnvrgv2 import Cnvrg
cnvrg = Cnvrg()
registry = cnvrg.registries.create(title="TITLE", url="URL")
Available Parameters:
| Parameter | type | description | required | default |
|---|---|---|---|---|
| title | string | Registry title | Yes | |
| url | string | Registry URL | Yes | |
| type | string | Registry type. options are: cnvrg, dockerhub, gcr, acr, ecr, nvidia, other | No | 'other' |
| username | string | Registry username | required for private registries | None |
| password | string | Registry password | required for private registries | None |
# Get a registry
To retrieve information about a registry, use the following command:
from cnvrgv2 import Cnvrg
cnvrg = Cnvrg()
registry = cnvrg.registries.get(slug="cnvrg")
print(registry.url) ## docker.io/cnvrg
print(registry.title) ## cnvrg
# List all registries
To retrieve all the registries in the AI Studio environment, use the following command:
from cnvrgv2 import Cnvrg
cnvrg = Cnvrg()
registry = cnvrg.registries.list()
# Update a registry
To update or modify a registry, use the following command with the required combination of options corresponding to the fields you want to modify:
from cnvrgv2 import Cnvrg
cnvrg = Cnvrg()
registry = cnvrg.registries.get(slug="my-registry")
registry.update(title="new-title")
Available Parameters:
| Parameter | type | description | required |
|---|---|---|---|
| title | string | Registry title | No |
| url | string | Registry URL | No |
| type | string | Registry type. options are: cnvrg, dockerhub, gcr, acr, ecr, nvidia, other | No |
| username | string | Registry username | required for private registries |
| password | string | Registry password | required for private registries |
# Delete a registry
To delete a registry from the AI Studio environment, use the following command:
from cnvrgv2 import Cnvrg
cnvrg = Cnvrg()
registry = cnvrg.registries.get(slug="my-registry")
registry.delete()
# Image commands
# Create an image
To create an image, use the following command:
from cnvrgv2 import Cnvrg
cnvrg = Cnvrg()
image = cnvrg.images.create(name="cnvrg", tag="v6.0", registry="cnvrg")
Available Parameters:
| Parameter | type | description | required | default |
|---|---|---|---|---|
| name | string | Image repository name | Yes | |
| tag | string | The image tag | Yes | |
| registry | string | The slug of the registry that the image will be added to | Yes | |
| dockerfile | string | path to Dockerfile path to build a custom image | No | None |
| custom | boolean | hether the image is custom (needs to be built with dockerfile) | No | False |
| readme | string | path to README file | No | None |
# Get an image
To retrieve information about an image, use the following command:
image = cnvrg.images.get(name="cnvrg", tag="v6.0")
print(image.slug)
print(image.dockerfile) ## when reffering to an image built from dockerfile
# List all images
To retrieve all the images in the AI Studio environment, use the following command:
images = cnvrg.images.list(sort='-id')
TIP
sort the list by: -key -> DESC | key -> ASC
# Delete an image
To delete an image using its name and tag use the following command:
image = cnvrg.images.get(name="cnvrg", tag="v6.0")
image.delete()
TIP
You can also delete an image using its slug instead