# cnvrgv2 CLI
As data scientists, we use the terminal a lot to run experiments, write code, change parameters, and more.
The cnvrgv2 CLI tool was built to be simple and easy-to-use, so you can do what you love the way you know it, but faster and in a more organized fashion.
The cnvrgv2 CLI allows you to create and manage projects, run experiments, and more from the comfort of your terminal.
In this guide we will learn how to setup the cnvrgv2 CLI and explore the different commands it supports.
Guide content:
- Install cnvrgv2 CLI
- Authenticate with cnvrgv2 CLI
- Project commands
- Dataset commands
- Workspace commands
- Experiment commands
- Run an experiment
- Download the output artifacts of an experiment
- Upload output artifacts to an experiment
- Upload image output artifacts to an experiment
- Log a paramater to an experiment
- Merge artifacts into project
- Start tensorboard in an experiment
- List all experiments in the project
- Stop tensorboard in an experiment
- Delete an experiment
- Flow commands
- Endpoint commands
- Advanced Volumes commands
- Registry commands
- Image commands
- Members commands
# Install cnvrgv2 CLI
The cnvrgv2 CLI is built with python.
Prerequisits:
- python version 3.6 or higher
- pip
# Install options
When on a self-hosted cnvrg environment, options need to be specified for the cnvrgv2 installation depending on the type of storage connected to the cnvrg environment, or if python3.6 is installed on your device.
For Metacloud, no options need to be specified.
Multiple options can be specified for the installation by adding options serperated by commas, options can be added to the installation command as follows:
pip3 install "cnvrgv2[options]"
Available options are:
azure- Install packages relevant for Azure storage clientgoogle- Install packages relevant for GCP storage clientpython3.6- Install specific dependencies for python version 3.6
# Authenticate with cnvrgv2 CLI
# Login
To authenticate with cnvrg use the following command:
cnvrgv2 login
Login command options
| Option | Short option | Value Type | Description |
|---|---|---|---|
| --domain | -d | Text | cnvrg domain/url starting from http/s, excluding the organization slug e.g. https://app.cnvrgdomain.com/ |
| -e | Text | User email | |
| --password | -p | Text | authenticate using password |
| --auth-token | -t | Text | authenticate using the API Token |
| --organization | -o | Text | cnvrg organization, this can be used when the user is a memner of multiple organizations |
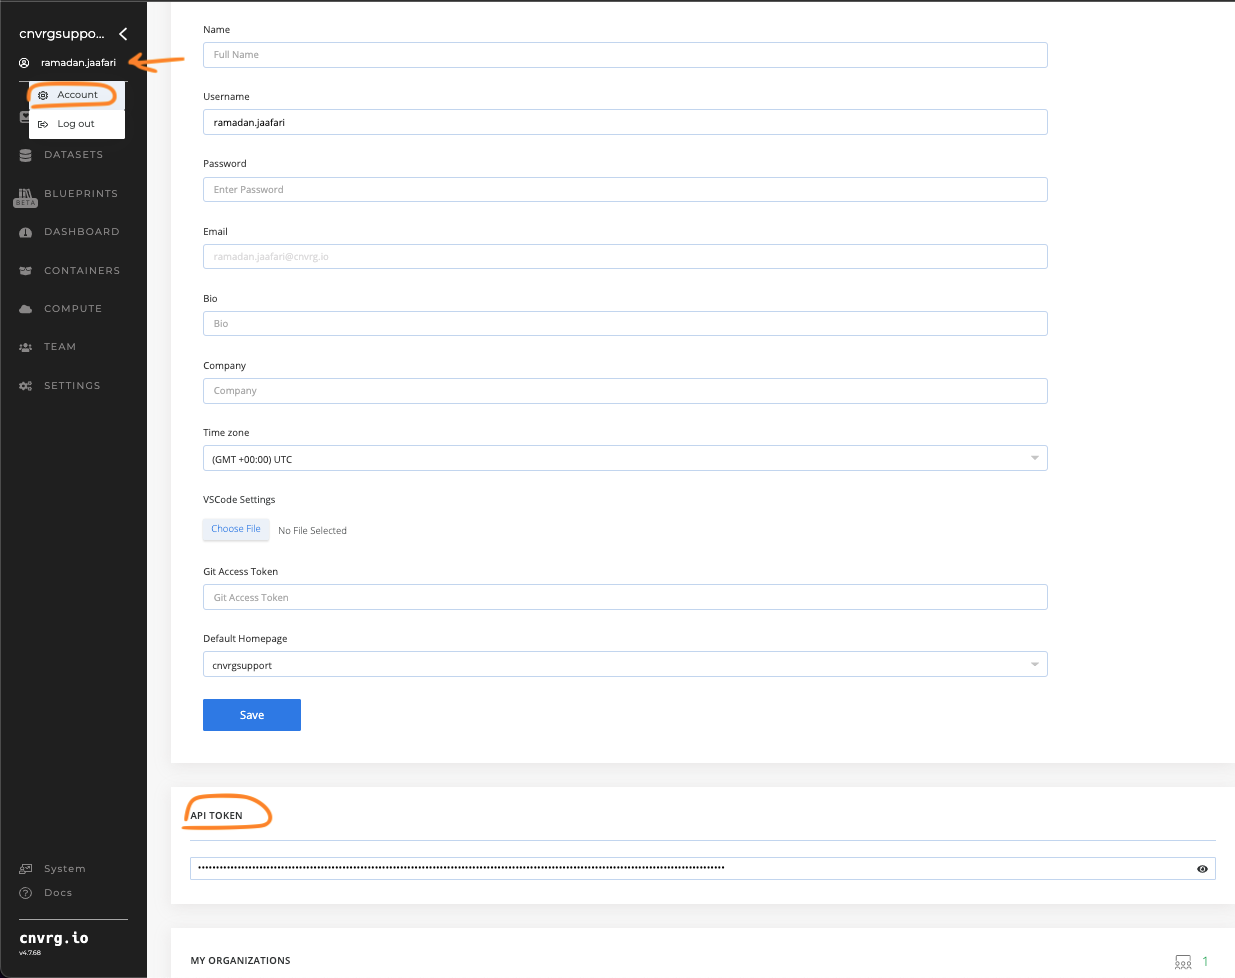
For Metacloud and self-hosted cnvrg environments with SSO authentication, The user's API Token must be used instead of the Password, with the flag --auth-token. the token can be retrieved from the user settings page, under API Token field:
Verify you are logged in
You can verify you are logged in to your organization using following command:
cnvrgv2 me
Switch to a different organization
In order to switch to another organization, use following command:
cnvrgv2 config --organization=ORGANIZATION_NAME
# Logout
To deauthenticate with cnvrg use the following command:
cnvrgv2 logout
# Project commands
# Create an empty project
To create an empty cnvrg project, use the following command:
cnvrgv2 project create --name=PROJECT_NAME
NOTE
'create' will associates the current working directory with the cnvrg project
# Link a local directory to a new project
To create new cnvrg project, associate it with the current working directory, and upload the content of the current working directory to it, use the following command:
cnvrgv2 project link
WARNING
Folder/file names must not contain special characters, which are - +?!@#$%&^*(){}[]
# Link an existing project to a git directory
To link or associate a local git directory with a git integrated cnvrg project, use the following command:
cnvrgv2 project link-git
Project link-git command options
| Option | Short option | Value Type | Description |
|---|---|---|---|
| --name | -n | Text | Project name |
| --soft | -s | Boolean | Don't link project if it's already linked |
# List projects
To retrieve a list of the projects you have access to, use the following command:
cnvrgv2 project list
# Clone a project
To clone a cnvrg project, use the following command:
cnvrgv2 project clone
NOTE
By default, the project will be cloned into a directory with its name, and the directory will be associated with the cnvrg project.
Project clone command options
| Option | Short option | Value Type | Description |
|---|---|---|---|
| --name | -n | Text | Project name |
| --commit | -c | Text | Project commit sha1 |
| --override | -o | Boolean | Force clone the project even if is already exists |
| --current_dir | -d | Boolean | Clone into current directory |
# Sync a project with a local directory
To synchronize the file changes of a local project with its corresponding cnvrg project, use the following command:
cnvrgv2 project sync
This command will download updated and new files from the cnvrg project, and then upload local file changes.
Project sync command options
| Option | Short option | Value Type | Description |
|---|---|---|---|
| --job-slug | -j | Text | Slug of the job |
| --git-diff | -g | Boolean | Upload git changed files, files included in the output of the git diff command |
| --message | -m | Text | Commit message |
| --output-dir | -o | Text | The directory that will be synced inside the project |
WARNING
Folder/file names must not contain special characters, which are - +?!@#$%&^*(){}[]
# Upload files to a project
To upload files or directories to a cnvrg project, use the following command:
cnvrgv2 project put
Project put command options
| Option | Short option | Value Type | Description |
|---|---|---|---|
| --name | -n | Text | Project name |
| --files | -f | Text | comma separated list of file and directory paths to upload. use . to upload the entire current working directory |
| --dir | -d | Text | Upload the files to a specific subdirectory in the remote project. For example, --dir /images will upload the files to the images folder. It will create the directory if it does not exist |
| --force | -fc | Boolean | Enable creating a new commit that is not related to the parent commit |
| --override | -or | Boolean | Enable re-uploading files even if they already exist in the project |
| --git-diff | -gd | Boolean | Upload git changed files, the files included in the output of the git diff command |
WARNING
Folder/file names must not contain special characters, which are - +?!@#$%&^*(){}[]
# Upload updated project files
To upload all file changes in a local project directory to the cnvrg project, use the following command:
cnvrgv2 project upload
Project upload command options
| Option | Short option | Value Type | Description |
|---|---|---|---|
| --git-diff | -g | Text | Upload git changed files, files included in the output of the git diff command |
# Download updated project files
To fetch latest commit into local project directory, use the following command:
cnvrgv2 project download
# Delete files from a project
To delete files and directories from a cnvrg project, use the following command:
cnvrgv2 project rm
Project rm command options
| Option | Short option | Value Type | Description |
|---|---|---|---|
| --name | -n | Text | Project name |
| --files | -f | Text | Comma seperated list of files or directories. for example: cnvrgv2 project rm --files=folder/,file.py |
| --message | -m | Text | Commit message |
NOTE
When specifying a directory name to be deleted, / must be added to the end of the directory name.
# Delete a project
To delete a cnvrg project, use the following command:
cnvrgv2 project delete --name=NAME
# Dataset commands
# Create a dataset
To create a new dataset, use the following command:
cnvrgv2 dataset create --name=NAME
This command will associates the current working directory with the created dataset.
# List datasets
To retrieve the list of the datasets that you have access to, use the following command:
cnvrgv2 dataset list
# Clone a dataset
To clone a cnvrg dataset, use the following command:
cnvrgv2 dataset clone
The dataset will be cloned into a directory with its name, and the directory will be associated with the cnvrg dataset.
Dataset clone command options
| Option | Short option | Value Type | Description |
|---|---|---|---|
| --name | -n | Text | Dataset name |
| --override | -o | Boolean | Clone the dataset even if it already exist, to get missing and deleted files |
| --cache-link | -cl | Boolean | Use cached commit |
| --commit | -c | Text | clone a specific dataset commit (default is latest) |
| --threads | -t | Integer | Number of thread that will perform the clone process |
| --query | -q | Text | Query slug or title |
# Put dataset
To upload files or directories to a cnvrg dataset, use the following command:
cnvrgv2 dataset put
Dataset put command options
| Option | Short option | Value Type | Description |
|---|---|---|---|
| --name | -n | Text | Dataset name |
| --files | -f | Text | Comma separated list of file and directory paths to upload. use . to upload the entire current working directory |
| --dir | -d | Text | Upload the files to a specific subdirectory in the remote dataset. For example, --dir /images will upload the files to the images folder. It will create the directory if it does not exist |
| --force | -fc | Boolean | Create a new commit with only the files included in the current upload. |
| --override | -or | Boolean | Upload every file specified, even if it already exists in the latest commit |
| --git-diff | -gd | Boolean | Upload git changed files, the files included in the output of the git diff command |
WARNING
Folder/file names must not contain special characters, which are - +?!@#$%&^*(){}[]
# Delete files from a dataset
To delete files and directories from a cnvrg dataset, use the following command:
cnvrgv2 dataset remove
Dataset remove command options
| Option | Short option | Value Type | Description |
|---|---|---|---|
| --name | -n | Text | Dataset name |
| --files | -f | Text | Comma seperated list of files or directories. for example: cnvrgv2 dataset rm --files=folder/,file.py |
| --message | -m | Text | Commit message |
NOTE
When specifying a directory name to be deleted, a / must be added to the end of its name.
# Scan datasets
To get the datasets located in the current working directory, use the following command:
cnvrgv2 dataset scan
# Upload updated dataset files
To upload all changed and new files from a local dataset directory to the cnvrg dataset, use the following command:
cnvrgv2 dataset upload
Dataset upload command options
| Option | Short option | Value Type | Description |
|---|---|---|---|
| --git-diff | -g | Text | Upload git changed files, the files included in the output of the git diff command |
# Download updated dataset files
To fetch latest commit into local dataset directory, use the following command:
cnvrgv2 dataset download
# Cache a dataset
To cache a dataset commit, use the following command:
cnvrgv2 dataset cache
Dataset cache command options
| Option | Short option | Value Type | Description |
|---|---|---|---|
| --name | -n | Text | Dataset name |
| --commit | -c | Text | Dataset commit sha1 |
| --external-disk-title | -d | Text | NFS name |
# Uncache dataset
To uncache a dataset commit, use the following command:
cnvrgv2 dataset uncache
Dataset uncache command options
| Option | Short option | Value Type | Description |
|---|---|---|---|
| --name | -n | Text | Dataset name |
| --commit | -c | Text | Dataset commit sha1 |
| --external-disk-title | -d | Text | NFS name |
# Verify dataset
To verify that certain datasets in the current working directory have finished downloading, use the following command:
cnvrgv2 dataset verify
Dataset verify command options
| Option | Short option | Value Type | Description |
|---|---|---|---|
| --name | -n | Text | Datasets names seperated by commas |
| --time-out | -t | Text | Timeout in seconds |
NOTE
- 'verify' command should be executed outside the dataset directory
- command stays alive until all the datasets provided have finished downloading or until it times out.
# Delete a dataset
To delete a cnvrg dataset, use the following command:
cnvrgv2 dataset delete --name=DATASET_NAME
# Workspace commands
NOTE
Workspace commands require the current working directory (or sub-directory) to be a linked to a cnvrg project
# Create new workspace
To create new workspace use following command:
cnvrgv2 workspace create
| Option | Short option | Value Type | Description |
|---|---|---|---|
| --title | -t | Text | Name of the workspace |
| --templates | -tm | Text | Comma separated list of compute templates. format is: resource_name.template_name, for example: --templates=ics.medium (default is taken from project's settings) |
| --commit | -c | Text | Project commit sha1 to be used, (default is latest) |
| --notebook_type | -nt | Text | Type of workspace to create. options are: jupyterlab, vscode, r_studio. (default is jupyterlab) |
| --datasets | -d | Text | List of comma separated datasets names to cloned to the workspace |
| --volume | -v | Text | Name of volume to attach to this workspace |
| --image | -i | Text | Image name and tag to create workspace with. format is - image_name:tag (default is taken from project's settings) |
| --git-branch | -gb | Text | The name of the git branch to pull files from, this option works only when the project is git integrated (default is taken from project's settings) |
| --git-commit | -gc | Text | The git commit to pull files from, this option works only when the project is git integrated (default is latest) |
| --local_folders | -lf | Text | Local folders to mount with workspace |
# Sync workspace file changes
To sync file changes from workspace, use following command:
cnvrgv2 workspace sync-remote --slug=WORKSPACE_SLUG
# Start an existing workspace
cnvrgv2 workspace start --slug=WORKSPACE_SLUG
# Stop a running workspace
cnvrgv2 workspace stop --slug=WORKSPACE_SLUG
# Start tensorboard session in a workspace
cnvrgv2 workspace start-tensorboard --slug=WORKSPACE_SLUG
# Stop tensorboard in a workspace
cnvrgv2 workspace stop-tensorboard --slug=WORKSPACE_SLUG
# SSH into a workspace
To establish an SSH connection to a workspace for access through your code editor or terminal, use the following command:
cnvrgv2 ssh start WORKSPACE_SLUG
NOTE.
This command will require access to your cluster, with a kubeconfig file
SSH start command options
| Option | Short option | Value Type | Description |
|---|---|---|---|
| --port | -p | Integer | SSH port number to bind on the host machine (user device) |
| --username | -u | Text | The username to ssh to inside the workspace |
| --password | -pw | Text | SSH password |
| --kubeconfig | -kc | Text | Full path to the kubeconfig file for the cluster hosting the workspace pod |
NOTE
- By default the ssh start command uses the default kubeconfig file (located at $HOME/.kube/config), or the file pointed at by the $KUBECONFIG environment variable.
- default port value is 2222, and the default username value is root. If not specified, the password will be generated randomly.
# Experiment commands
NOTE
The experiment commands require the current working directory to be a local cnvrg project directory(or sub-directory)to work.
# Run an experiment
To run an experiment in a cnvrg project, use the following command:
cnvrgv2 experiment run --command=COMMAND
If only the experiment run command was specified the project's default image and compute template will be used to run the experiment.
Experiment run command options
| Option | Short option | Value Type | Description |
|---|---|---|---|
| --title | -t | Text | Experiment title |
| --templates | -tm | Text | A comma separated list of template names |
| --local | -l | Boolean | Run experiment locally |
| --command | -c | Text | The command that will run in the experiment |
| --image | -i | Text | The name and tag of the image that will be used to run the experiment. image value format: IMAGE_NAME:IMAGE_TAG |
| --datasets | -d | Text | A comma separated list of the slugs of dataset that will be used by the experiment (unique identifier of the dataset, can be taken for the ending of the dataset's url. for example: domain.com/organization/datasets/my-dataset). Example: cnvrgv2 experiment run -c 'python3 mnist.py' -d '[{"slug": "my-dataset"},{"slug": "my-dataset2"}]' |
| --volume | -v | Text | A volume name that will be attached to the experiment |
| --sync-before | -sb | Boolean | Enable Syncing the local project with the cnvrg project before running the experiment (default is true) |
| --no-sync-before | -nsb | Boolean | Disable Syncing the local project with the cnvrg project before running the experiment |
| --sync-after | -sa | Boolean | Enable Syncing the local project with the cnvrg project after running the experiment (default is true) |
| --no-sync-after | -nsa | Boolean | Disable Syncing the local project with the cnvrg project after running the experiment |
| --git-branch | -gb | Text | The name of the git branch to pull files from, this option works only when the project is git integrated |
| --git-commit | -gc | Text | The git commit to pull files from, this option works only when the project is git integrated |
| --output_dir | -od | Text | Output folder for cnvrg to track experiment artifacts |
| --grid | -g | Text | Path to yaml file outlining the parameters to be run as gridsearch (example bellow) |
| --local_folders | -lf | Text | Local folders to mount with experiment |
| --log | -log | Boolean | Display log of local experiment |
| --wait | -w | Boolean | Wait for local experiment to complete and return the exit status of the experiment |
| --project-slug | -ps | Text | Enables running an experiment without the need to perform a project clone before (must add flag --no-sync-before when used) |
NOTE.
Options log and wait are only applicable for local experiments
Example YAML file for grid searches:
parameters:
    - key: "learning_rate"
      type: "discrete" # An array of numerical values
      values: [0.1, 0.01]

    - key: "kernel"
      type: "categorical" # An array of string values
      values: ["linear", "rbf"]

    - key: "epochs"
      type: "integer"
      min: 10 # inclusive
      max: 20 # not inclusive
      scale: "linear"
      steps: 2 # The number of linear steps to produce.
# Download the output artifacts of an experiment
To download the output artifacts of an experiment, use the following command:
cnvrgv2 experiment pull-artifacts --slug EXPERIMENT_SLUG
Experiment pull-artifacts command options
| Option | Short option | Value Type | Description |
|---|---|---|---|
| --slug | -s | Text | Experiment slug |
| --project-slug | -ps | Text | Enables running a command without the need to clone a project first |
| --commit | -c | Text | The sha1 of the commit that contains the artifacts (default is the end commit) |
# Upload output artifacts to an experiment
To upload and save files and directories as output artifacts of an experiment, use the following command:
cnvrgv2 experiment log-artifacts --slug=EXPERIMENT_SLUG
Experiment log-artifacts command options
| Option | Short option | Value Type | Description |
|---|---|---|---|
| --slug | -s | Text | Experiment slug |
| --files | -f | Text | Comma separated list of file and directory paths to upload. use . to upload the entire current working directory |
| --git-diff | -g | Boolean | Upload git changed files, the files included in the output of the git diff command |
# Upload image output artifacts to an experiment
To upload and save image files and directories as output artifacts of an experiment, use the following command:
cnvrgv2 experiment log-images --slug=EXPERIMENT_SLUG
This command exclusivly uploads image files, and ignores other files types.
Experiment log-images command options
| Option | Short option | Value Type | Description |
|---|---|---|---|
| --slug | -s | Text | Experiment slug |
| --files | -f | Text | Comma separated list of file and directory paths to upload. use . to upload the entire current working directory |
# Log a paramater to an experiment
To log a parameter as an experiment tag, use the following command:
cnvrgv2 experiment log-param --slug=EXPERIMENT_SLUG --key=KEY --value=VALUE
# Merge artifacts into project
To merge commit created from an experiment into project master branch, use the following command:
cnvrgv2 experiment merge-to-master --slug=EXPERIMENT_SLUG
Experiment merge-to-master command options
| Option | Short option | Value Type | Description |
|---|---|---|---|
| --slug | -s | Text | Experiment slug |
| ---commit | -c | Text | Commit sha1 to merge |
# Start tensorboard in an experiment
To start the tensorboard in an experiment, use the following command:
cnvrgv2 experiment start-tensorboard --slug=EXPERIMENT_SLUG
# List all experiments in the project
To get a list of all of the experiments in the project:
cnvrgv2 experiment list --project-slug PROJECT_SLUG
Experiments list command options
| Option | Short option | Value Type | Description |
|---|---|---|---|
| --project-slug | -ps | Text | The slug of the project |
| --chunk-size | -cs | Integer | Number of experiments to display at a time |
| --limit | -l | Integer | Maximum number of experiments to display |
# Stop tensorboard in an experiment
To stop the tensorboard in an experiment, use the following command:
cnvrgv2 experiment stop-tensorboard --slug=EXPERIMENT_SLUG
# Delete an experiment
To delete an experiment, use following command:
cnvrgv2 experiment delete --slug=EXPERIMENT_SLUG
Experiment delete command options
| Option | Short option | Value Type | Description |
|---|---|---|---|
| --slug | -s | Text | Experiment slug |
| --delete_artifacts | -d | Boolean | Delete related artifacts from the storage (default is false) |
# Flow commands
NOTE
Flow commands require the current working directory (or sub-directory) to be a linked to a cnvrg project
# Create new flow
To create new flow use following command:
cnvrgv2 flow create --yaml-path=PATH_TO_FLOW_YAML
Example YAML file for flow:
---
flow: Sentiment Analysis
recurring: 0 0 * * 1 Asia/Jerusalem
tasks:
- input: python3 train.py
  params:
  - key: epochs
    type: categorical
    min: 0
    max: 0
    scale: linear
    steps: 0
    values:
    - '5'
    - '10'
  - key: batch_size
    type: categorical
    min: 0
    max: 0
    scale: linear
    steps: 0
    values:
    - '128'
    - '256'
  computes:
  - large
  image: cnvrg:v5.0
  description: Train
  type: exec
  algorithm: GridSearch
  queue_slug: c9rlzkv5zazkdyxg7esg
  title: Train
  conditions: []
  commit: 5dd42b08460dae46456ca6e3cf9db621b59e67b6
- title: Sentiment API
  description: Sentiment API
  conditions:
  - target: 0.0
    task:
    objective: max
    tag_key: test_accuracy
    value: ''
  type: deploy
  confirmation: false
  kind: webserver
  endpoint_title: sentiment-service
  function_name: predict
  file_name: predict.py
  env_setup: python_3
  min_replica: 1
  max_replica: 1
  local_folders: []
  accept_files: false
  computes:
  - medium
  image: cnvrg:v5.0
relations:
- from: Train
  to: Sentiment API
# Endpoint commands
NOTE
Endpoint commands require the current working directory (or sub-directory) to be a linked to a cnvrg project
# Create new endpoint
To create new endpoint use following command:
cnvrgv2 endpoint create --title=TITLE --file_name=FILE_NAME --function_name=FUNCTION_NAME -stmOn
Endpoint create command options
| Option | Short option | Value Type | Description |
|---|---|---|---|
| --title | -t | Text | Name of the Endpoint (required) |
| --file_name | -f | Text | The file containing the endpoint's functions (required) |
| --function_name | -fn | Text | The name of the function the endpoint will route to (required) |
| --templates | -tm | Text | Comma separated list of compute templates. format is: resource_name.template_name, for example: --templates=ics.medium (default is taken from project's settings) |
| --kind | -k | Integer | Kind of endpoint to create. options are: Webserver = 0, Kafka = 1, Batch = 2, Triton = 3, Tensorflow = 4, RabbitMQ = 5 (default is 1) |
| --env_setup | -e | Text | The interpreter to use. options are: python_2,python_3,pyspark,r_endpoint |
| --kafka_brokers | -kb | Text | Comma separated list of kafka brokers |
| --kafka_input_topics | -kit | Text | Comma separated list of kafka input topics |
| None | -stmOn | No value | Does endpoint returns stream output |
| None | -stmOff | No value | The endpoint does't returns stream output |
| --args | -a | List | Additional arguments can be sent in a list. for example: --args=[image_slug=SLUG, commit=sha1] |
| Options for args are: image_slug=string(slug of the image to be used), commit=string(sha1 of project commit), prep_file=string(preprocess file), prep_function=string(preprocess function), input_file=boolean(endpoint accepts files as input), prep_function=string(preprocess function), min_replica=integer(number of min pods), max_replica=integer(number of max pods), desired_percentage=integer(Canary deployment percentage),gunicorn_config=array(key:val),flask_config=array(key:val),nginx_config=array(key:val),models_config_file=string(Tensorflow serving config file path), models_folder=string(Triton server models folder path),rabbitmq_host=string(RabbitMQ host IP), rabbitmq_input_queues=array(RabbitMQ input queues), rabbitmq_output_queue=string(RabbitMQ output queue),rabbitmq_user=string(RabbitMQ login user), rabbitmq_password=string(RabbitMQ login password), rabbitmq_exchange=string(RabbitMQ exchange), rabbitmq_prefetch=integer(RabbitMQ prefetch count), model_id=string(name od the model), command_arguments=object(key value of parameters) |
NOTE
These options, -stmOn and -stmOff, are flag options and should not be accompanied by any values. Please refer to the code example provided above for usage guidance. Stream output is supported only at web service endpoints.
# Get endpoint predictions:
Get last 50 predictions made by the endpoint:
cnvrgv2 endpoint get-predictions --slug=ENDPOINT_SLUG
Endpoint get-predictions command options
| Option | Short option | Value Type | Description |
|---|---|---|---|
| --slug | -s | Text | Endpoint slug |
| --start_time | -st | Text | The start time of the predictions to return |
| --end_time | -et | Text | The end time of the predictions to return |
| --offset | -o | Text | The offset of the predictions to return |
| --size | -si | Integer | Number of predictions to return (default is 20) |
| --model | -m | Text | The endpoint model number to query |
# Add logs to endpoint:
Add logs to running endpoint using following command:
cnvrgv2 endpoint logs --slug=ENDPOINT_SLUG --logs="new log added"
Endpoint logs command options
| Option | Short option | Value Type | Description |
|---|---|---|---|
| --slug | -s | Text | Endpoint slug |
| --logs | -l | Text | Comma separated list of logs to write to endpoint |
| --log_level | -lv | Text | Level of the logs. options are: output, error, warning, info (default is output) |
# Log metrics to endpoint:
Add metrics to running endpoint using following command:
cnvrgv2 endpoint log-metric --slug=ENDPOINT_SLUG --name=METRIC_NAME --x=X_VALUE --y=Y_VALUE
Endpoint log-metric command options
| Option | Short option | Value Type | Description |
|---|---|---|---|
| --slug | -s | Text | Endpoint slug |
| --name | -n | Text | The metric name |
| --x | -x | Text | Metric x value |
| --y | -y | Text | Metric y value |
# update endpoint version
To update a running endpoint, use the following command:
cnvrgv2 endpoint update --slug=ENDPOINT_SLUG -stmOff
Endpoint update command options
| Option | Short option | Value Type | Description |
|---|---|---|---|
| --title | -t | Text | Name of the Endpoint (required) |
| --file_name | -f | Text | The file containing the endpoint's functions (required) |
| --function_name | -fn | Text | The name of the function the endpoint will route to (required) |
| --templates | -tm | Text | Comma separated list of compute templates. format is: resource_name.template_name, for example: --templates=ics.medium (default is taken from project's settings) |
| --kind | -k | Integer | Kind of endpoint to create. options are: Webserver = 0, Kafka = 1, Batch = 2, Triton = 3, Tensorflow = 4, RabbitMQ = 5 (default is 1) |
| --env_setup | -e | Text | The interpreter to use. options are: python_2,python_3,pyspark,r_endpoint |
| --kafka_brokers | -kb | Text | Comma separated list of kafka brokers |
| --kafka_input_topics | -kit | Text | Comma separated list of kafka input topics |
| None | -stmOn | No value | Does endpoint returns stream output |
| None | -stmOff | No value | The endpoint does't returns stream output |
| --args | -a | List | Additional arguments can be sent in a list. for example: --args=[image_slug=SLUG, commit=sha1] |
| Options for args are: image_slug=string(slug of the image to be used), commit=string(sha1 of project commit), prep_file=string(preprocess file), prep_function=string(preprocess function), input_file=boolean(endpoint accepts files as input), prep_function=string(preprocess function), min_replica=integer(number of min pods), max_replica=integer(number of max pods), desired_percentage=integer(Canary deployment percentage),gunicorn_config=array(key:val),flask_config=array(key:val),nginx_config=array(key:val),models_config_file=string(Tensorflow serving config file path), models_folder=string(Triton server models folder path),rabbitmq_host=string(RabbitMQ host IP), rabbitmq_input_queues=array(RabbitMQ input queues), rabbitmq_output_queue=string(RabbitMQ output queue),rabbitmq_user=string(RabbitMQ login user), rabbitmq_password=string(RabbitMQ login password), rabbitmq_exchange=string(RabbitMQ exchange), rabbitmq_prefetch=integer(RabbitMQ prefetch count) |
# Rollback to previous endpoint version:
To rollback to a previous endpoint model,use following command
cnvrgv2 endpoint rollback --slug=ENDPOINT_SLUG --version_slug=VERSION_TO_ROLLBACK_TO
# Start an existing endpoint
To start an existing endpoint which is currently offline, use following command:
cnvrgv2 endpoint start --slug=ENDPOINT_SLUG
# Stop a running endpoint
To stop a running endpoint, use following command:
cnvrgv2 endpoint stop --slug=ENDPOINT_SLUG
# Advanced Volumes commands
# Storage Class Management
# Create a New NFS Storage Class
To add a New NFS Storage Class, use the following command:
cnvrgv2 storage-class create --title ... --host-ip ... --host-path ... --wait
New NFS Storage Class create command options
| Option | Short option | Value Type | Description |
|---|---|---|---|
| --title | -t | Text | Title of the storage class to create |
| --host-ip | -i | Text | Storage class host ip |
| --host-path | -p | Text | Storage class host path |
| --cluster-slug | -c | Text | Cluster slug to create storage class on. If not sent, will use the default cluster. |
| --wait | -w | Boolean | Will cause the command to wait until the storage class is ready to use |
- Mandatory attributes: title, host_ip, host_path.
# Connect Exists NFS Storage Class
To Connect Exists NFS Storage Class, use the following command:
cnvrgv2 storage-class connect --cluster-slug ... --title ...
| Option | Short option | Value Type | Description |
|---|---|---|---|
| --title | -t | Text | Title of the storage class to connect |
| --connect-volumes | -cv | Text | To connect all volumes that exist on the storage class |
| --cluster-slug | -c | Text | Cluster slug to connect storage class to. If not sent, will use the default cluster. |
| --wait | -w | Boolean | Will cause the command to wait until the storage class is ready to use |
- Mandatory attributes: title
# Registry commands
# Create a registry
To create a registry in the cnvrg environment, use the following command:
cnvrgv2 registry create
Registry create command options
| Option | Short option | Value Type | Description |
|---|---|---|---|
| --title | -t | Text | Registry title |
| --url | -u | Text | Registry url |
| --type | -rt | Text | Registry type. options are: cnvrg, dockerhub, gcr, acr, ecr, nvidia, other |
| --username | -us | Text | Registry username, required for private registries |
| --password | -ps | Text | Registry password, required for private registries |
# Get a registry
To retrieve information about a registry, use the following command:
cnvrgv2 registry get --slug=REGISTRY_SLUG
Output will include the registry slug, title, url, username, type, and whether it's private or not.
# List all registries
To retrieve all the registries in the cnvrg environment, use the following command:
cnvrgv2 registry list
# Update a registry
To update or modify a registry, use the following command with the required combination of options corrosponding to the fields you want to modify:
cnvrgv2 registry update --slug=REGISTRY_SLUG --title=NEW_TITLE --url=NEW_URL
Registry update command options
| Option | Short option | Value Type | Description |
|---|---|---|---|
| --title | -t | Text | Registry title |
| --url | -u | Text | Registry url |
| --username | -us | Text | Registry username |
| --password | -ps | Text | Registry password |
# Delete a registry
To delete a registry from the cnvrg environment, use the following command:
cnvrgv2 registry delete --slug=REGISTRY_SLUG
# Image commands
# Create an image
To create an image, use the following command:
cnvrgv2 image create --registry=REGISTRY_SLUG --name=IMAGE_NAME --tag=IMAGE_TAG
Image create command options
| Option | Short option | Value Type | Description |
|---|---|---|---|
| --name | -n | Text | Image repository name |
| --tag | -t | Text | The image tag |
| --registry | -r | Text | The slug of the registry that the image will be added to |
| --logo | -l | Text | Logo name |
| --custom | -c | Udr custom image (requires using the --dockerfile option) | |
| --readme | -rd | Text | Readme file path for the image |
| --dockerfile | -df | Text | Dockerfile path to build a custom image |
Ai Studio supports choosing one of the following logos for an image view:
| Logo name | Logo image | Logo name | Logo image | Logo name | Logo image |
|---|---|---|---|---|---|
| keras |  | tensorflow |  | sklearn |  |
| python |  | r |  | xgboost |  |
| bash |  | s3 |  | spark |  |
| opencv |  | pytorch |  | vgg |  |
| cnvrg | mxnet |  | tensor_rt |  | |
| rapids |  | nvidia |
# Get an image
To retrieve information about an image using its slug, use the following command:
cnvrgv2 image get --slug=IMAGE_SLUG
To retrieve information about an image using its name and tag, use the following command:
cnvrgv2 image get --name=IMAGE_NAME --tag=IMAGE_TAG
# List all images
To retrieve all the images in the cnvrg environment, use the following command:
cnvrgv2 image list
# Update an image
To update or modify an image, use the following command with the required combination of options corrosponding to the fields you want to modify:
cnvrgv2 image update --slug=IMAGE_SLUG
Image update command options
| Option | Short option | Value Type | Description |
|---|---|---|---|
| --slug | -s | Text | Image slug |
| --logo | -l | Text | Logo name |
| --readme | -rd | Text | Readme file path for the image |
# Delete an image
To delete an image using its slug, use the following command:
cnvrgv2 image delete --slug=IMAGE_SLUG
To delete an image using its name and tag, use the following command:
cnvrgv2 image delete --name=IMAGE_NAME --tag=IMAGE_TAG
# Members commands
# Add a new member
To add a member to the cnvrg environment, use the following command:
cnvrgv2 members add --email=MEMBER_EMAIL --role=MEMBER_ROLE
Members add command options
| Option | Short option | Value Type | Description |
|---|---|---|---|
| -e | Text | Member email | |
| --role | -r | Text | Member role, role values: admin, manager, member (corresponds to data scientist role), or reviewer |
NOTE
Admin permission is required in order to add new members
# list all members
To retrieve all the members in the environment, use the following command:
cnvrgv2 members list
# Revoke a member
To remove or revoke a user's membership to the organization, use the following command:
cnvrgv2 members revoke --email=MEMBER_EMAIL
NOTE
Admin permission is required in order to revoke user membership
# Update the role of a member
To update the role of a member in the cnvrg environment, use the following command:
cnvrgv2 members update --email=MEMBER_EMAIL --role=NEW_ROLE
NOTE
Admin permission is required in order to update user membership