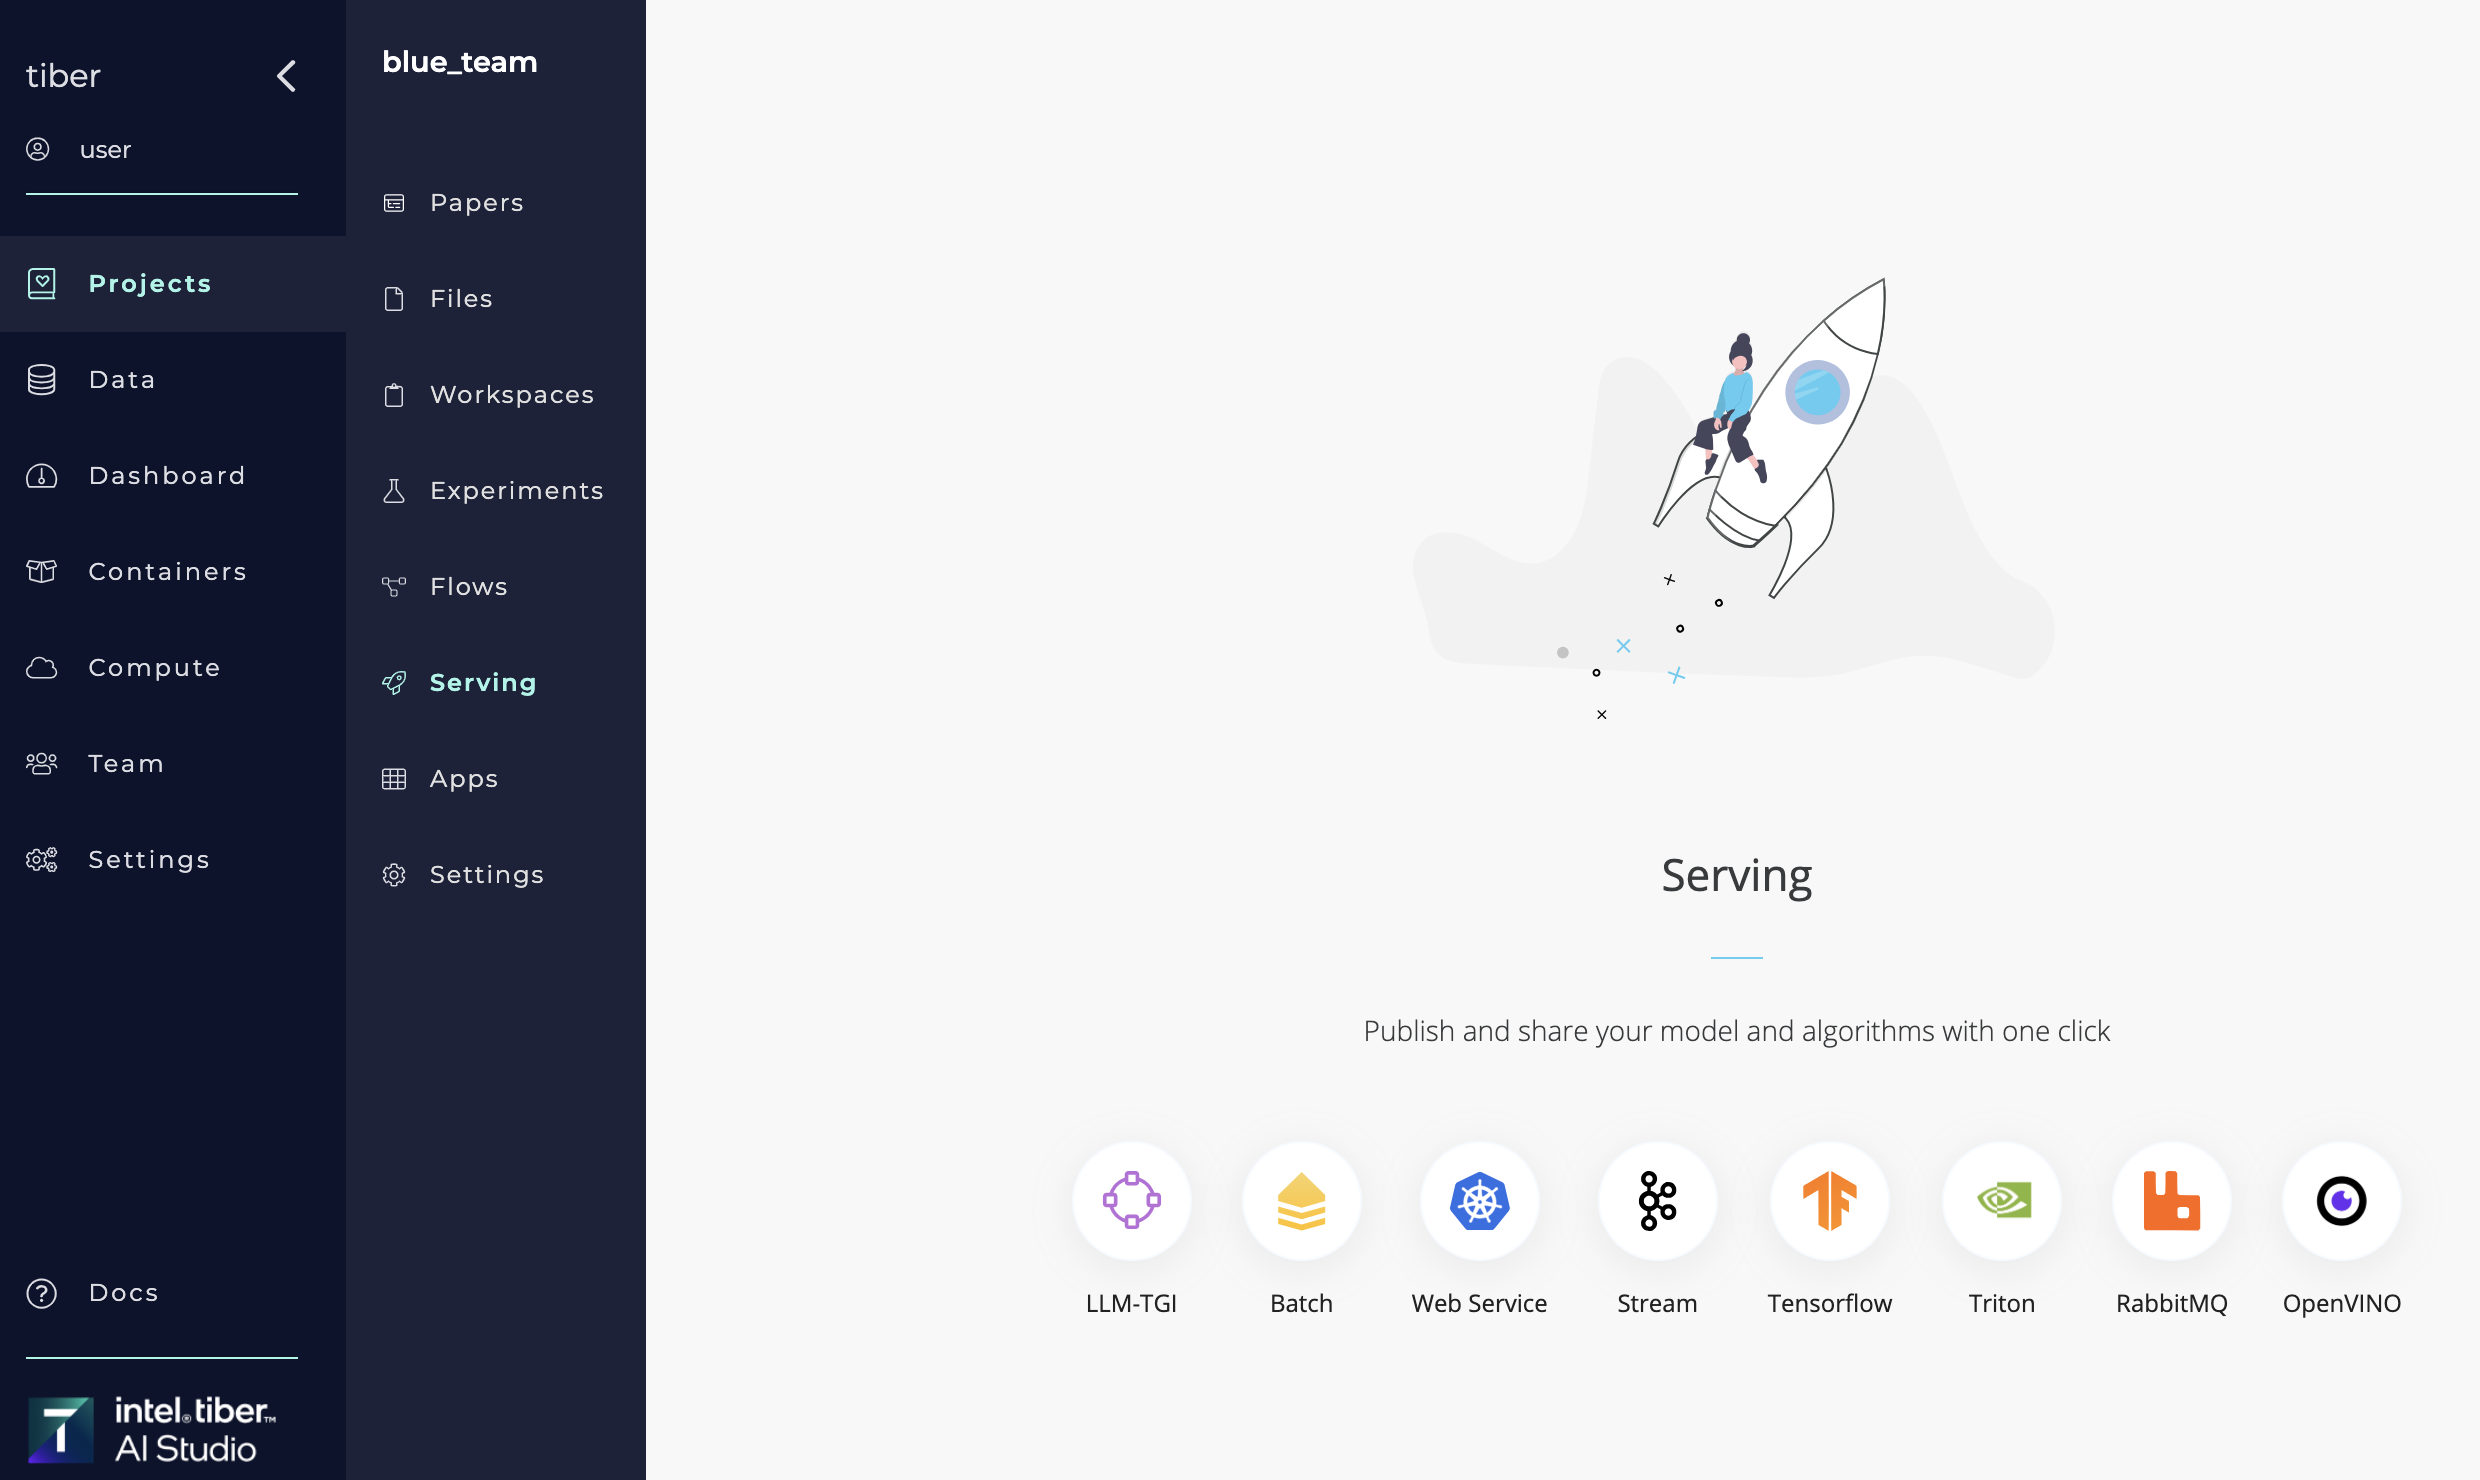
# Serving
The Intel® Tiber™ AI Studio platform facilitates rapid model publishing and deployment within Kubernetes clusters. It supports three endpoint types: web services, batch predictions, and Kafka streams, allowing for versatile integration and scalability of AI models in diverse operational environments.
For web services, AI Studio automatically encases the code and model in a lightweight REST API, exposes it to the web, generates an authentication token to protect the endpoint use, and automatically builds comprehensive model tracking and monitoring tools.
For batch predictions, AI Studio creates a model endpoint that remains inactive with zero pods until making a prediction. The endpoint then scales up as needed and scales back down after completing the prediction.
For Kafka streams, AI Studio integrates model predictions with existing Kafka streams, ingests them, and performs real-time predictions with complex model monitoring features.
The topics in this page:
- Service Requirements
- Web Services
- Batch Predictions
- Kafka Streams
- LLM - TGI
- Generic Endpoint
- Charts
- Logs, Endpoint Data, and Feedback Loops
- Monitoring Systems
- Endpoint Reruns
- Model Updates
- Endpoint Updates with Flows
- File Inputs
- Canary Release
- Continual Learning (Triggers)
- Endpoint Configuration Options
- Stream Output
# Service Requirements
Developing AI Studio services involves a straightforward process. However, specific requirements must be adhered to in order to ensure the proper functionality of the endpoint service.
# Predict function
Before deploying an endpoint, complete the following predict function-related steps to ensure the code adheres to AI Studio requirements:
Create a predict function that queries the supplied model and returns the output as a simple object or a type compatible to a Flask's Jsonify function.
Note: You cannot return an existing Jsonify object as AI Studio performs this function.
Reference the predict function's query similarly to this:
def predict(*input):, as AI Studio sends the query's input to your code exactly as entered. Note: The name of the file containing the function cannot contain a dash (-) in it.Enable Function accepts file as input for the service to expect a Base64 encoded file, which AI Studio then decodes and passes to the predict function.
TIP
Because AI Studio constructs the service using the code supplied, users can execute any script within the predict function from their Git repository and project files. This allows users to process inputs and trigger other logic in addition to querying their model.
# Predict function examples
The following sections list several predict function examples:
Example 1: Receiving a sentence for sentiment analysis and processing it before using the model.
def predict(sentence):
    encoded = encode_sentence(sentence)
    pred = np.array([encoded])
    pred = vectorize_sequences(pred)
    a = model.predict(pred)
    return str(a[0][0])
Example 2: Receiving an array and parsing it before using the model.
def predict(*data):
    data = np.asarray(data)
    a=model.predict(data)
    return round(a[0][0],0)
Example 3: Receiving a file and processing it before using the model.
def predict(file_path):
    img = load_img(file_path, grayscale=True, target_size=(28, 28))
    img = img_to_array(img)
    img = img.reshape(1, 28, 28, 1)
    img = img.astype('float32')
    img = img / 255.0
    digit = model.predict_classes(img)
    return str(digit[0])
Example 4: Receiving multiple parameters.
def predict(a, b, c):
    prediction = model.predict(a, b)
    result = prediction[0] - c
    return str(result)
# Preprocess Function
All endpoints can optionally include a preprocessing function. Similar to the predict function, the preprocess function receives and processes all inputs. Afterward, the preprocess function's output is then used as the input for the predict function.
This simplifies applying any processing on the inputs that may be required before making the prediction.
The same requirements that apply to a prediction function also apply to the preprocessing function. However, the output of the preprocessing function must be verified as compatible input for the prediction function.
# Web Services
The AI Studio platform enables users to set up a real-time web service. Users provide their code and model, and AI Studio encases it in a lightweight REST API service and enables it to be queried easily through the web.
All that is required is a compatible predict function and optionally a preprocess function that processes each input before making the prediction.
The AI Studio software sets up the network requirements and deploys the service to Kubernetes, allowing autoscaling to be leveraged, ensuring all incoming traffic can be accommodated, and adding an authentication token to secure access. Additionally, AI Studio provides an entire suite of monitoring tools to simplify the process of managing a web service and its performance.
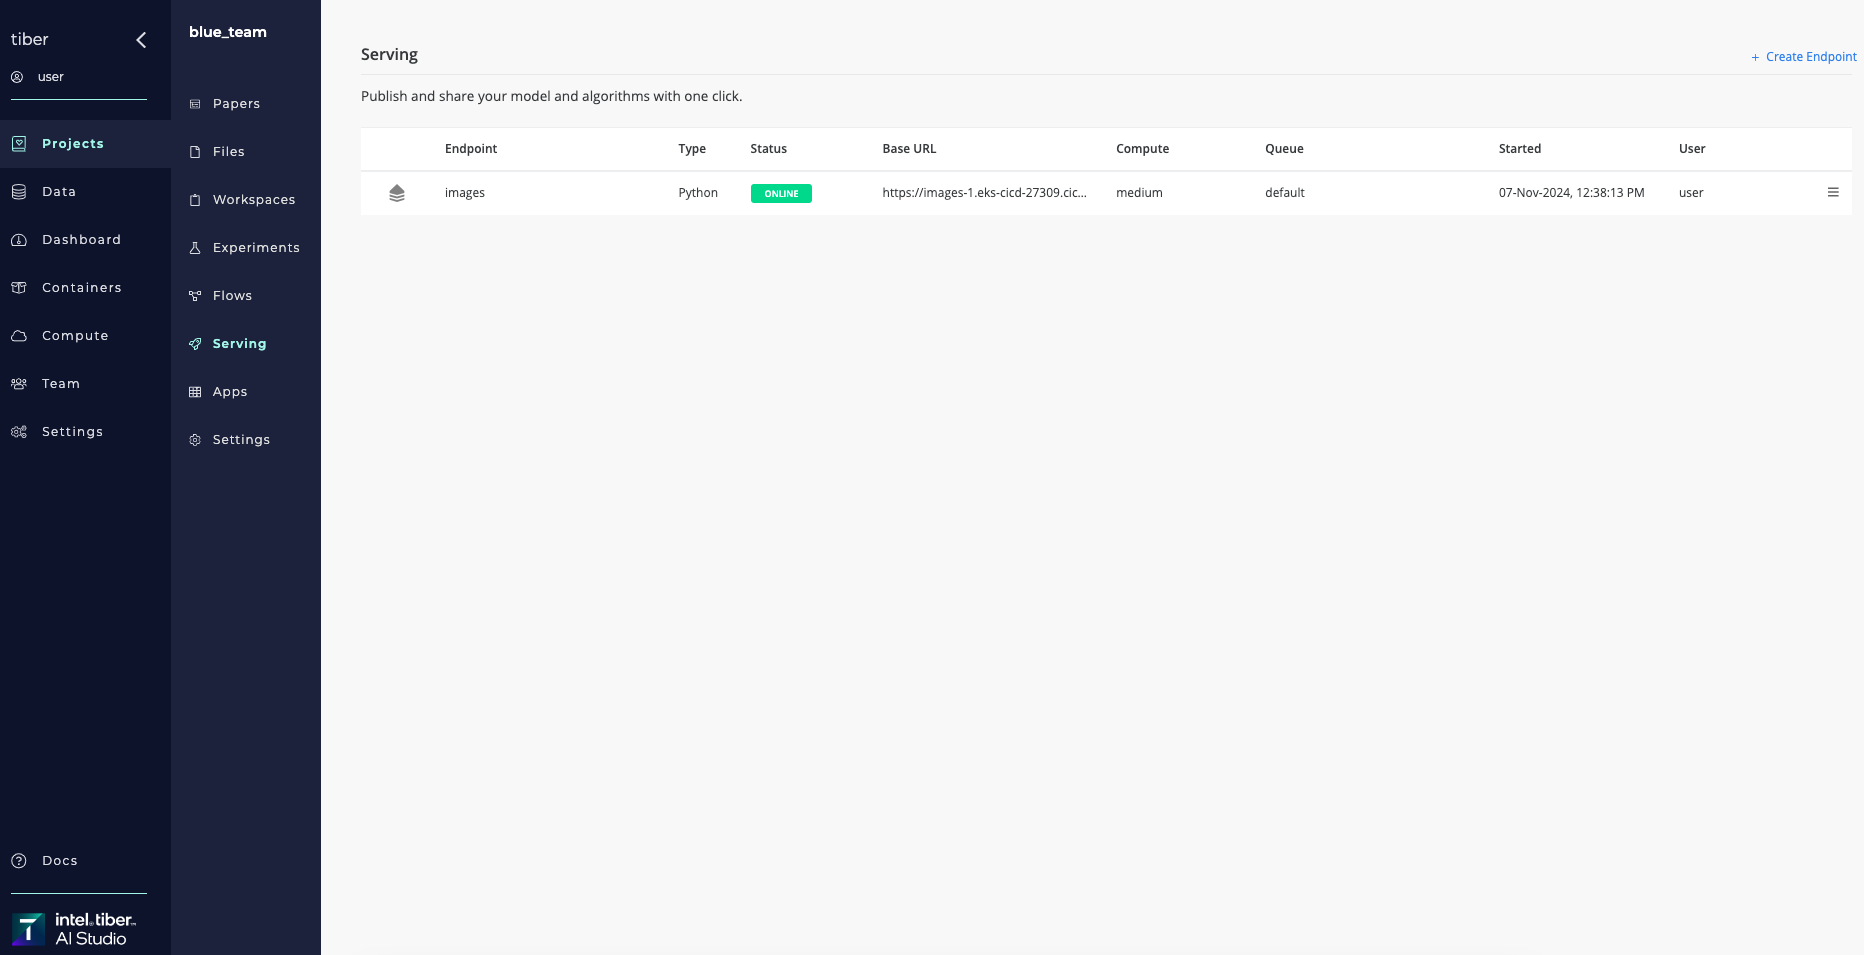
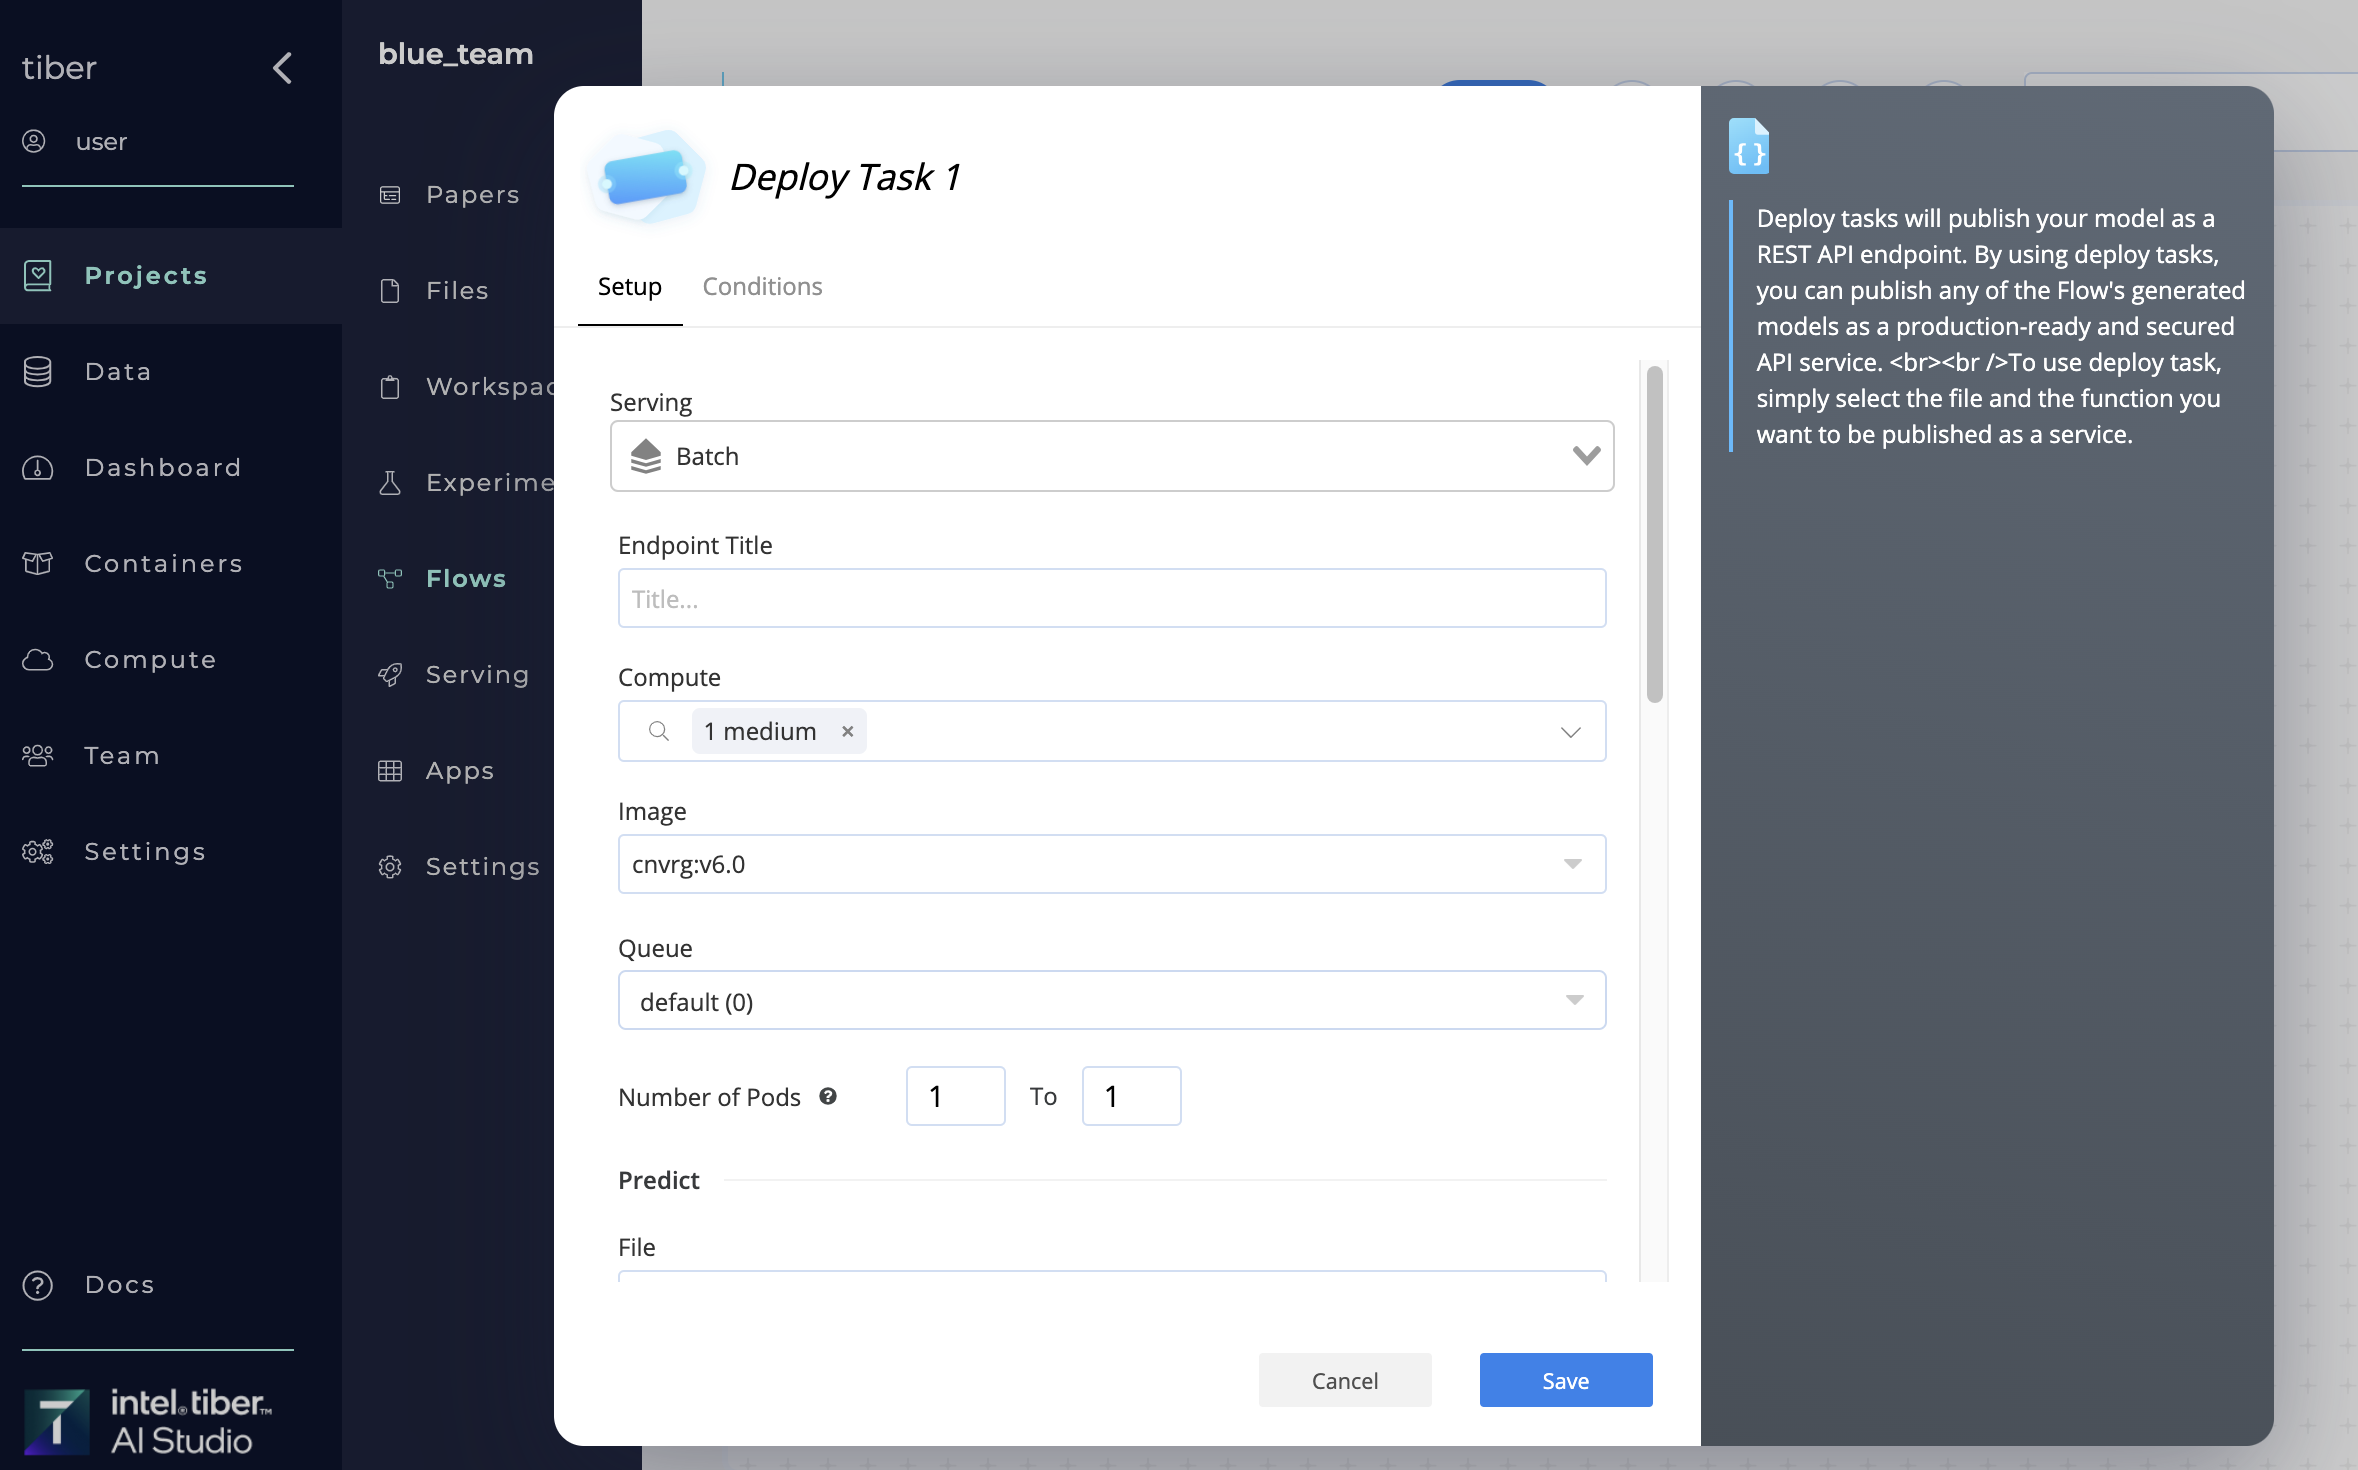
# Publishing a new web service endpoint
A new AI Studio web service endpoint can be created in two ways:
- Using the Serving tab to publish a new model
- Using a Deploy Task in a flow


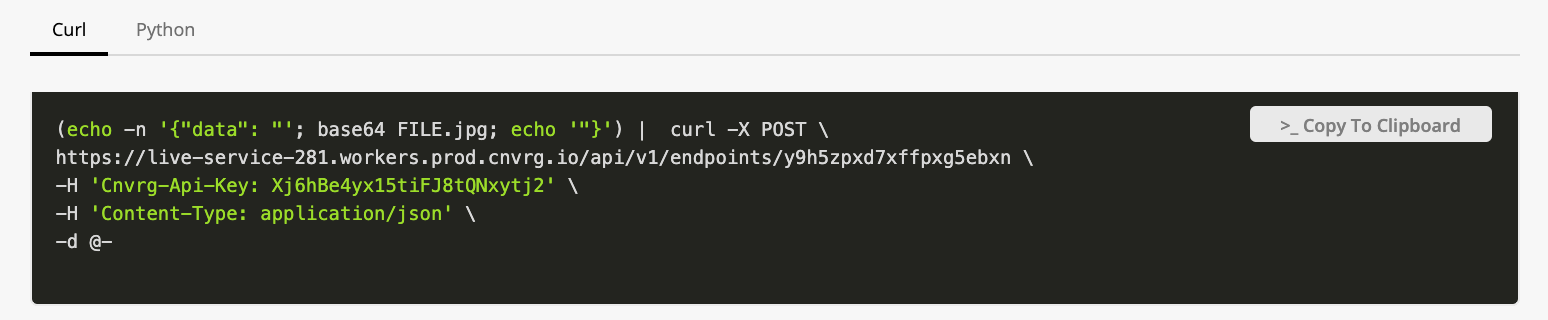
# Querying a web service
A AI Studio service can be queried using two main methods:
- Using API calls
- Using the Python SDK
# Batch Predictions
The AI Studio platform helps users set up the required infrastructure to easily query their models with batch predictions. The software takes the code and model and encases it in a lightweight REST API service, enabling it to be queried easily through the web. However, when not in use, the service scales down to zero pods, preventing compute resource usage while not making predictions.
The service also enables each batch prediction to be tracked. A batch predict endpoint includes the same AI Studio monitoring and tracking features as web services and Kafka streams.
All that is required is to provide a compatible predict function. Optionally, use a preprocess function to process each input before making the prediction.
The AI Studio software tracks all the batch predictions made to the endpoint. Click the Predictions tab to display the Predictions section and view all the batch predictions that ran using the specific endpoint.
Click a Batch Predict Title to display the Experiments page for a specific prediction. Clicking the Compare All button displays a comparison of all of the batch prediction experiments.
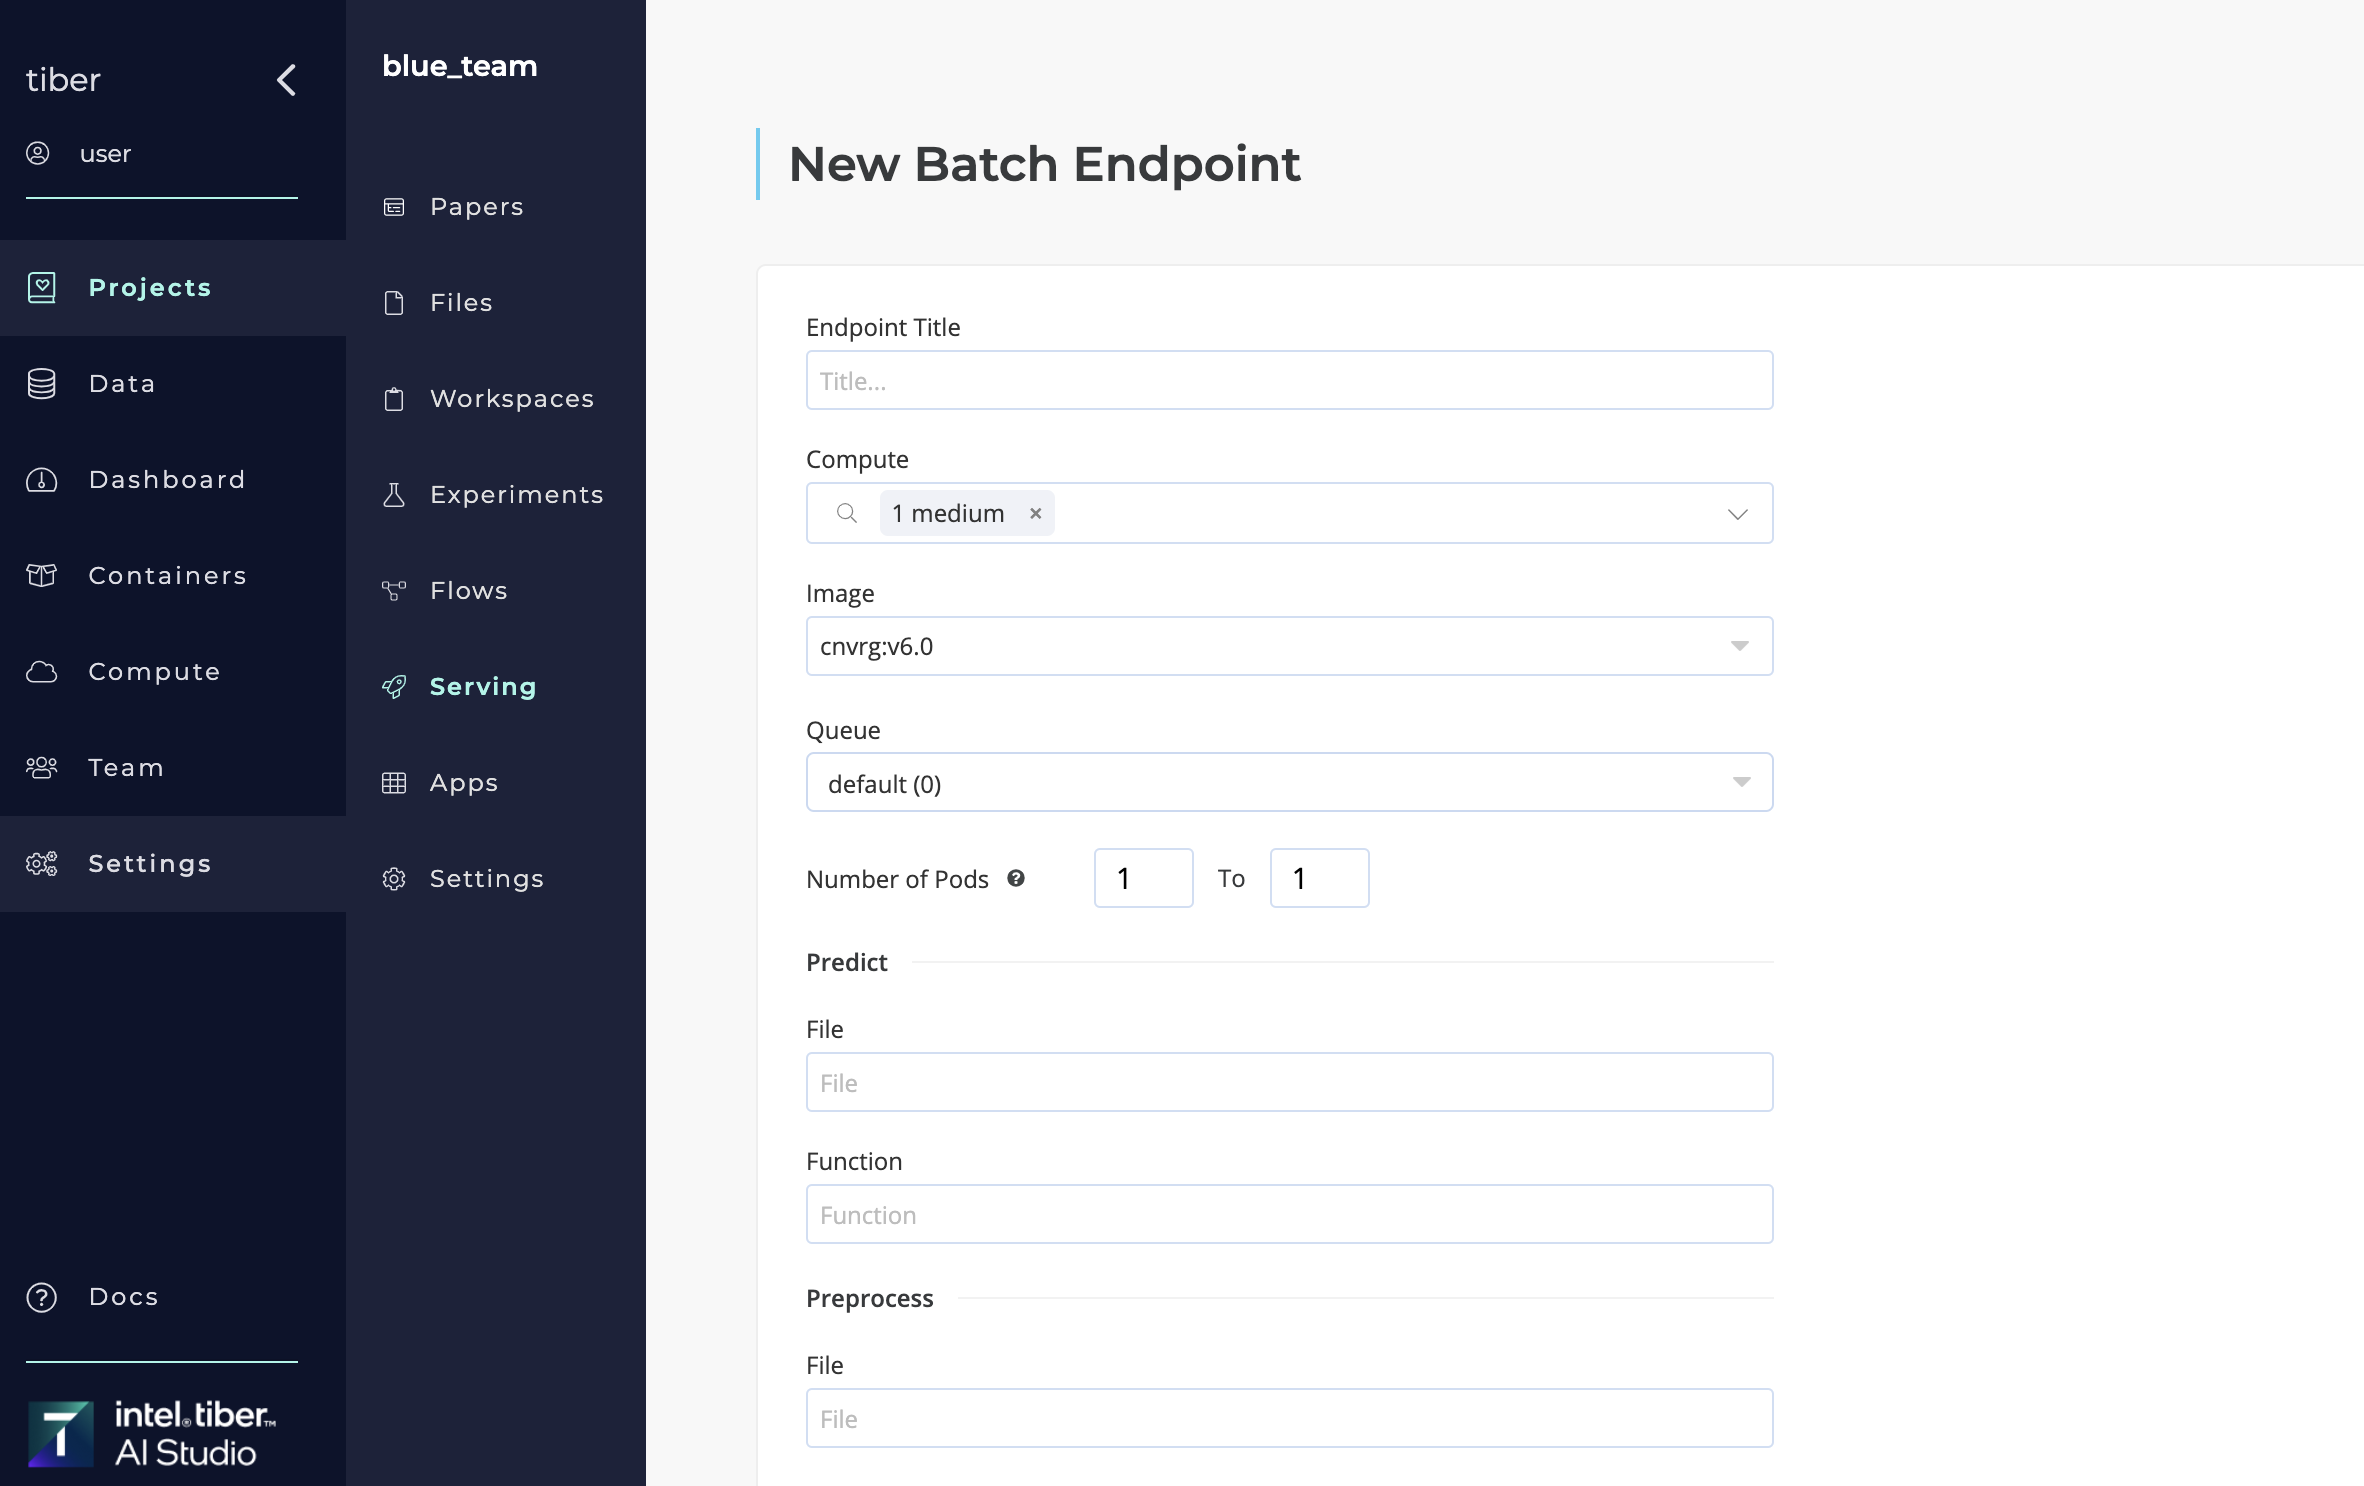
# Publishing a new batch predict endpoint
A new AI Studio batch prediction endpoint can be created in two ways:
- Using the Serving tab to publish a new model
- Using a Deploy Task in a flow
# Performing a batch prediction
A AI Studio batch prediction endpoint can be conducted using the Batch Predict AI Library In a flow
When running the library, AI Studio scales up the selected batch-predict endpoint and makes a batch prediction using the CSV input file. Then, AI Studio saves the output predictions in a new output CSV file and syncs it with the selected dataset.
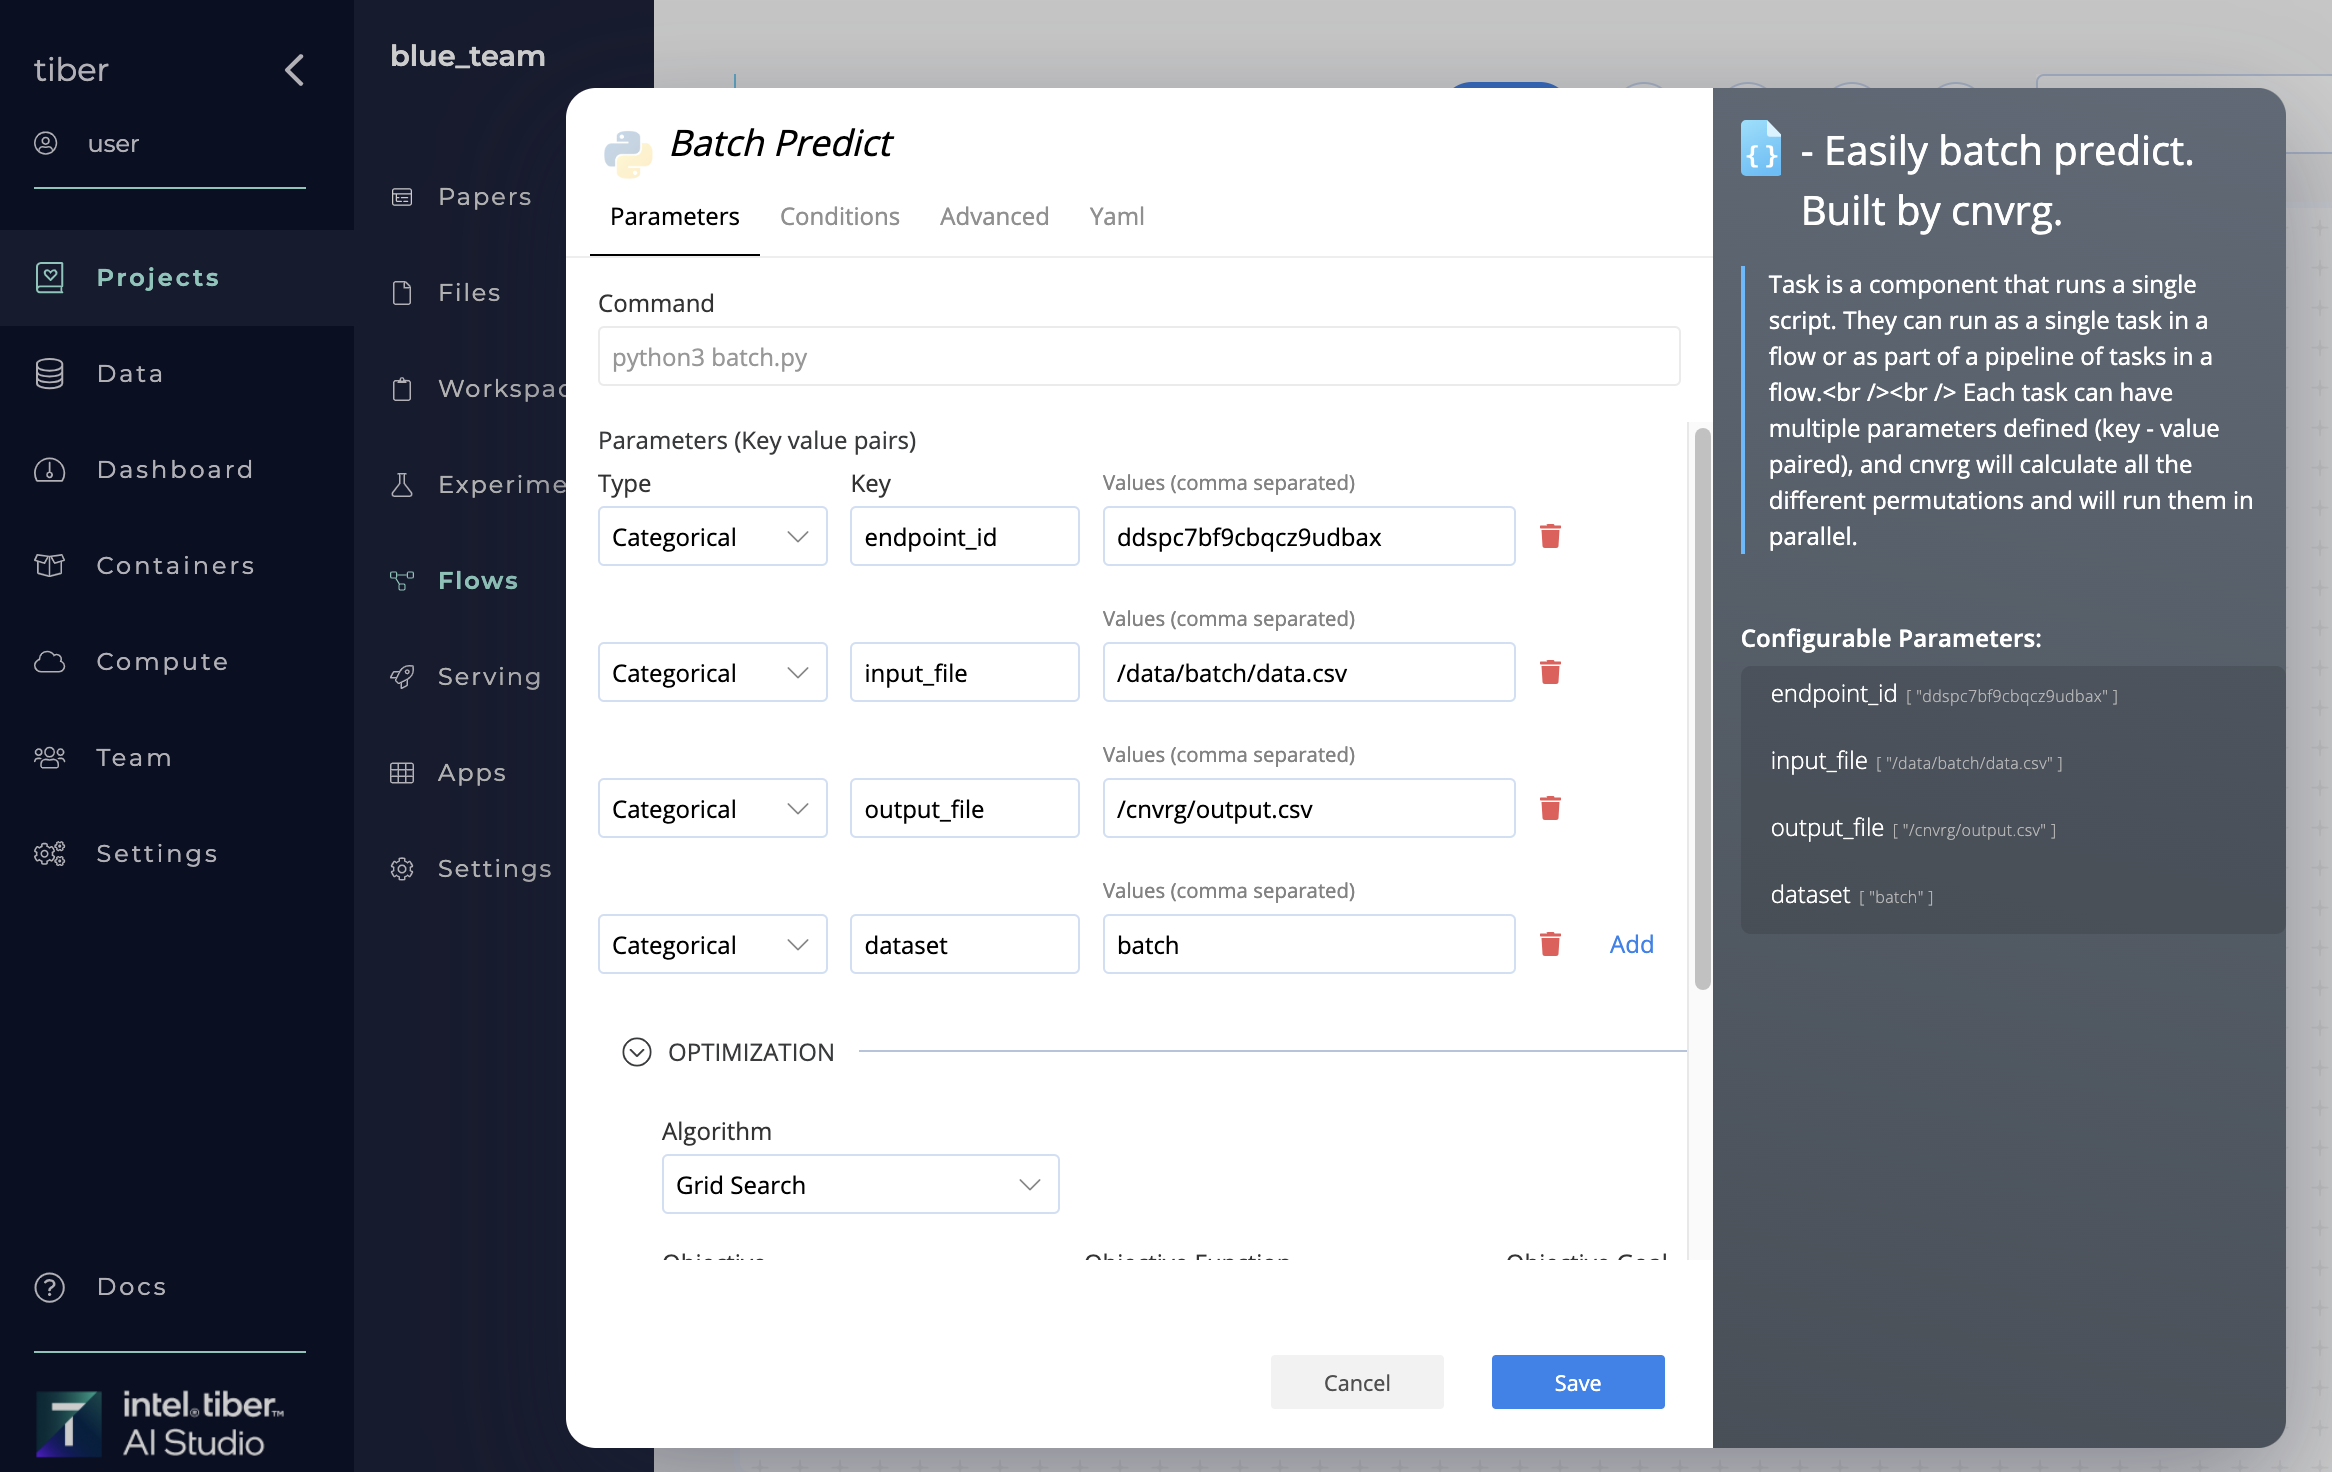
The AI Library has four parameters:
endpoint_id: The name of the batch-predict endpoint being used. Note: The endpoint must already be deployed.input_file: The path of a CSV file containing the data for the batch prediction.output_file: The path of the CSV output file, which must not start with a/. For example,output/predictions.csv.dataset: The name of an existing dataset where the output CSV uploads.
Complete the following steps to make a batch prediction using a flow:
- Click the Flows tab of the project.
- Open an existing flow or click New Flow to create a new one.
- Select New Task > Batch Predict.
- Provide the required key-value pair parameters as shown in the above screenshot.
- Click Save Changes.
- Add further tasks to the flow if required.
- Click Run to begin the batch prediction and run the flow. The flow is run and the batch prediction is made.
# Kafka Streams
The AI Studio platform supports users integrating their model predictions with existing Kafka streams, ingesting these streams, and performing real-time predictions using complex model monitoring features.
Kafka is an open source library that allows low-latency streaming of data with zero batching. This streaming can be useful for moving and processing data as soon as it is ingested, avoiding complex triggering and scheduling as data comes in. With the AI Studio integration, real-time model predictions on a Kafka stream can be performed using all incoming data. Both Kafka and AI Studio leverage clusters and scaling technology, ensuring that a service can manage any incoming demand.
Kafka streaming functionality has the following requirements:
- A compatible predict function, with input in the format of
bytesliteral. - A running Kafka service that includes:
- A Kafka broker
- Input topics
- An output topic
Optionally, use a preprocessing function that processes each input before making the prediction.
The AI Studio software streams the data from the input topics to the model using the predict function and streams the output back to the output topic.
Using Kafka streams with AI Studio enables real-time predictions while also leveraging all the other AI Studio model tracking features such as logs, a/b testing, canary deployment, flow integrations, and continual learning.
# Streaming with Kafka
When starting a new Kafka stream endpoint, the model makes predictions on messages at the latest point on the input stream. This means the predictions are made only on new entries to the input stream received after the endpoint has been deployed.
When deploying a new model into production for an existing endpoint, the old model is used until the new model is deployed. Then, the new model continues making predictions from the same point on the input stream where the previous model finished. This ensures zero downtime and complete data continuity.
# Autoscaling with Kafka
As with web service endpoints,AI Studios autoscaling for Kafka streams. As Kafka streams are backed by Kubernetes, AI Studio automatically replicates the service to accommodate for incoming demand, resulting in a powerful and stable service.
To control the lower and upper bounds for the autoscaling feature, set the Number of Pods to indicate the minimum and maximum number of pods for the stream. The maximum number of pods is bounded by the number of partitions of the input topics.
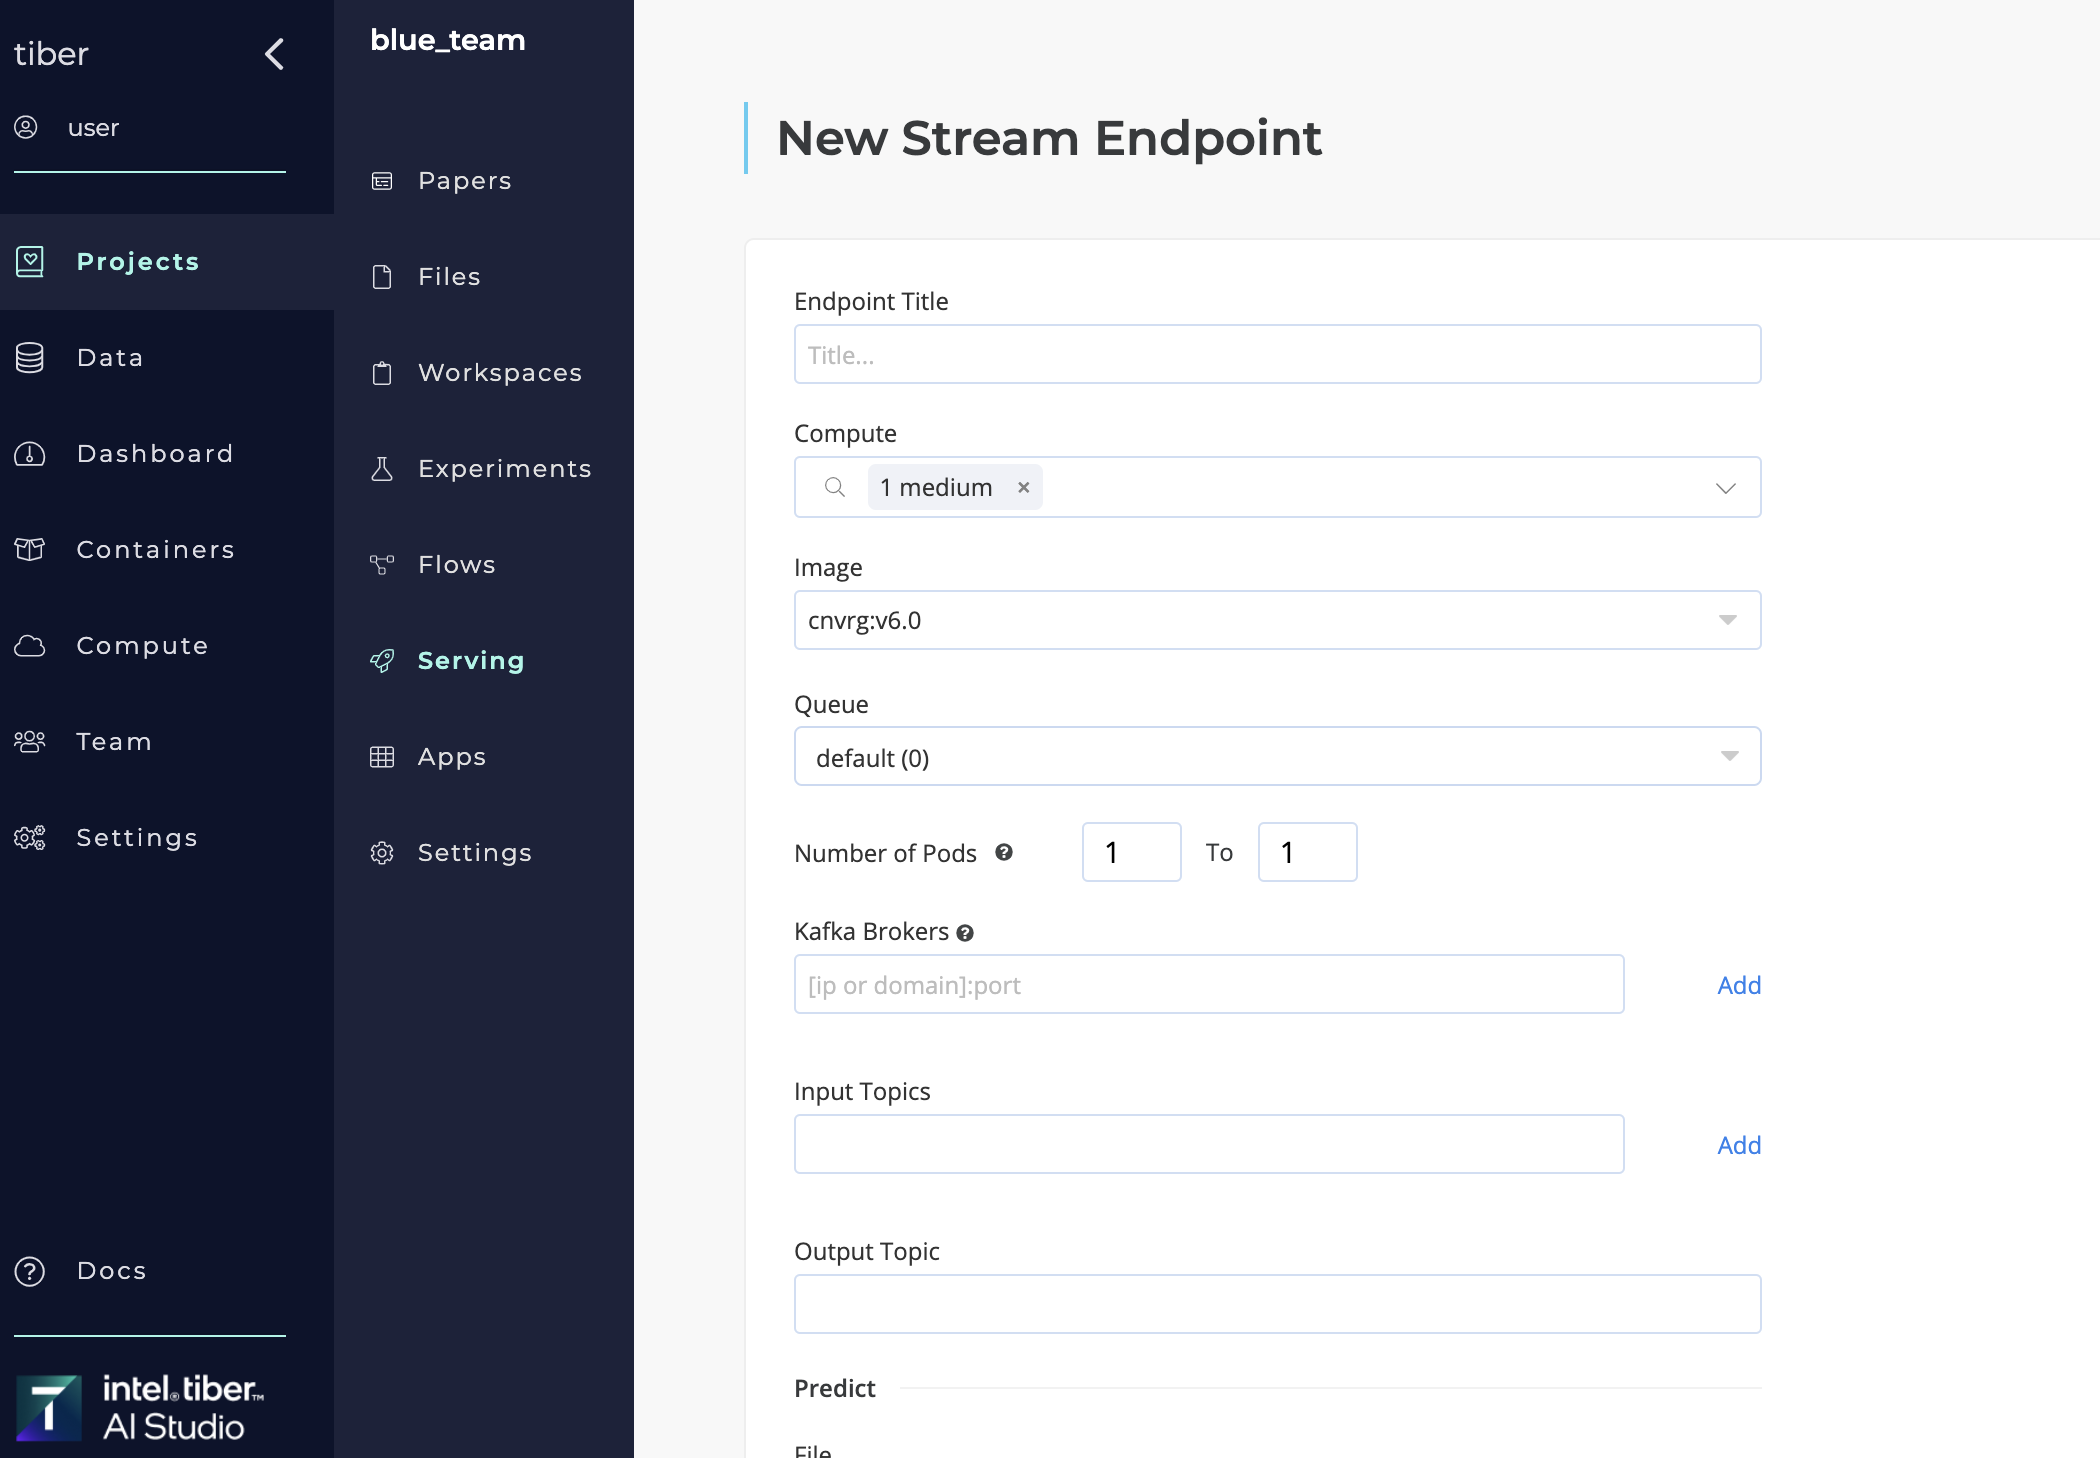
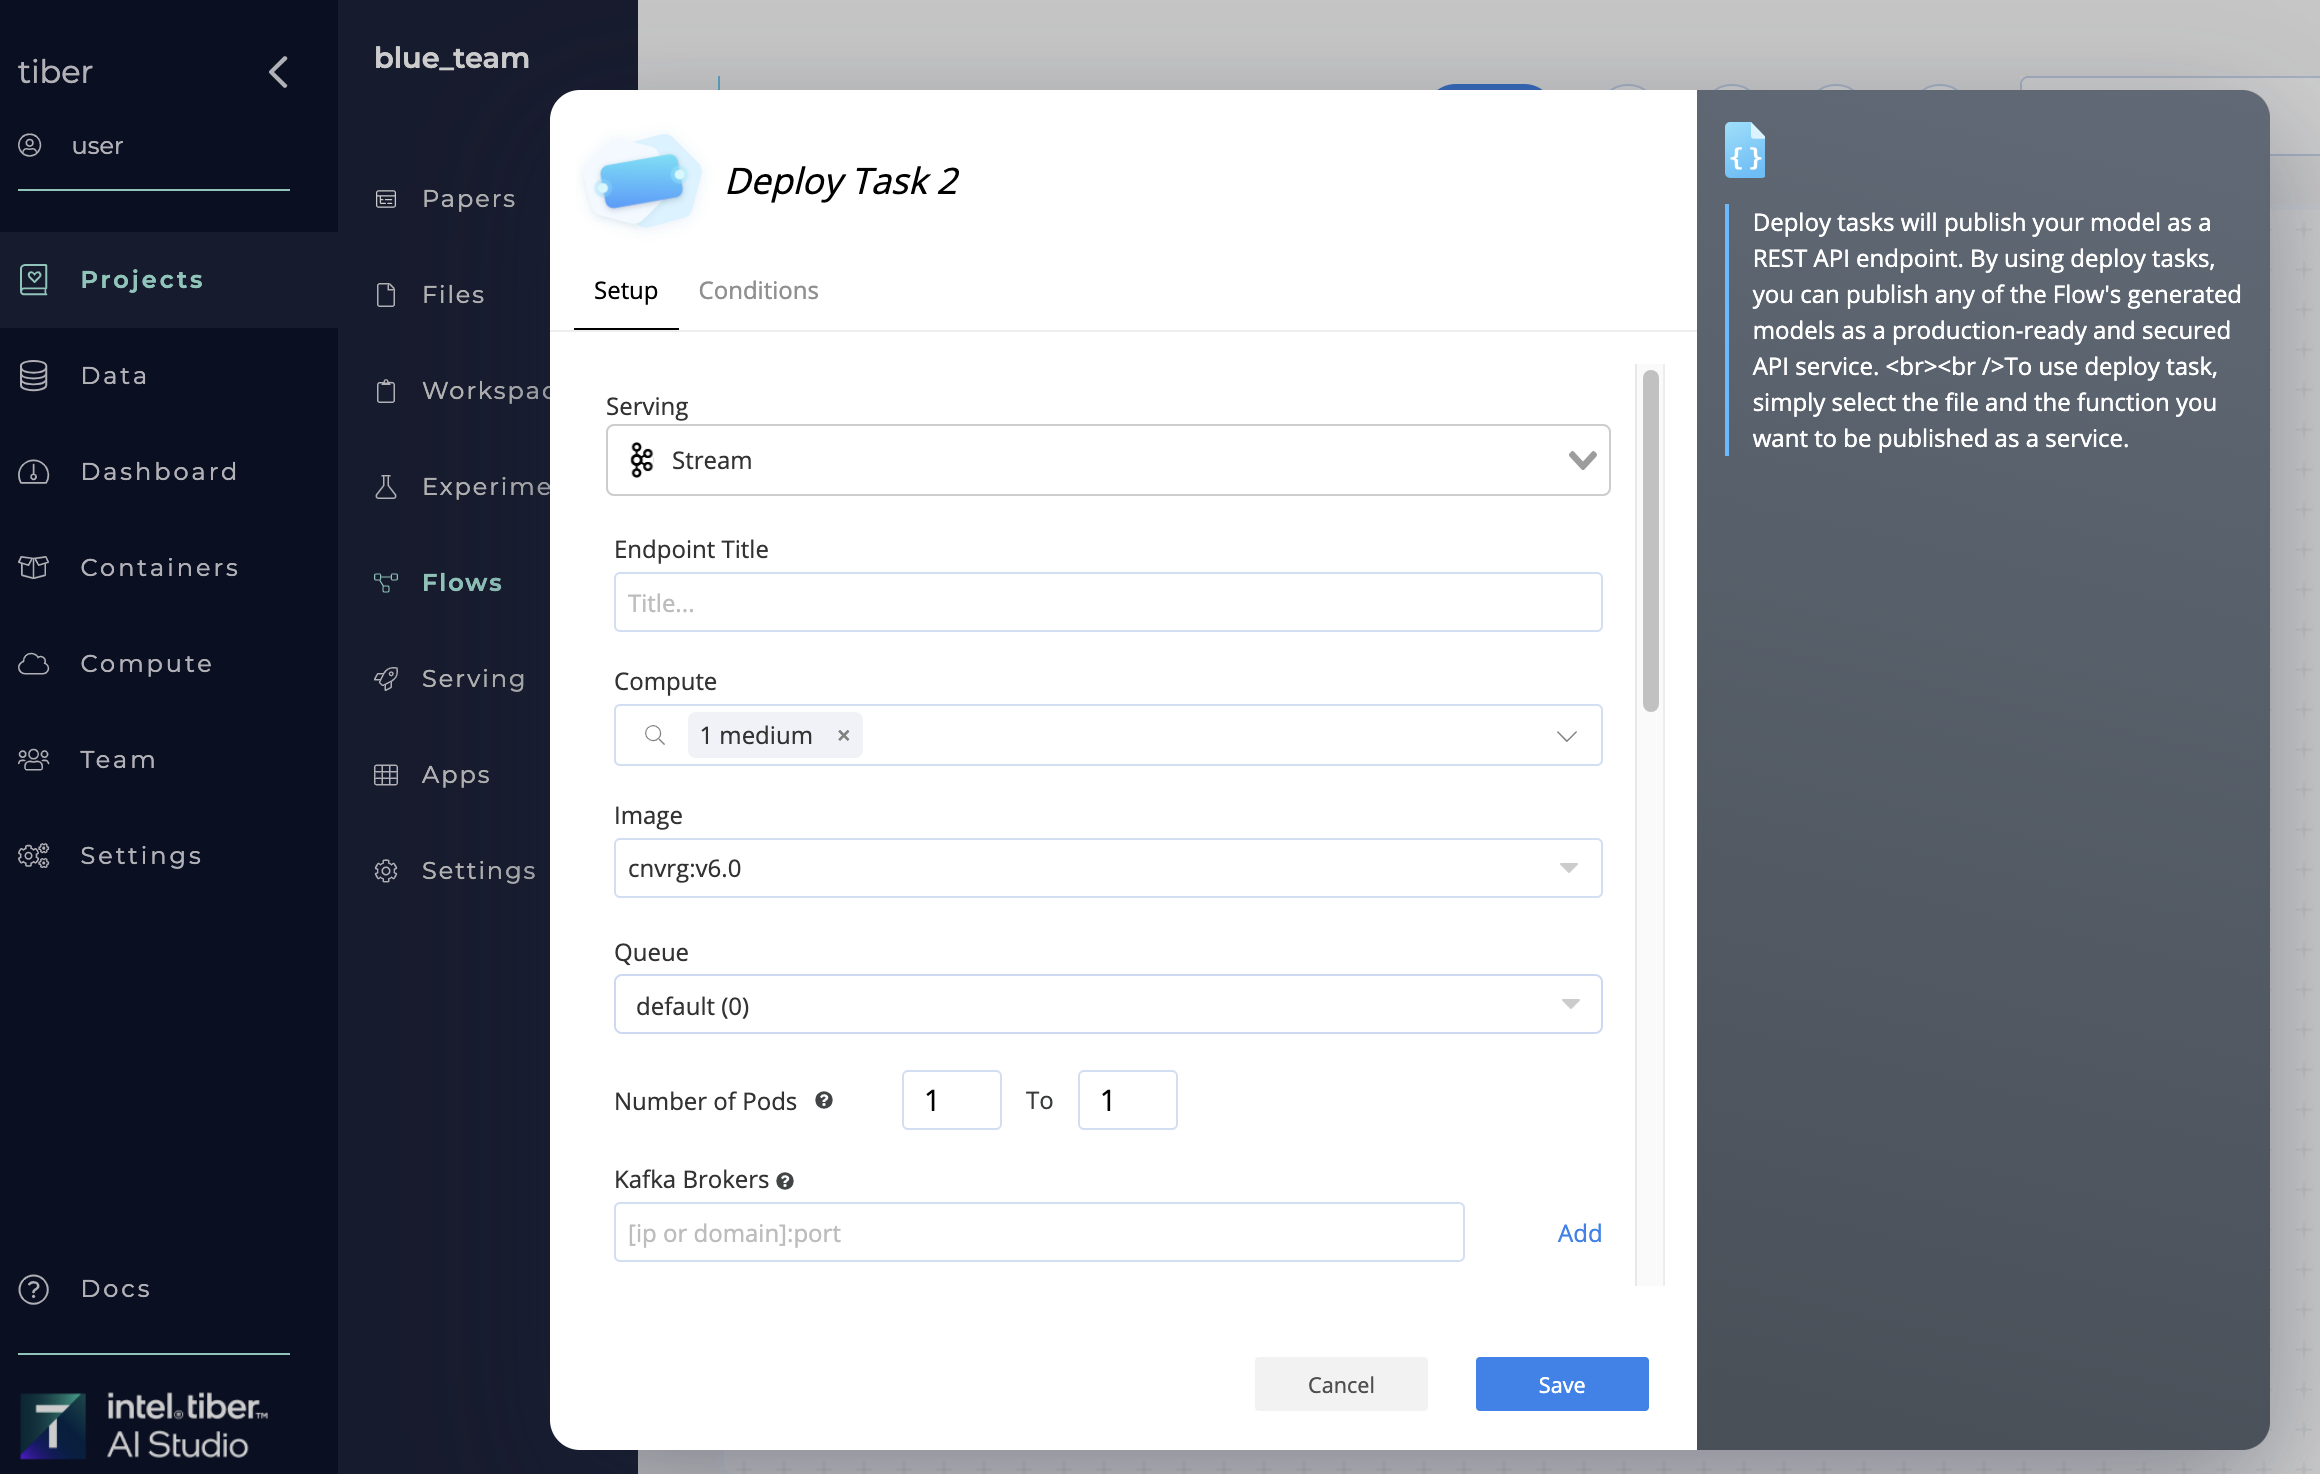
# Publishing a new Kafka Stream
A new AI Studio Kafka stream can be created in two ways:
- Using the Serving tab to publish a new model
- Using a Deploy Task in a flow
# LLM - TGI
The AI Studio platform enables users to deploy large language models (LLMs) with ease through a ready-to-use LLM endpoint. This feature allows users to deploy LLMs quickly, with minimal setup, facilitating rapid experimentation and adoption of generative AI.
To deploy an LLM, you simply need to select a pre-defined configuration or customize the endpoint as needed. The AI Studio software manages the deployment process, providing a fully operational API endpoint ready for integration into applications.
# Publishing a New LLM Endpoint
A new LLM endpoint can be created in three ways:
- Using the LLM Endpoint from the Serving Page: Navigate to the Serving page in your project and select LLM-TGI.
- Using a Deploy Task in a Flow: Automate the deployment of the LLM endpoint within a flow.
- Using the SDK
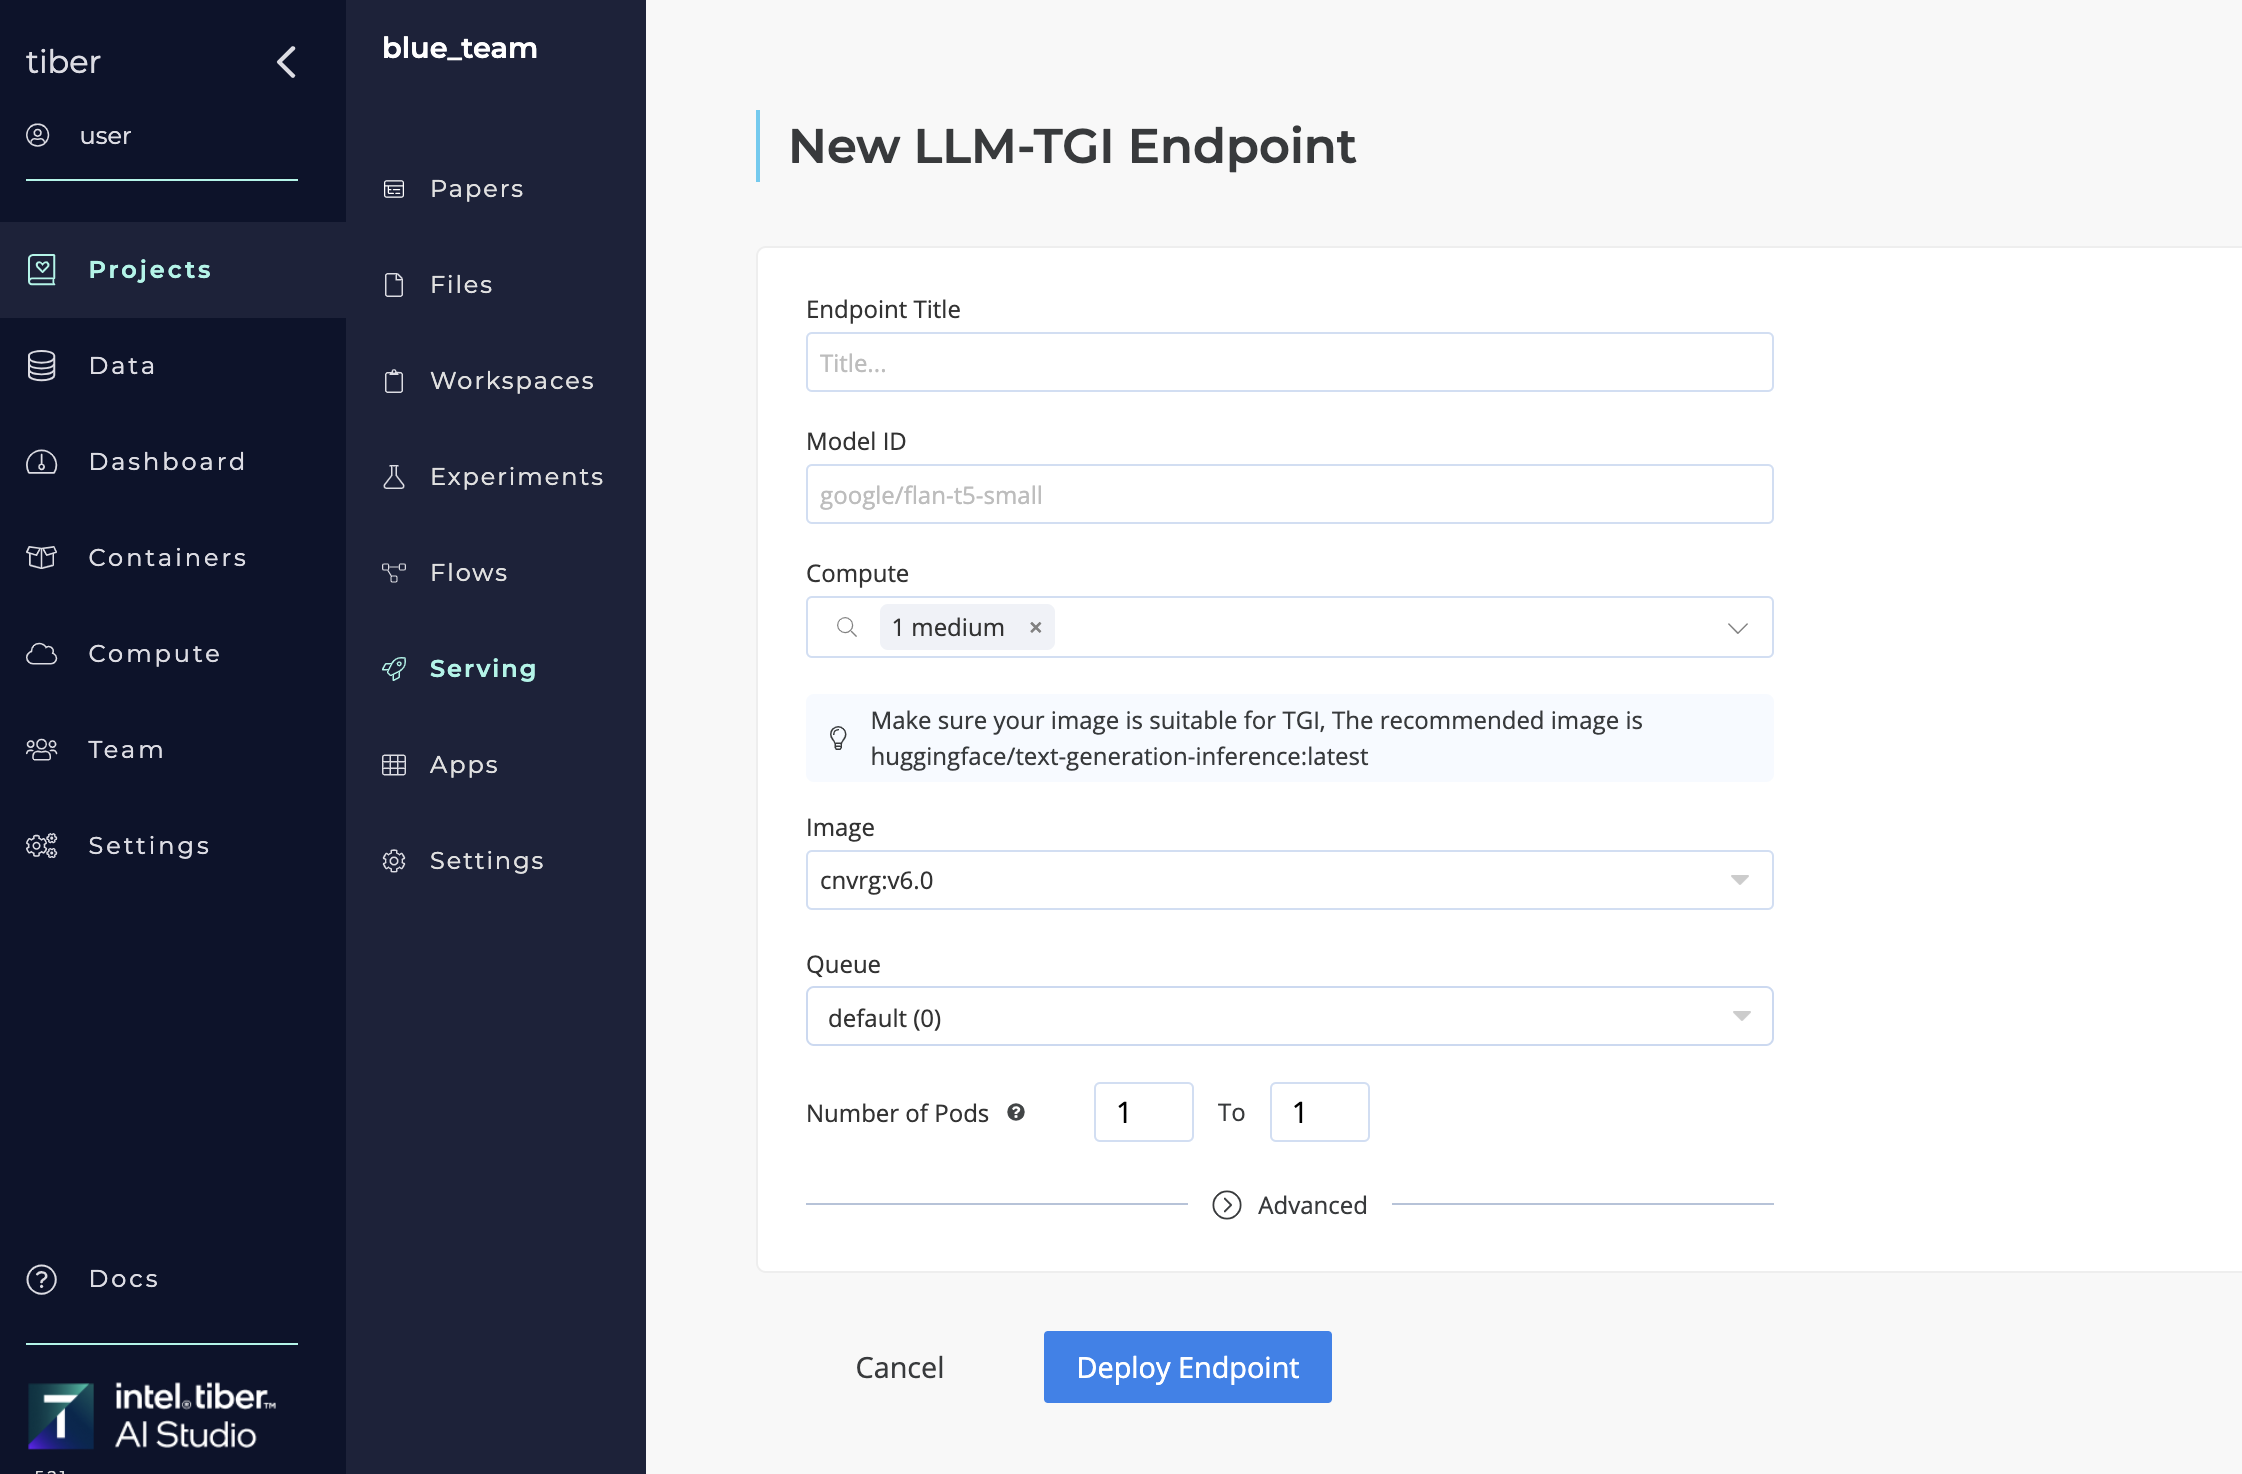 To set up an LLM endpoint using TGI, follow these steps:
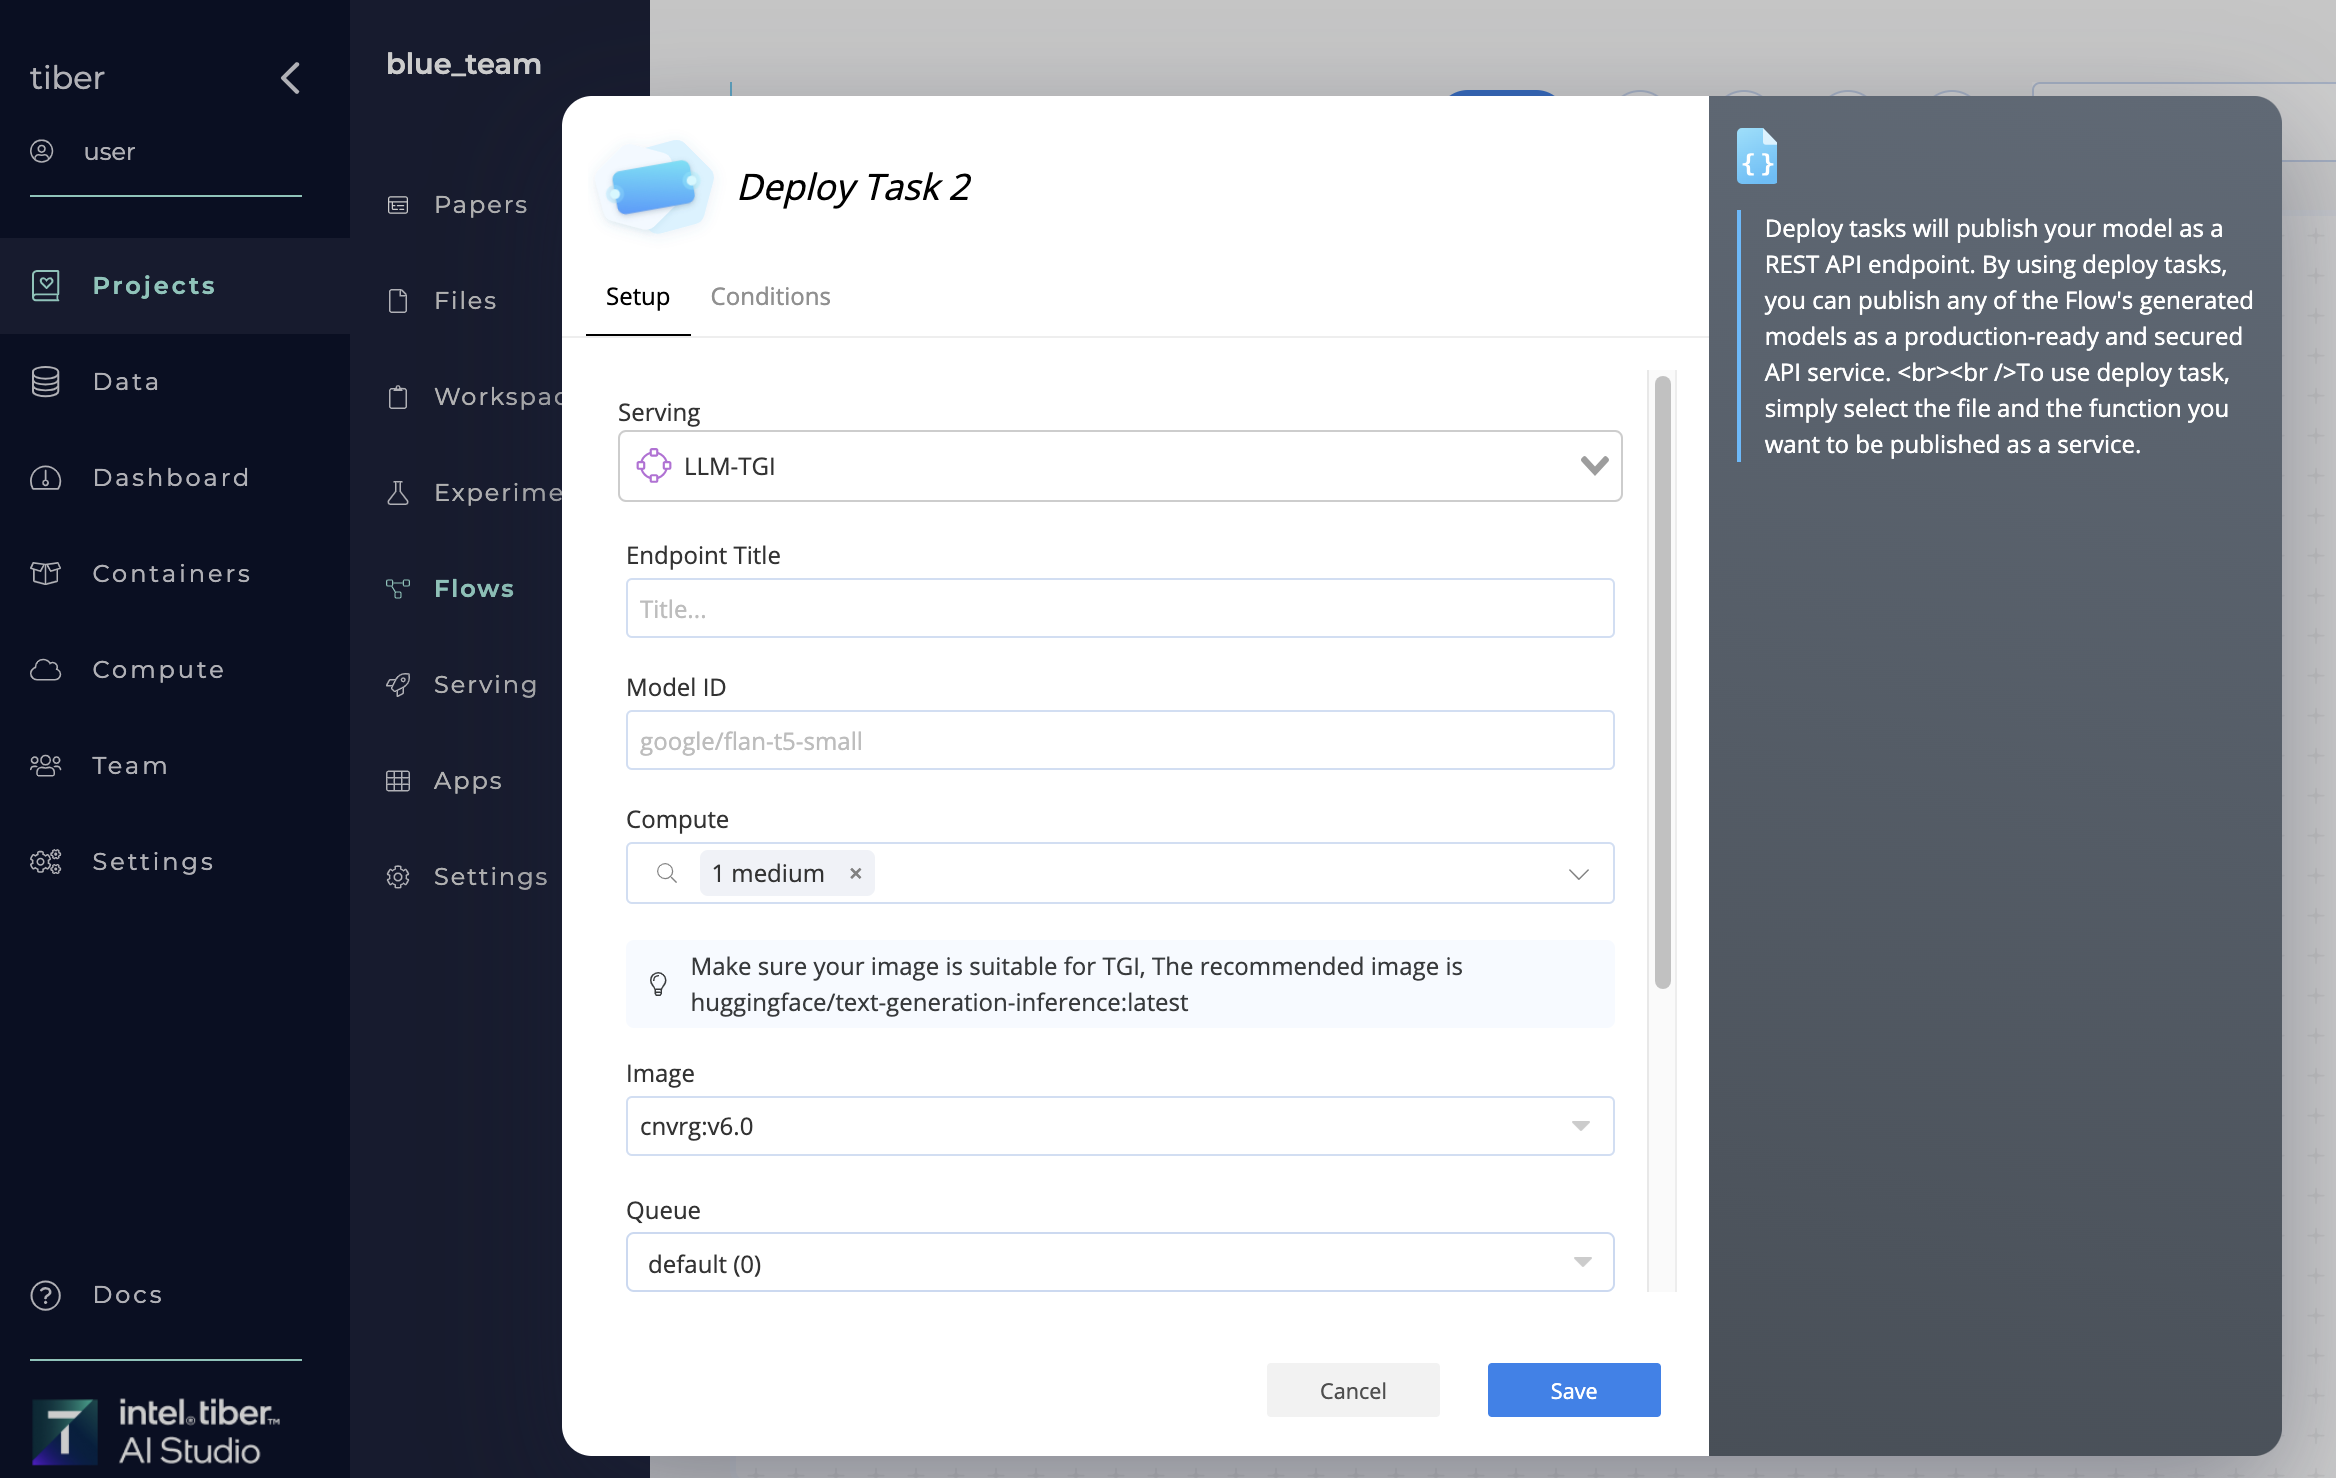
# Generic Endpoint
The Intel® Tiber™ AI Studio platform also supports the deployment of generic endpoints, offering flexibility for a wide range of applications. This feature allows users to deploy custom services and commands, providing control over the endpoint setup.
To deploy a Generic Endpoint, users simply need to configure the command to be executed. The cnvrg software manages the deployment process, ensuring a fully operational API endpoint ready for integration into various workflows. Publishing a New Generic Endpoint
A new Generic Endpoint can be created in three ways:
- Using the Generic Endpoint from the Serving Page: Navigate to the Serving page in your project and select Generic.
- Using a Deploy Task in a Flow: Automate the deployment of the generic endpoint within a flow.
- Using the SDK
# Publishing Generic Endpoint
 To set up a Generic Endpoint, follow these steps:
- Click Serving in your Project: Navigate to the Serving section.
- Select Generic: Choose Generic as your service type.
- Enter the title of the endpoint.
- Scaling: Set the minimum and maximum number of pods for scaling.
- Enter the Generic Command (example: /app/run_script.sh)
- Select Image: Choose a relevant Docker image or a custom image that suits your application. Recommended Image: Use a base image that contains all the necessary dependencies for your command.
- Select Compute: Choose the appropriate compute resources to run your application.
- Click Deploy Endpoint: cnvrg will deploy your generic endpoint based on the provided configuration.
# Customizing Your Deployment (Advanced)
Under Advanced, you can customize your deployment by specifying parameters such as the arguments:
- Commit SHA1: Define the project commit SHA1 or Git branch and commit
# Stream Output
After the endpoint is deployed, you can change the output format from streaming to chunked.
The default output is set to stream.
To change this, modify the command in the ‘How to Integrate with Your Code’ section by removing the "_stream" suffix.

# Charts
To simplify tracking a service,AI Studios automatic and custom tracking on all endpoints, which can be found in the service's Charts tab.
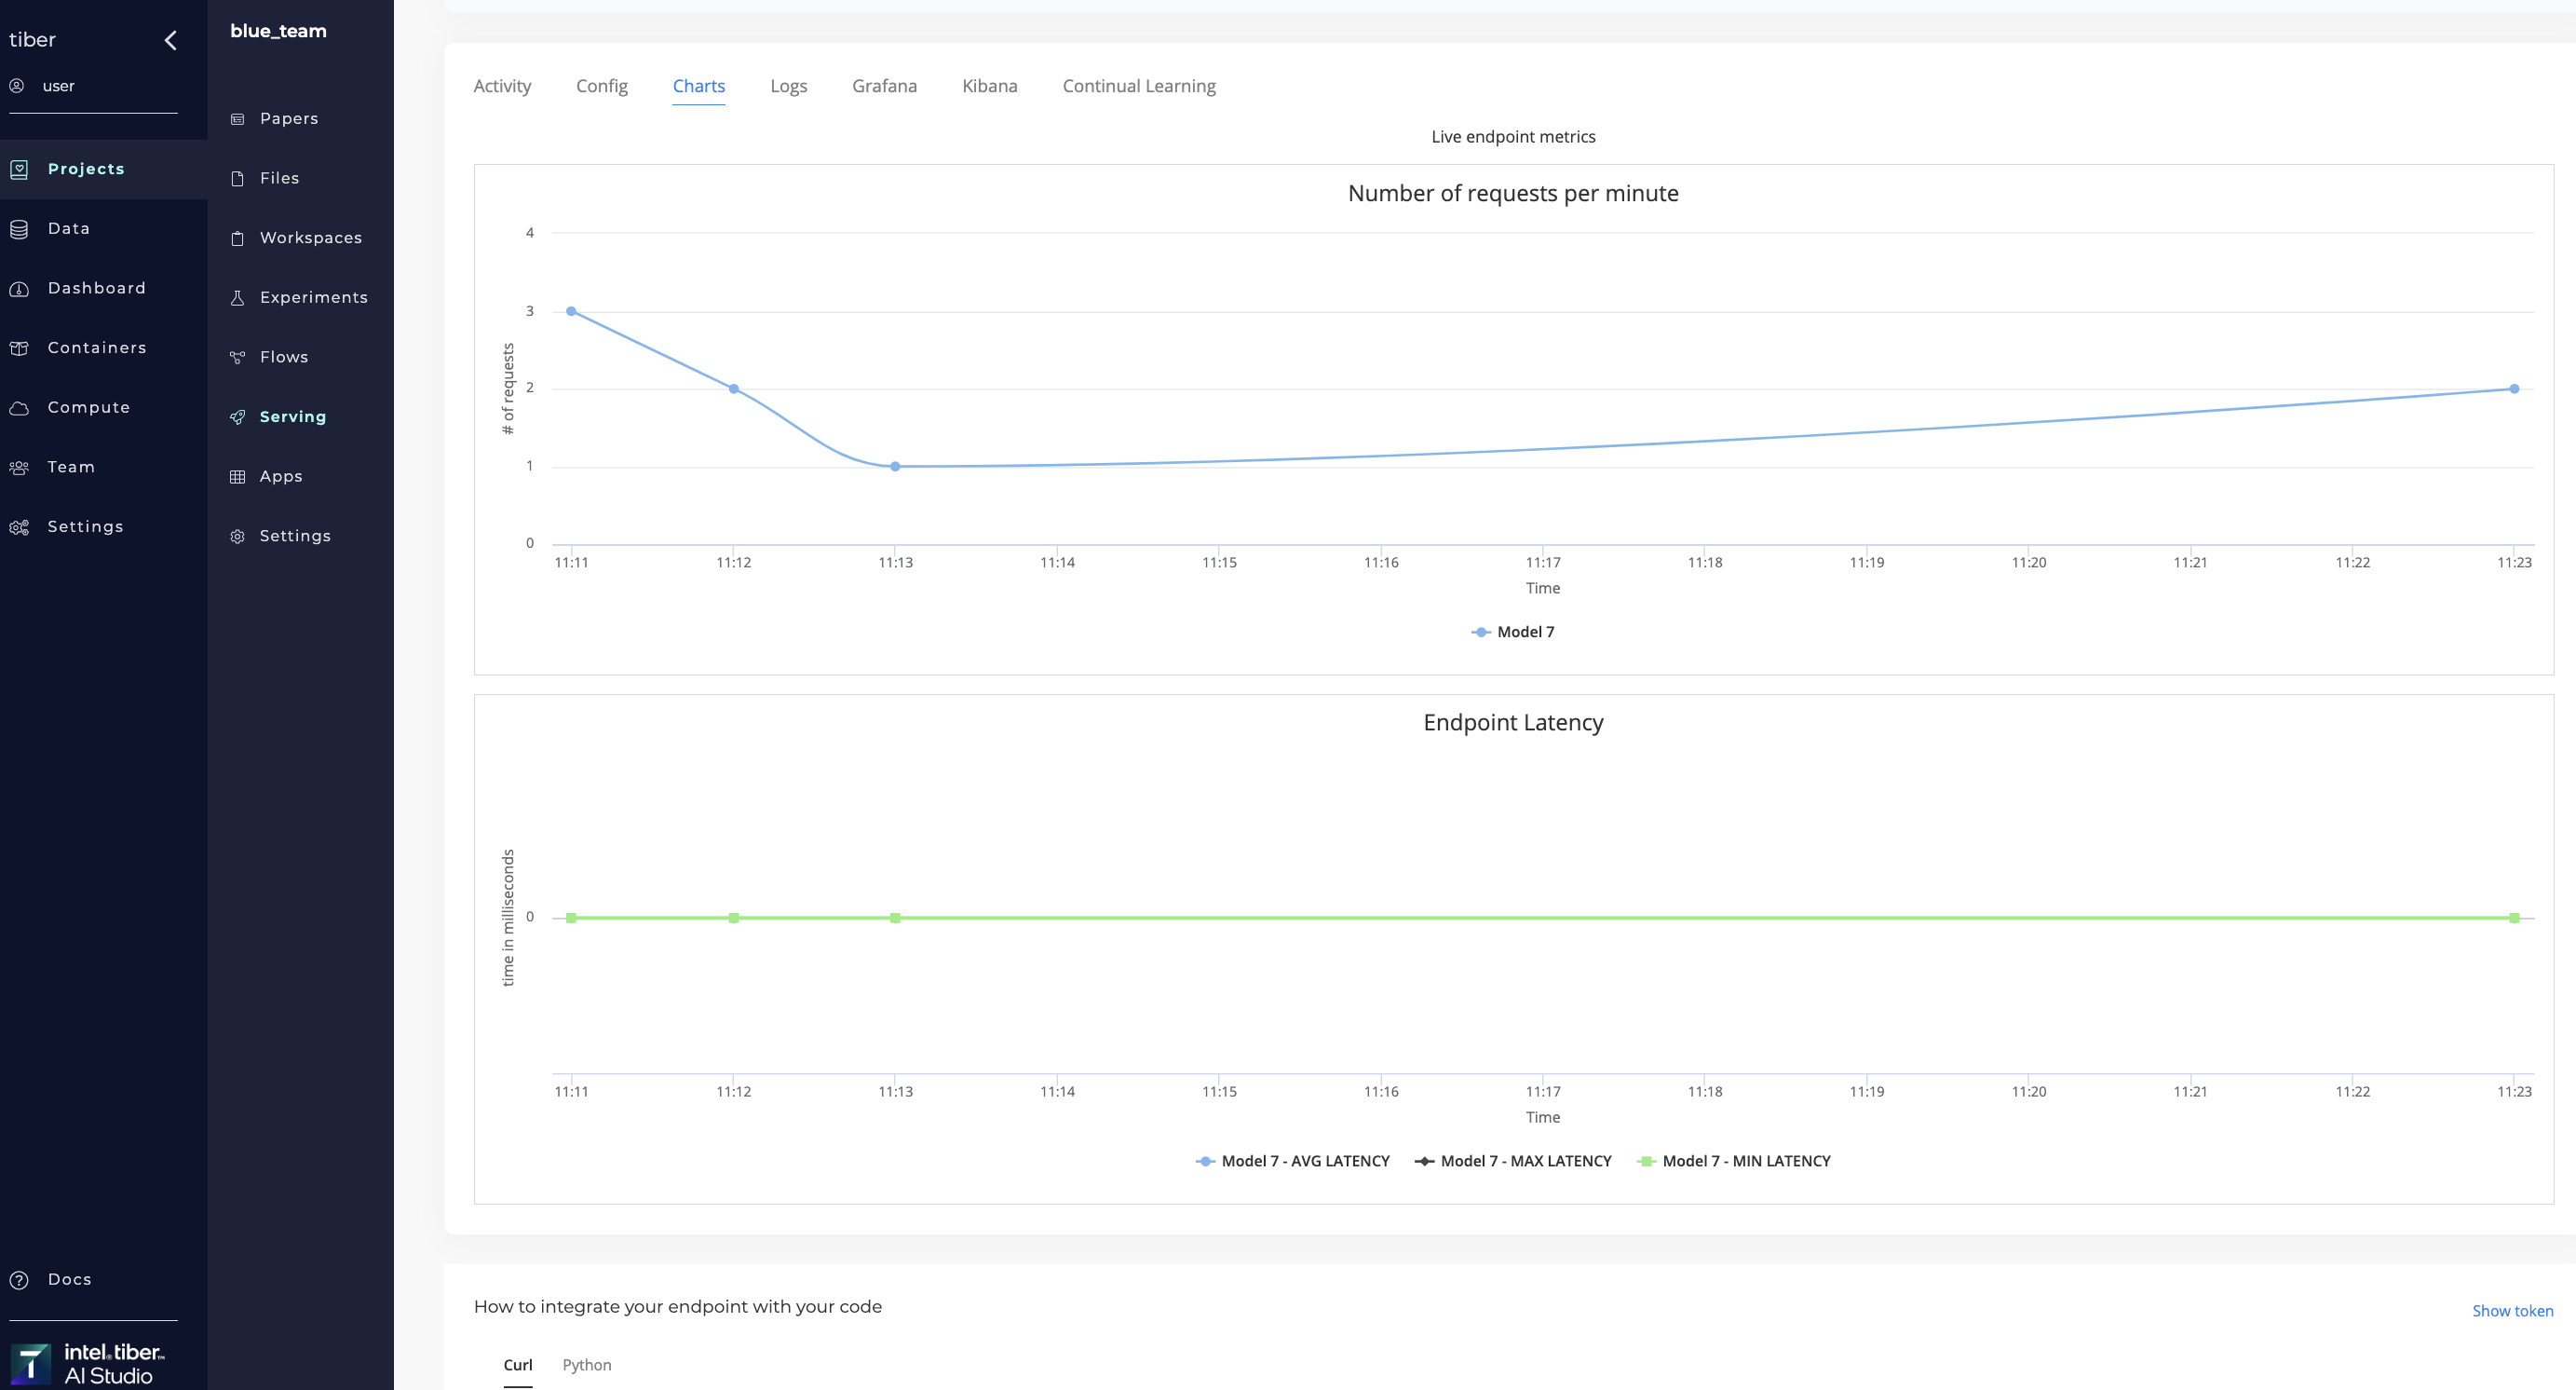
The AI Studio software automatically creates live charts for the Requests per Minute (traffic) and the Endpoint Latency (response time).
Users can create new line graphs using the Python SDK. Use the log_metric() method to track new metrics like accuracy and drift.
# Logs, Endpoint Data, and Feedback Loops
# Display logs
Click the Logs tab to display all the logs for each prediction.
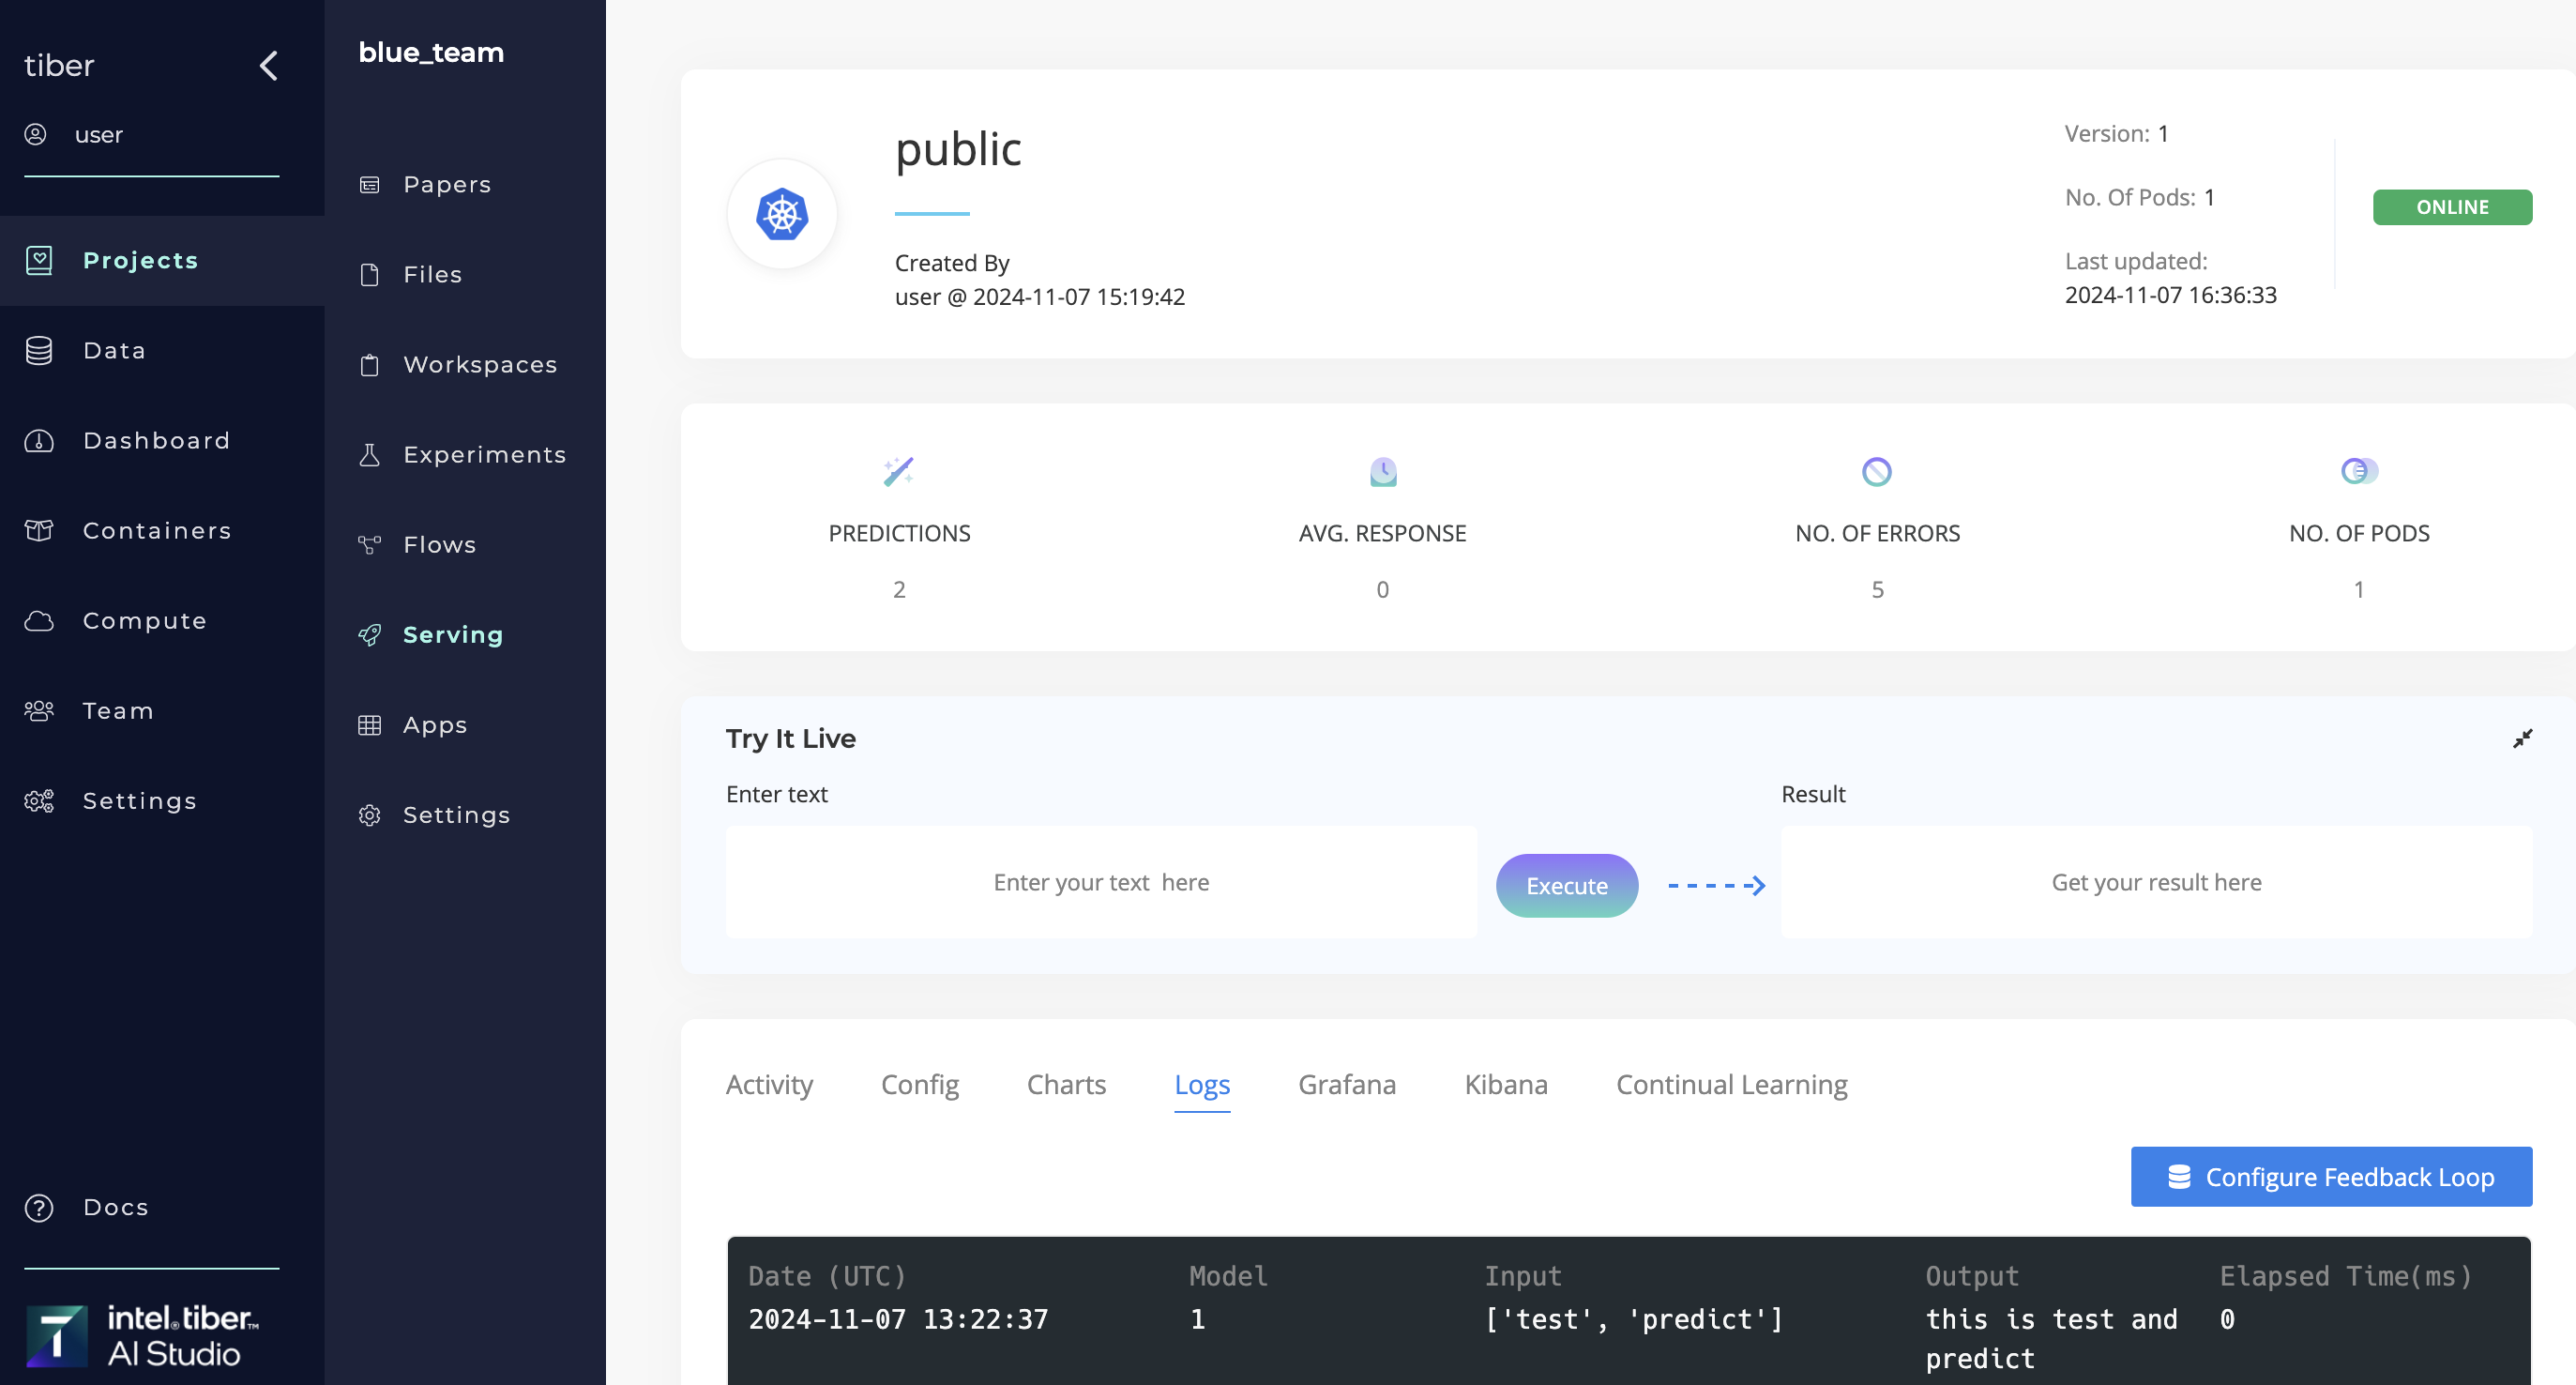
# Export CSV-formatted data
Every prediction, input, and output of the Serving endpoint is recorded and logged. All data is tracked so users can quickly determine how their models perform in a production environment. Use the Export function to export the data as a CSV and analyze it.
# Create and end a feedback loop
With AI Studio feedback loops, users can export endpoint data to a AI Studio dataset. Queries, predictions, and endpoint logs are important data elements. Feedback loops can be useful to a train model on real predictions to help improve its performance.
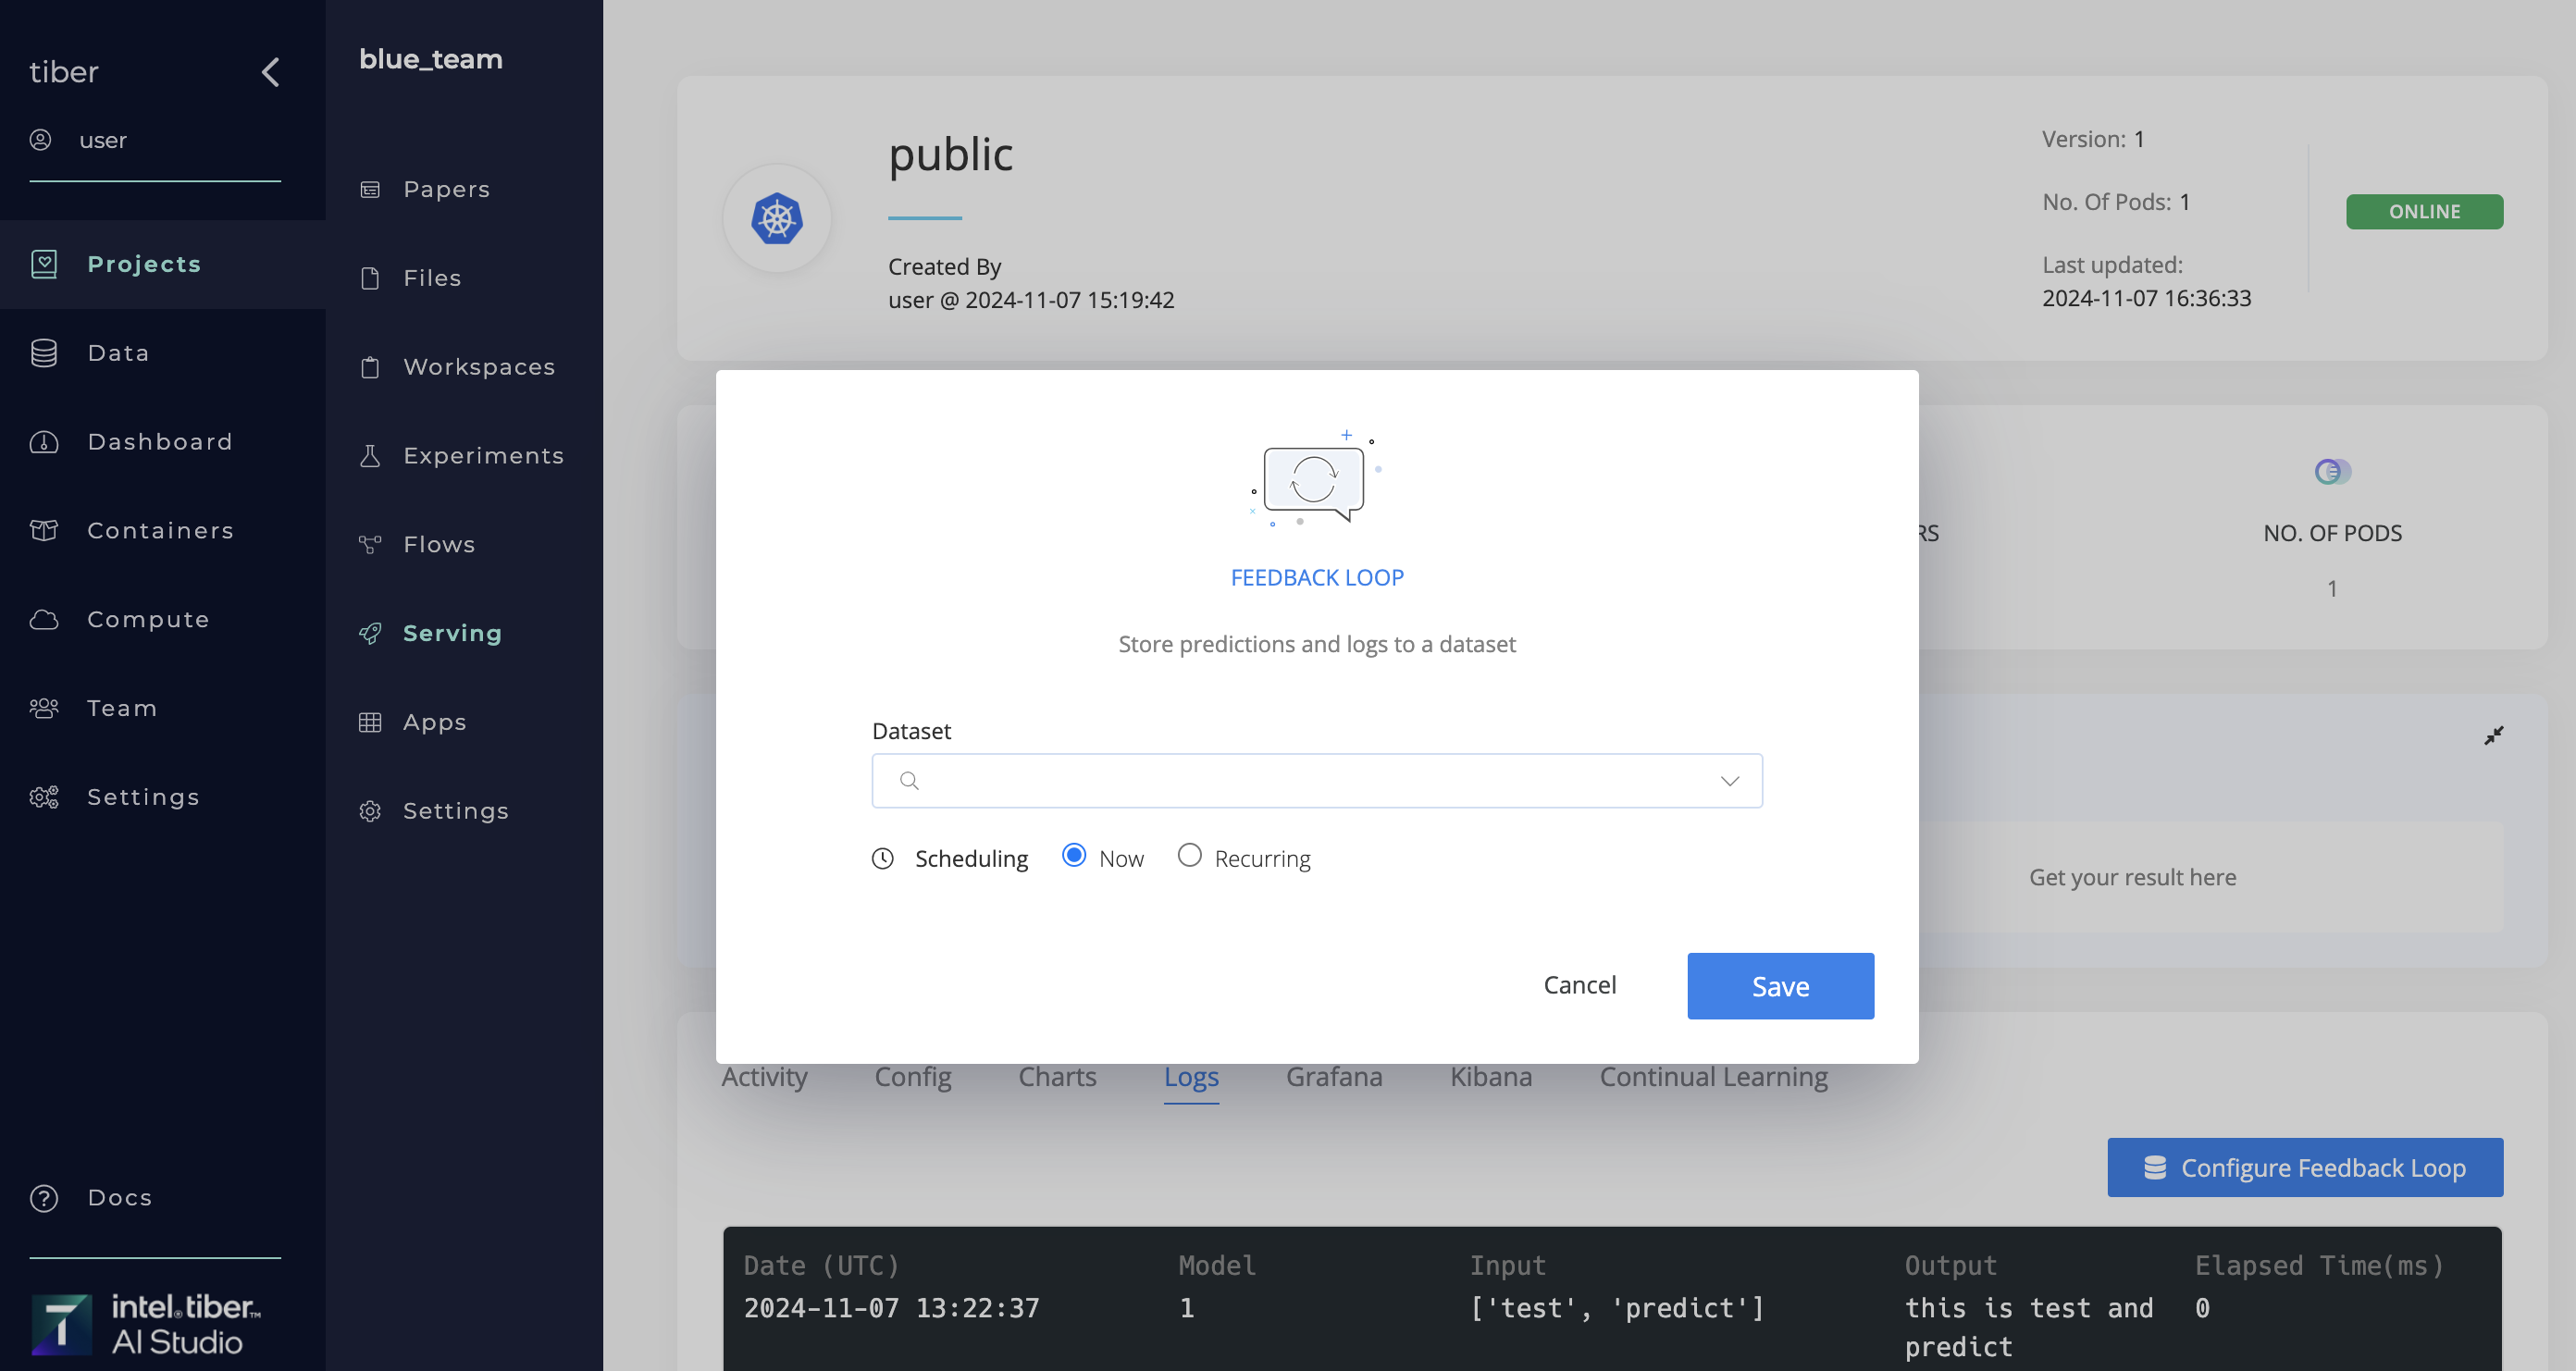
A feedback loop exports the endpoint data (like queries, predictions, and metadata) either immediately or on a user-set schedule.
 Complete the following steps to create a feedback loop:
- Go to the selected endpoint.
- Click the Logs tab.
- Click Configure Feedback Loop to display its dialog.
- Click the Dataset selector to choose the dataset to sync the data to.
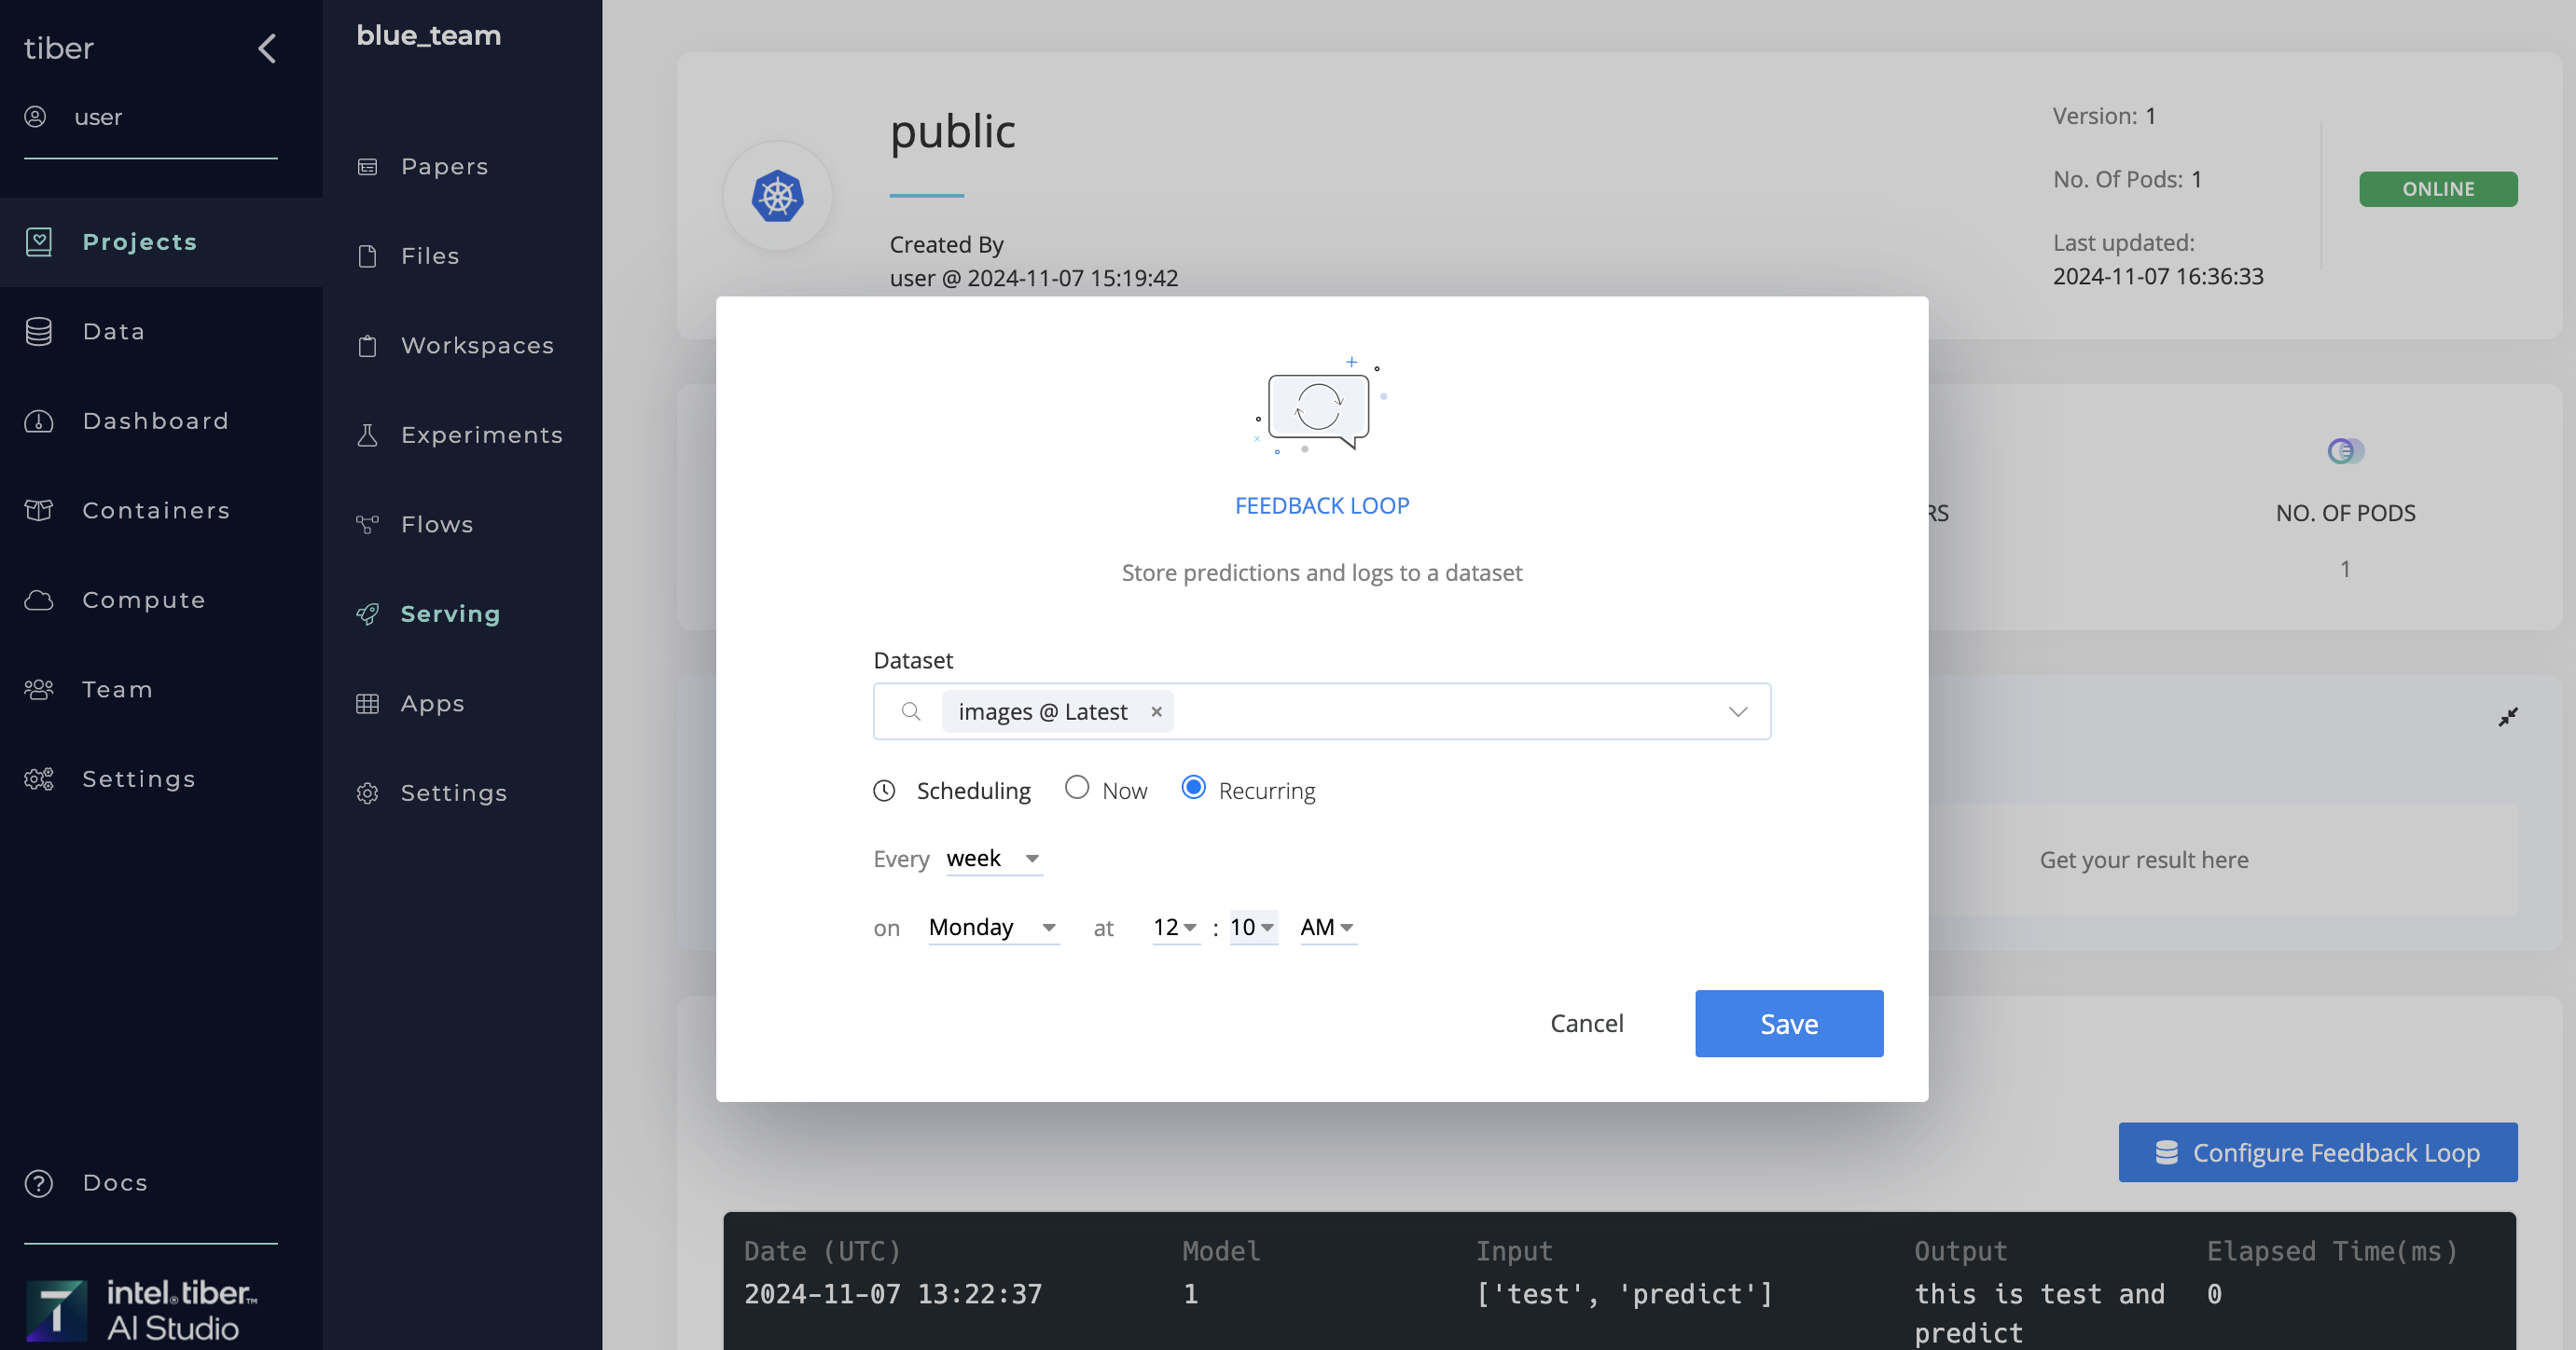
- For Scheduling, choose whether to sync the data Now or Recurring.
- For Recurring, set the schedule using one of the following two options:
- Every: The frequency the feedback loop runs.
- On: The specific day and time the feedback loop repeats.
- Click Save.
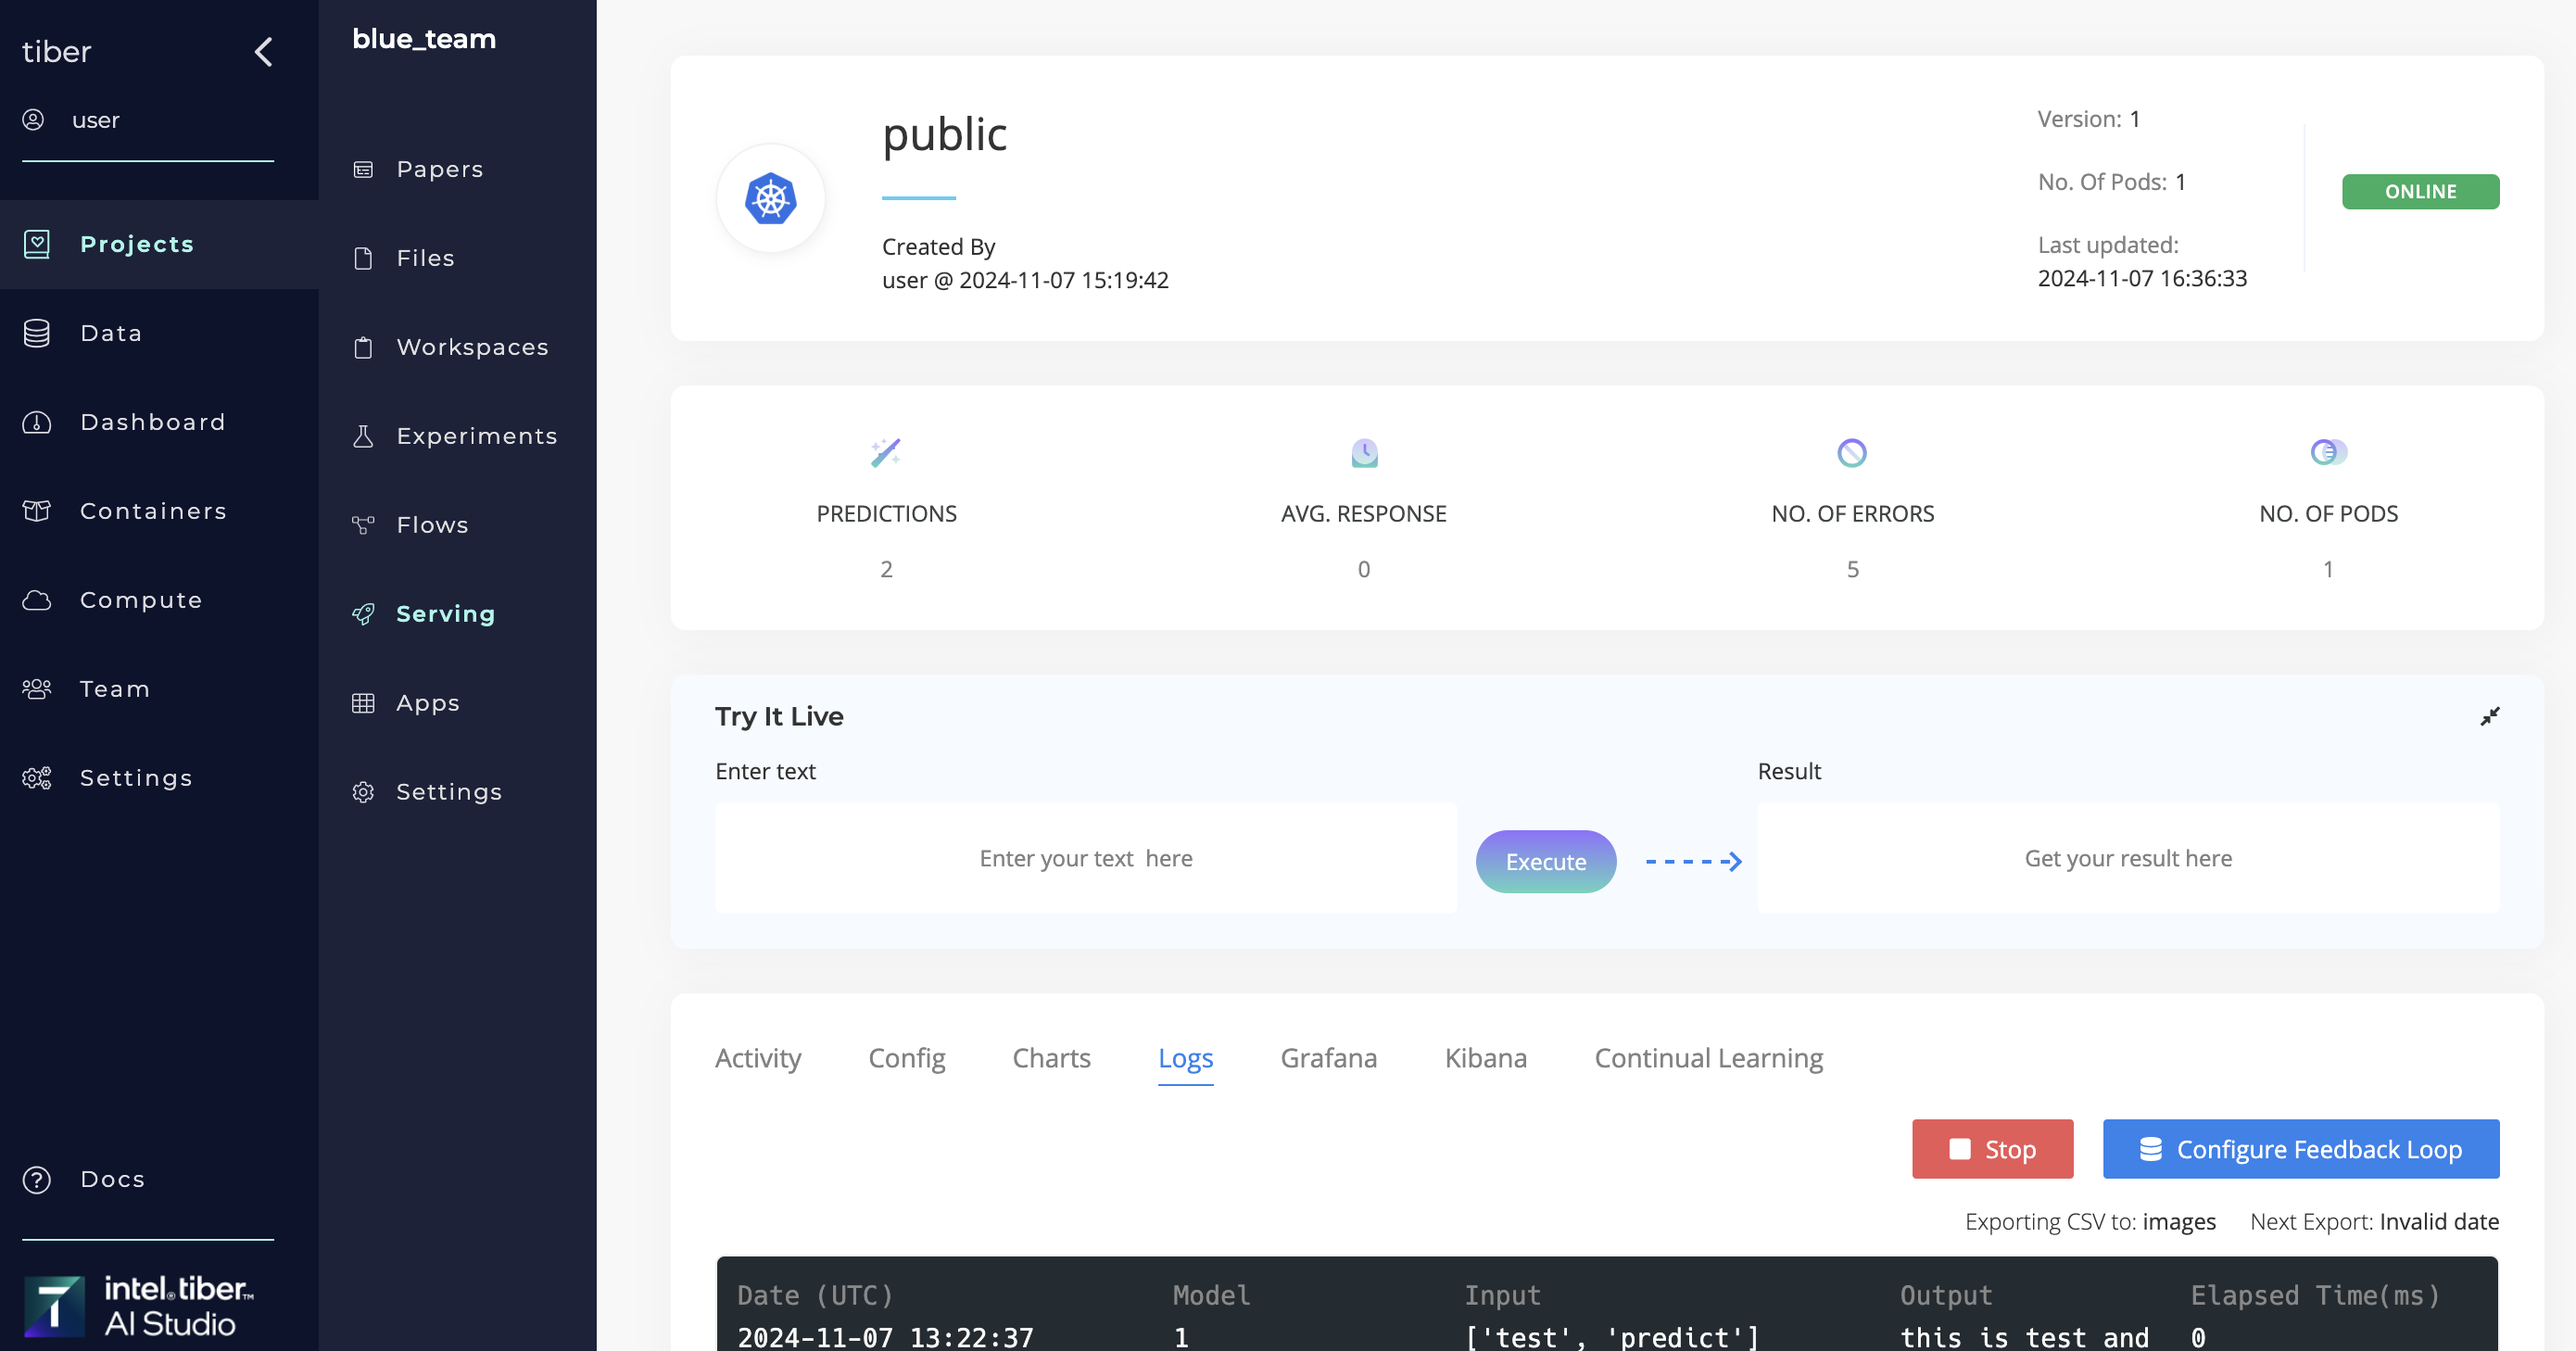 Complete the following steps to end a recurring feedback loop:
- Go to the selected endpoint.
- Click the Logs tab.
- Click Stop next to Configure Feedback Loop.
# Monitoring Systems
Kubernetes supports AI Studio endpoints, and AI Studio automatically installs advanced monitoring tools for production-grade readiness. The AI Studio platform includes Grafana for dashboarding and Kibana for log visualizations.
# Grafana
Grafana is an analytics and monitoring platform for monitoring a Kubernetes cluster.
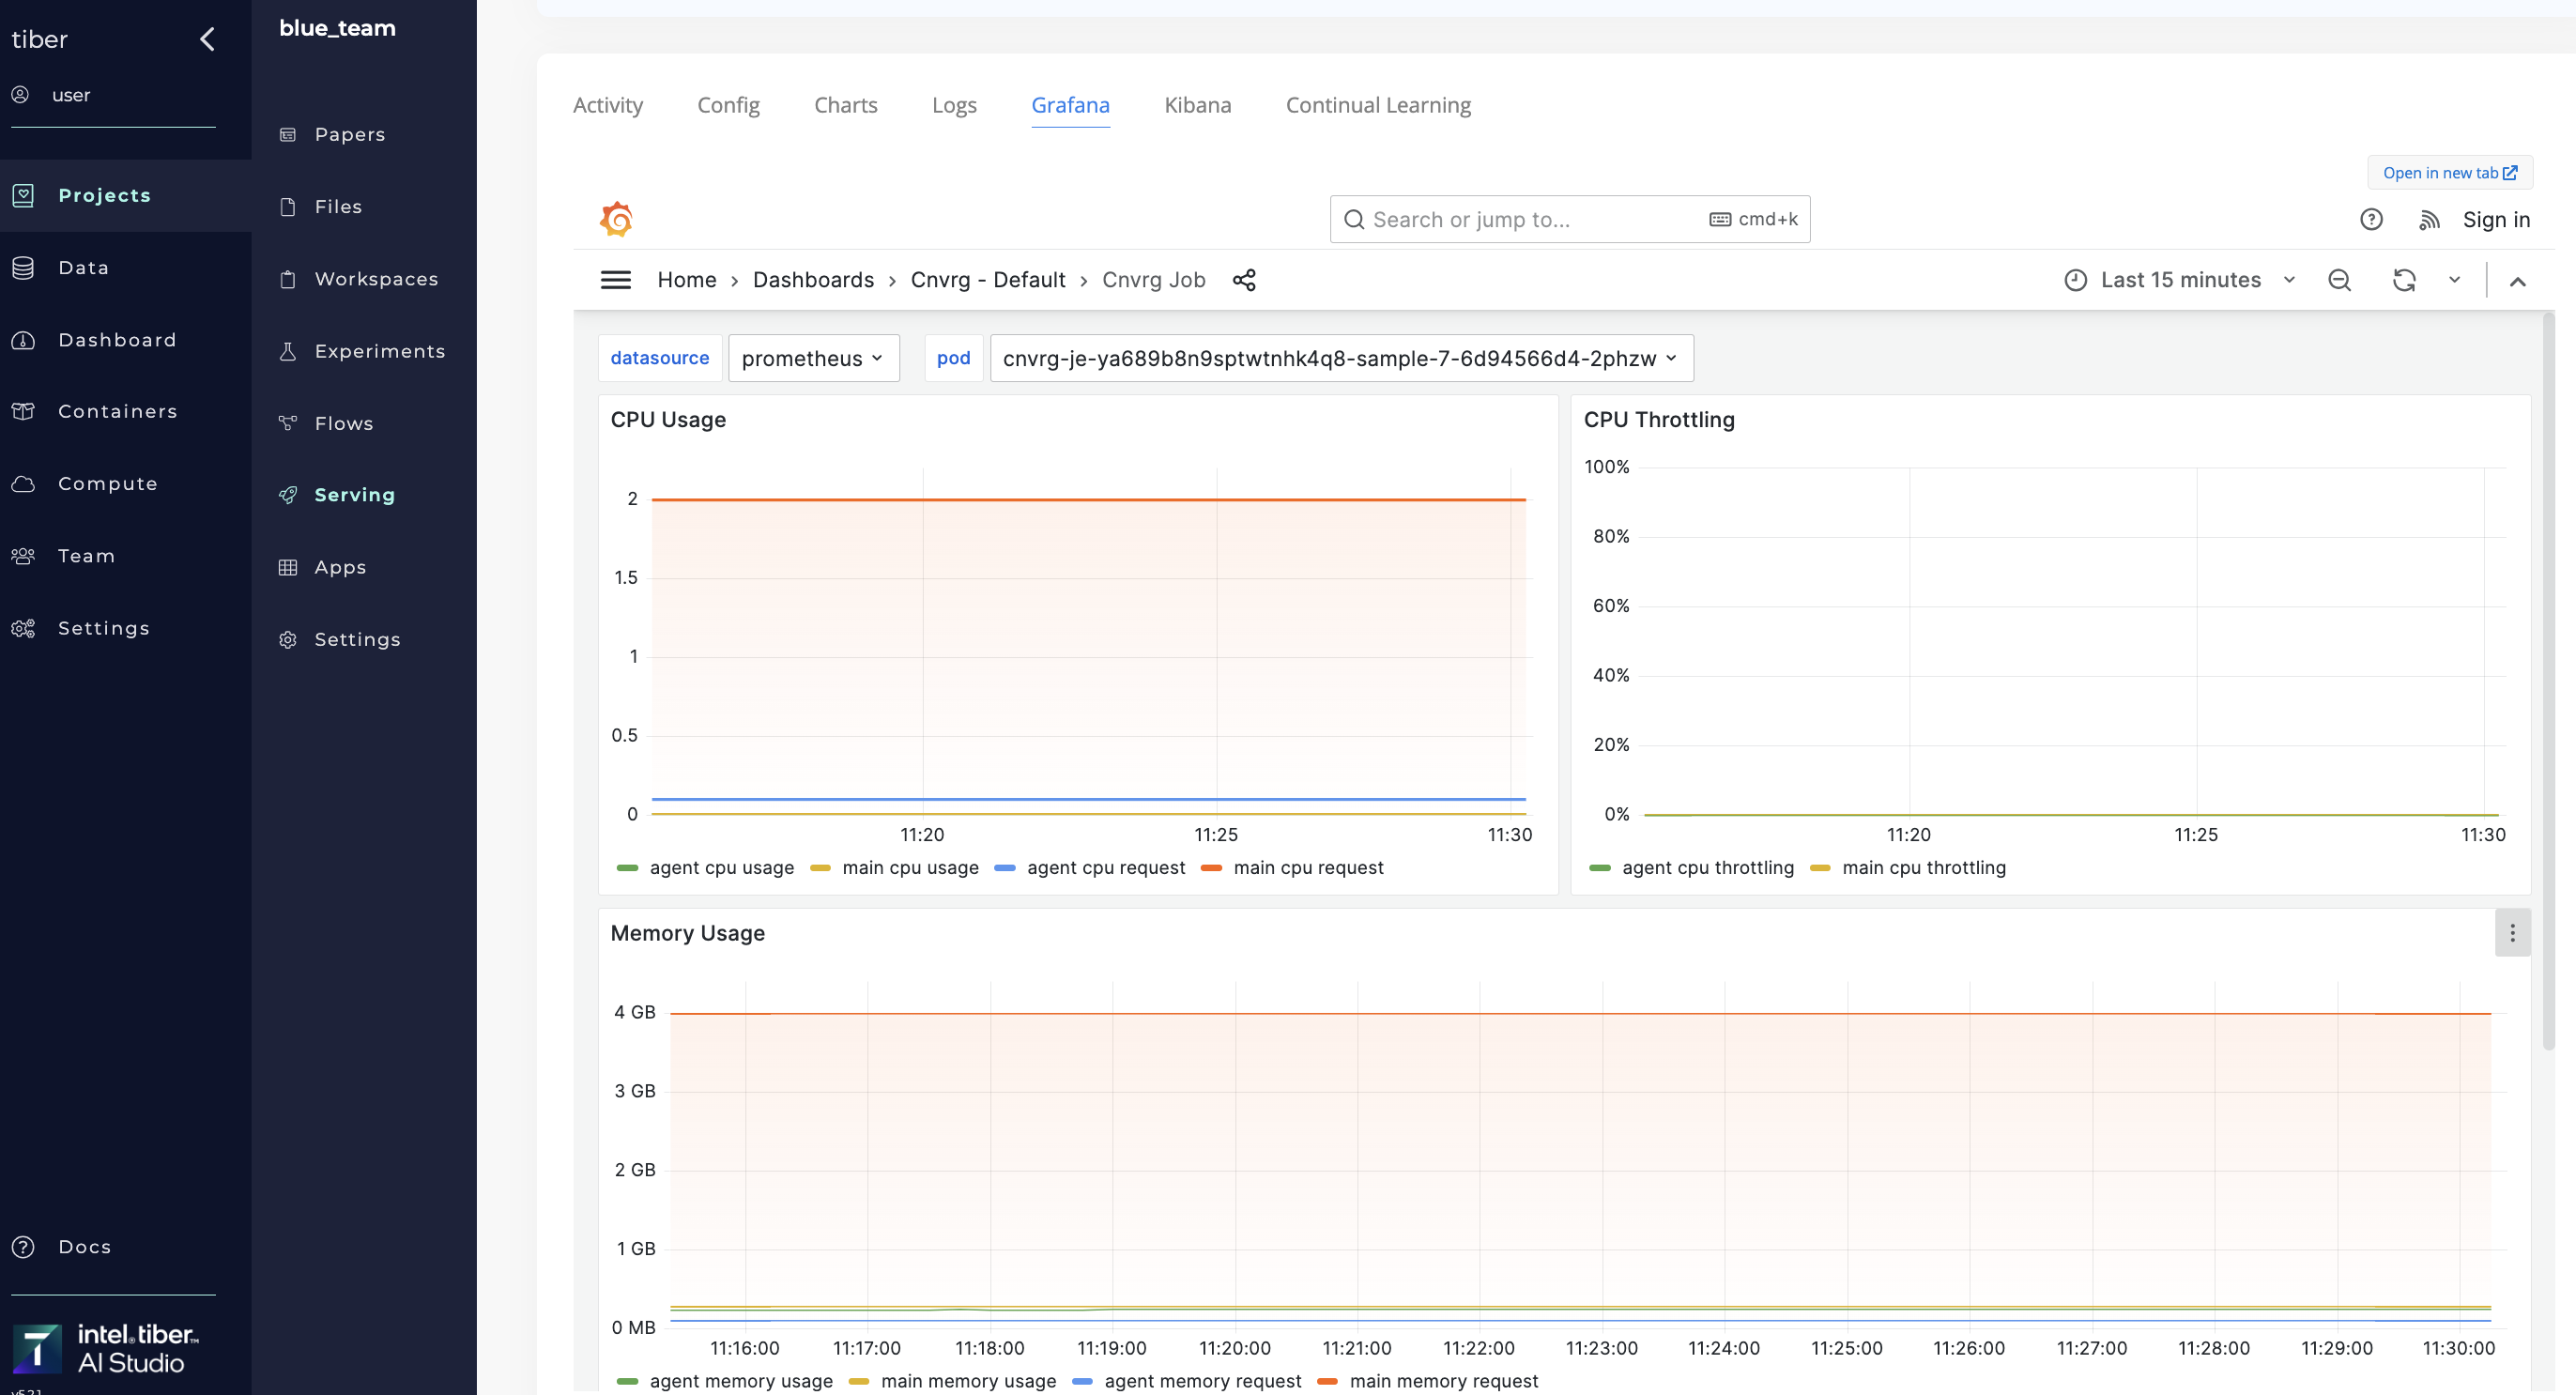
In AI Studio, view the Grafana dashboard by navigating to the running endpoint and clicking the Grafana tab.
A AI Studio Grafana dashboard is preconfigured for monitoring pod health, including:
- Memory usage: A pod's memory usage
- CPU usage: A pod's CPU usage
- Network I/O: A pod's input and output traffic
# Kibana
A Kibana dashboard is a collection of charts, maps, and tables to visualize Elasticsearch data. The Kibana tool shows all prints in code and displays them by converting them into graphs.
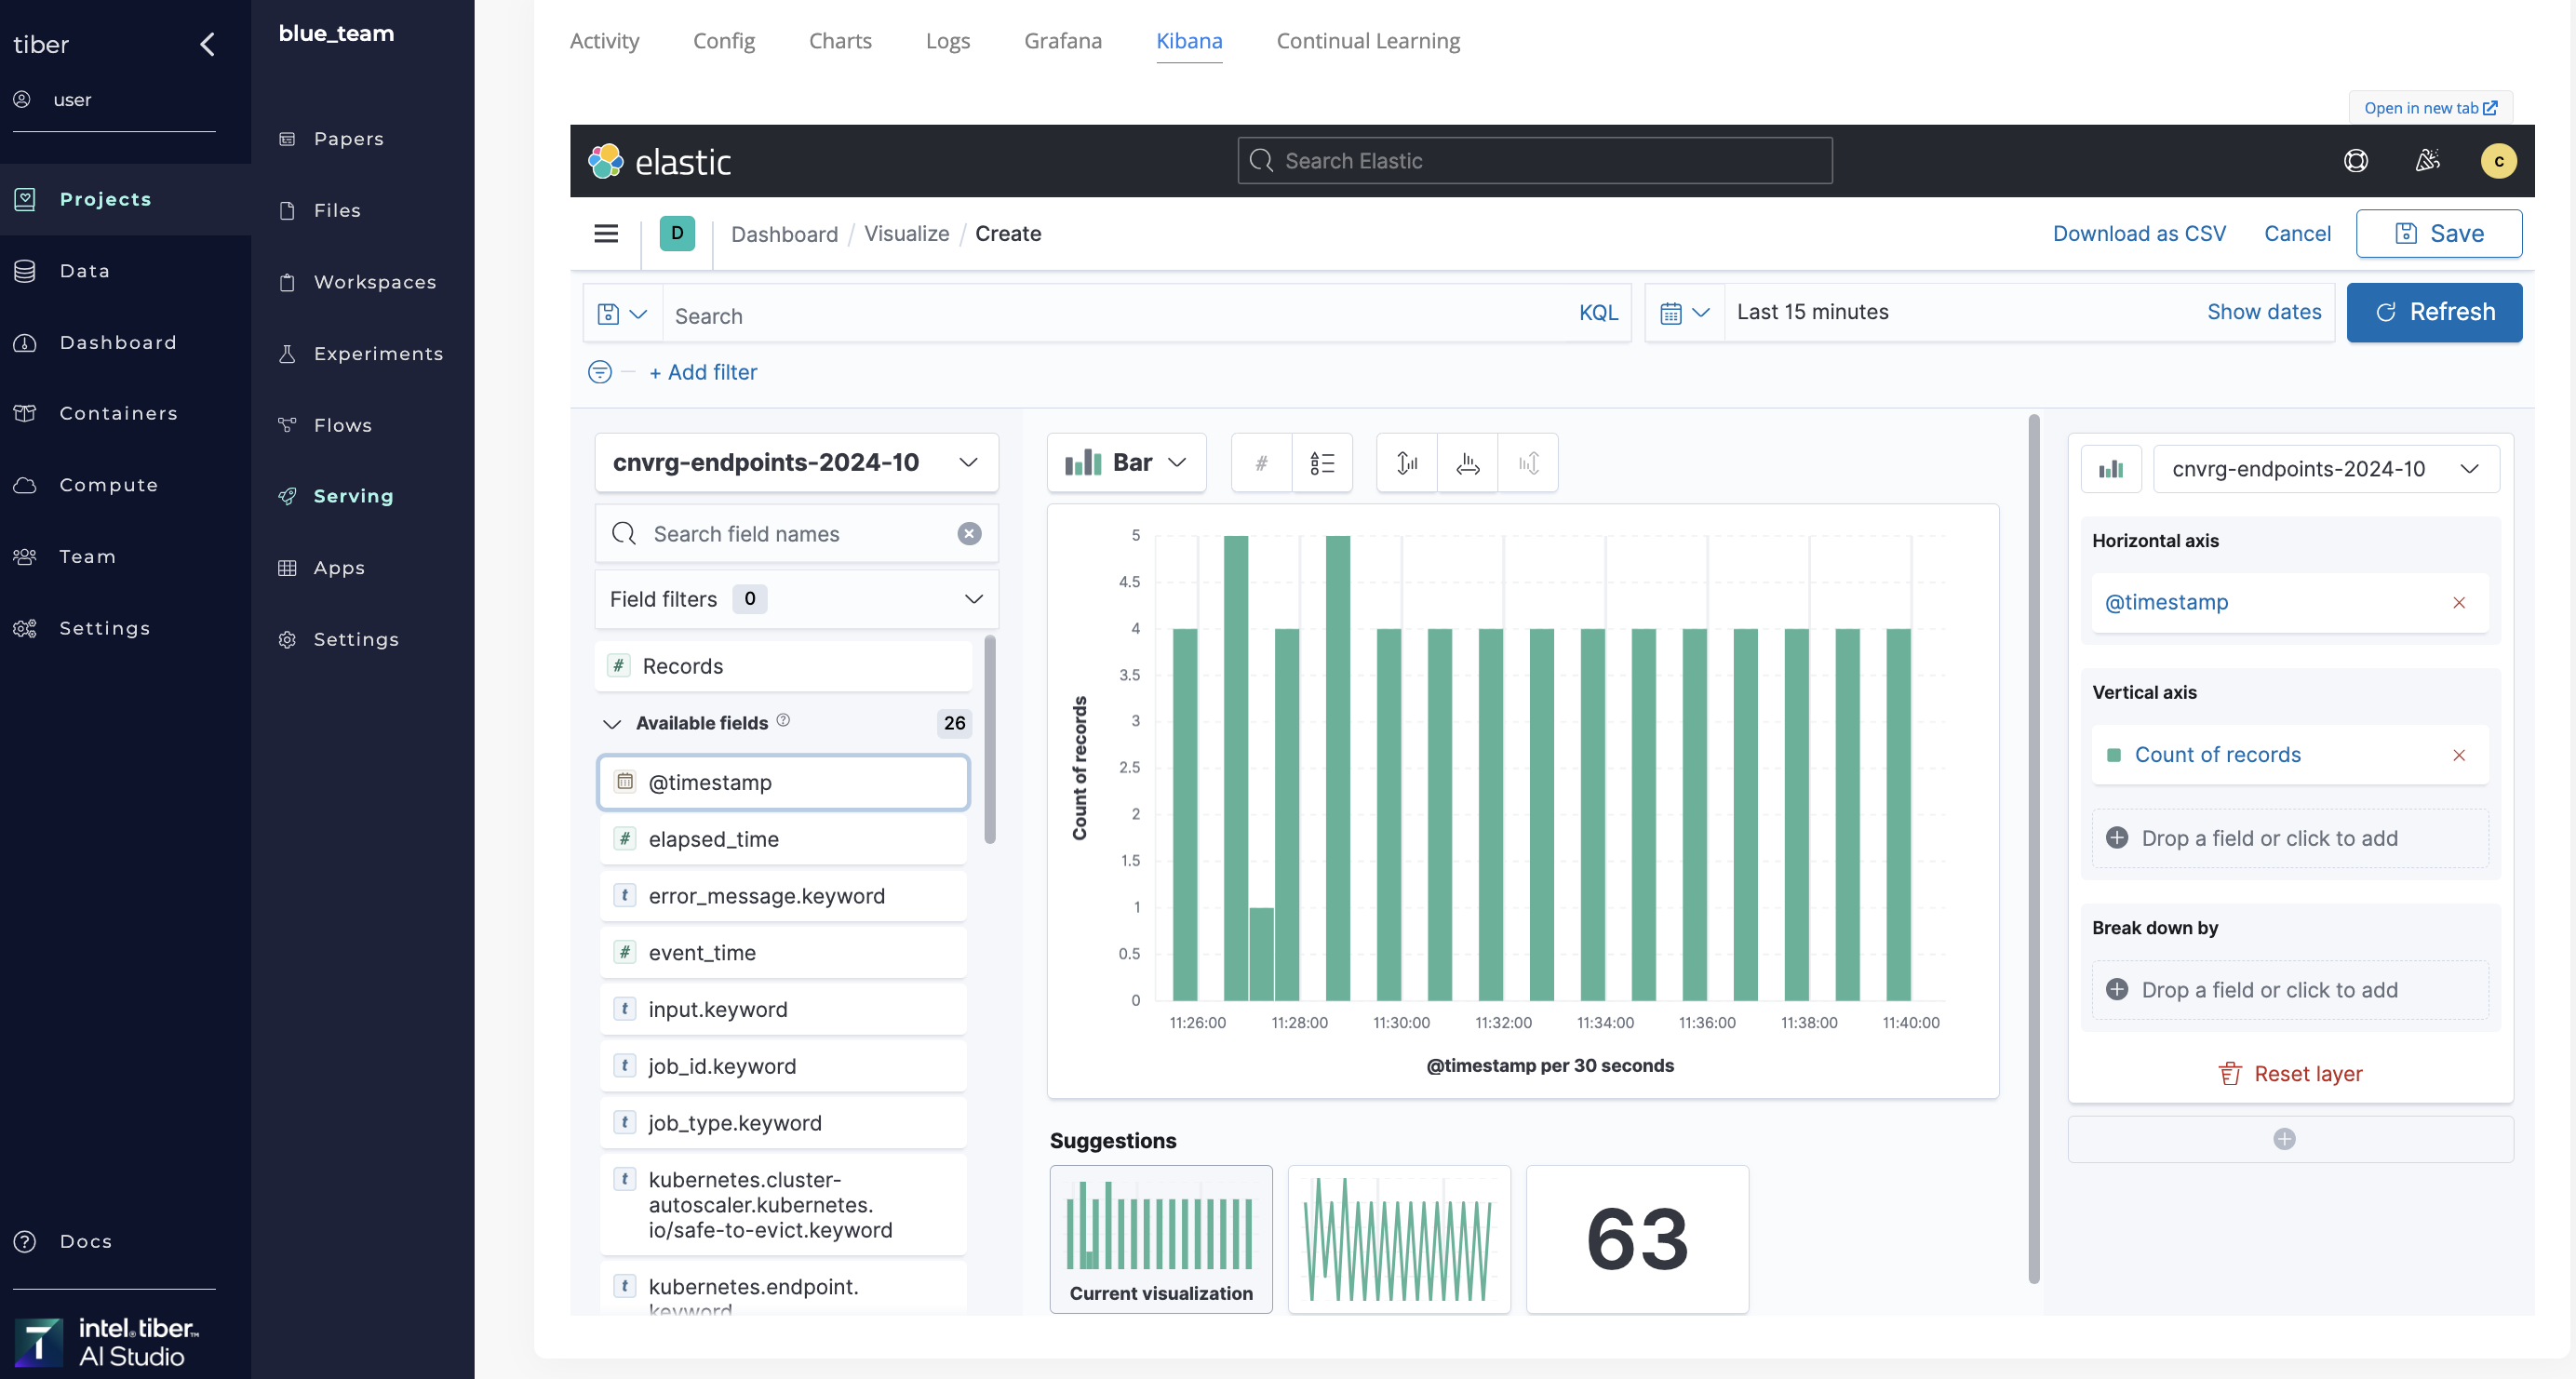
In AI Studio, access Kibana by navigating to the running endpoint and clicking the Kibana tab.
# Endpoint Reruns
Reproducible code and environments are key AI Studio elements.
To quickly and easily rerun an endpoint using all the same settings (like file, command, compute, and Docker image), select an endpoint, click its Menu, and then select Rerun from the drop-down list.
The new endpoint page displays with all the details preselected. Check the details, make any required changes, and then run the modified endpoint.
# Model Updates
Models can be easily updated for endpoints that are in the ONLINE state.
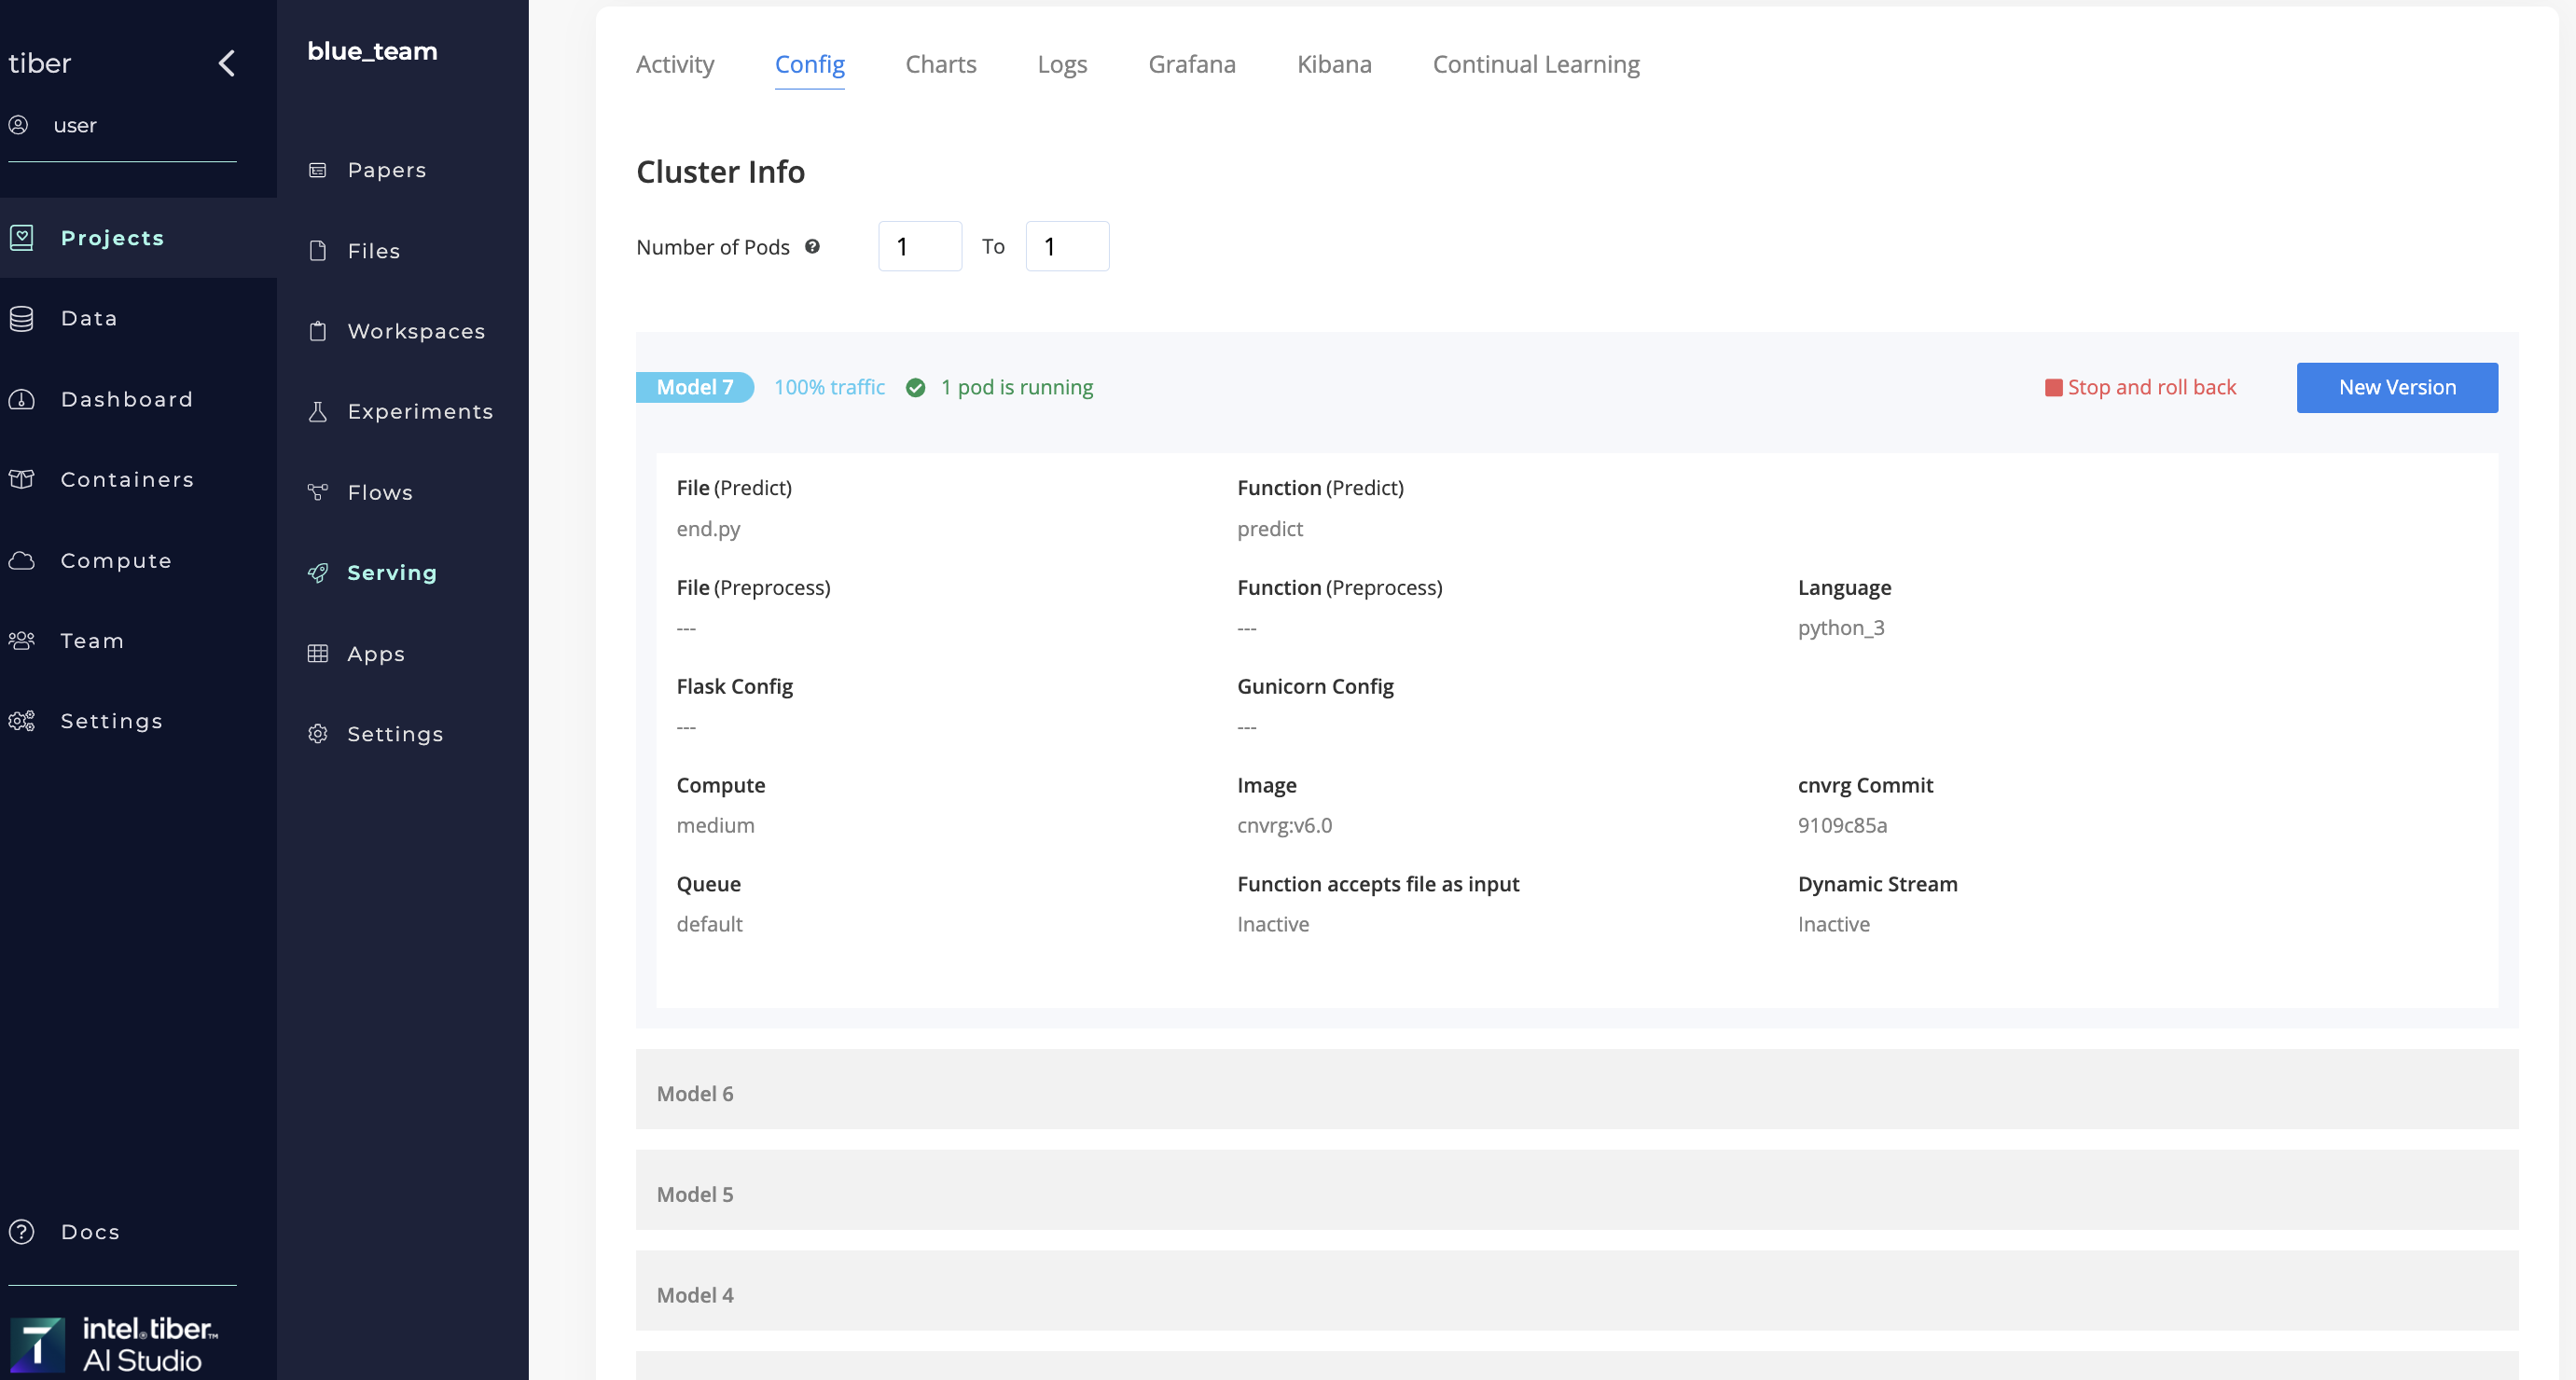
Select the Config tab > New Version to display the new model dialog. Specify the file, function and/or, a different commit version.
Click Update and AI Studio gradually rolls out updates to the endpoint using the Canary Deployment mechanism.
A model can also be updated using a flow.
# Endpoint Updates with Flows
Users can roll over an endpoint to a new model within a flow. To do so, complete the following to add a Deploy task to your flow and set it to update an existing endpoint:
- Click the Flows tab of your project.
- Open an existing flow or click New Flow to create a new one.
- Click the New Task menu.
- Select Deploy Task from the menu.
- In the Select Endpoint menu, click the name of the existing endpoint to update.
- Click Save Changes.
When the flow runs successfully, the endpoint rolls over to the end commit of the task connected to the newly created deploy task, with zero downtime.
For more information about flows, see the AI Studio flows documentation.
# File Inputs
In AI Studio, web services and batch prediction endpoints can be set to accept files as an input. To enable this functionality when launching a service or batch predict, enable the Function accepts file as input option.
To send a file to the endpoint, encode it in Base64 and then send the encoded string as the input to the model.
The AI Studio software decodes the file and passes it to the predict function. This means the predict function simply expects a file as the input with no further decoding requirements.
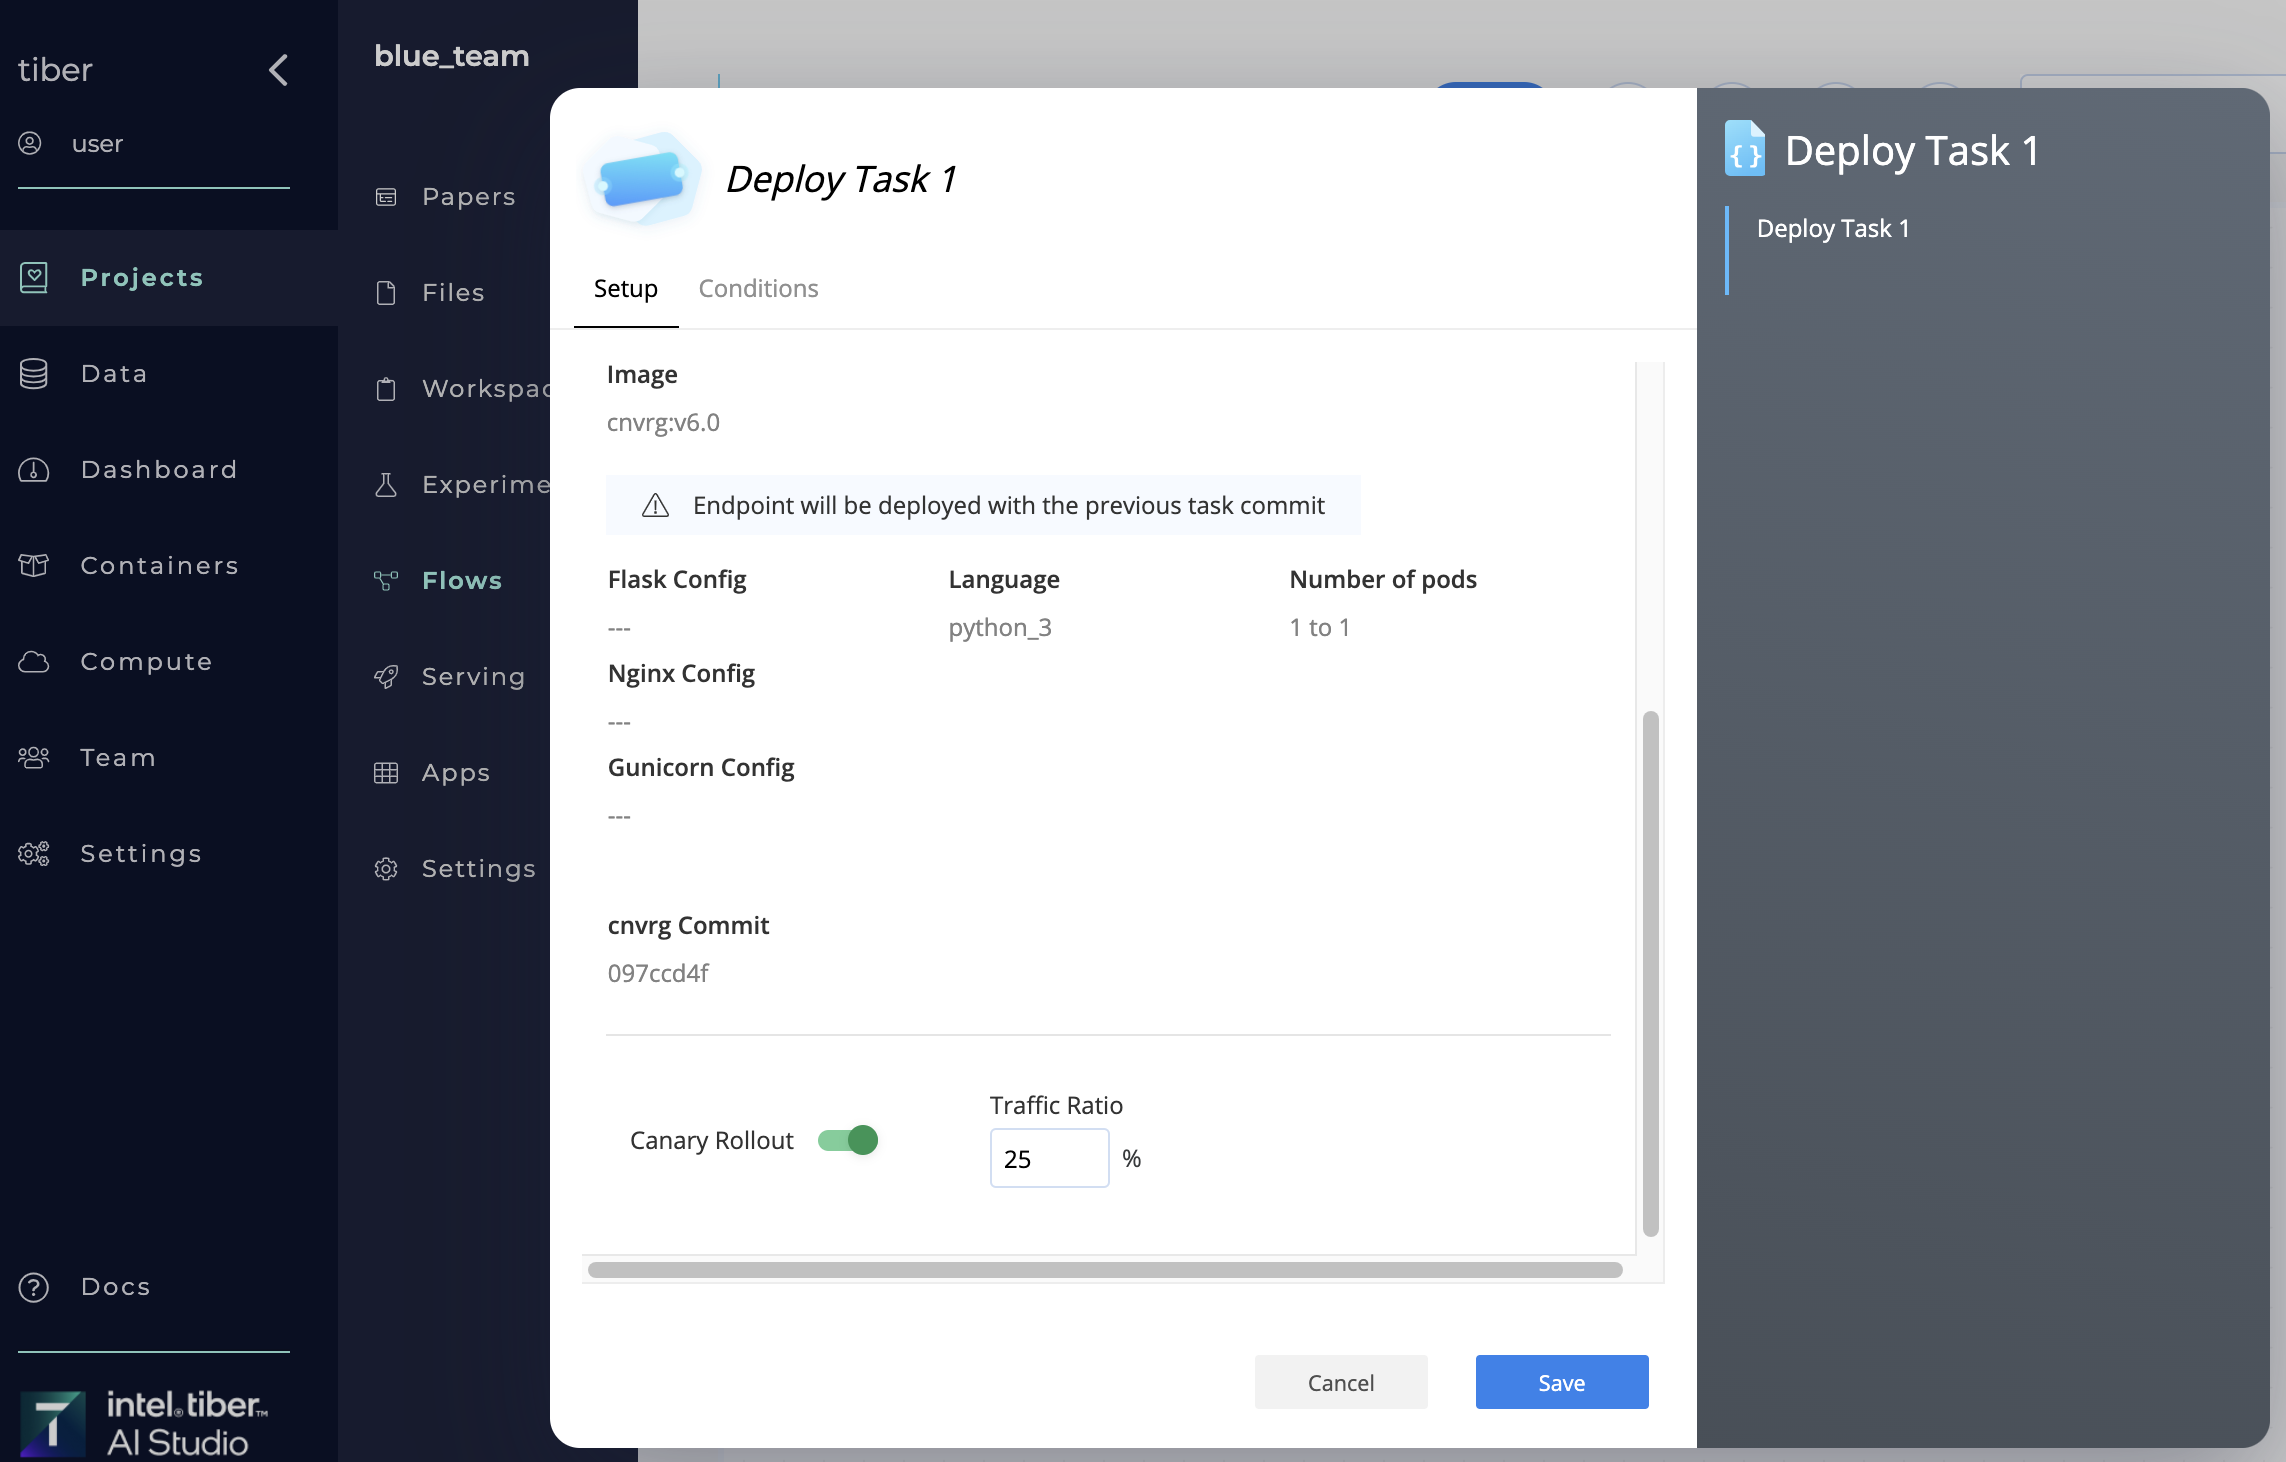
# Canary Release
Canary release is a technique to reduce the risk of introducing a new software version in production. This allows a slow roll out of a change to a small percentage of the traffic, before rolling it out to the entire infrastructure and making it available to everyone. This permits users to check their model during a gradual roll out, and if any issues are revealed, they can undo the change before it reaches too many users.
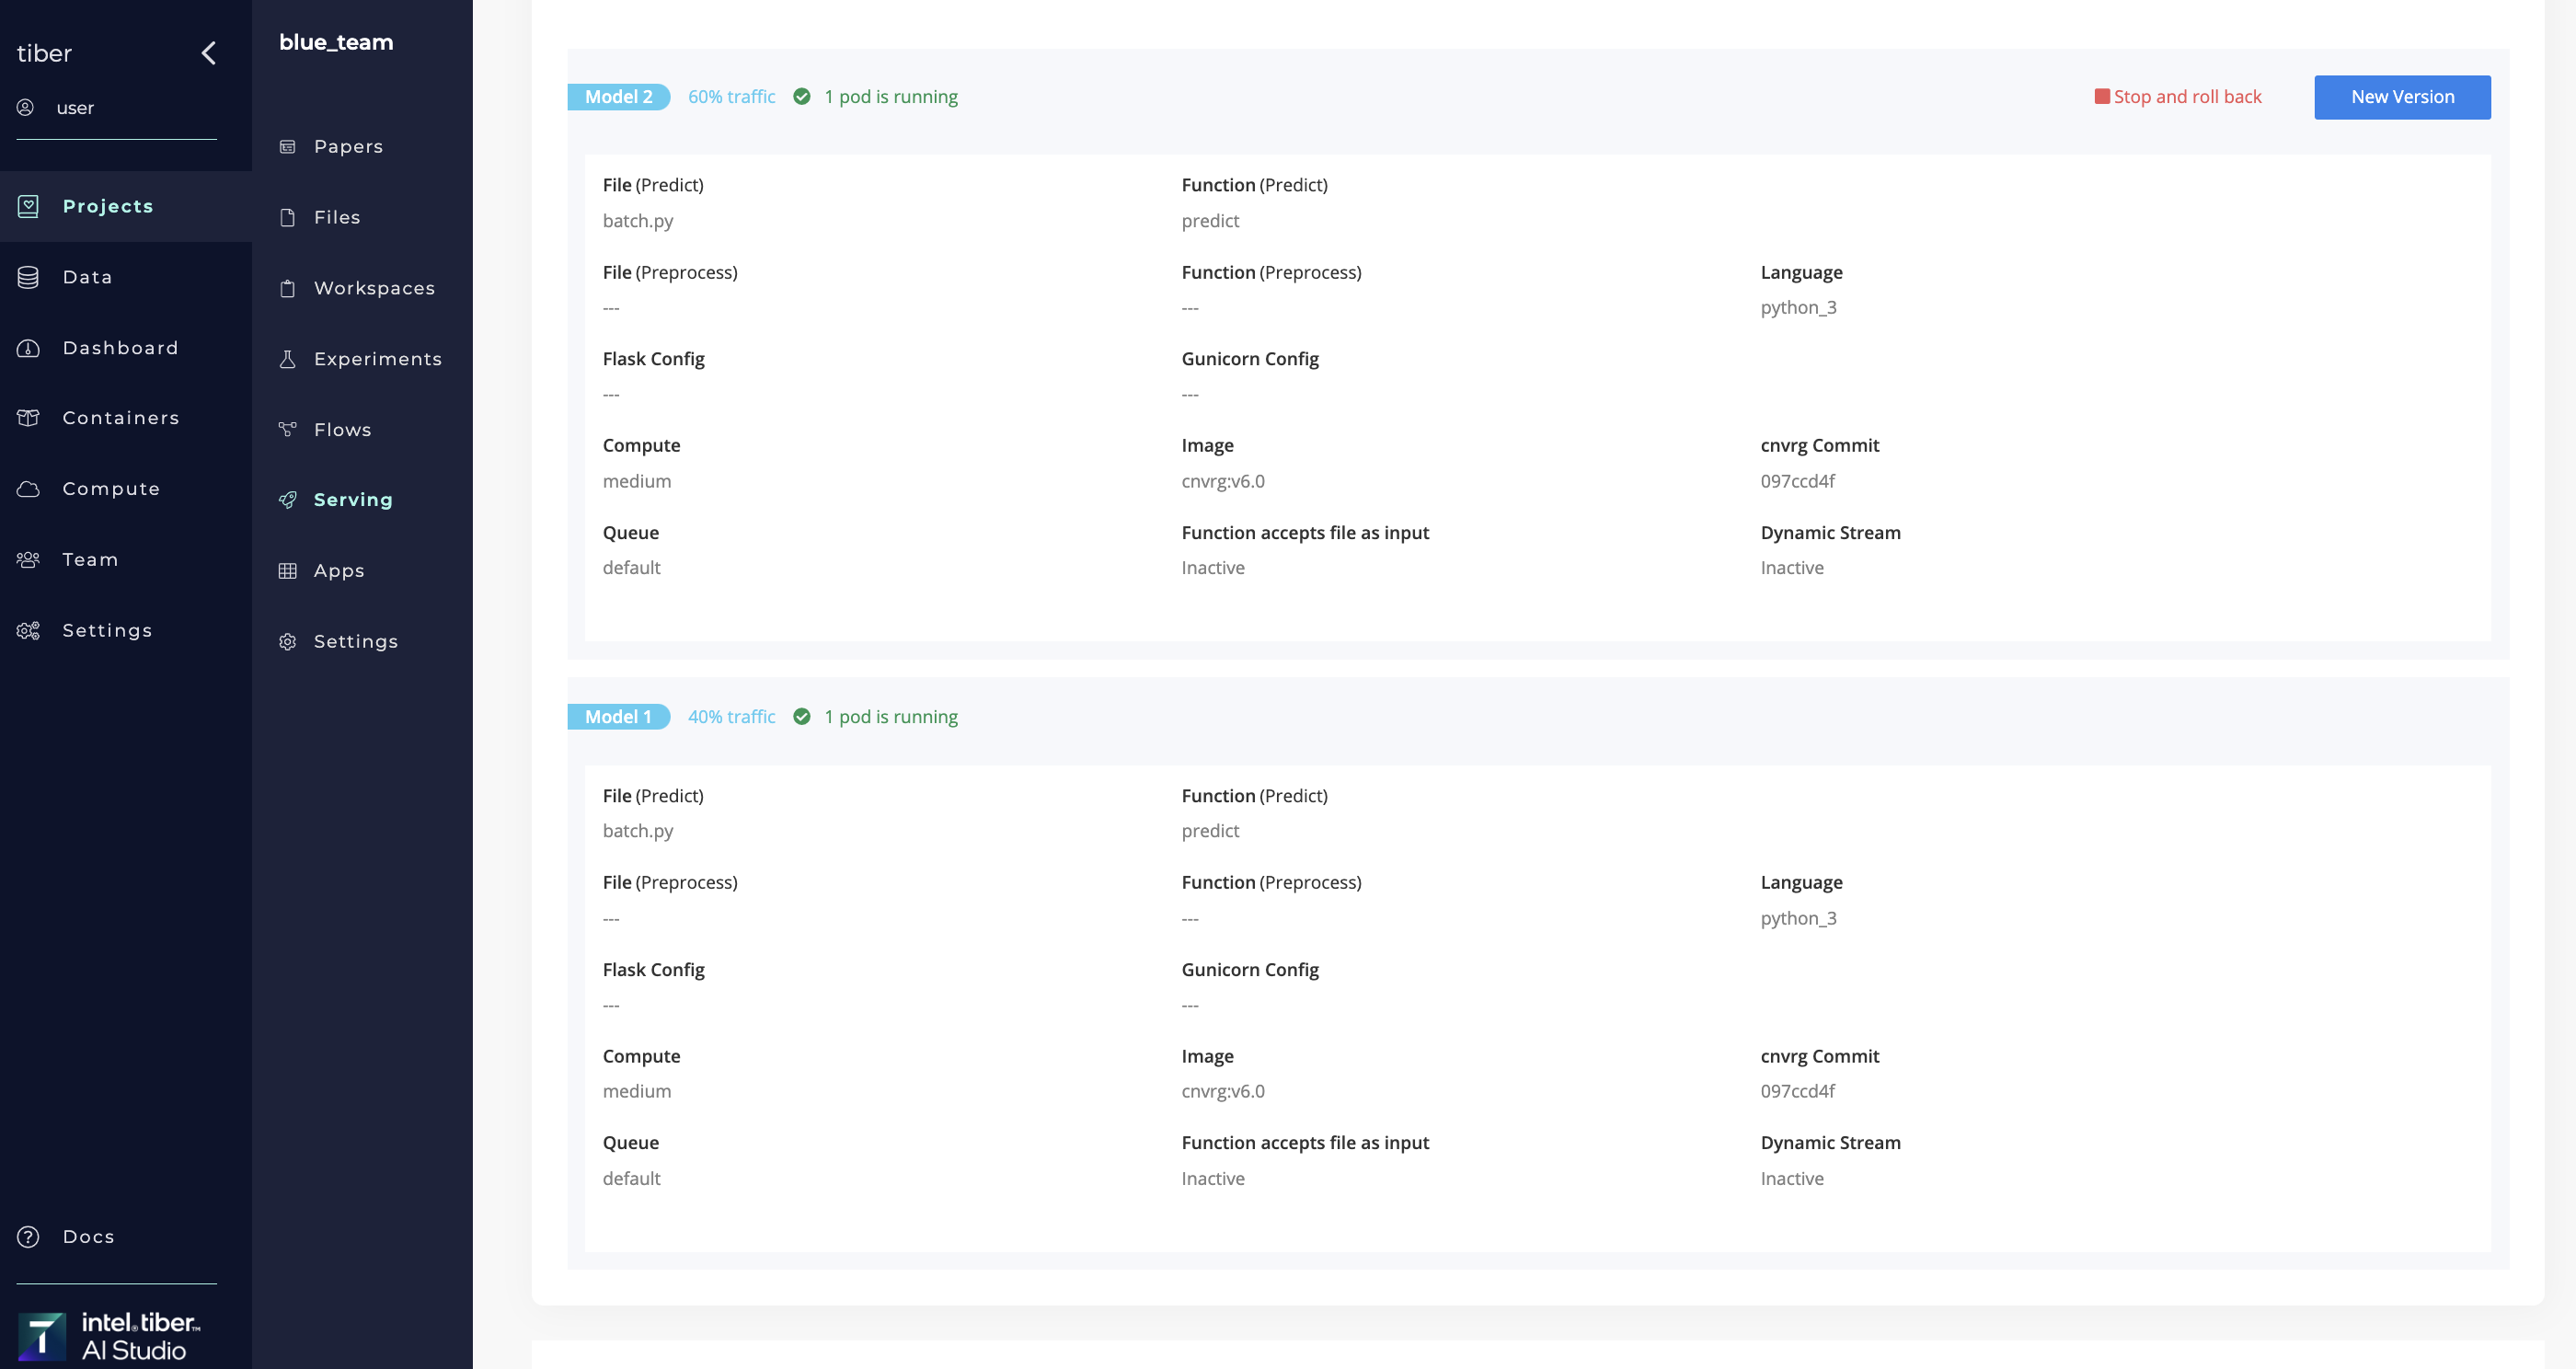
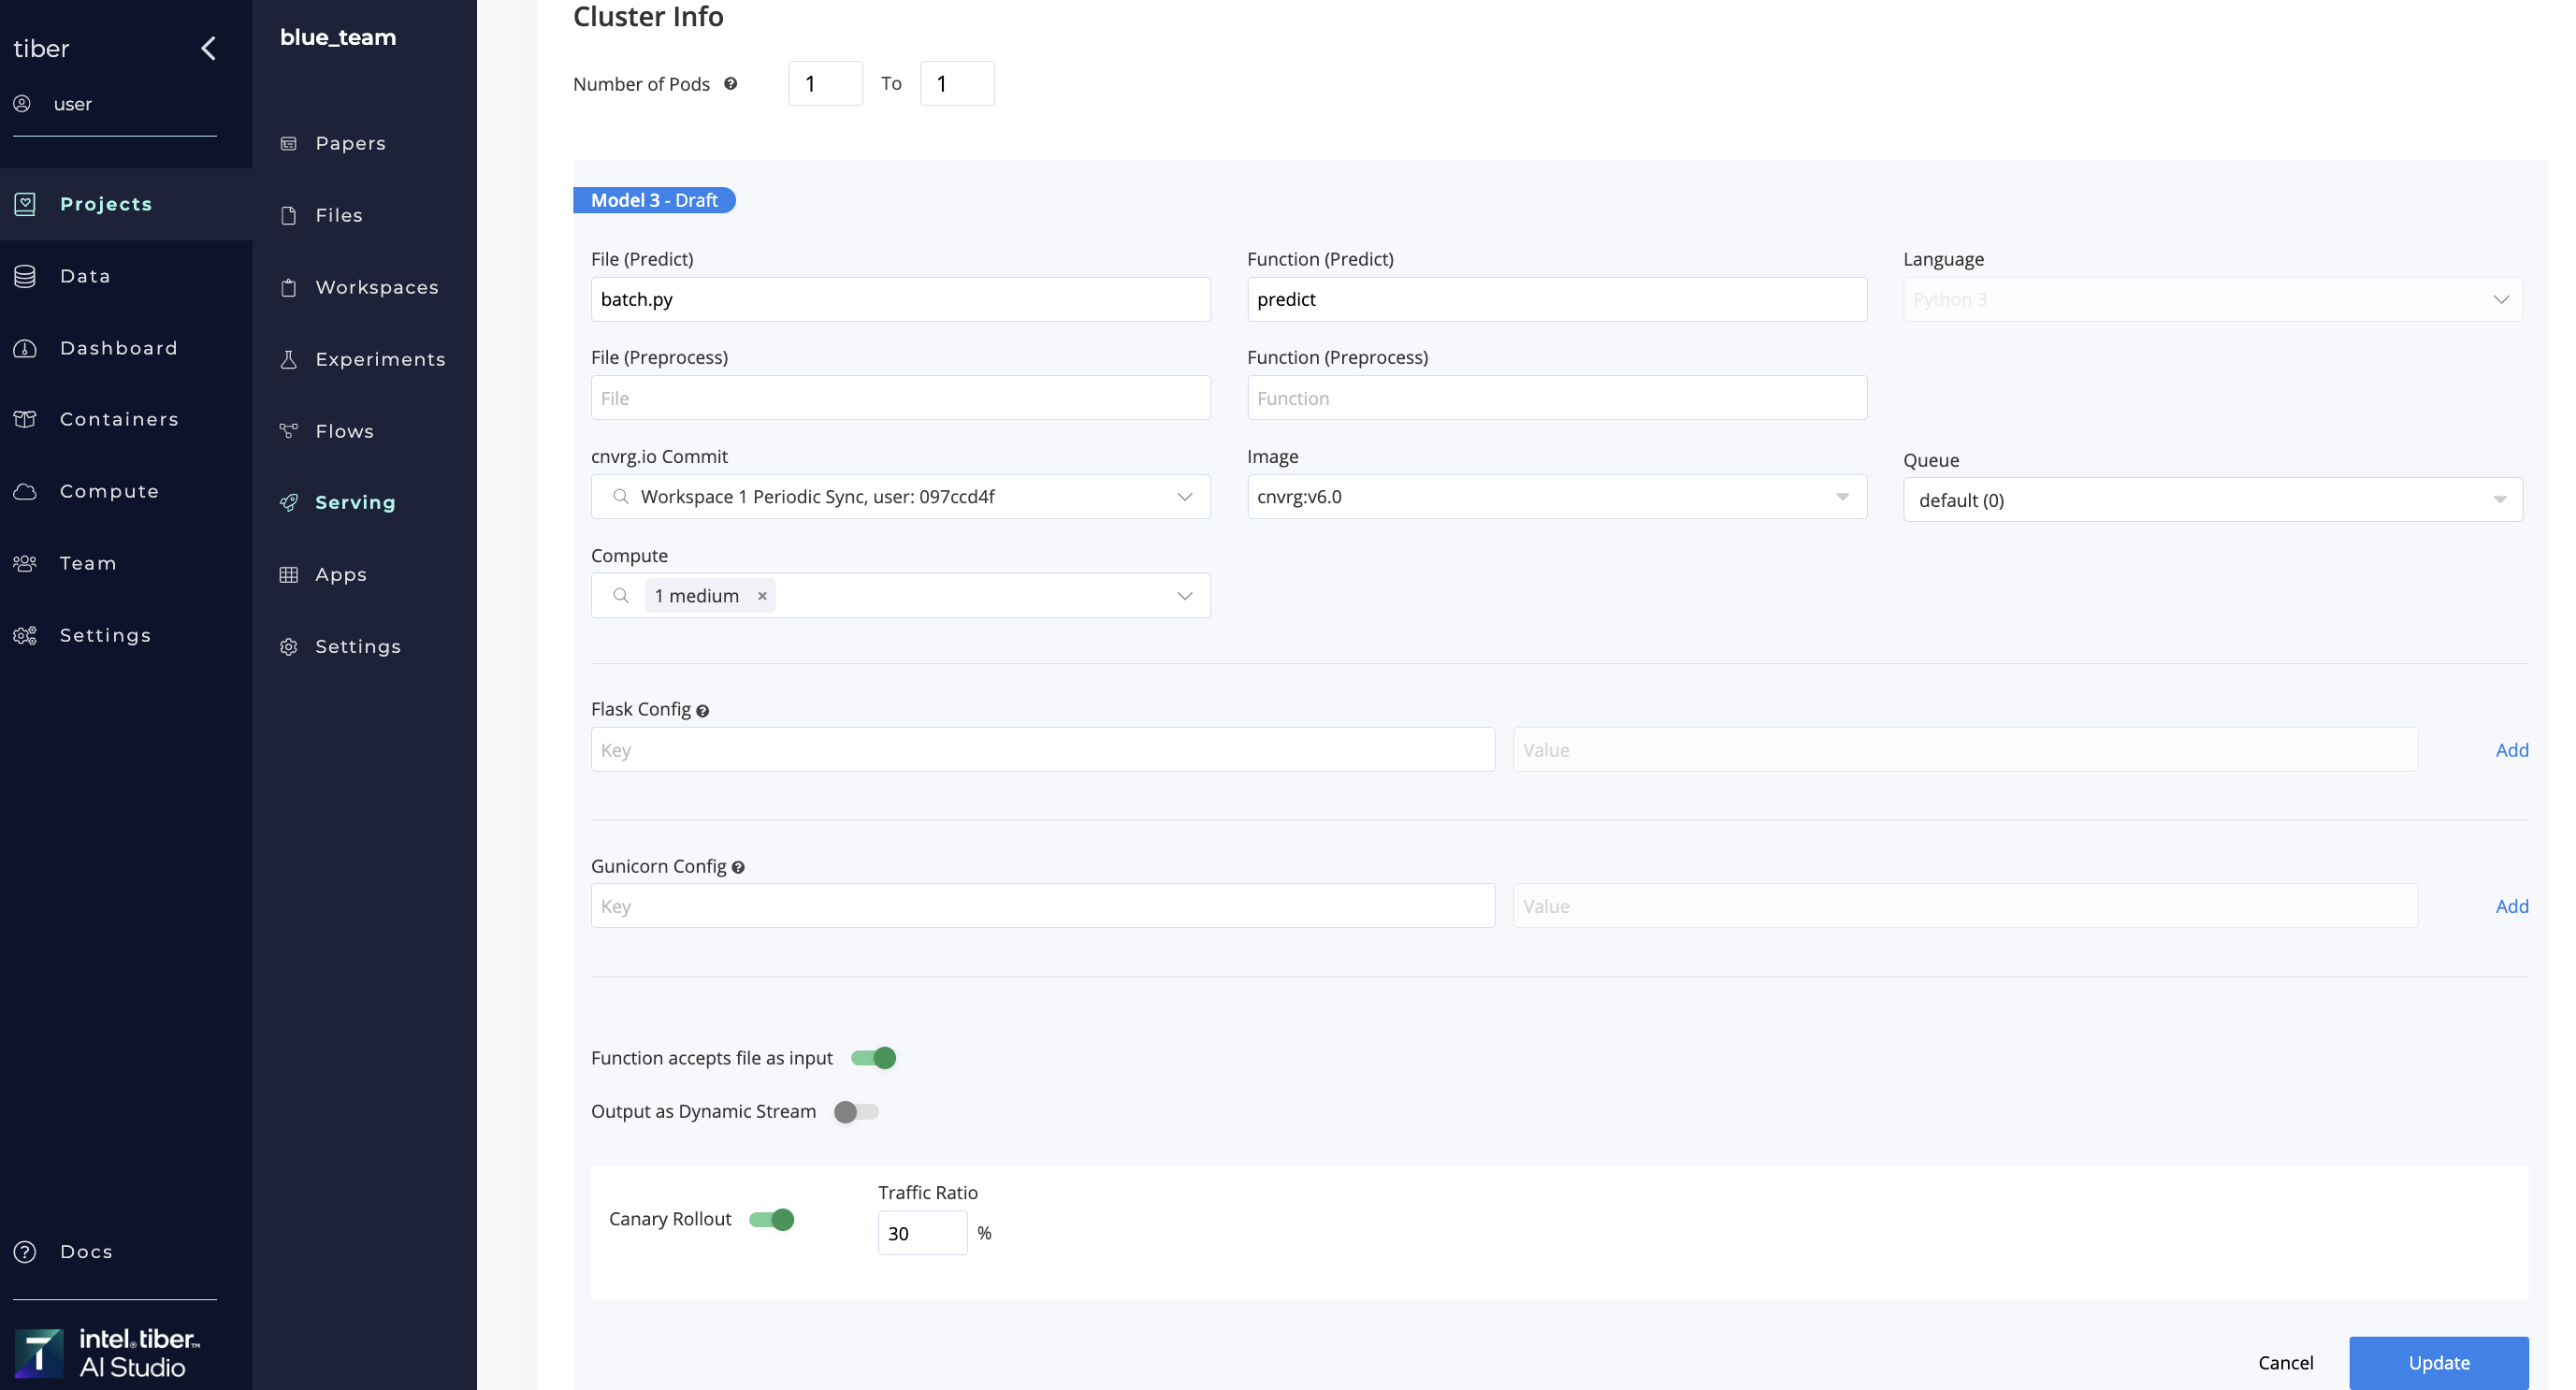
When rolling out a new model to an existing service, AI Studio offers a Canary Rollout, which manages the percentage of incoming traffic served by the new model. This ratio can be subsequently increased, as desired.
The software also provides the ability to rollback the model if it is not meeting requirements. In this case, the previous model is served to all traffic.
Using flows, users can create a fully automated canary release with gradual rollout according to custom validation and set an automatic rollback, if needed.
# Rollout a new model
A new model can be rolled out to a selected ratio of incoming traffic in two ways:
- Using the endpoint's Config tab
- Using a flow's Deploy Task
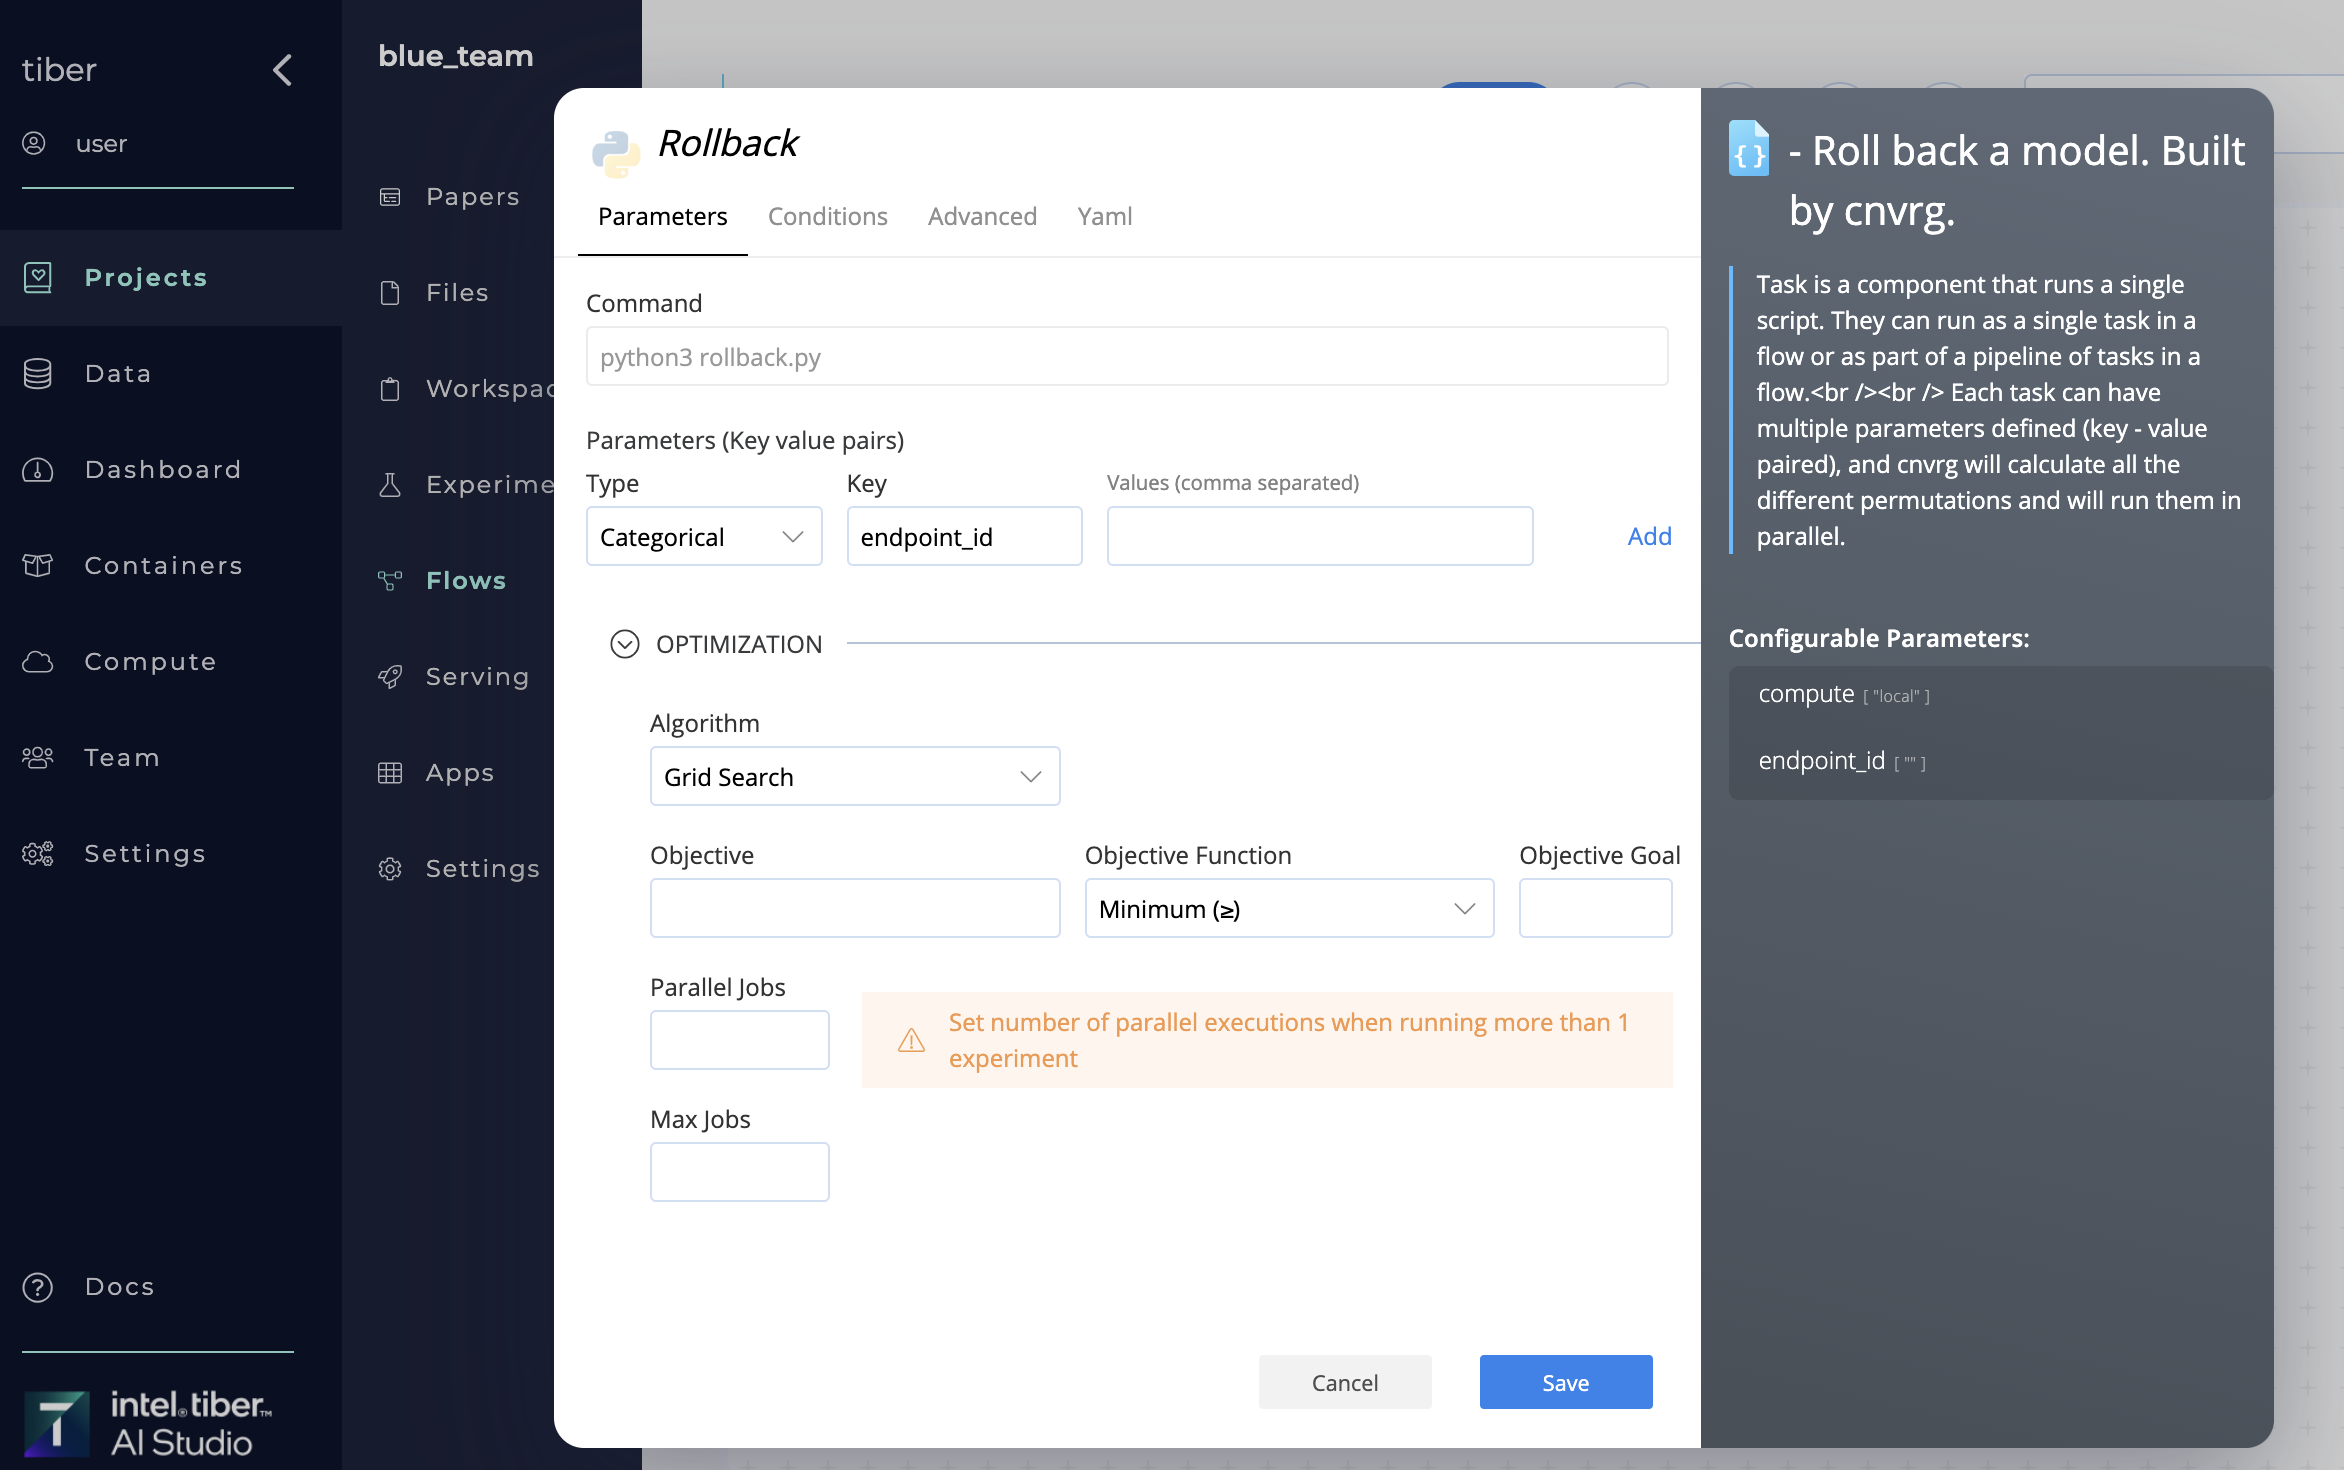
# Rollback a model
A new model can be rolled back using the Rollback in two ways:
- Using Rollback in a flow
- Using the SDK
When the library is run, AI Studio rolls back the selected endpoint's latest model. The previous model is then used.
The AI Library has one parameter, endpoint_id, which is name of the endpoint to be rolled back.
# Continual Learning (Triggers)
With AI Studio, users can leverage its triggers to ensure their endpoint is performing accurately without experiencing decay. A trigger allows users to run an action based on the metrics tracked in their endpoint, allowing them to simply and easily manage their endpoint and automate the upkeep of their service.
Users can send emails to their team or even run an end-to-end flow to retrain their model and automatically update their endpoint with zero downtime.

The triggers are based on the metrics that AI Studio logs within an endpoint.
To accomplish this using the SDK, use following command within the endpoint function:
from cnvrgv2 import Endpoint
def predict(data):
    ep = Endpoint()
    ep.log_metric("key",0.1)
    return(data)
Now that a metric is being logged, it can be used as the tag inside a new trigger.
TIP
More information on ep.log_metric() can be found here.
To create a new trigger, click the Continual Learning tab in a desired endpoint. Click New Alert and then provide the necessary details in the displayed panel, which contains the following sections:
# Info:
- Title: The name for the trigger.
- Severity: An indication of the alert's importance (Info, Warning, or Critical).
# If Condition:
- Tag: The AI Studio SDK metric used for the trigger. Note: Only tags with numeric values are currently supported.
- Comparision Type: The type of comparison used for comparing with the set value (greater than or less than).
- Value: The value being compared against.
- Run Condition Every: The frequency to poll the endpoint to test for the trigger.
- Minimum events: The number of times the condition is met before the alert is triggered.
# Action:
- Trigger: The type of action that occurs when the alert is triggered.
- Email: The email address(es) to receive an email when the alert is triggered (if applicable).
- Flow: The flow that runs when the alert is triggered (if applicable).
When finished, click Add to successfully create a new trigger. Whenever the criteria set in the trigger are fulfilled, the action set automatically runs.
NOTE
Ensure the tag selected for the trigger exactly matches the metric being logged in the endpoint.
# Endpoint Configuration Options
Additional AI Studio endpoint configuration options include Flask and Gunicorn.
# Flask Config
Flask is a lightweight web framework, which AI Studio uses to create an API for batch predict and web service endpoints.
Users can alter the Flask configuration in their endpoint by adding key-value pairs in the Flask Config section of the endpoint dialog.
Add each key-value pair to the Flask configuration file as follows:
app.config['KEY'] = 'VALUE"
These key-value pairs are then exported as environment variables that a deployment can access.
For example, to set the FLASK_ENV as development, complete the following:
- KEY:
FLASK_ENV - VALUE:
developmentThe value is exported in the configuration file and set in Flask.
Information on Flask configuration and key-value pairs can be found in the Flask documentation.
# Gunicorn Config
Gunicorn is a simple and scalable framework, which AI Studio uses to run the server for batch predict and web service endpoints.
Users can change the Gunicorn settings in their endpoint by adding key-value pairs in the Gunicorn Config section of the endpoint dialog.
Adhere to the following two requirements:
- Do not alter the
bindsetting. - Do not change flag or key settings; change only settings that work with a key-value pairs. For example,
reloadcannot be used, as it does not have a key.
Otherwise, use any of the config settings from the Gunicorn documentation.
There are two default Gunicorn config settings that AI Studio sets:
workers: Sets according to the CPU of the selected compute template.timeout: Submits alternative default values in the Gunicorn Config section, if desired. This defaults to1800.
For example, to change the number of threads to four on each worker for handling requests, provide the following:
- KEY:
threads - VALUE:
4When the service initializes, Gunicorn runs with--threads 4.
# Stream Output
Allows to start receiving parts of the response immediately as they are generated. This is useful for applications that handle large data sets or require real-time updates, such as live feeds, progress tracking, or continuous data monitoring. Data is sent in chunks, reducing latency and improving the responsiveness of the application. This feature integrates with existing endpoints, enabling developers to implement it without significant changes to their current infrastructure. By using 'stream output', developers can enhance the efficiency of data handling and provide a more dynamic and real-time experience for end-users.
← Distributed Jobs Apps →