# Workspaces
AI Studio workspace is an interactive environment for developing and running code.
The Intel® Tiber™ AI Studio platform supports many different interactive development environments such as Python scripts and Jupyter Notebooks. An environment is preconfigured with all dependencies preinstalled and all its files and data preserved across workspace instance restarts. Moreover, a workspace's automatic version control and scalable compute provide virtually unlimited compute resources to perform your data science research.
To run on remote computes, AI Studio has built-in support for JupyterLab, JupyterLab on Spark, RStudio, and Visual Studio Code.

The topics in this page:
# Supported Workspaces
The Intel® Tiber™ AI Studio platform platform supports the following workspace types:
# JupyterLab
JupyterLab is a next-generation web-based user interface (UI) for Project Jupyter. JupyterLab enables you to work with documents and activities such as Jupyter Notebooks, text editors, terminals, and custom components (such a Python enviroments) in a flexible, integrated, and extensible manner.
To switch your JupyterLab Notebook to dark (night) mode, click Settings inside the workspace. Then, click JupyterLab Theme and JupyterLab Dark.
# JupyterLab on Spark
JupyterLab can also be run on Spark in AI Studio. Select this option with a compatible Spark Compute template to use JupyterLab backed by Spark.
# RStudio
RStudio is an integrated development environment (IDE) for R. It includes a console, a syntax-highlighting editor that supports direct code execution, as well as tools for plotting, viewing history, debugging, and managing workspaces.
# Visual Studio Code
Visual Studio Code is a lightweight but powerful source code editor, which runs on your desktop and is available for Windows, macOS, and Linux. It includes built-in support for JavaScript, TypeScript, and Node.js. It has a rich ecosystem of extensions for other languages (such as C++, C#, Java, Python, PHP, and Go) and runtimes (such as .NET and Unity).
Learn more about Visual Studio Code.
You can add a Visual Studio Code settings file to your user account. This is used to configure any Visual Studio Code workspaces you start.
# Workspace Environment Overview
Similar to the execution of any other AI Studio machine learning (ML) job, when a workspace is created without an existing volume, AI Studio constructs its environment as outlined in the following steps:
- Pulls and executes the selected container.
- Clones the selected Git branch and commit (if project connected to Git) into
/cnvrg. - Clones the latest versions of your files from your projects Files tab (or the chosen AI Studio commit) into
/cnvrg. - Clones or attaches the selected datasets into
/data. - Installs packages from the
requirements.txtfile (if it exists). - Executes the
prerun.shscript (if it exists).
When AI Studio completes these steps, the environment is fully constructed and the workspace is loaded.
For more information see Environment.
# Workspace Usage
# Starting a workspace

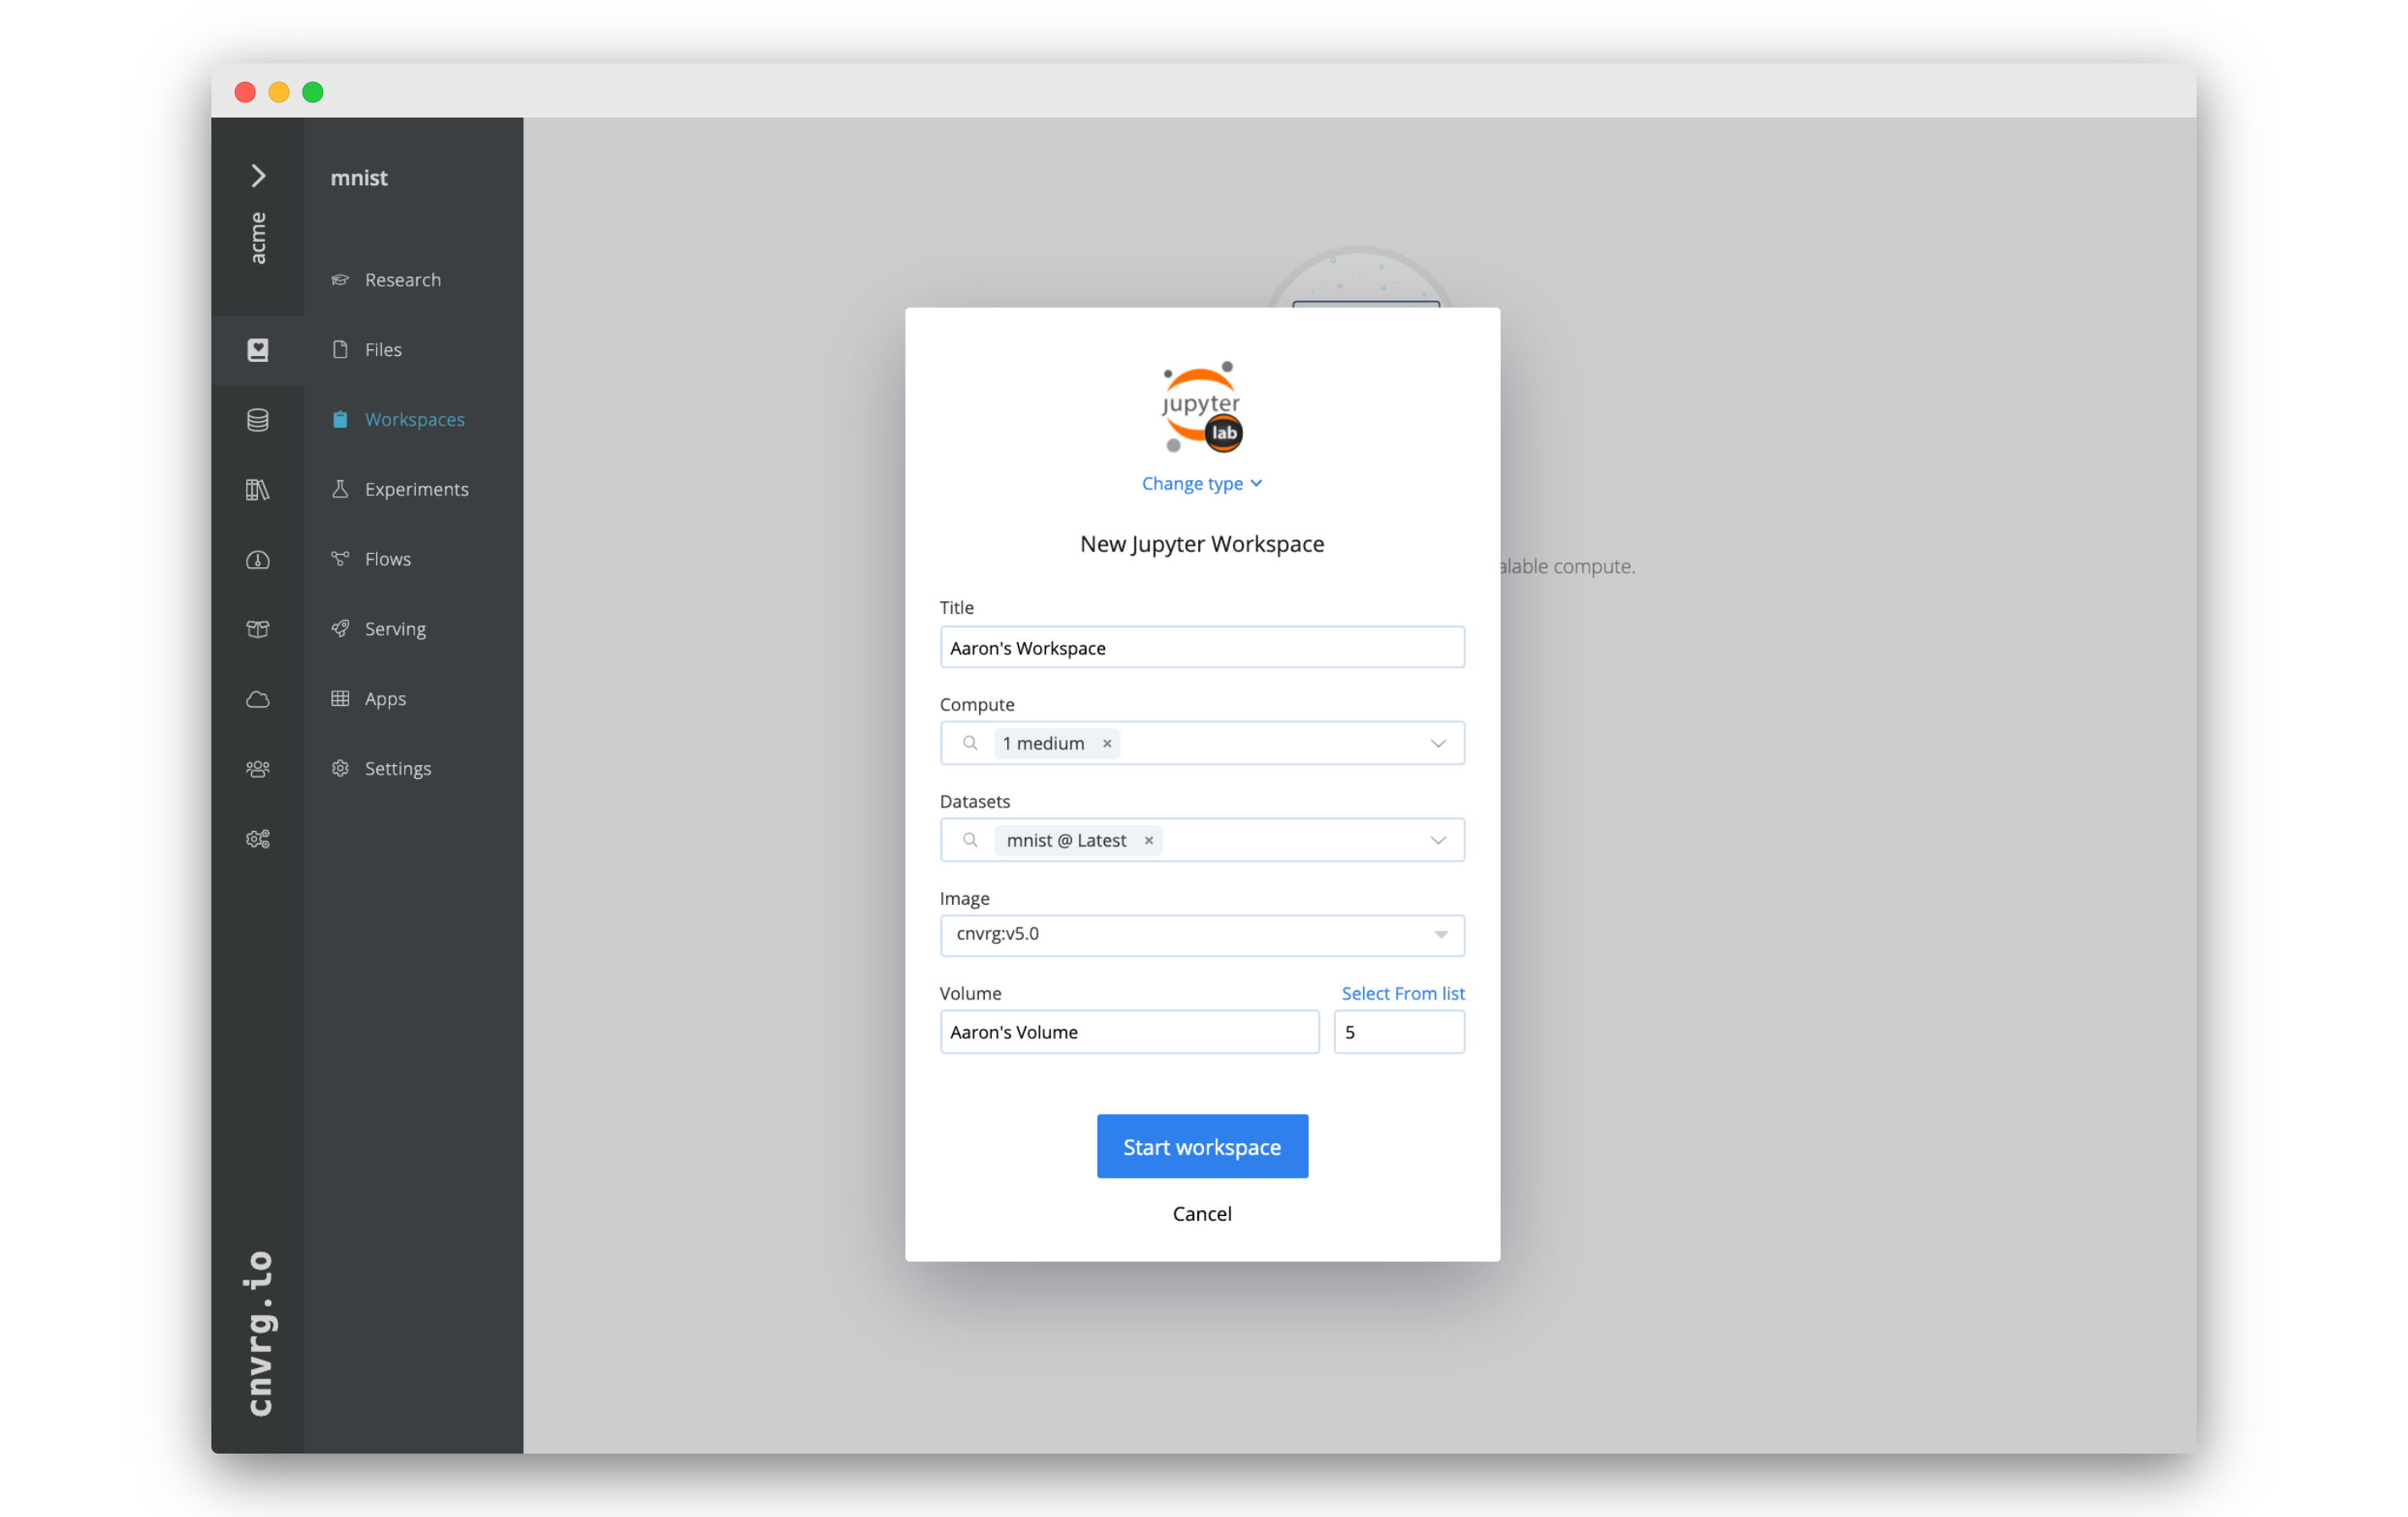
Complete the following steps to start a new workspace:
- Open a project and then click the Workspaces tab.
- Click Start a Workspace.
- Click Change type to select the notebook type: JupyterLab, JupyterLab on Spark, RStudio, or VSCode.
- Set the Title for the workspace.
- Select a Compute template(s) for your workspace.
- Select Datasets to add to your workspace, if desired. (Optional)
- Select a Docker Image to use for your workspace.
- Choose an existing Volume or create a new one. (Optional)
- Click Start workspace.

# Stopping a workspace
AI Studio workspace stays active until a user stops it or it reaches the max duration.
There are two ways to stop a running workspace:
- From the Workspaces table
- From inside a workspace
Complete the following steps to stop a workspace that is loading or running:
- Click the Workspaces tab.
- Complete one of the following two steps:
- In the Workspaces table, click the menu at the right end of the workspace to stop, then click Stop.
- Click the workspace name to stop, then click the Stop button next to its name at the top of the displayed pane.
- Confirm the stop action.
# Rerunning a workspace
There are two ways to rerun or reopen a stopped workspace:
- From the Workspaces table
- From inside the workspace
Complete the following steps to rerun a stopped workspace:
- Click the Workspaces tab.
- Complete one of the following two steps:
- In the Workspaces table, click the menu at the right end of the workspace to resume, then click Start.
- Click the workspace name to resume, then click the Start button next to its name at the top of the displayed pane.
- Confirm the run action.
# Deleting a workspace
Complete the following steps to delete a workspace:
- Click the Workspaces tab.
- In the Workspaces table, click the menu at the right end of the workspace to delete, then click Delete.
- Confirm the deletion.
# Workspace Assets
# Using Compute
Select one or more Compute templates when starting the workspace. If the first compute is unavailable, the job attempts to run on the next compute you have selected, and so on. If you only select one compute template, the job waits until it is available to run or until the wait time reaches the max duration.
# Using Datasets
When starting a workspace, AI Studio provides the option to include one or more Datasets. You can also choose a specific query or commit of the dataset at this point.
When you clone or attach a Dataset, it is mounted in the remote compute and is accessible from the absolute path: /data/name_of_dataset/.
For example, when running an experiment, if you include the dataset hotdogs, the dataset and all its files can be found in the /data/hotdogs/ directory.
Datasets can also be added to a live workspace.
Refer to the Datasets section for more detailed information on uploading your datasets to AI Studio.
# Using Images
Select a Docker Image to serve as the basis for a virtual environment of the workspace.
The AI Studio default Docker images update regularly and support most standard use cases. Learn more about using your own custom Docker image to support your specific use case here.
# Workspace Volumes (Kubernetes Only)
Attention
This feature is available up to app version v5.2.4 and has been deprecated, with functionality now replaced by Advanced Volumes in later versions.
Workspace Volumes allow you to create a persistent file system for your workspace. This enables you to persist the exact same files and datasets, even after shutting down workspaces and restarting them.
When a workspace is started without a volume, a fresh environment is created, requiring user reconfiguration. With a volume, AI Studio loads the exact previously configured setup. This treats a workspace as if it is your own laptop, with its configuration being the same at startup as at the previous shutdown.
Volumes are project-specific, so they can be used only by the project in which they were created. A volume has a title and a size (in GB), and can only be used by one workspace at a time.
When a volume is created, the environment is created according to the regular process. When a volume is reused, it is simply reattached at startup without the required cloning of AI Studio data, or Git.
Workspace Volumes are supported natively in cloud Kubernetes clusters. Extra configuration is required to enable this functionality in on-premise clusters. Please contact AI Studio support to set up AI Studio Volume functionality.
WARNING
This feature is not supported with on-premise machines.
# Persist or attach a volume's files
A volume is attached to /cnvrg (the working directory) and /data. This means the volume persists files only in these two locations.
If you are working with a cached dataset commit, the commit does not persist in the volume and thus needs to be reattached.
Python packages and environment setup are not persisted either.
# Create a volume
Complete the following steps to start a workspace and create its volume:
- On a project's dashboard or from the Workspaces page, click Start a Workspace.
- In the displayed dialog, complete the regular workspace form: Title, Compute, Datasets, and Image.
- Next to Volume, click + Create New. The Volume field displays.
- Enter a Volume Title and Size (GB) for the new volume.
- Click Start Workspace. The workspace environment is constructed and the volume is created and attached.
# Use an existing volume
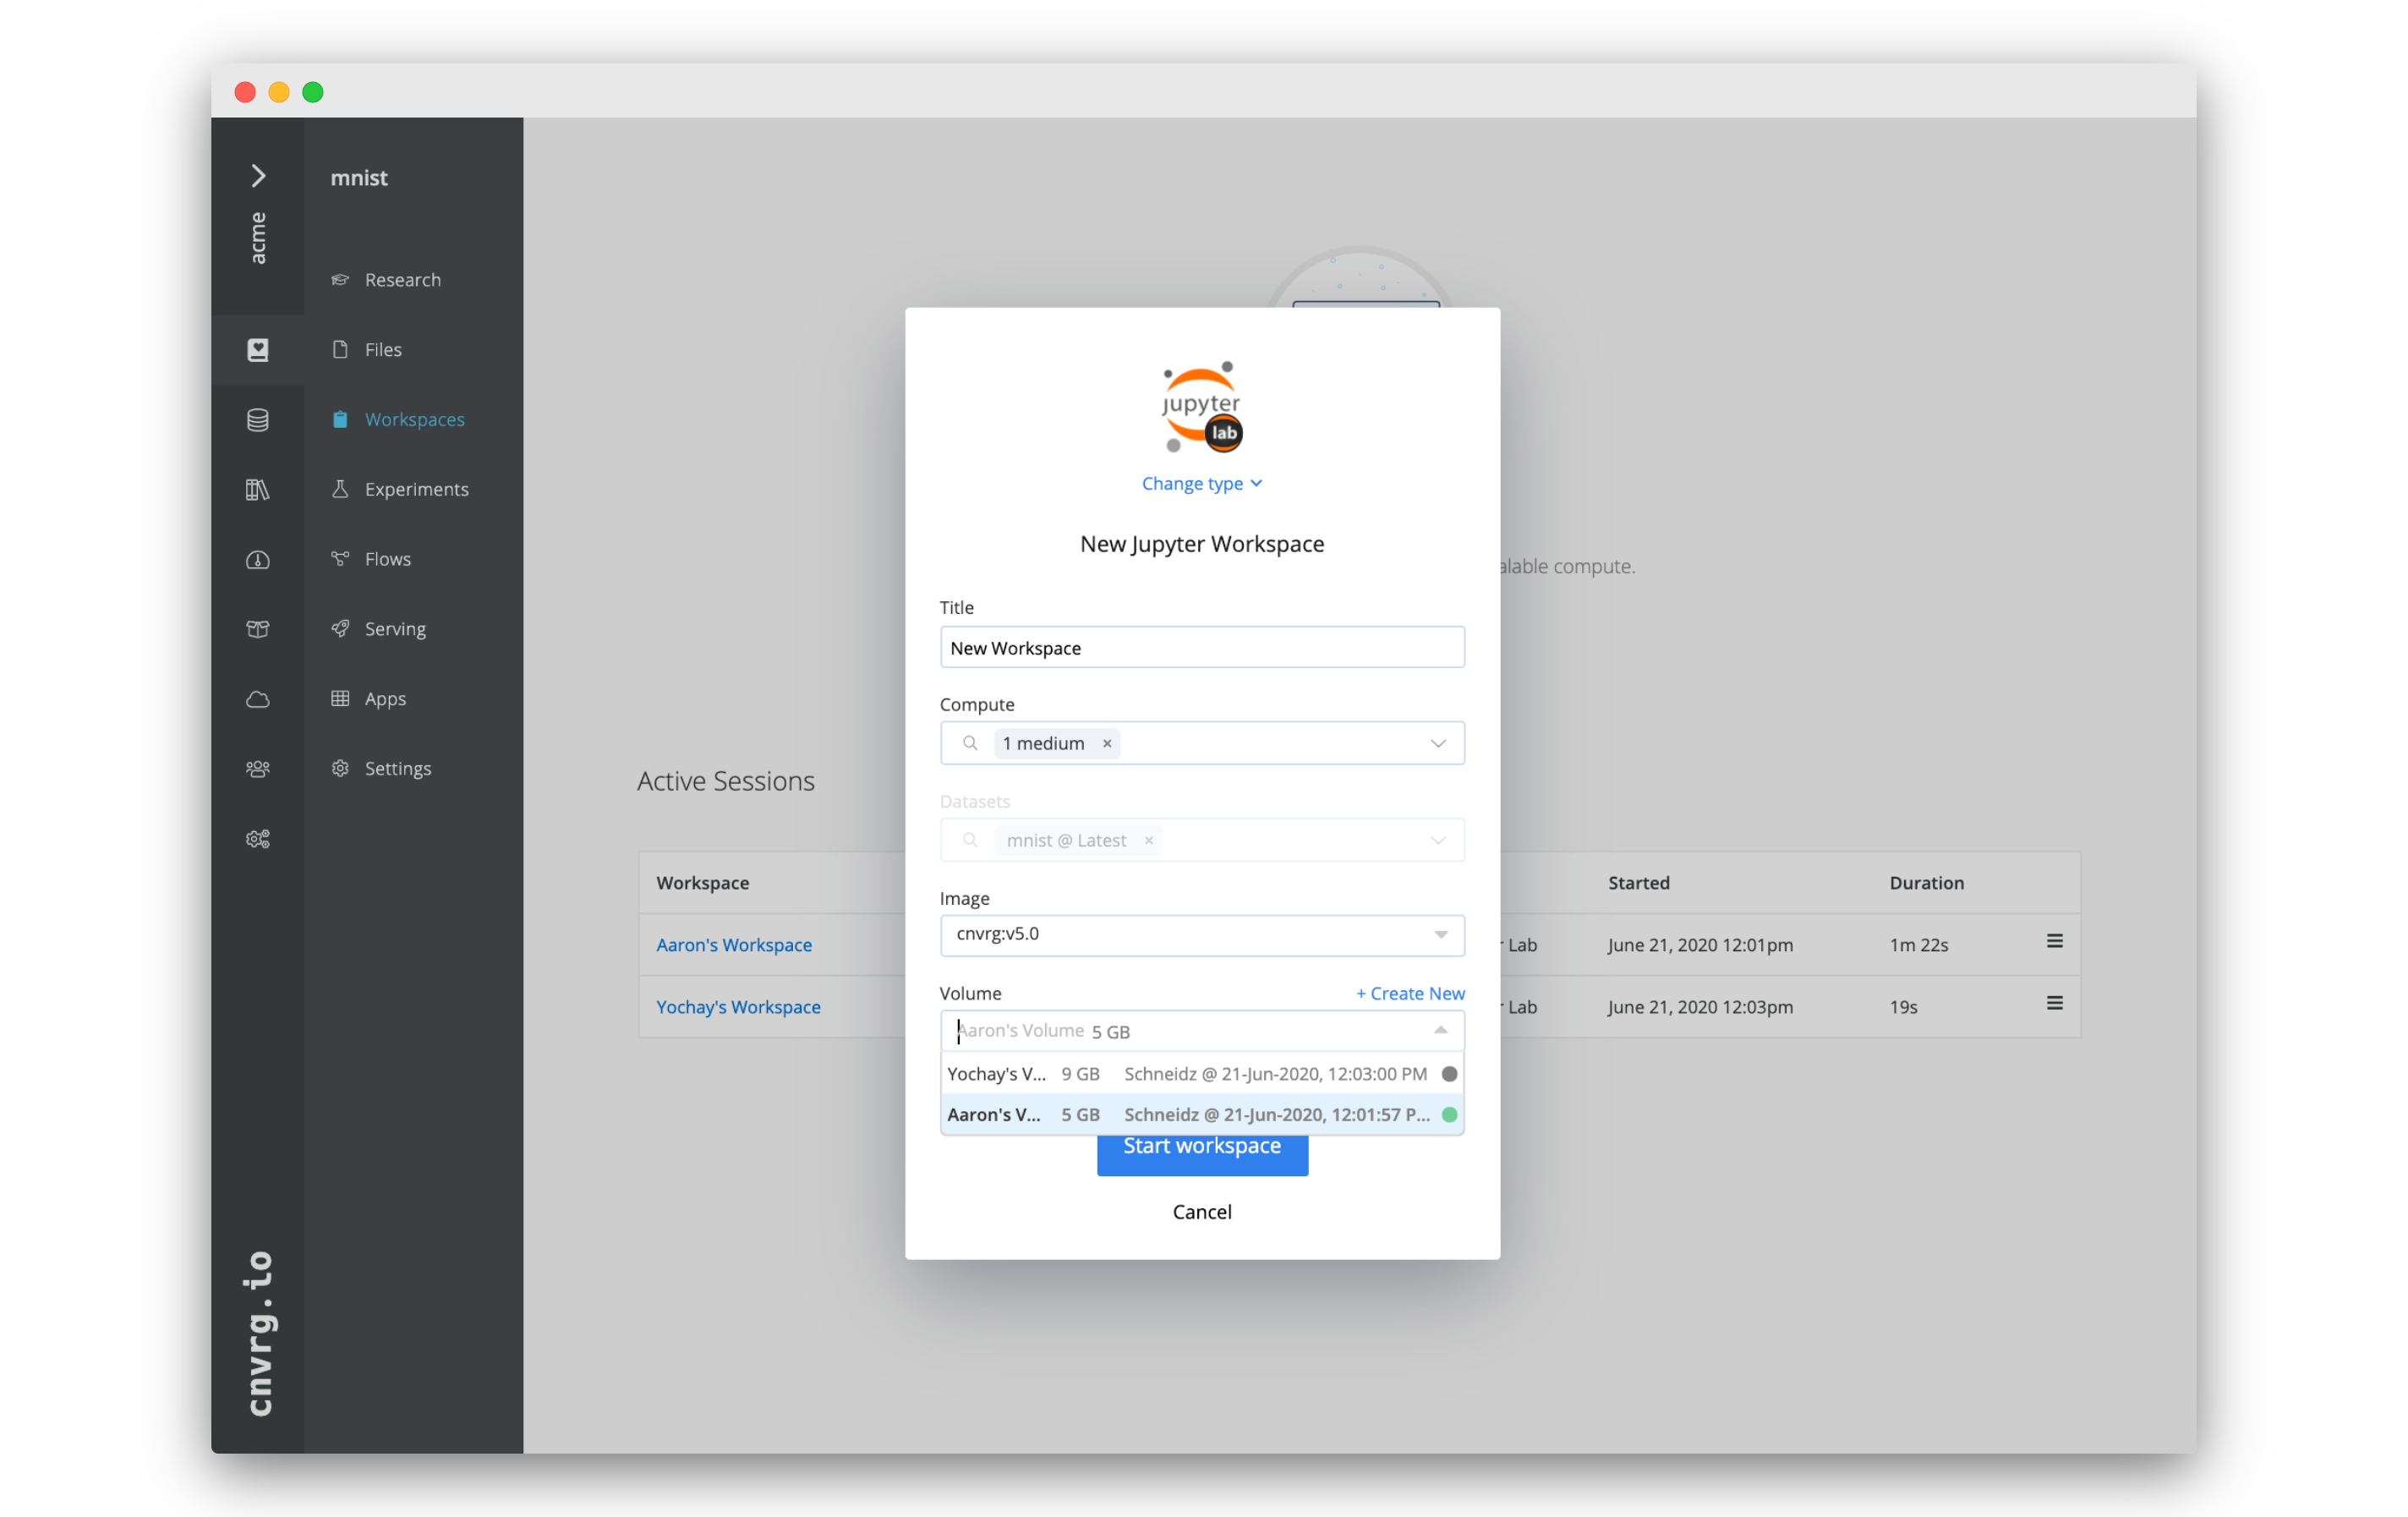 When restarting a closed workspace previously run with a volume, AI Studio automatically reattaches the volume. Ensure the volume is not currently in use before restarting the workspace.
Complete the following steps to create a new workspace with an existing volume:
- On a project's dashboard or from the Workspaces page, click Start a Workspace.
- In the displayed dialog, complete the regular workspace form: Title, Compute, and Image. Note: Using a volume overrides the Datasets selector, eliminating the need to select a dataset.
- Select the desired volume using the Volume selector. Only volumes not currently in use can be selected.
- Click Start Workspace. The workspace environment is constructed and the volume is attached.
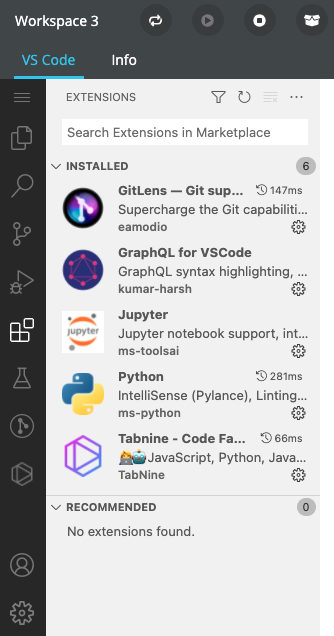
# Save and reload VScode extensions automatically
When using VScode, users often want to save and use their favorite extension, so upon startup, their workspace loads it automatically. To accomplish this, complete the following steps:
- Start a new VScode workspace and create or attach a volume to it. The volume can be any size that meets requirements.
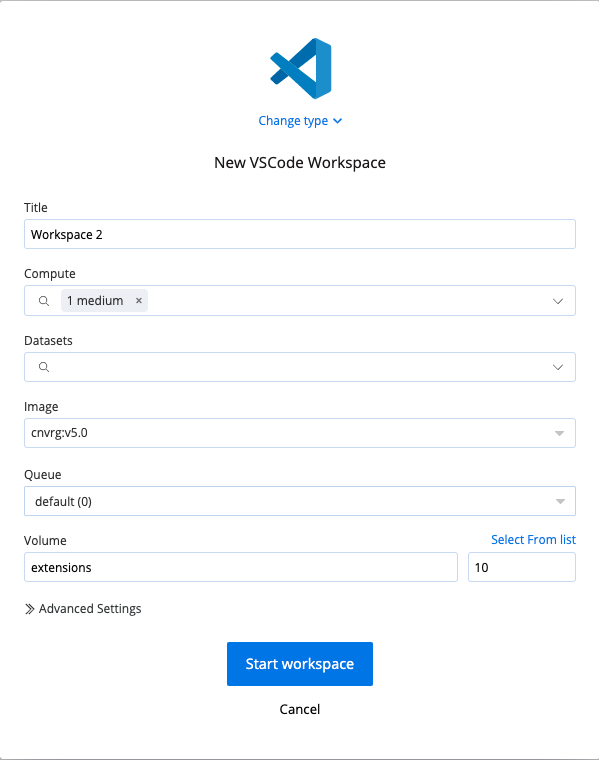
- Once the workspace runs, use the Extensions tab to install the desired extensions:
Continue working with your VScode workspace.
Once finished, click the Stop button (or wait for AI Studio to stop it after idle time).
When next using a VScode workspace, either start the same workspace or create a new one and attach the volume created in step 1. Once the workspace is running, the VScode extensions load automatically.
The following provides an example of a new workspace (Workspace 3). First, attaching the volume:
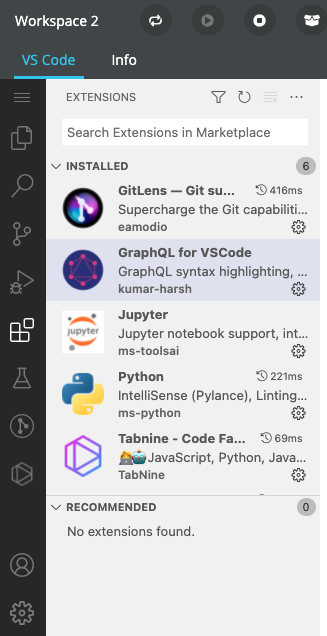
Then, the extensions automatically installing onto it:
# Workspace Controls

Inside a workspace, its environment displays in the center, where you can access all the functionality of JupyterLab, RStudio, and Visual Studio Code.
However, you also have access to other controls designed to make interfacing with AI Studio from a workspace as seamless as possible.
# Workspace titlebar
The following controls display above the workspace:
- Workspace Name: Click to edit the workspace title, if desired.
- Stop: Click to stop a running workspace and release its compute resources.
- Sync: Click to sync the workspace's working directory with AI Studio. The workspace also periodically syncs according to the Sync time set in the project Settings > Environnement tab.
- More: Click to access the Upload (force control), which runs the command
cnvrg upload --forceinside the workspace.
# Workspace sidebar
The workspace sidebar controls enable users to add datasets, monitor running experiments, use AI libraries, view information and logs, and use tools like SparkUI and TensorBoard.

The following workspace icons display in the right sidebar:
- Datasets: Click to view the datasets attached to the workspace and add others.
- Libraries: Click to view and interact with the AI Library.
- Experiments: Click to view experiments running from the workspace.
- Apps: Click to publish an app or dashboard.
- Info: Click to view details of the workspace session.
- TensorBoard, SparkUI and others: Click to view the TensorBoard or SparkUI of your workspace.
# Syncing
Because the workspace runs on a remote compute, the workspace must be synced to commit file changes back to AI Studio.
Enable auto-sync in your project settings to automatically sync the workspace after a specified interval has passed.
To sync on demand, click the Sync button that displays above the workspace.
# Datasets on a live workspace
Click the Datasets icon in the right sidebar to control the datasets attached to your workspaces or attach new ones.
The displayed page contains a list of the datasets currently attached. For each dataset, AI Studio displays the name, size, and file count.
You can also choose a specific query or commit of the datasets.
When you choose to include a dataset within a workspace (whether at start-up or on-the-fly using the sidebar), the dataset is mounted in the remote compute and is accessible from the absolute path: /data/<name_of_dataset>/.
For example, if you include a dataset hotdogs in the workspace, the dataset and all its files can be found in the /data/hotdogs/ directory.
If the dataset is still cloning, the cloning symbol displays next to the dataset name.
# Attach new datasets to the workspace
- Click Select Datasets To Attach.
- For each dataset to add to the workspace, select the commit or query and the portion of the dataset to clone.
- Click the dataset to add it to the list of datasets for the workspace.
You can remove a dataset from the list by clicking the X next to its name. - Click Attach.
The selected datasets begin cloning to the workspace. You can track their statuses from the datasets panel where you attached them.
TIP
Any datasets added on-the-fly are located at the absolute path: /data/name_of_dataset/.
# AI Library components in a workspace
You can use all of your available AI Library components from within a workspace.
Complete the following steps to access and use an AI Library component:
- Click the Workspaces tab.
- In the right sidebar, click the Libraries icon.
- Select the library to use.
- Copy the code.
- Paste it in your workspace and run it.
# Active experiments viewing from a workspace
Complete the following steps to view experiments running from the workspace:
- Click the Workspaces tab.
- In the right sidebar, click the Experiments icon.
Experiments currently running from the workspace are displayed here, where you can view their status and click through to their pages.
# Apps and Dashboards publication from a workspace
Complete the following steps to publish an app from a workspace:
- Click the Workspaces tab.
- In the right sidebar, click the Apps icon.
- Click Publish Apps.
- Follow the instructions here.
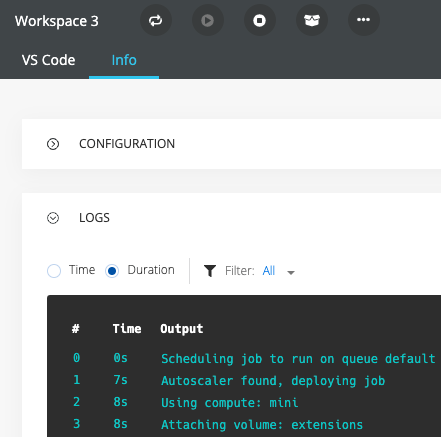
# Workspace Info
Click the Info icon to access the Workspace Info page and view a workspace's details. Accessing a closed workspace also shows the Workspace Info details.
Along the top of the page are summary details of the workspace session:
- Start time
- End time
- Duration
- Start commit
- Compute
- Image
- Volume
Below these details are the workspace logs and underneath the logs is a list of associated commits for the workspace.
# Remote SSH
You can use SSH to connect with a AI Studio workspace and code locally from your machine and IDE. Most major IDEs support this remote SSH feature, including Visual Studio Code and PyCharm (excluding community edition).
To open a remote SSH session, use the cnvrgv2 ssh start command on your local workstation. This begins an SSH session with a selected workspace. Once you run the cnvrgv2 ssh start command, it connects to the existing remote workspace and the SSH session goes live until you actively interrupt it. The command also identifies the host, port, username, and password required to add the workstation as an SSH host in your IDE.
NOTE
This command will require access to your cluster, with a kubeconfig file
# Requirements
The following is required to remotely SSH to your AI Studio workspace:
- cnvrgv2 CLI installed on your local machine. CLI installation
- kubectl installed on your local machine. kubectl installation
- The cluster's
kubeconfigthat the workspace runs configured on your local machine.
TIP
ssh-server does not need to be installed in the Docker image, as AI Studio configures this automatically.
# Remote SSH instructions
Complete the following steps to remotely SSH to your AI Studio workspace:
- Click your AI Studio project's Workspaces tab and launch any workspace type. Wait for the setup to complete.
- On your local machine, run the command
cnvrgv2 ssh start WORKSPACE_SLUGin a terminal session. You can also configure this command as required. - Wait for ssh to start. When it has started, the command identifies the
host,port,username, andpasswordfor the SSH session. - Add the SSH details as a host within your selected IDE. The default values is:
ssh root@localhost -p 2222. Ensure to include the port. - Connect to the newly added SSH host from your IDE. Enter the
passwordwhen prompted.
You now have connected to the workspace remotely and can code on your local machine while leveraging your workspace's remote compute. You can access all the files and contents from the remote container. When you are finished working, stop the session by ending the cnvrgv2 ssh start command.
NOTE
To disable the host key checking for ssh by default, add the following lines in your ssh config file (usually located at ~/.ssh/config):
Host localhost
  StrictHostKeyChecking no
To disable it for all hosts, change localhost to *, such that:
Host *
  StrictHostKeyChecking no
TIP
Check the AI Studio tutorials for step-by-step guides for Visual Studio Code and PyCharm.
# Workspace experiment tracking
A workspace provides the ability to run experiments and train models on-the-fly. You can run your scripts inside your workspace, but still access the AI Studio experiment tracking and visualization features.
To run an experiment locally through the SDK in a remote workspace with AI Studio tracking, run the experiment using myproj.experiments.create(). The experiment is recorded in the Experiments workspace sidebar. Track its progress either in the workspace or from the AI Studio Experiments page.
Use the myproj.experiments.create() method as follows:
from cnvrgv2 import Cnvrg
cnvrg = Cnvrg()
myproj = cnvrg.projects.get("myproject")
e = myproj.experiments.create(title="my new exp",
                              template_names=["medium", "small"],
                              command="python3 test.py")
NOTE
SDK commands can also be used to run experiments outside of a AI Studio workspace.
Learn more about using the Python SDK in the SDK docs.
# Git Integration
Workspaces facilitate code modifications and experiment runs and their results. While rapid experimentation is important, saving the code from a specific AI Studio job is essential to trackable and repeatable experiments. Though you can push to Git before each experiment, this can be avoided by using the git_diff parameter in your Experiment.run() command.
When you set git_diff=True, AI Studio also syncs the Git difference and saves the changes relative to your experiment's Git index. Then, after modifying your code and running experiments, you can simply compare the experiments, identify the most successful one, clone the AI Studio commit, and then push back the changes to your Git repository.
The following provides example experiment runs:
Run an experiment on remote compute using a script:
from cnvrg import Experiment
e=Experiment.run('python3 train,py', compute='medium', git_diff=True)
Run an experiment directly in your AI Studio workspace or local IDE (local Visual Studio Code/PyCharm):
from cnvrg import Experiment
e=Experiment.run(train(), git_diff=True)
Run an experiment with the CLI:
cnvrg run --git_diff=True `python3 train.py`
# Idle Workspaces
When working in AI Studio Workspaces, users may leave them online for an extended time period without use, for example, overnight. For this reason, AI Studio includes the option to automatically designate a workspace as idle, and thereafter, start a shutdown process. An idle workspace is defined by the following two conditions:
- No changes in the file system under the folders:
/cnvrgand/data - Usages of CPU, memory, and GPU (if exists) are each lower than 20% After more than set X minutes, AI Studio automatically starts to shut down the workspace.
NOTE
The above two conditions must be met before a workspace enters an idle state.
# Idle workspace settings
The number of elapsed minutes before AI Studio designates a workspace as idle is defined in organization settings. By default, it is set to 60 minutes. To enable Idle workspace functionality, an administrator enables the Idle flag in the organization settings and sets the number of minutes to perform an idle time check. If a user wants to change the idle time wait period, go to project Settings > Environment tab.
NOTE
A user can only decrease the Idle value that is set within organization settings. If a user needs to increase this value, an administrator can set it in the project settings.
# Shutdown process
Once a workspace is defined as idle, AI Studio notifies the user by sending an email stating the workspace entered an idle state. The user can still access the workspace for the next 15 minutes. After the 15-minute time period elapses, AI Studio performs the following actions to start the shutdown process:
- Syncs any changes in the
/cnvrgdirectory - Retains the volume attached to the workspace and eventually releases the resource behind it
← Dashboard Experiments →