# Datasets
Datasets in Intel® Tiber™ AI Studio platform allow users to automatically and easily upload and version any kind of file.
The AI Studio Datasets functionality uses an object storage for the backend to host any file type of varying quantities and sizes up to 500GB. Additionally, AI Studio Datasets allows you to version, label, and tag your data.
Datasets are managed at the Organizational level rather than on a separate Project level. Once you've uploaded Datasets to AI Studio in your Organization, you can reuse them in every Project, Experiment, and notebook.
The topics in this page:
# Datasets Page

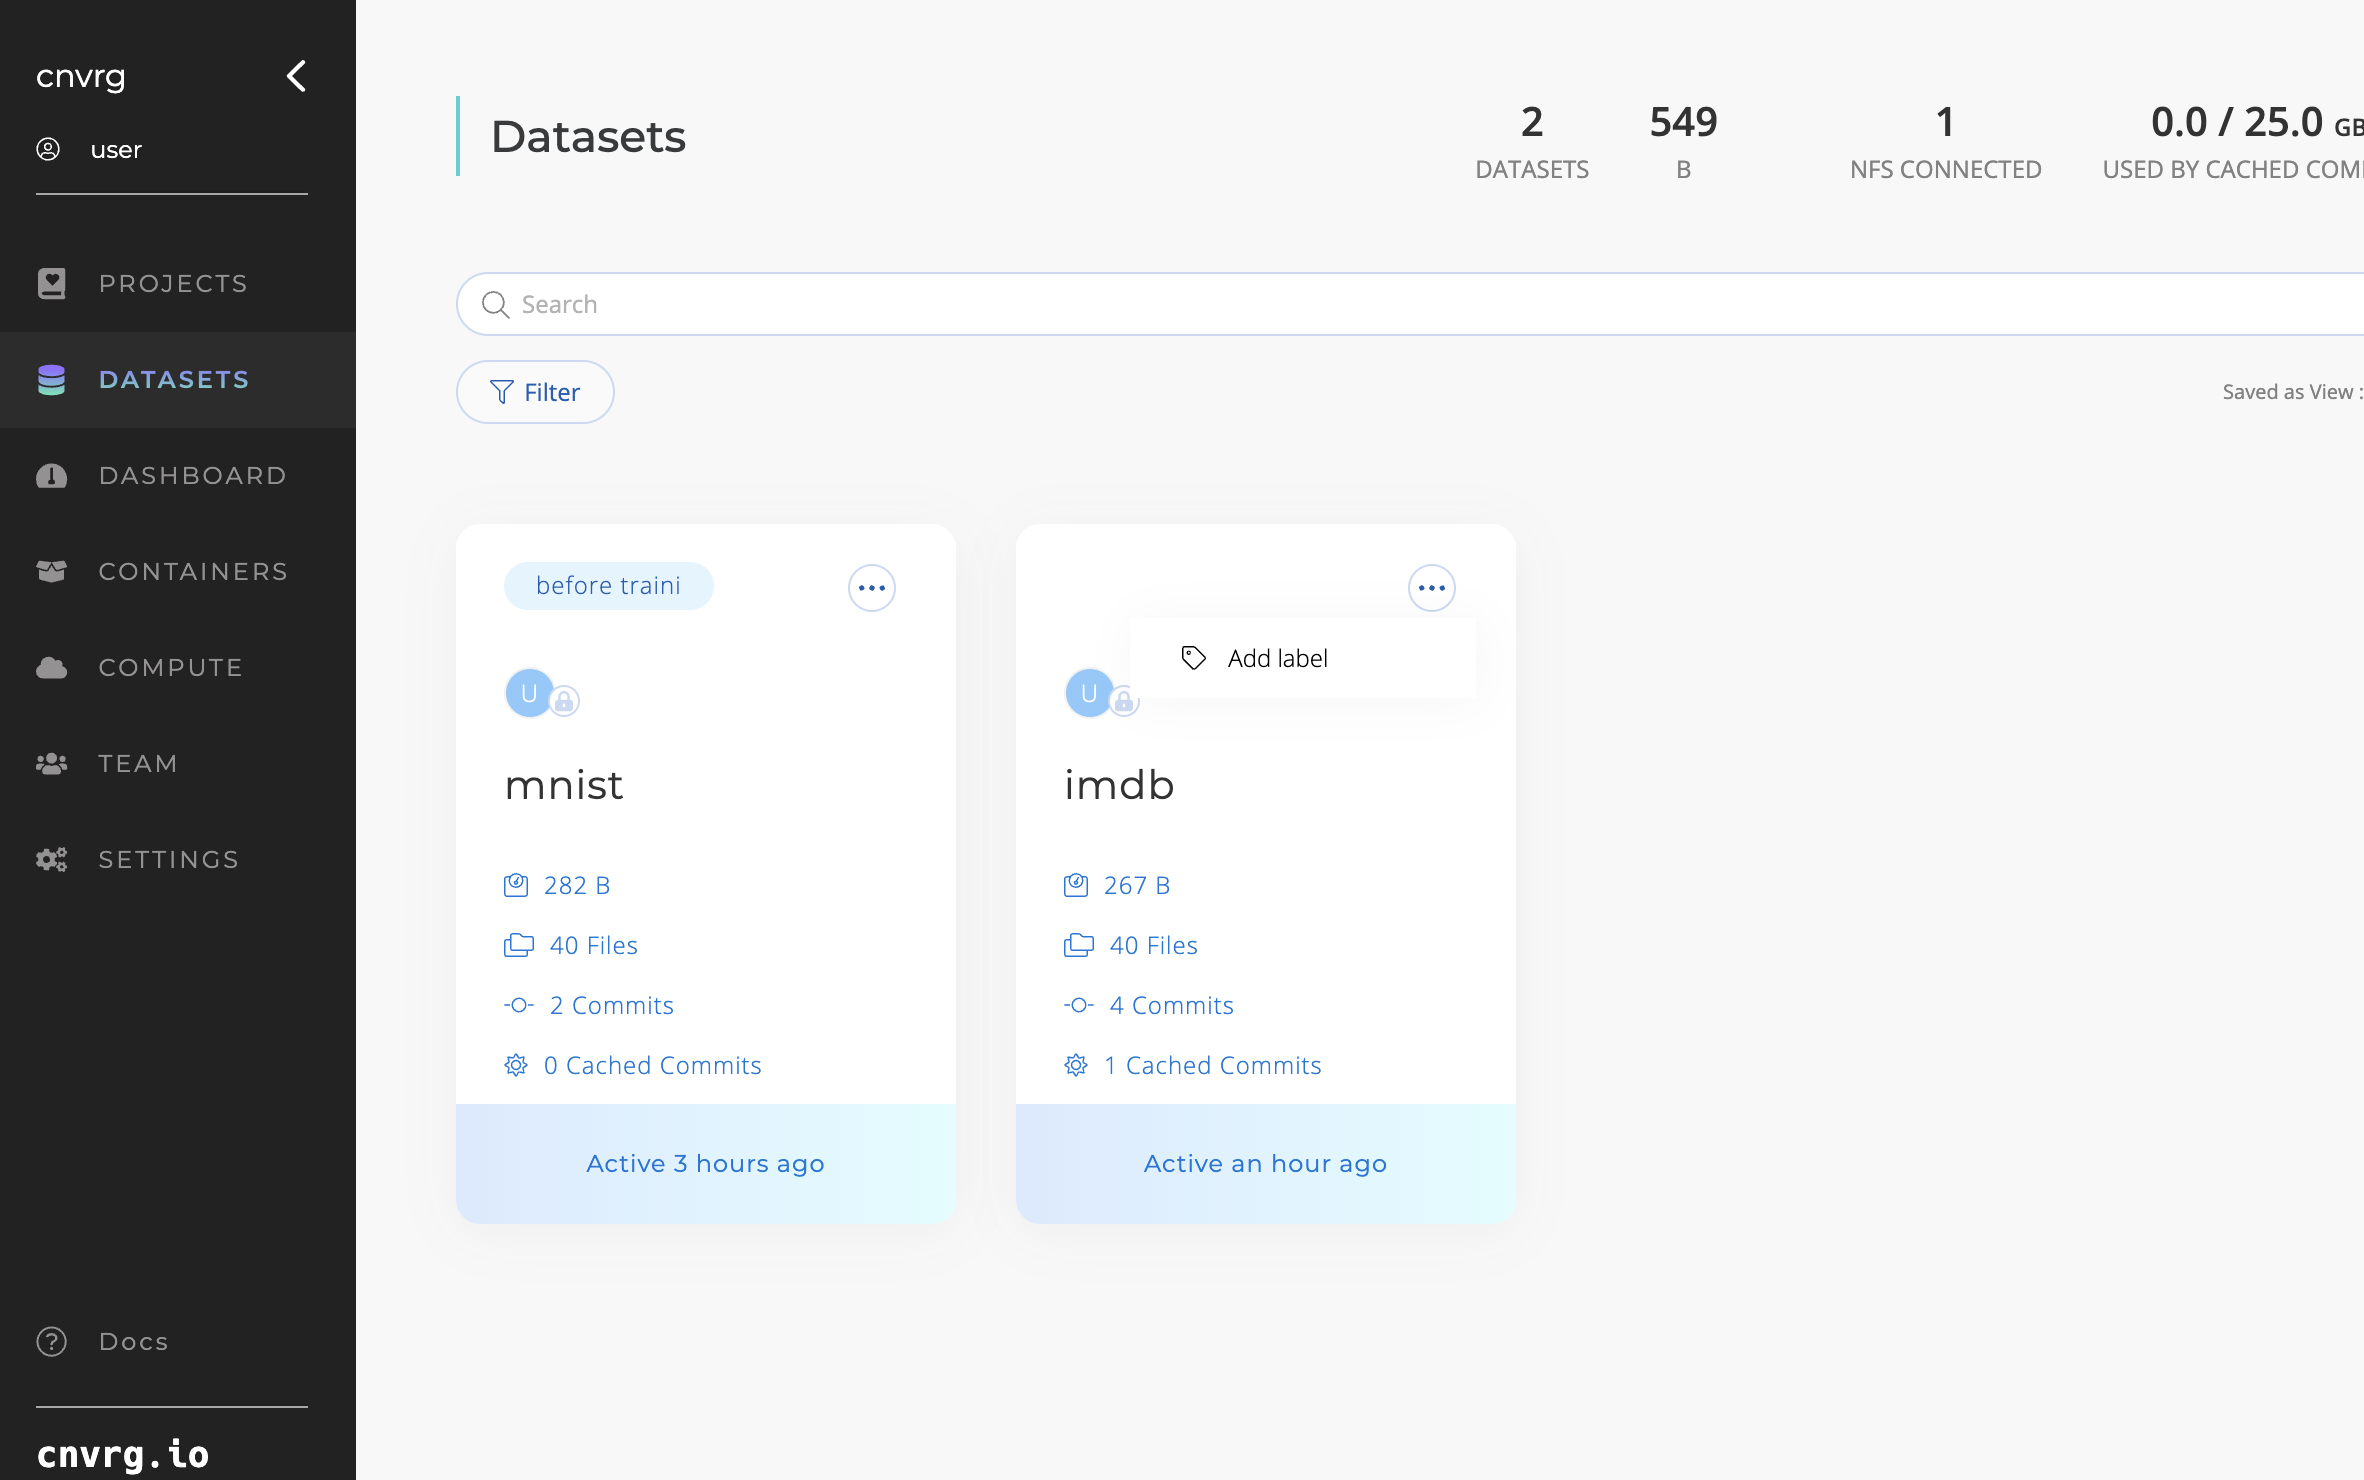
In the Dataset page you can create a new Dataset, or access existing Datasets of your Organization.
# Datasets Labels
The Dataset Labels feature allows users to apply customizable tags to datasets, enhancing organization and navigation. By categorizing items, users can efficiently locate and manage resources based on their needs and development stages.
- Enhanced Organization: categorize datasets by status, type, or other criteria.
- Improved Navigation: Quickly find specific items using label filters.
How to Create and Manage Labels:
- Navigate to Organization Settings.
- Navigate to datasets labels section.
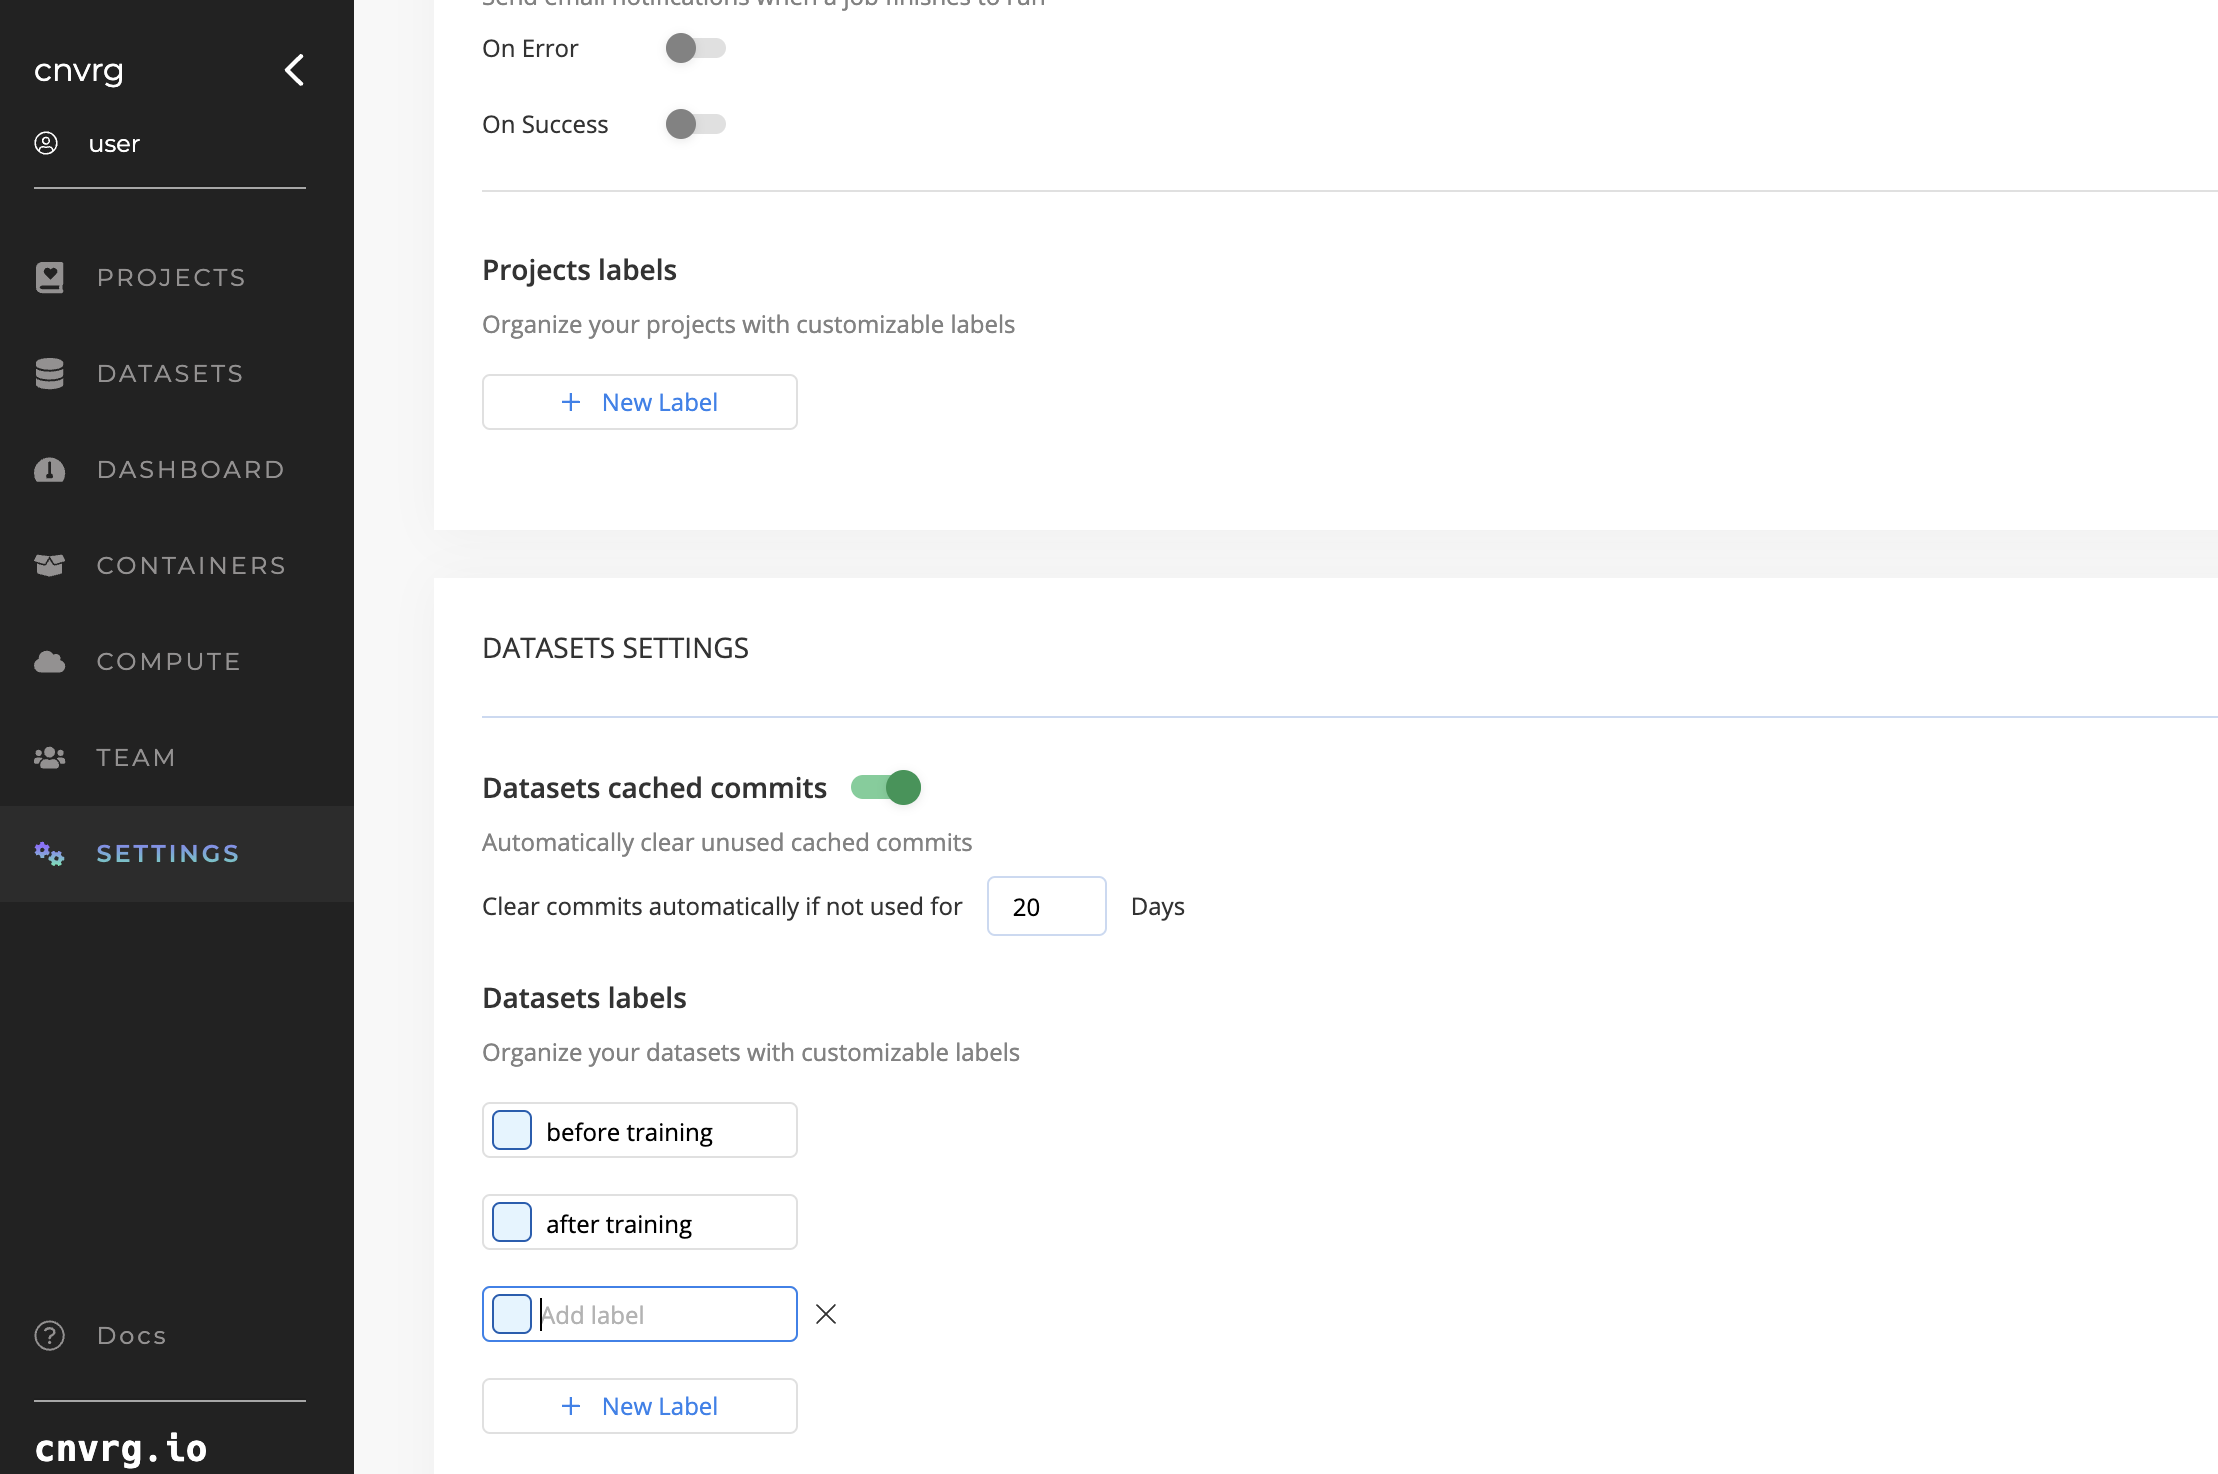
- Add New Label: Click ‘New Label' to create new label.
- Edit: Click on the label you want to change and edit and to update all occurrences of the label.
- Delete: Click on the X to delete. Removing a label deletes it from all associated datasets.
Operations with Labels:
- Apply Labels: On the Dataset card, click “Add Label” and select from the list.
- Remove Labels: On the Dataset card, click “Remove Label” to remove it only from that card.
- Change Label: Click on an existing label to view and select from all label options available for your organization.
# Dataset File Uploads
Use the following file-size guidelines to identify the correct method to upload your Dataset files:
- AI Studio user interface (UI): for small Dataset files where each upload instance is limited to 20MB.
- AI Studio command line interface (CLI): for files greater than 20MB but less than 5GB.
- Network File System (NFS): for Datasets greater than 5GB but less than 500GB. See NFS Integration.
- PersistentVolumeClaim (PVC) (Kubernetes only): for Datasets greater than 5GB but less than 500GB. They upload in Local Folders as an NFS mount. Refer to NFS Cache Configuration.
NOTE
These are guidelines: the Dataset doesn't have to be greater than 5GB to use PVC mount or NFS integration.
There are several ways to add Datasets:
- Through the web UI
- Through CLI commands
- Though a local cache configuration: NFS backend connection or a PVC mount
TIP
For a large Dataset, it is recommended to use the CLI, NFS, or PVC.
# Uploading Datasets using the web UI
The AI Studio UI suffices to upload small Dataset files. Complete the following steps to create a new Dataset:
- Navigate to the Datasets tab.
- Click + New Dataset.
- In the displayed panel, select a Name and a Type (optional).
- Click Create

AI Studio creates an empty Dataset ready for all your files to be added.
After creating your Dataset, you can upload your data using the drag-and-drop UI. Every upload session is counted as a commit.
WARNING
Keep in mind the AI Studio web UI limits each file upload instance to 20MB. If you want to upload larger files: use the CLI, NFS, or PVC.
NOTE
You can upload files to Datasets that you created using the UI in combination with the CLI.
# Uploading and removing files using the CLI
If you have a large Dataset, you can use the CLI.
TIP
Details about installing and using the CLI can be found here.
Upload data
Use the cnvrgv2 dataset put command to upload files to a remote Dataset without initializing a local version.
- Upload the entire current folder recursively (including all files & sub-folders & folder structure):
cnvrgv2 dataset put -n mnist .
the command will upload the matching files to the remote Dataset mnist.
- Upload a specific file:
cnvrgv2 dataset put -n mnist -f image.png
the command will upload the file image.png to the parent directory of the Dataset mnist.
- Upload a specific file from a path:
cnvrgv2 dataset put -n mnist -f training/image.png
the command will upload the file image.png to the folder training in the remote Dataset mnist.
- Upload files using regex:
cnvrgv2 dataset put -n mnist -f "*.png"
the command will upload all files with an extension .png to the remote Dataset mnist.
Learn more about cnvrgv2 dataset put in the CLI documentation.
Remove data
Use the cnvrgv2 dataset remove command to remove files from a remote Dataset without initializing a local version.
- Remove a specific file:
cnvrgv2 dataset remove -n mnist -f image.png
the command will remove the file image.png from the remote Dataset mnist.
- Remove a specific folder:
cnvrgv2 dataset remove -n mnist -f traning/
the command will remove the folder /traning and all its contents from the remote Dataset mnist.
Learn more about cnvrgv2 dataset remove in the CLI documentation.
# Version Control

The AI Studio platform automatically manages your Dataset with an internal version controlled system, so you can track your Dataset at every stage. Any action writes as a new commit, so you can browse and select specific versions. Versioning gives you the confidence to use your Dataset as you need; AI Studio always keeps it safe and controlled without lost files or features.
Access different versions of your data using the Version drop-down menu on the Dataset's page. Select the desired version and the page refreshes to display the selected version.
Under the Actions columns in any specific Dataset, click:
- Browse to perform queries on the Dataset.
- Revert to revert your Dataset to that specific commit version.
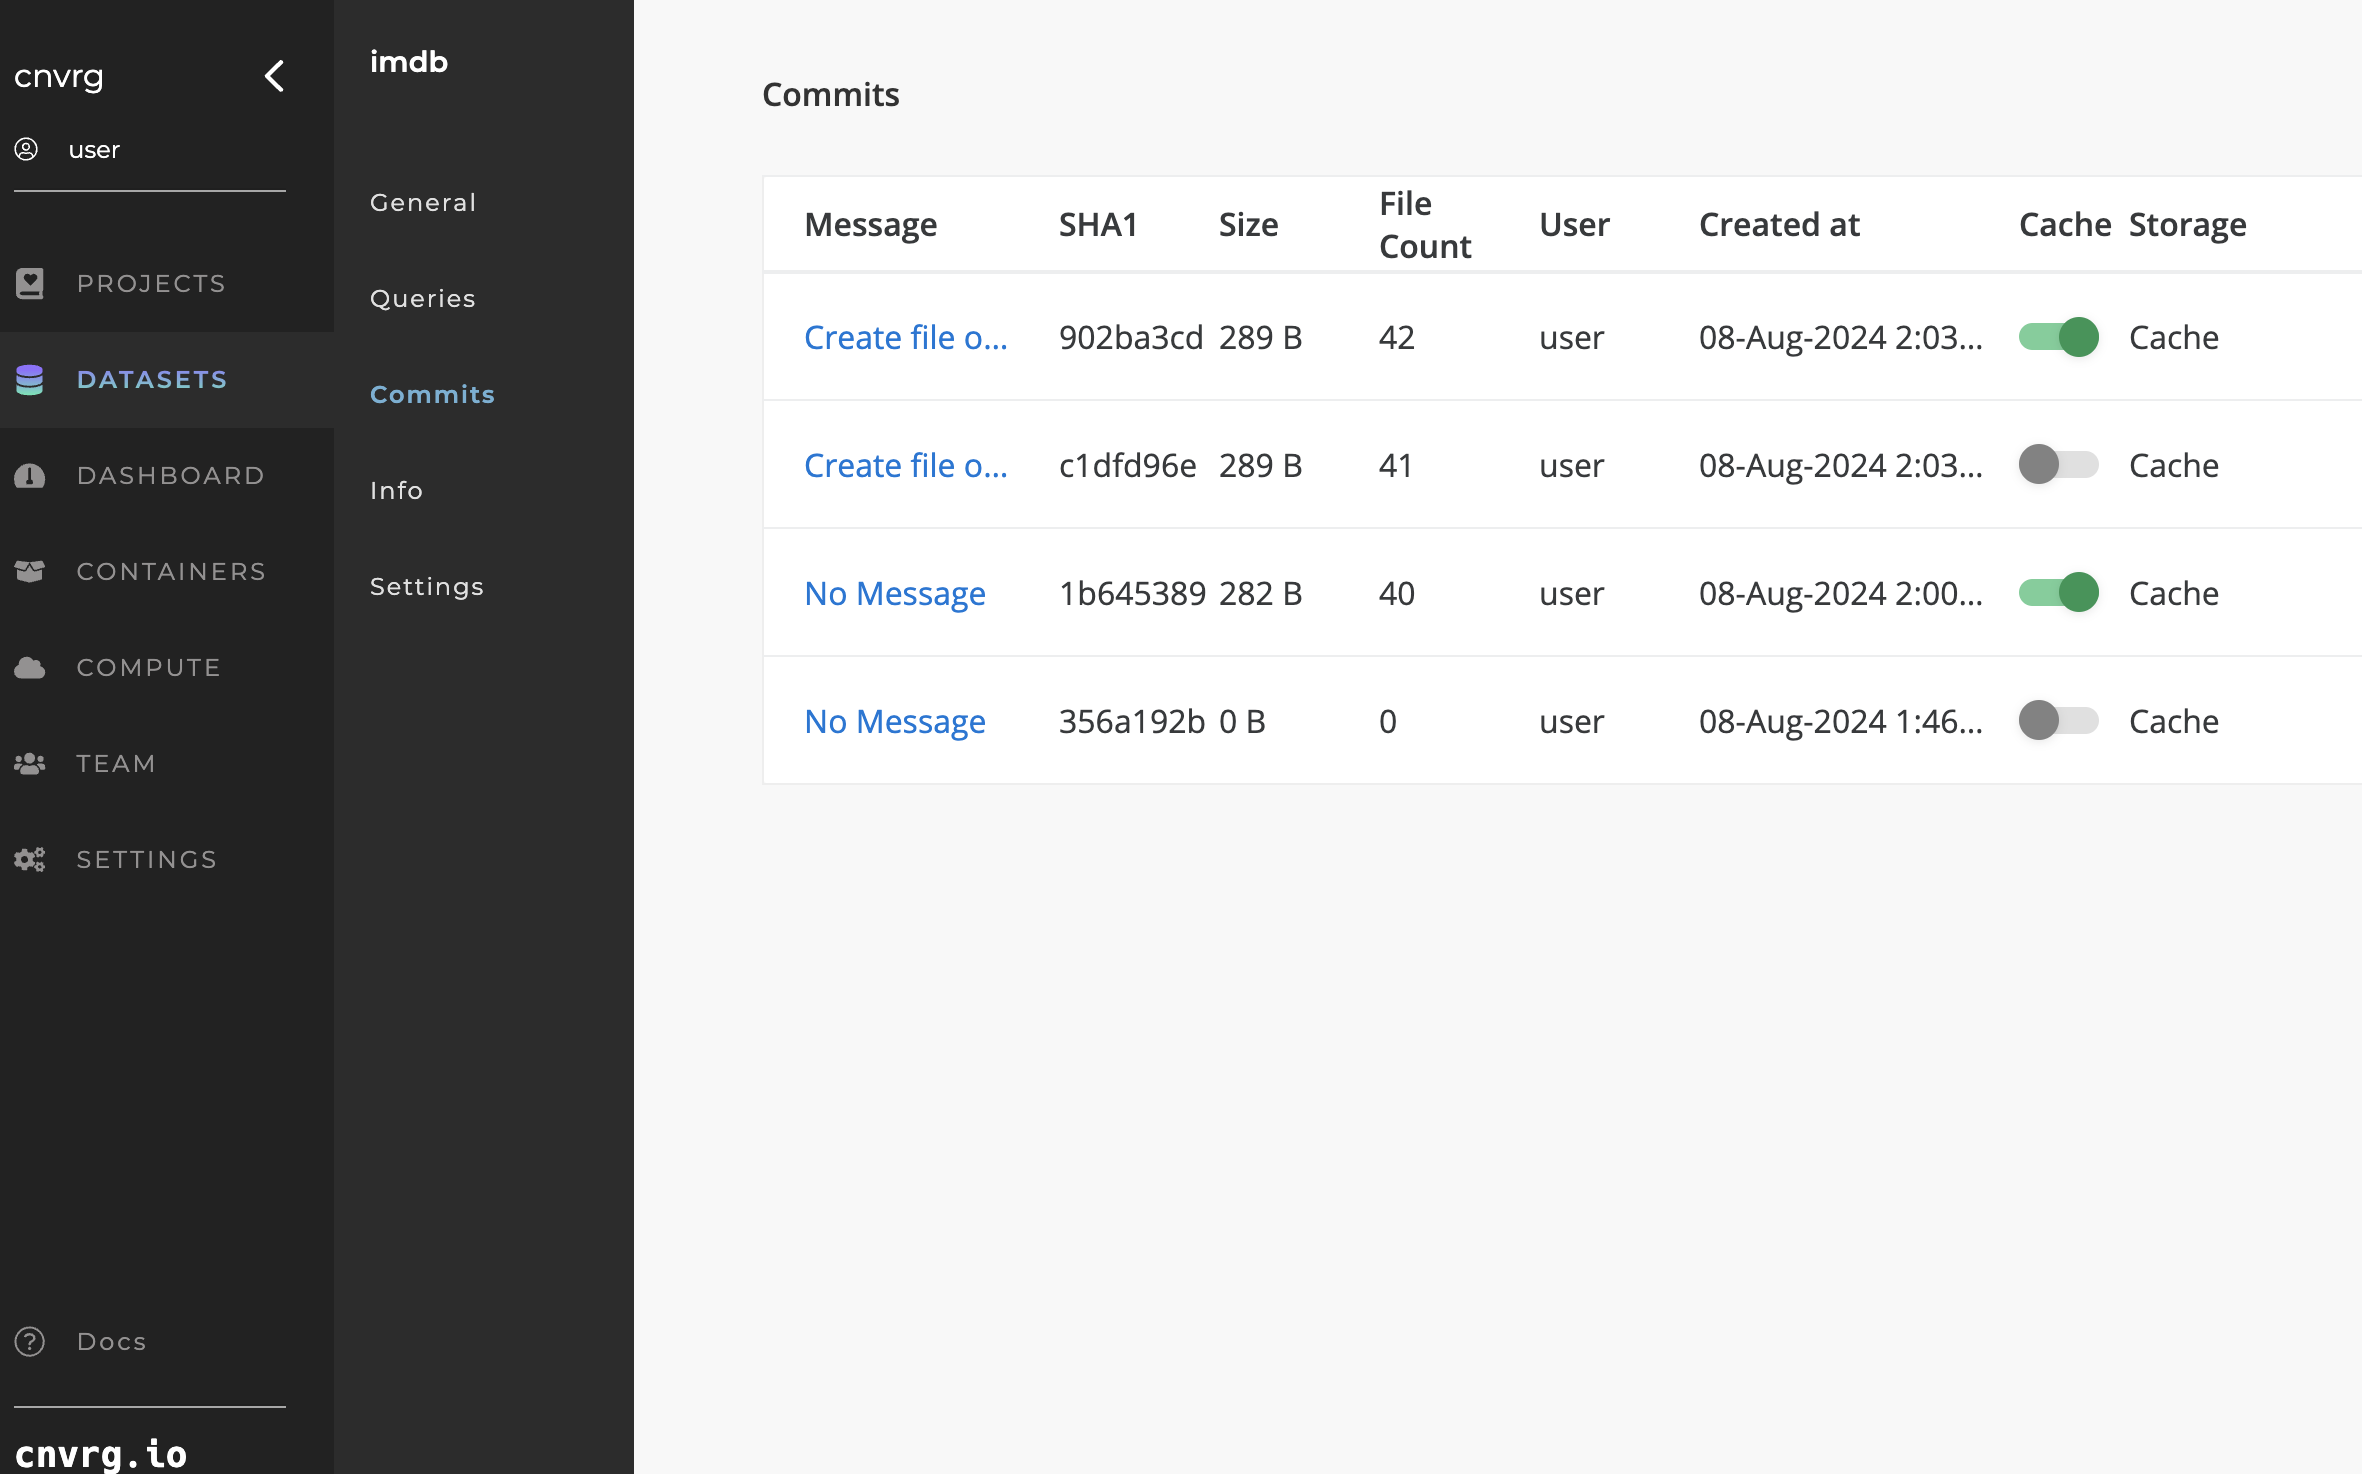
# Commits
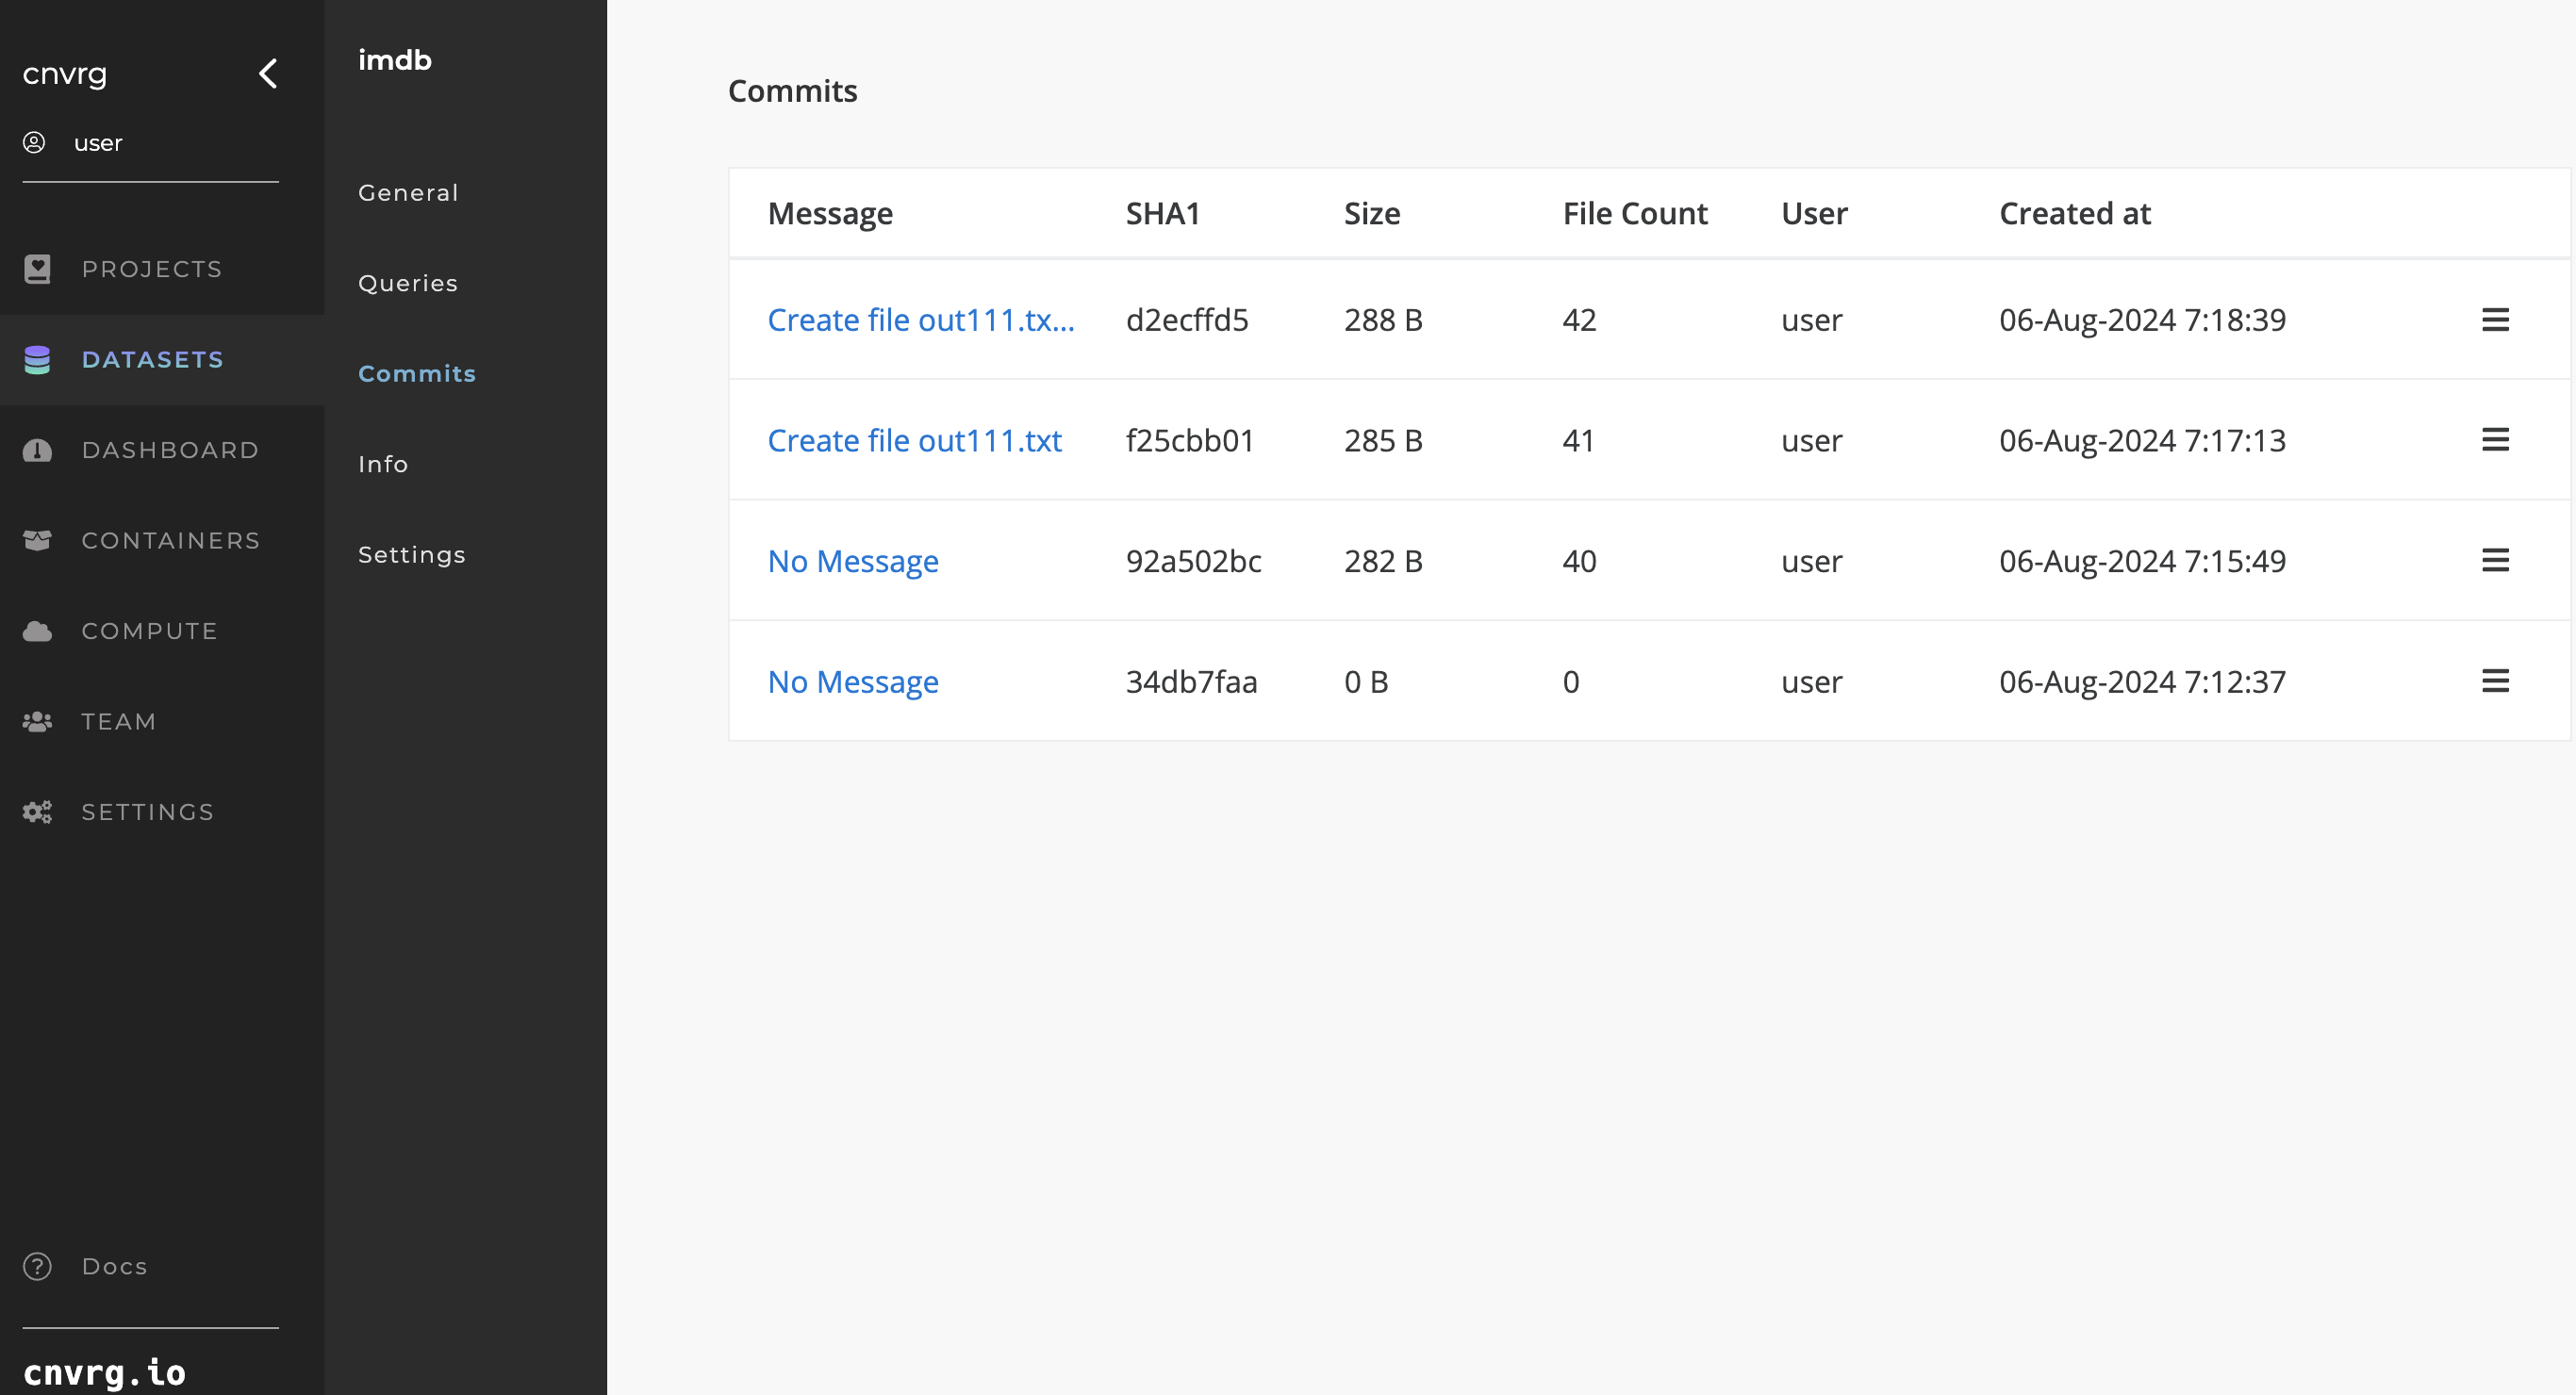
Click the Commits tab of your Dataset to access an overview of its version history.
# Commit table
The commit table displays a row for each commit of your Dataset with the following information for each commit:
- Commit Message: The commit's message. Note: Clicking on the message displays the commit summary page.
- Commit SHA1
- Commit Size
- File Count: The number of files in the commit.
- User: The user who made the commit.
- Created at: The date it was committed.
- If connected to NFS:
- Cache: The toggle to cache/clear the commit for each connected NFS.
- Status: If and when the commit was cached to the specific NFS.
- Storage: The NFS to which the Cache toggle and Status are referring.
- Commit actions menu:
- Browse: The commit's browser. Note: Clicking this link displays the file viewer for the commit.
- Revert: The default revert function. Note: Clicking this link makes the commit the default commit (requires confirmation).
# Commit summary page

To access this page, go to your Dataset and click Commits. Click the commit message corresponding to the desired commit.
This page provides a summary of the selected commits changes, including:
- The commit message and SHA1.
- The date and time the commit was made.
- The link to Browse the file viewer for the Dataset at this commit.
- The SHA1 of the parent commit.
- A list of the files changed by the commit.
# Dataset Commit Caches (NFS Integration)
AI Studio can be integrated with one or more NFS data storage units. When an NFS disk is connected to your Organization, you can cache commits of your Dataset to the disk. When a commit is cached, you can attach it to jobs so they have immediate access to the data. Moreover, the job does not need to clone the Dataset on start-up.
The caching process is simple. You can clear unused commits manually or even automatically.
There are five ways to access the controls for caching and clearing commits:
- On the files viewer for the commit
- From the Commits tab of the Dataset
- From the cached commit's information screen
- With the CLI
- With the SDK
# Connect to NFS storage
To integrate NFS into your environment, please contact AI Studio support. The AI Studio team will help you set up the integration.
# Cache a commit to NFS

Complete the following steps to cache a commit to NFS:
- Access the Cache button for the selected commit through one of the methods to display the Cache Commit panel, which summarizes the commit to be cached:
- The commit SHA1
- The commit size
- The commit status
- The used and remaining storage for the selected NFS unit
- In the panel, use the drop-down menu to select the NFS unit on which the commit is to be cached.
- Click Cache to start caching the Dataset commit.
The commit begins to cache. The information page for the cached commit displays, where you can track the caching process live.
An email notification sends when the caching process finishes.
# Interrupt caching and clear the commit
![]()
If you choose to cache a commit, and the commit has not finished caching, you can interrupt the process, and stop and clear the commit.
Complete the following steps to stop and clear a caching commit from the cached commit's information screen:
- Navigate to the information page of the caching commit you want to interrupt.
- If the status is
Caching, a red Stop & Clear button displays. Locate this button. - Click the Stop & Clear button. An information panel displays with details about the commit.
- Click Stop & Clear on the panel to interrupt the caching and clear the commit from the NFS disk.
The caching is interrupted and the commit is cleared. You can follow the process live from the cached commit's information screen.
# Clear a cached commit
![]()
WARNING
You cannot clear a commit while the cached commit is currently in use by any active jobs such as Workspaces and Experiments. To enable clearing of the commit, either wait for the jobs to finish or stop them.
Complete the following steps to clear a cached commit and free the space currently in use on the NFS unit:
- Using one of the supported methods, access the Clear button for the chosen commit to display the Clear Commit panel showing a summary of the commit being cleared:
- The commit SHA1
- The NFS storage to be cleared
- The NFS storage available after the clear
- Click Clear to start clearing the dataset commit.
When the commit begins to clear, an information page displays, tracking the live clearing process.
# Access cached commit information page
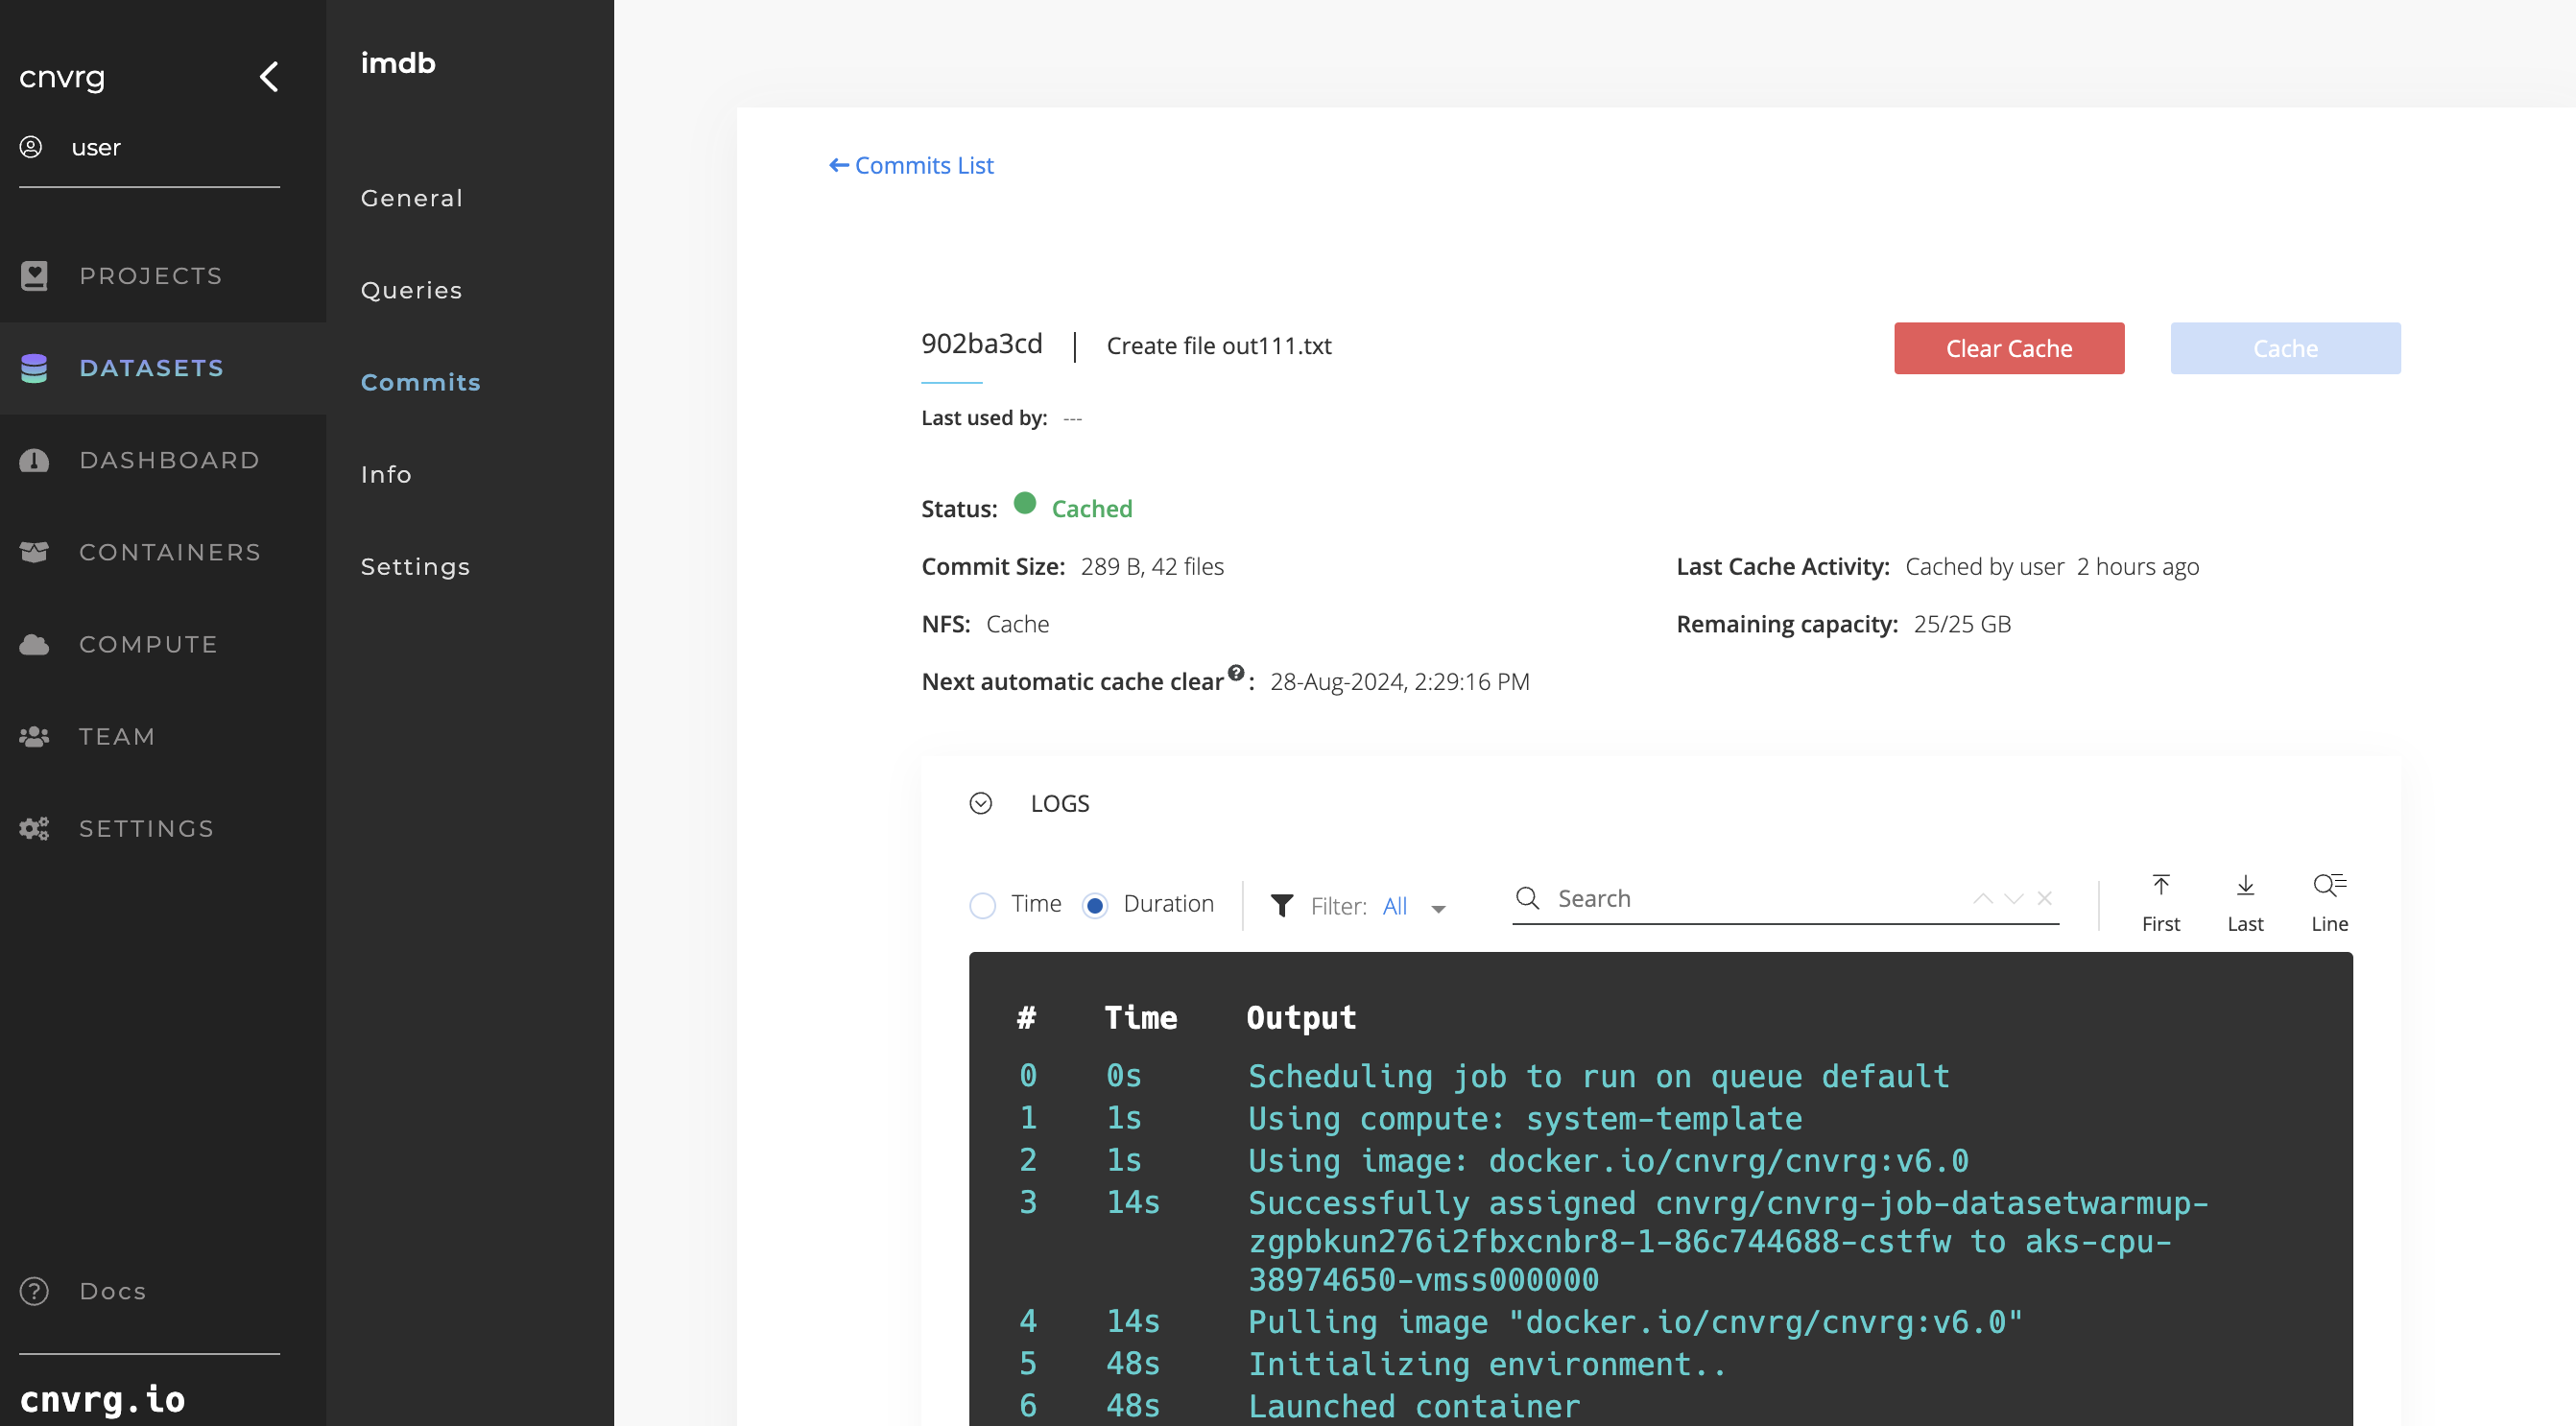
Each cached commit has its own information page. On the cached commit's information page, you can find:
- The commit SHA1
- The user who last used the cached commit and when
- The current cache status
- The size of the commit
- The most recent caching activity for the commit
- The name of the NFS disk and its remaining capacity
- The date and time when the next automatic clear will occur
There are two ways to access this page:
- On the files viewer for the commit:
- Navigate to the files viewer for the desired cached commit
- Click the cached activity status along the top
- From the Commits tab of the Dataset:
- Navigate to the desired Dataset
- Click the Commits tab
- Click the cached activity status for the desired commit
# Automatically clear cached commits
![]()
AI Studio has the capability to automatically clear unused cached commits from your NFS disk to save disk space. Control this functionality in the Organization's Settings.
To turn this functionality on or off, go to Settings and use the Automatically Clear Cached Commits toggle. Set the number of days a cached commit is left unused before AI Studio automatically clears it from the NFS disk.
When the auto-clear functionality is toggled on, AI Studio clears any cached commits unused for the time specified in Settings. For example, if you choose to clear cached commits if unused for 10 days, any cached commits unused by a job (like a Workspace or Experiment) for 10 days is cleared from their NFS disk and the space is restored.
A day before an unused cached commit is due to be automatically cleared, AI Studio sends an email notification to the user.
# Local Folders (Network Storage Support)
If you have a storage disk attached to your network, you can easily mount the storage as a local folder for a job. There is no added setup required, but you must ensure your cluster or machine on which the job is running has access to the storage disk.
The option to use a network drive as a job's local folder is located in the Advanced Settings for Experiments and Workspaces.
Pass the IP address and folder of any external drive you want to attach as Local Folders to the job. Use the format <ip_of_network_drive>:/<name_of_folder>. This is mounted to the machine as /nfs/<name_of_folder>.
# Dataset Additions to Jobs
You can add a Dataset in the following situations:
- At Workspace or Experiment startup
- In an online Workspace
- In a Flow
# At Workspace or Experiment startup

When starting a Workspace or an Experiment from the UI, use the Datasets selector to add one or more Datasets:
- Click Start Workspace or New Experiment and provide the relevant details in the displayed panel.
- To add your Dataset(s), select the Datasets drop-down list.
- For each Dataset to add to the Workspace or Experiment, choose the commit or query and the portion of the Dataset to clone.
- Click the Dataset to add it to the list of Datasets for the Workspace or Experiment.
You can remove a Dataset from the list by clicking the X next to its name. - Under Advanced Settings, pass the IP address and folder of any external drive to attach as Local Folders to the job. Use the format
<ip_of_network_drive>:/<name_of_folder>. This mounts to the machine as/nfs/<name_of_folder>. - Click Start Workspace or Run.
The Datasets are cloned to the remote compute.
# In an online Workspace
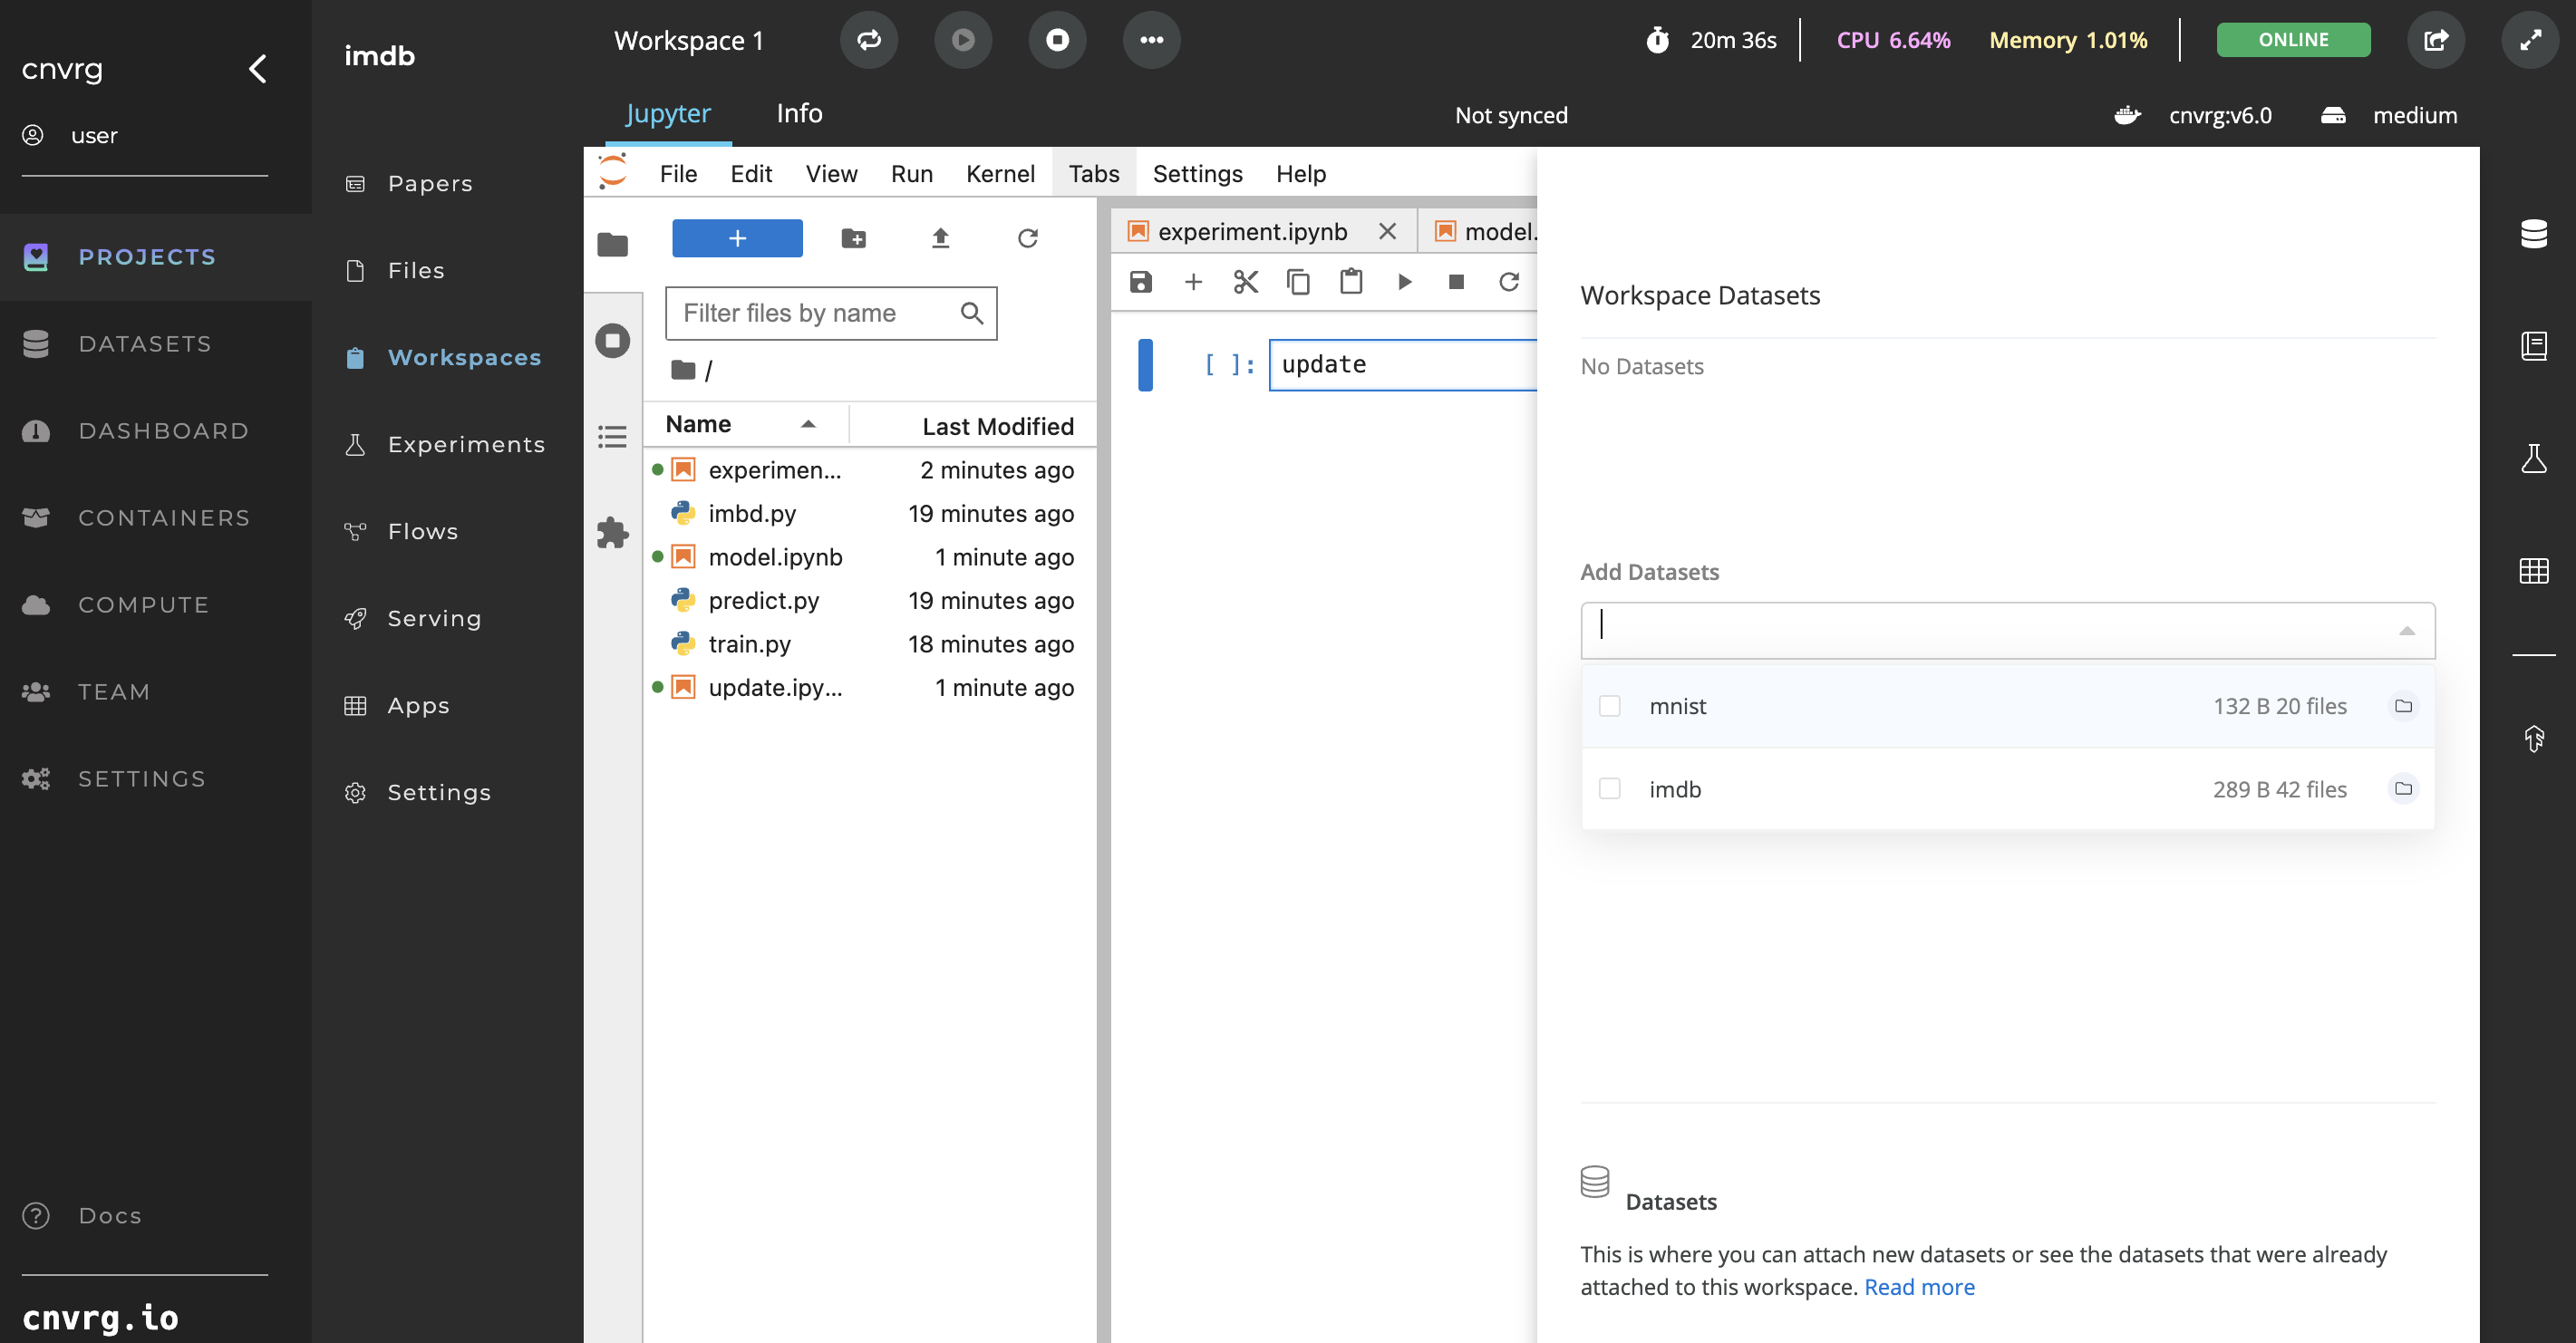
Complete the following steps to add Datasets on-the-fly to online Workspaces:
- Click the Datasets tab on the right sidebar for your open Workspace to display the statuses of all Datasets already connected to the Workspace.
- To add a new Dataset, click the Add Datasets drop-down menu.
- For each Dataset to add to the Workspace, choose the commit or query and the portion of the Dataset to clone.
- Click the Dataset to add it to the list of Datasets for the Workspace.
You can remove a Dataset from the list by clicking the X next to its name. - Click Submit.
The selected Datasets begin cloning to the Workspace. You can track their statuses from the Datasets panel where you attached them.
# In a Flow
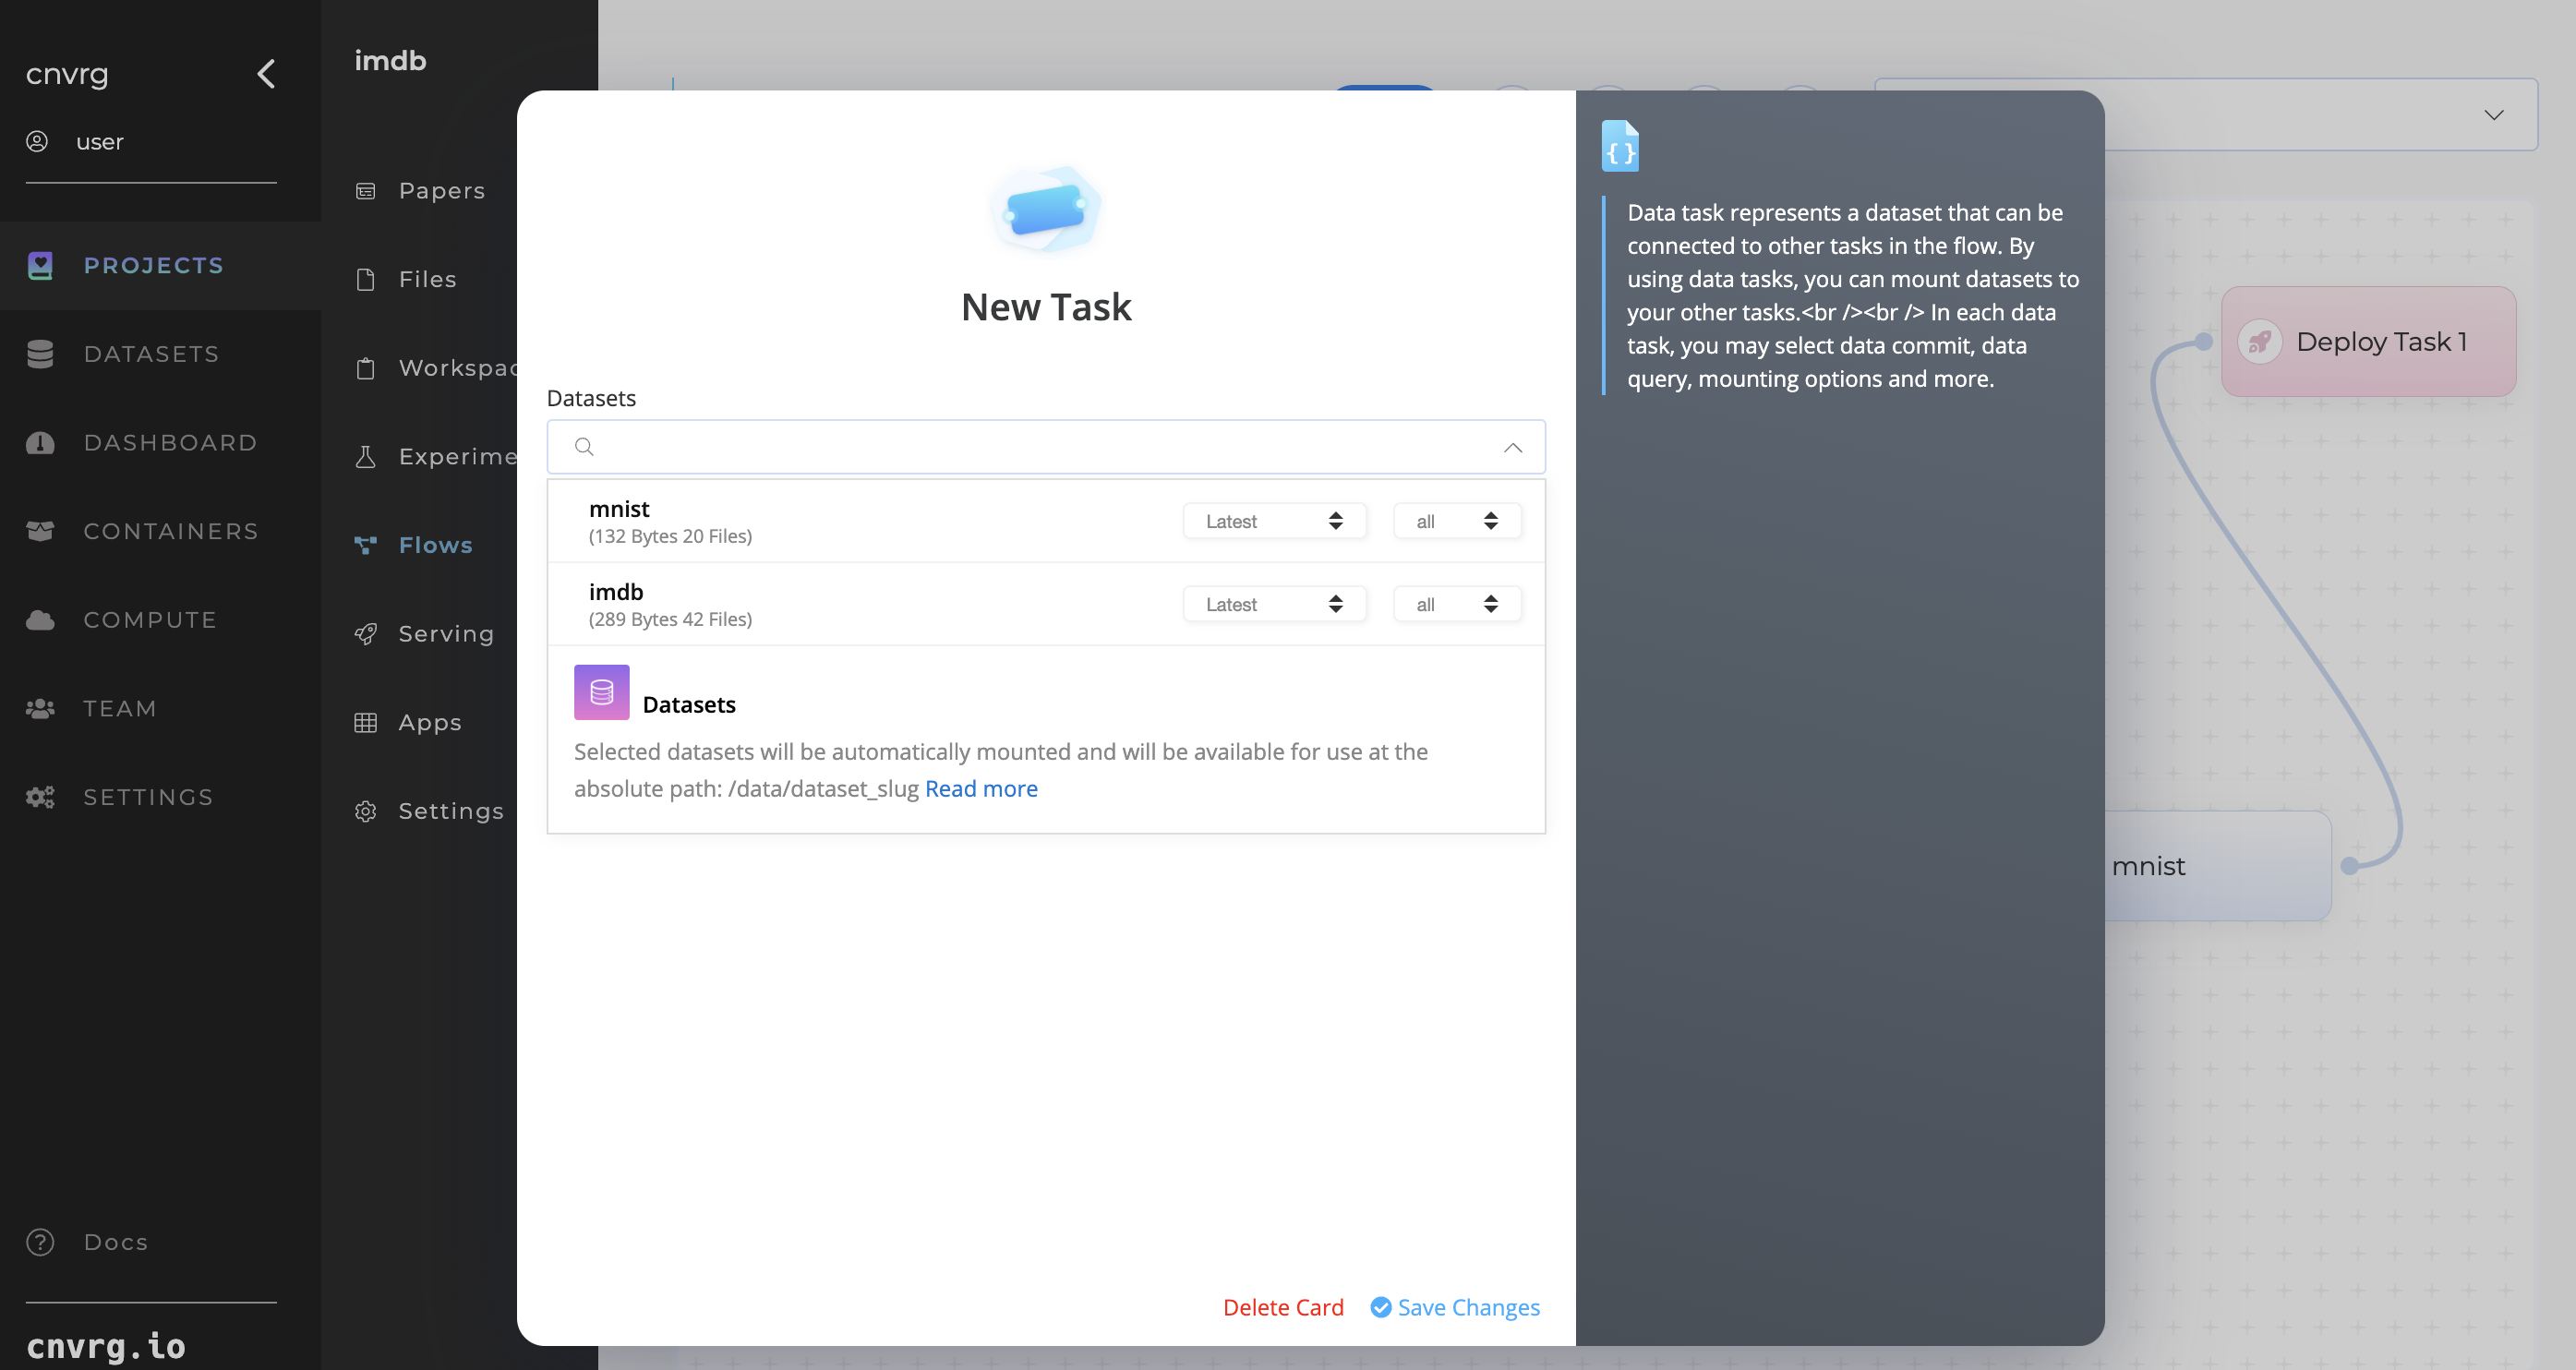
Complete the following steps to add a Dataset in a Flow:
- Open the Flow to which you want to add the Dataset.
- In the New Task drop-down list, select Data Task.
- In the displayed panel, select the Dataset, Dataset Commit, and Dataset Query (only if queries exist for the Dataset).
- Click Save Changes.
- Link the displayed purple box to the task you want the Dataset to be available in.
You can also add Datasets when constructing a Flow with a YAML.
NOTE
The Dataset is also available in any tasks that follow on from the task you connect it to.
# With the CLI
To add a Dataset when running an Experiment using the CLI, use the --datasets flag:
cnvrgv2 experiment run --command 'python3 mnist.py' --datasets '[{"slug": "my-dataset"},{"slug": "my-dataset2"}]'
You can include multiple Datasets in the array.
You can also include Dataset information in a Flow YAML file and use it with the CLI. See the full CLI documentation for more information about running Experiments using the CLI.
# With the SDK
To add a Dataset when running an Experiment using the SDK, use the datasets parameter:
from cnvrgv2 import Cnvrg
cnvrg = Cnvrg()
myproj = cnvrg.projects.get("myproject")
e = myproj.experiments.create(title="my new exp",
                              command="python3 test.py",
                              datasets=['my_dataset1, my_dataset2'])
You can include multiple Datasets in the array.
You can also include Dataset information in a Flow YAML file and use it with the SDK. See the full SDK documentation for more information about running experiments using the SDK.
# Dataset File Downloads
There are several ways to download Datasets or use them in your code. The following sections provide examples of Dataset usage using the CLI, SDK, and other popular framework integrations.
# Including Datasets within jobs
When you choose to include a Dataset at an Experiment start-up or within a Workspace (whether at start-up or on-the-fly using the sidebar), the Dataset is mounted in the remote compute and accessible from the absolute path: /data/name_of_dataset/.
For example, when working in a Workspace, if you include a Dataset hotdogs, the Dataset and all its associated files can be found in the /data/hotdogs/ directory.
# Cloning using the CLI
Clone a Dataset using the following command:
cnvrgv2 dataset clone --name my_dataset
This command is used to clone the Dataset from the app servers into your local environment.
See the full CLI documentation for more information about Dataset usage in the CLI.
# Cloning using the SDK
To clone a Dataset using the SDK, use the following code snippet in your Python code or Jupyter Workspace:
from cnvrgv2 import Cnvrg
cnvrg = Cnvrg()
ds = cnvrg.datasets.get('dataset-id')
ds.clone()
See the full SDK documentation for more information about Dataset commands in the SDK.
# Dataset Metadata
In machine learning, most data entries have metadata associated with them. Metadata can represent labels, image size, data source, and any other features of your files. AI Studio has built-in support for tagging objects.
Simply include a YAML file for each object you want to store metadata.
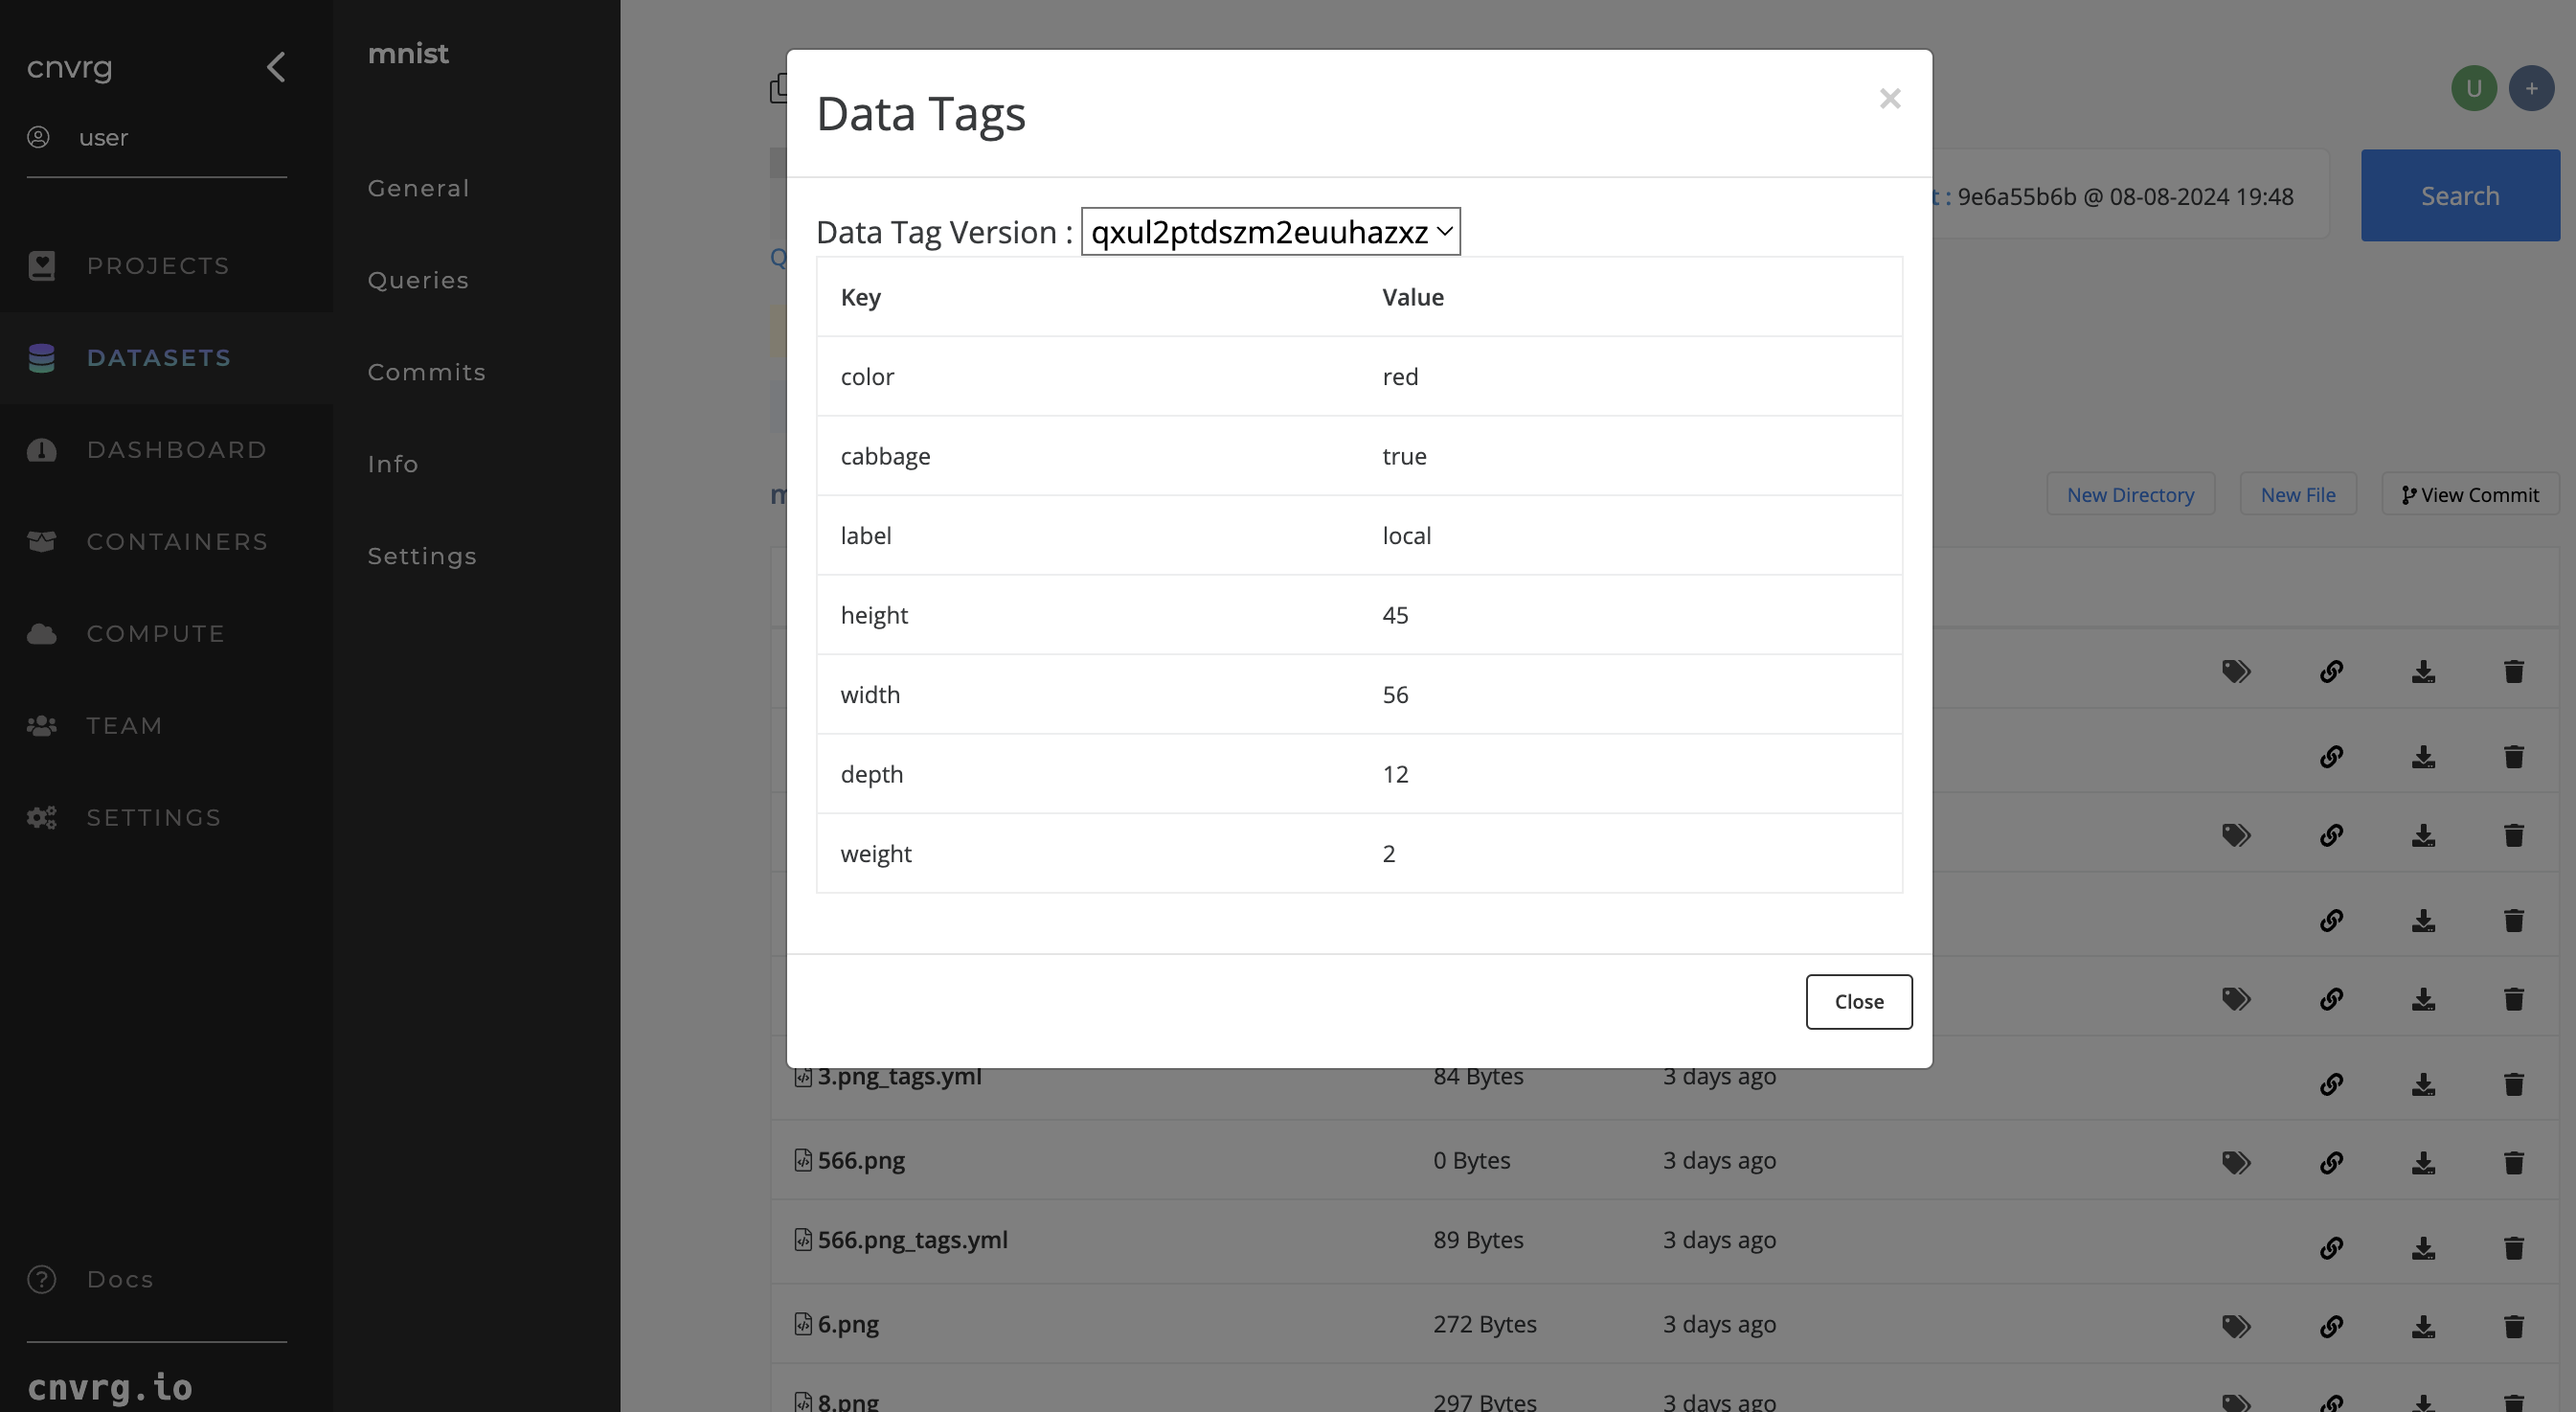
A metadata YAML file is simple to create. Use the following guidelines:
Name it according to the following convention:
NameOfFile.ext_tags.yml.Ensure the file's contents fit the following syntax:
---
label1: value1
label2: value2
As an example, for an image 9.png representing the digit "9" in an MNIST Dataset, to tag it with metadata, create a YAML file with the following content:
9.png_tags.yml
---
label: "9"
width: "32"
height: "32"
source: "yann lecun"
Then update your changes back to AI Studio using the AI Studio UI or CLI.
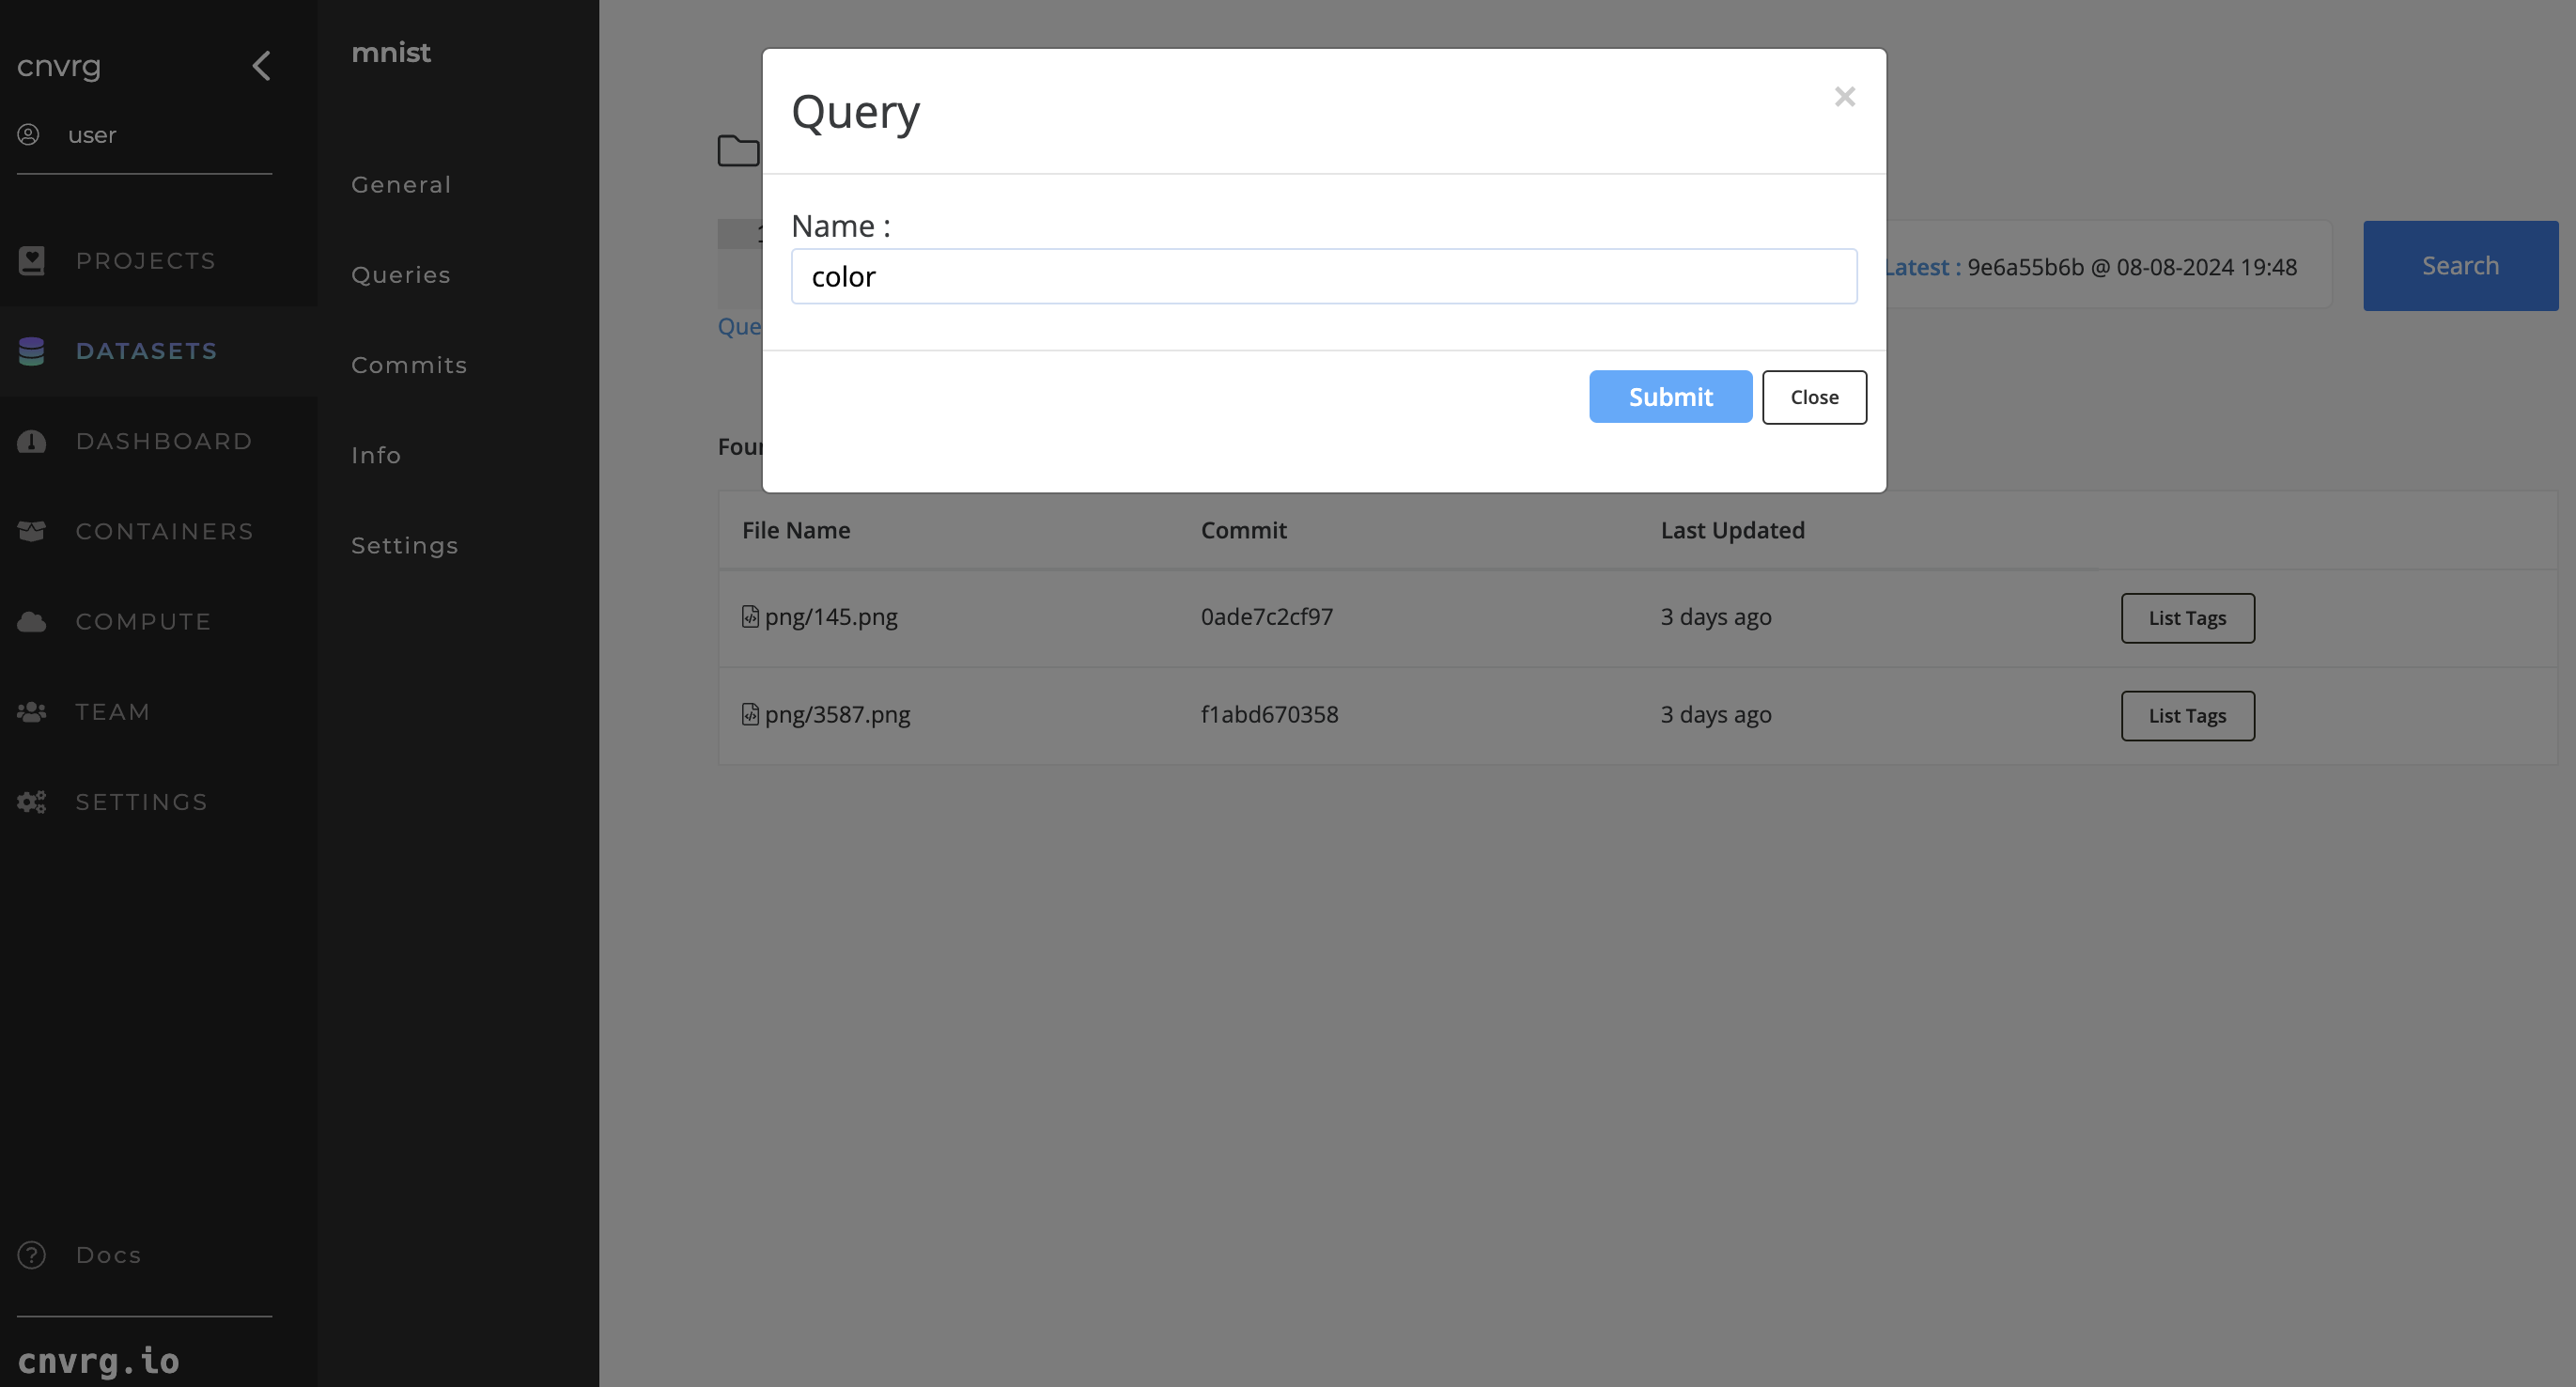
# Data Queries

Using AI Studio, you can create queries and subsets of your original Dataset. This is especially useful when you want to work on a subset of your Dataset (for example, only data labelled "train").
There are two ways to query your data: using the file path or using tags. Complete the following steps:
- Navigate to the relevant Dataset page.
- At the top, enter your query and click Search.
The files that match the query load.
TIP
You can also use a regular expression within your query.
# Querying Datasets using the file path
You can query any kind of file, type, or folder in your Dataset. Simply enter the file path query you are looking for.
Examples queries:
- *.zip
- cats/*.png
- *.tffrecord
- image-0*.png
- training/6/*.png
To search using wildcards:
{ "fullpath": "image*.png" }
# Querying Datasets using tags
Once a dataset has been tagged using YAML files, you can use the key:value syntax within the query box to search for those labels.
{ "label": "hotdog" }
The query above searches for files that have metadata with the label hotdog.
# Querying Datasets using wildcards
Use wildcard when querying labels:
{ "label": "hot*" }
The query above searches for files that have metadata with the label hot*.
# AND/OR operators
To run queries with and/or logical operators, use the _or and _and operators.
For example, for querying yellow and blue objects, use the follow query:
{ _or: [{"color": "yellow"}, {"color": "blue"}] }
using wildcards:
{ _or: [{"color": "yel*"}, {"color": "blue"}] }
For AND operators, use a similar query:
{ _and: [{"color": "yellow"}, {"background": "blue"}] }
using wildcards:
{ _and: [{"color": "yellow"}, {"background": "*"}] }
# Mathematical operations
To run queries with >, <, <=, and >= operators, use the following:
{ result: { gt: 10 } }
The following table provides the keywords required to query the operators:
| Operator | Keyword |
|---|---|
| Greater than (>) | gt |
| Greater than and equal to (>=) | gte |
| Less than (<) | lt |
| Less than and equal to (<=) | lte |
For example, to run a query on a range of objects where x: 305 => x >= 290, use the following:
{ _and: [{"x": { lte: 305 }}, {"x": { gte: 290 } } ]}
# In/not queries
To run queries with in operators, use the following:
{ "color": ["brown", "yellow"] }
To run queries with not operators, use the following:
{ "color": { not: "brown" } }
To run queries with not and in operators, use the following:
{ "color": { not: ["brown", "yellow"] } }
To run queries with not in fullpath, use the following:
{ _and: [{"fullpath":"15*.jpg"}, {"fullpath": {not: "1519.jpg"}}]}
TIP
When running a query, search on a specific commit version by using the Commit drop-down.
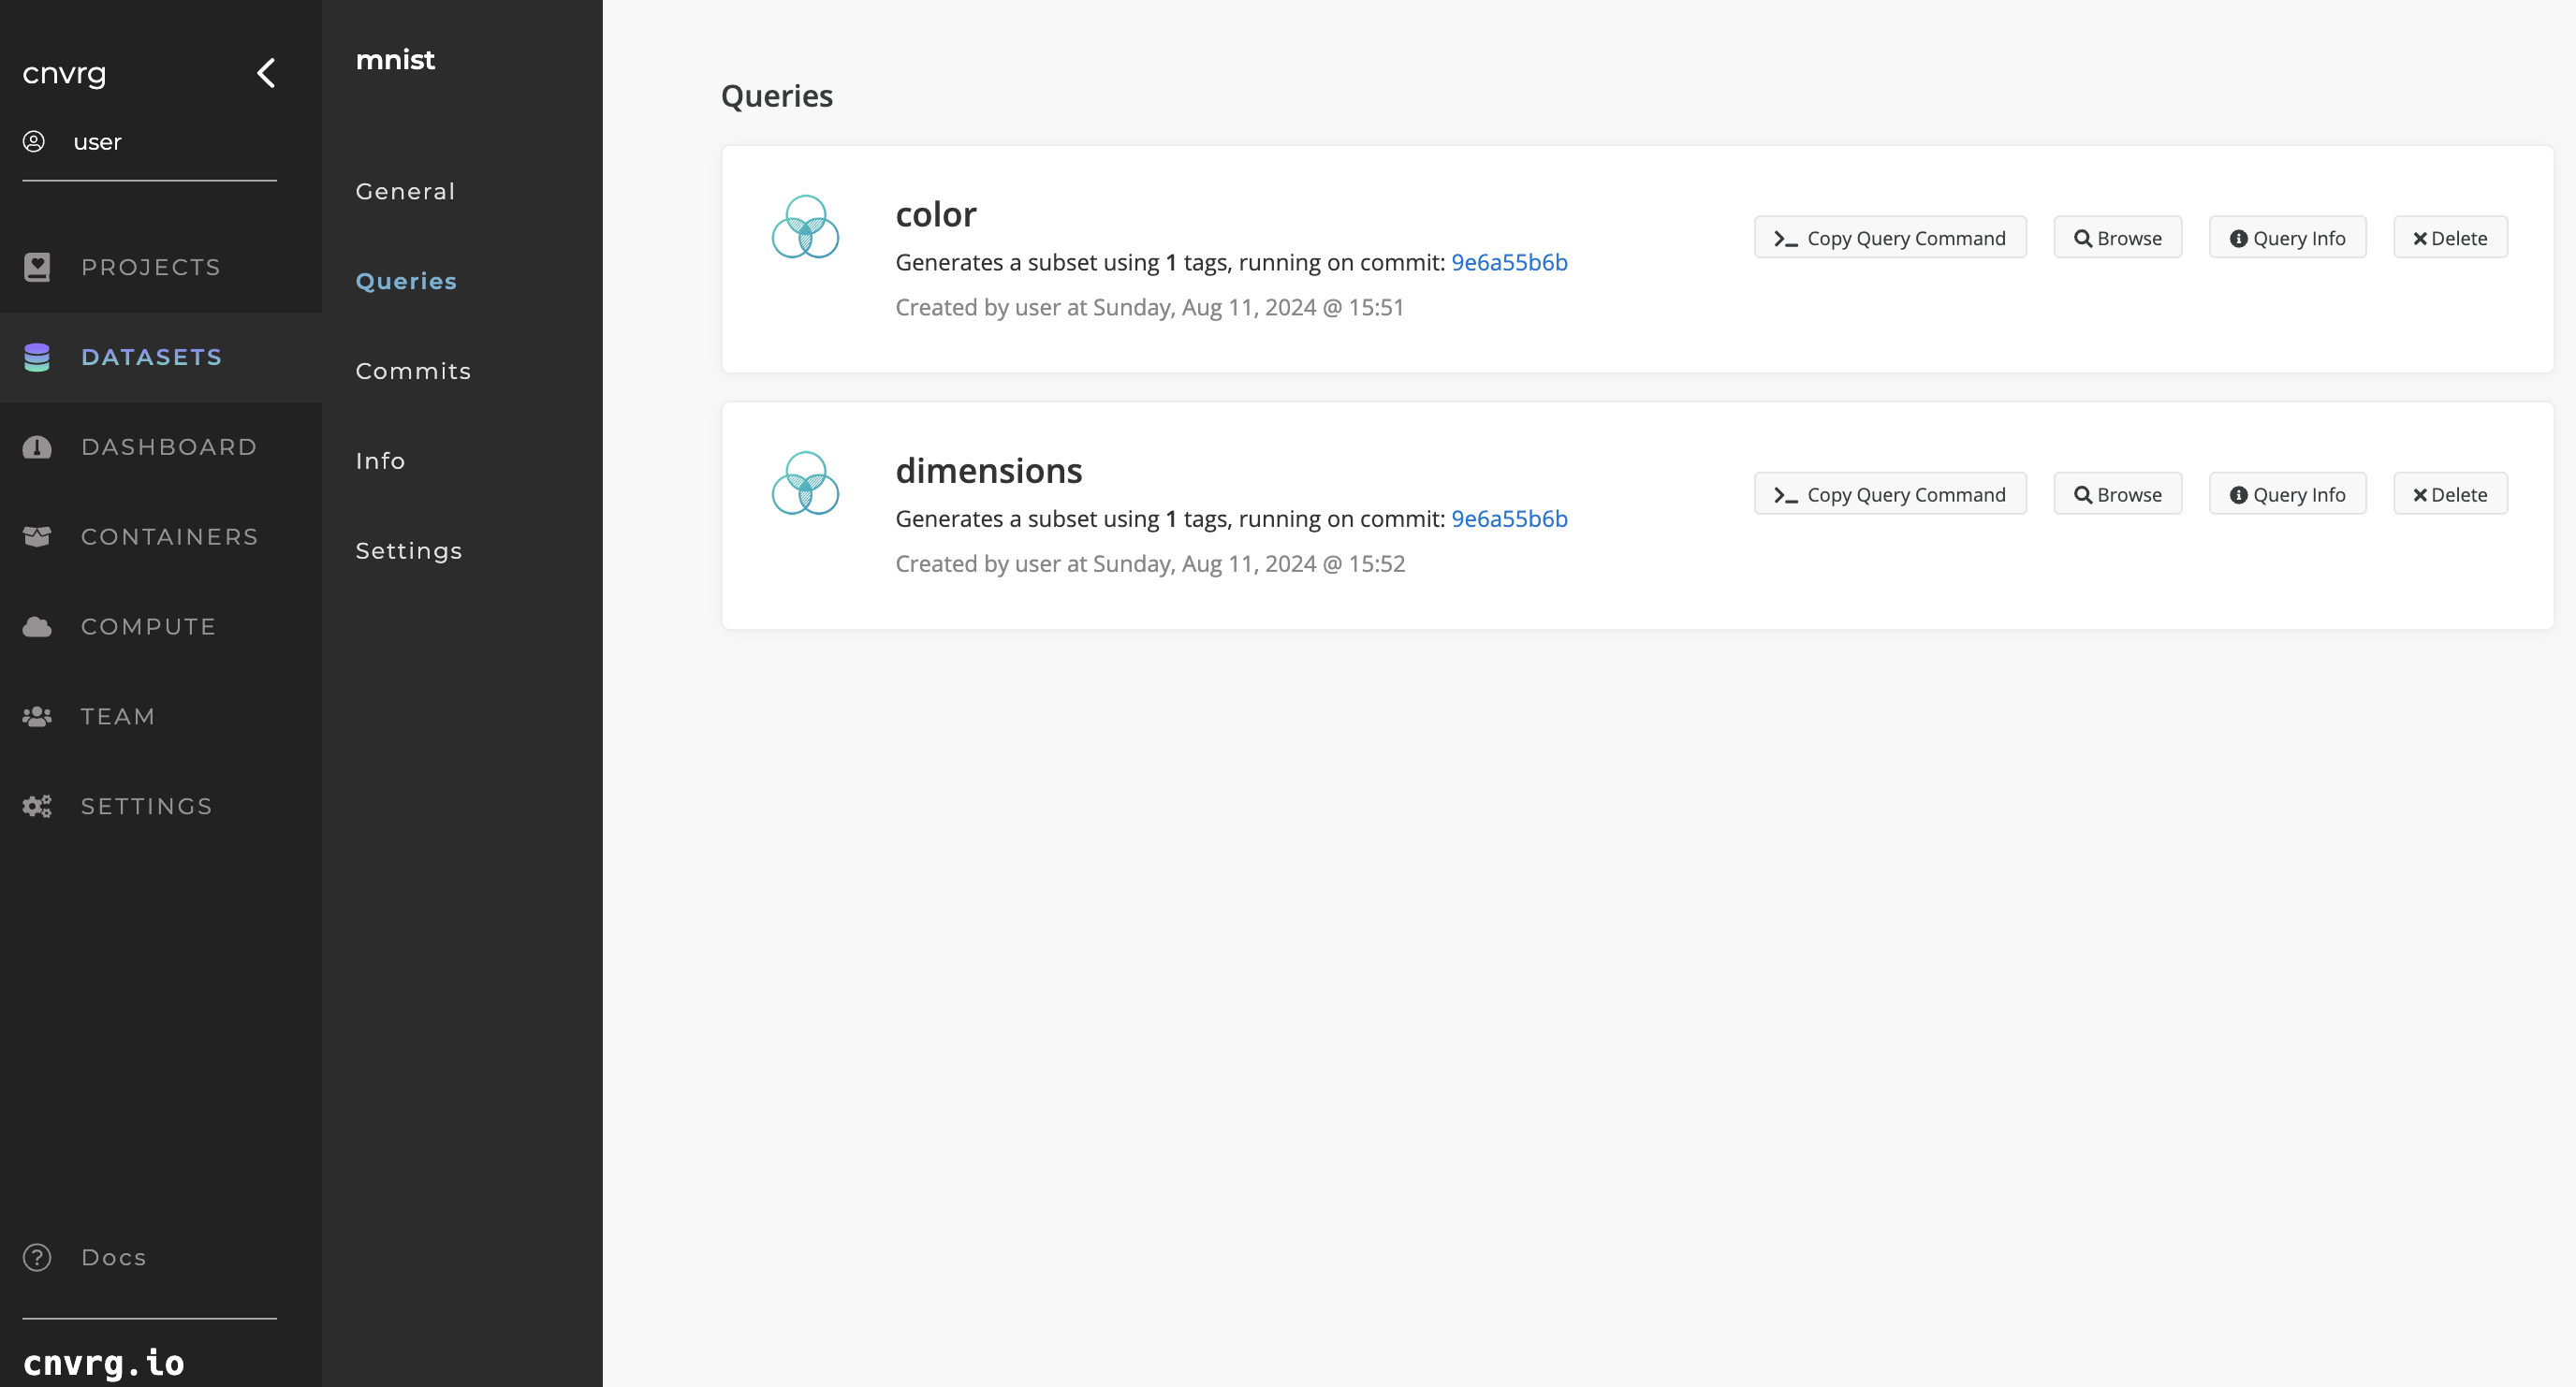
# Saving queries
Once you have searched using a query, save it by clicking Save Query. For each saved query, click the Queries tab in the Dataset's left sidebar to browse its files and view its information.
You can also use saved queries when loading Datasets in AI Studio jobs. Use the Datasets selector to choose the Dataset and then the specific commit or query in the drop-down list.
# Collaborators

Making collaboration simpler is a key goal in AI Studio's mission. As such, every Dataset in AI Studio can have different members. Datasets are private by default and only their collaborators can access them.
To view the collaborators in your Dataset, click the Settings tab of the Dataset and then click Collaborators.
TIP
More details on AI Studio collaboration functionality can be found here.
# Add a collaborator
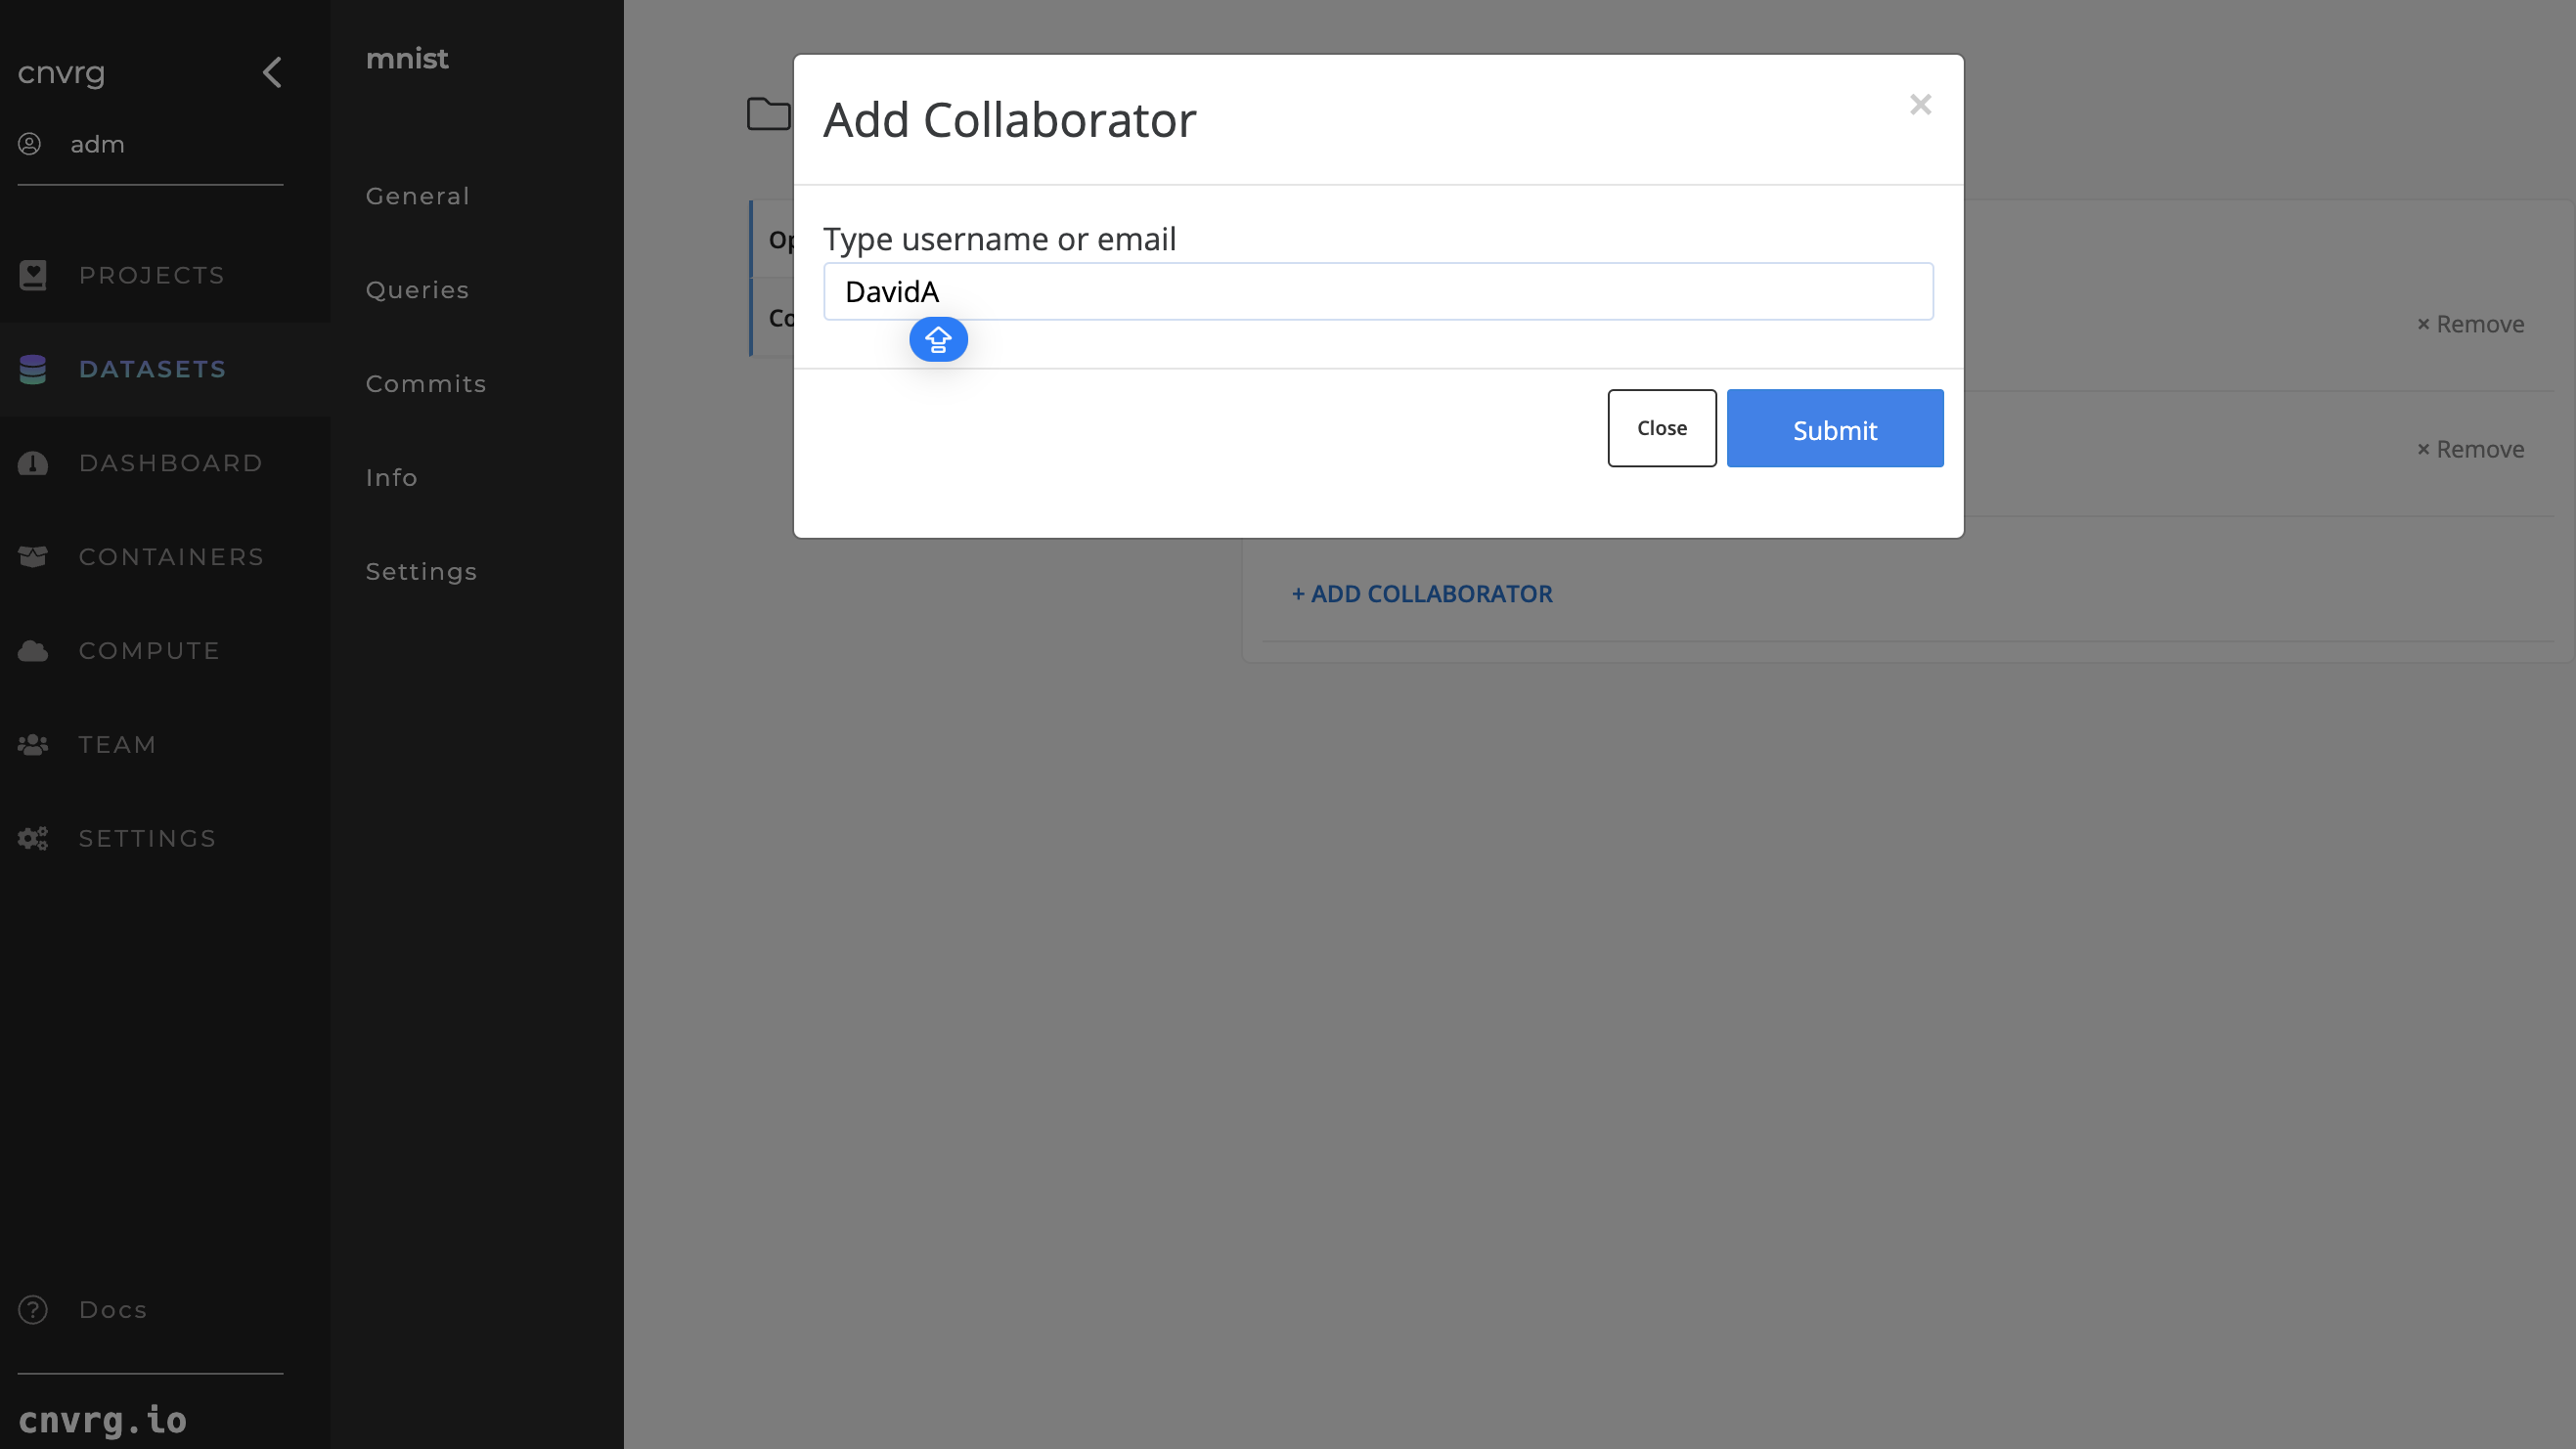
Complete the following steps to add a collaborator to a Dataset:
- Go to Dataset > Settings > Collaborators.
- Click Add Collaborator.
- In the displayed panel, enter the username or email of the user you want to add.
- Click Submit.
AI Studio adds the user as a collaborator to the Dataset.
# Remove a collaborator
Complete the following steps to remove a collaborator from a dataset:
- Go to Dataset > Settings > Collaborators.
- Click the Remove button next to the user you want to remove.
AI Studio removes the user from the Dataset.
NOTE
Administrators in your Organization have access to all Datasets, without being added as a collaborator.
← Datasources Dashboard →