# Compute
Data scientists necessitate robust and dependable access to substantial computational resources for extended durations.
Intel® Tiber™ AI Studio platform offers advanced capabilities for managing compute resources, whether within a Kubernetes cluster. The software includes several preconfigured compute templates, which are predefined collections of computational resources. Users have the flexibility to modify these default templates or create entirely new, customized templates tailored to specific requirements.
Typically, users configure the necessary compute resources once during the initial system setup using compute templates. These computes are then made available organization-wide, facilitating their selection during the creation of experiment, workspace, flow, apps, and serving.
Compute template configuration can be performed through the AI Studio web UI, or alternatively, through CLI command or SDK call.
During job execution, AI Studio prioritizes the use of compute resources based on their attachment order and availability. If the first compute resource is not available, AI Studio will sequentially attempt to utilize subsequent resources in the defined order until it finds an available compute instance.
The topics in this page:
# Compute Templates
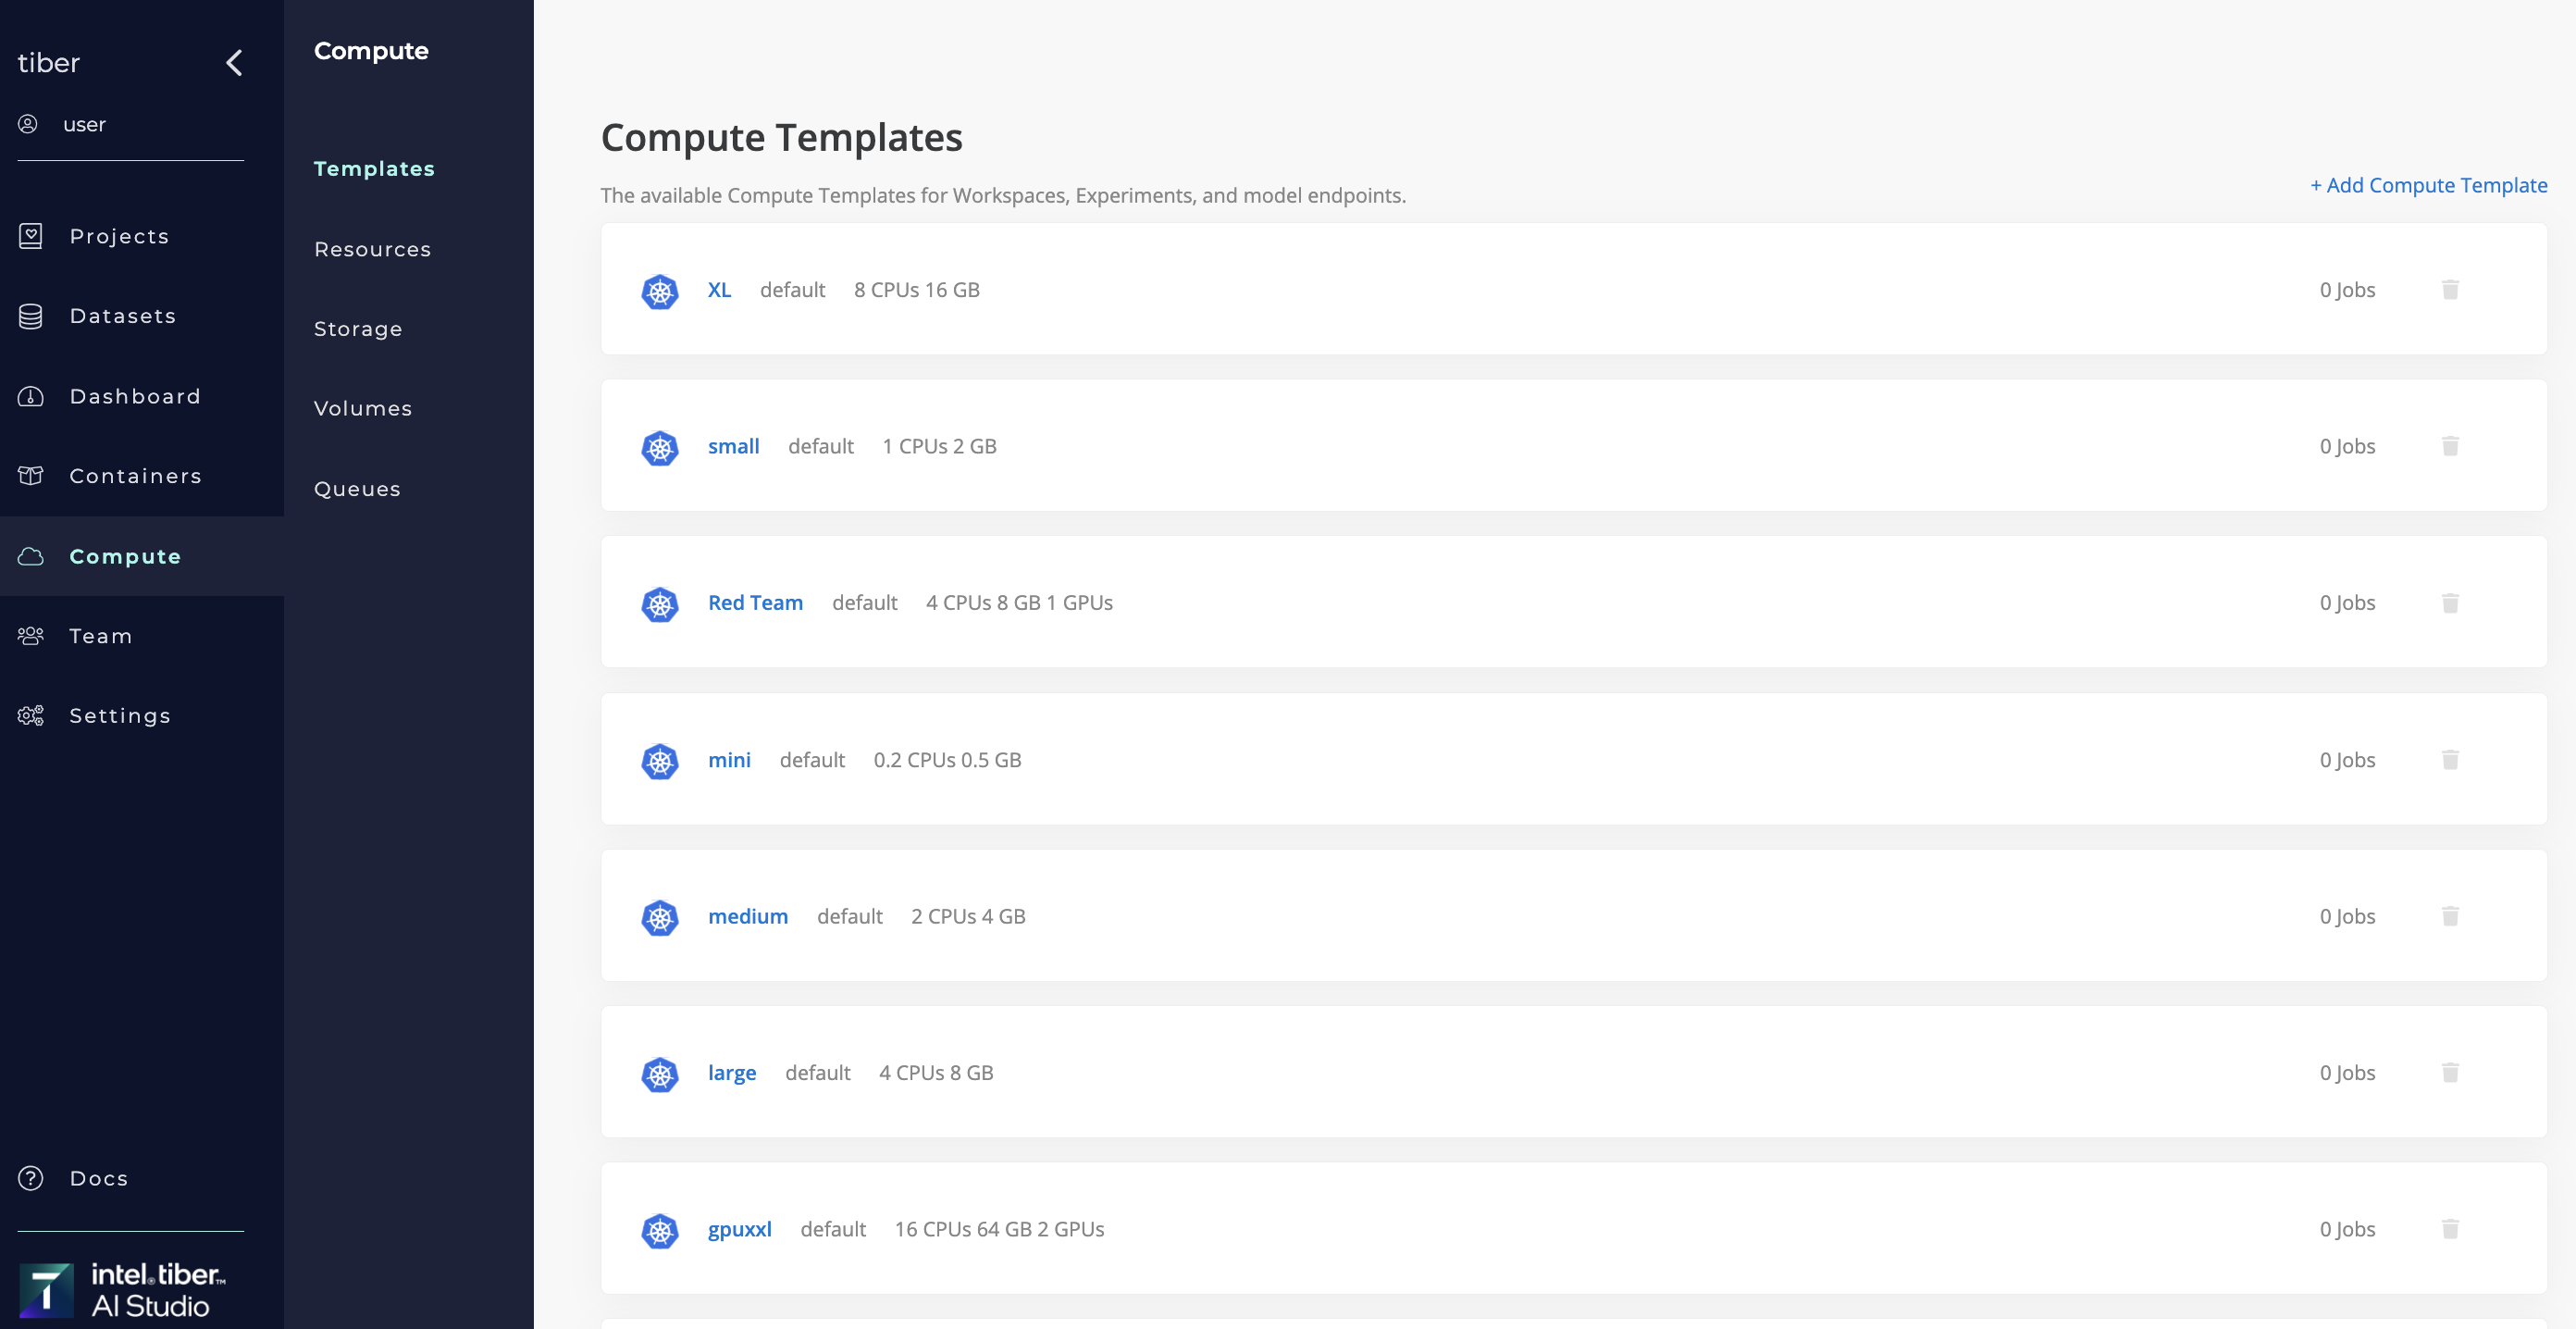 A compute template is a predefined set of computer resources. It consists of information to define CPUs, GPUs, memory, and other metadata. A template exists for a specific compute resource such as a Kubernetes cluster.
Technically, a compute template describes either an one or more Kubernetes pods. Each template added is a different set of resources to use as a compute engine when running a AI Studio job, either as a specific pod on a Kubernetes cluster.
For each connected resource, AI Studio automatically creates a set of default compute templates. Users can customize existing templates, add templates, or remove templates as required.
# Compute Template Settings
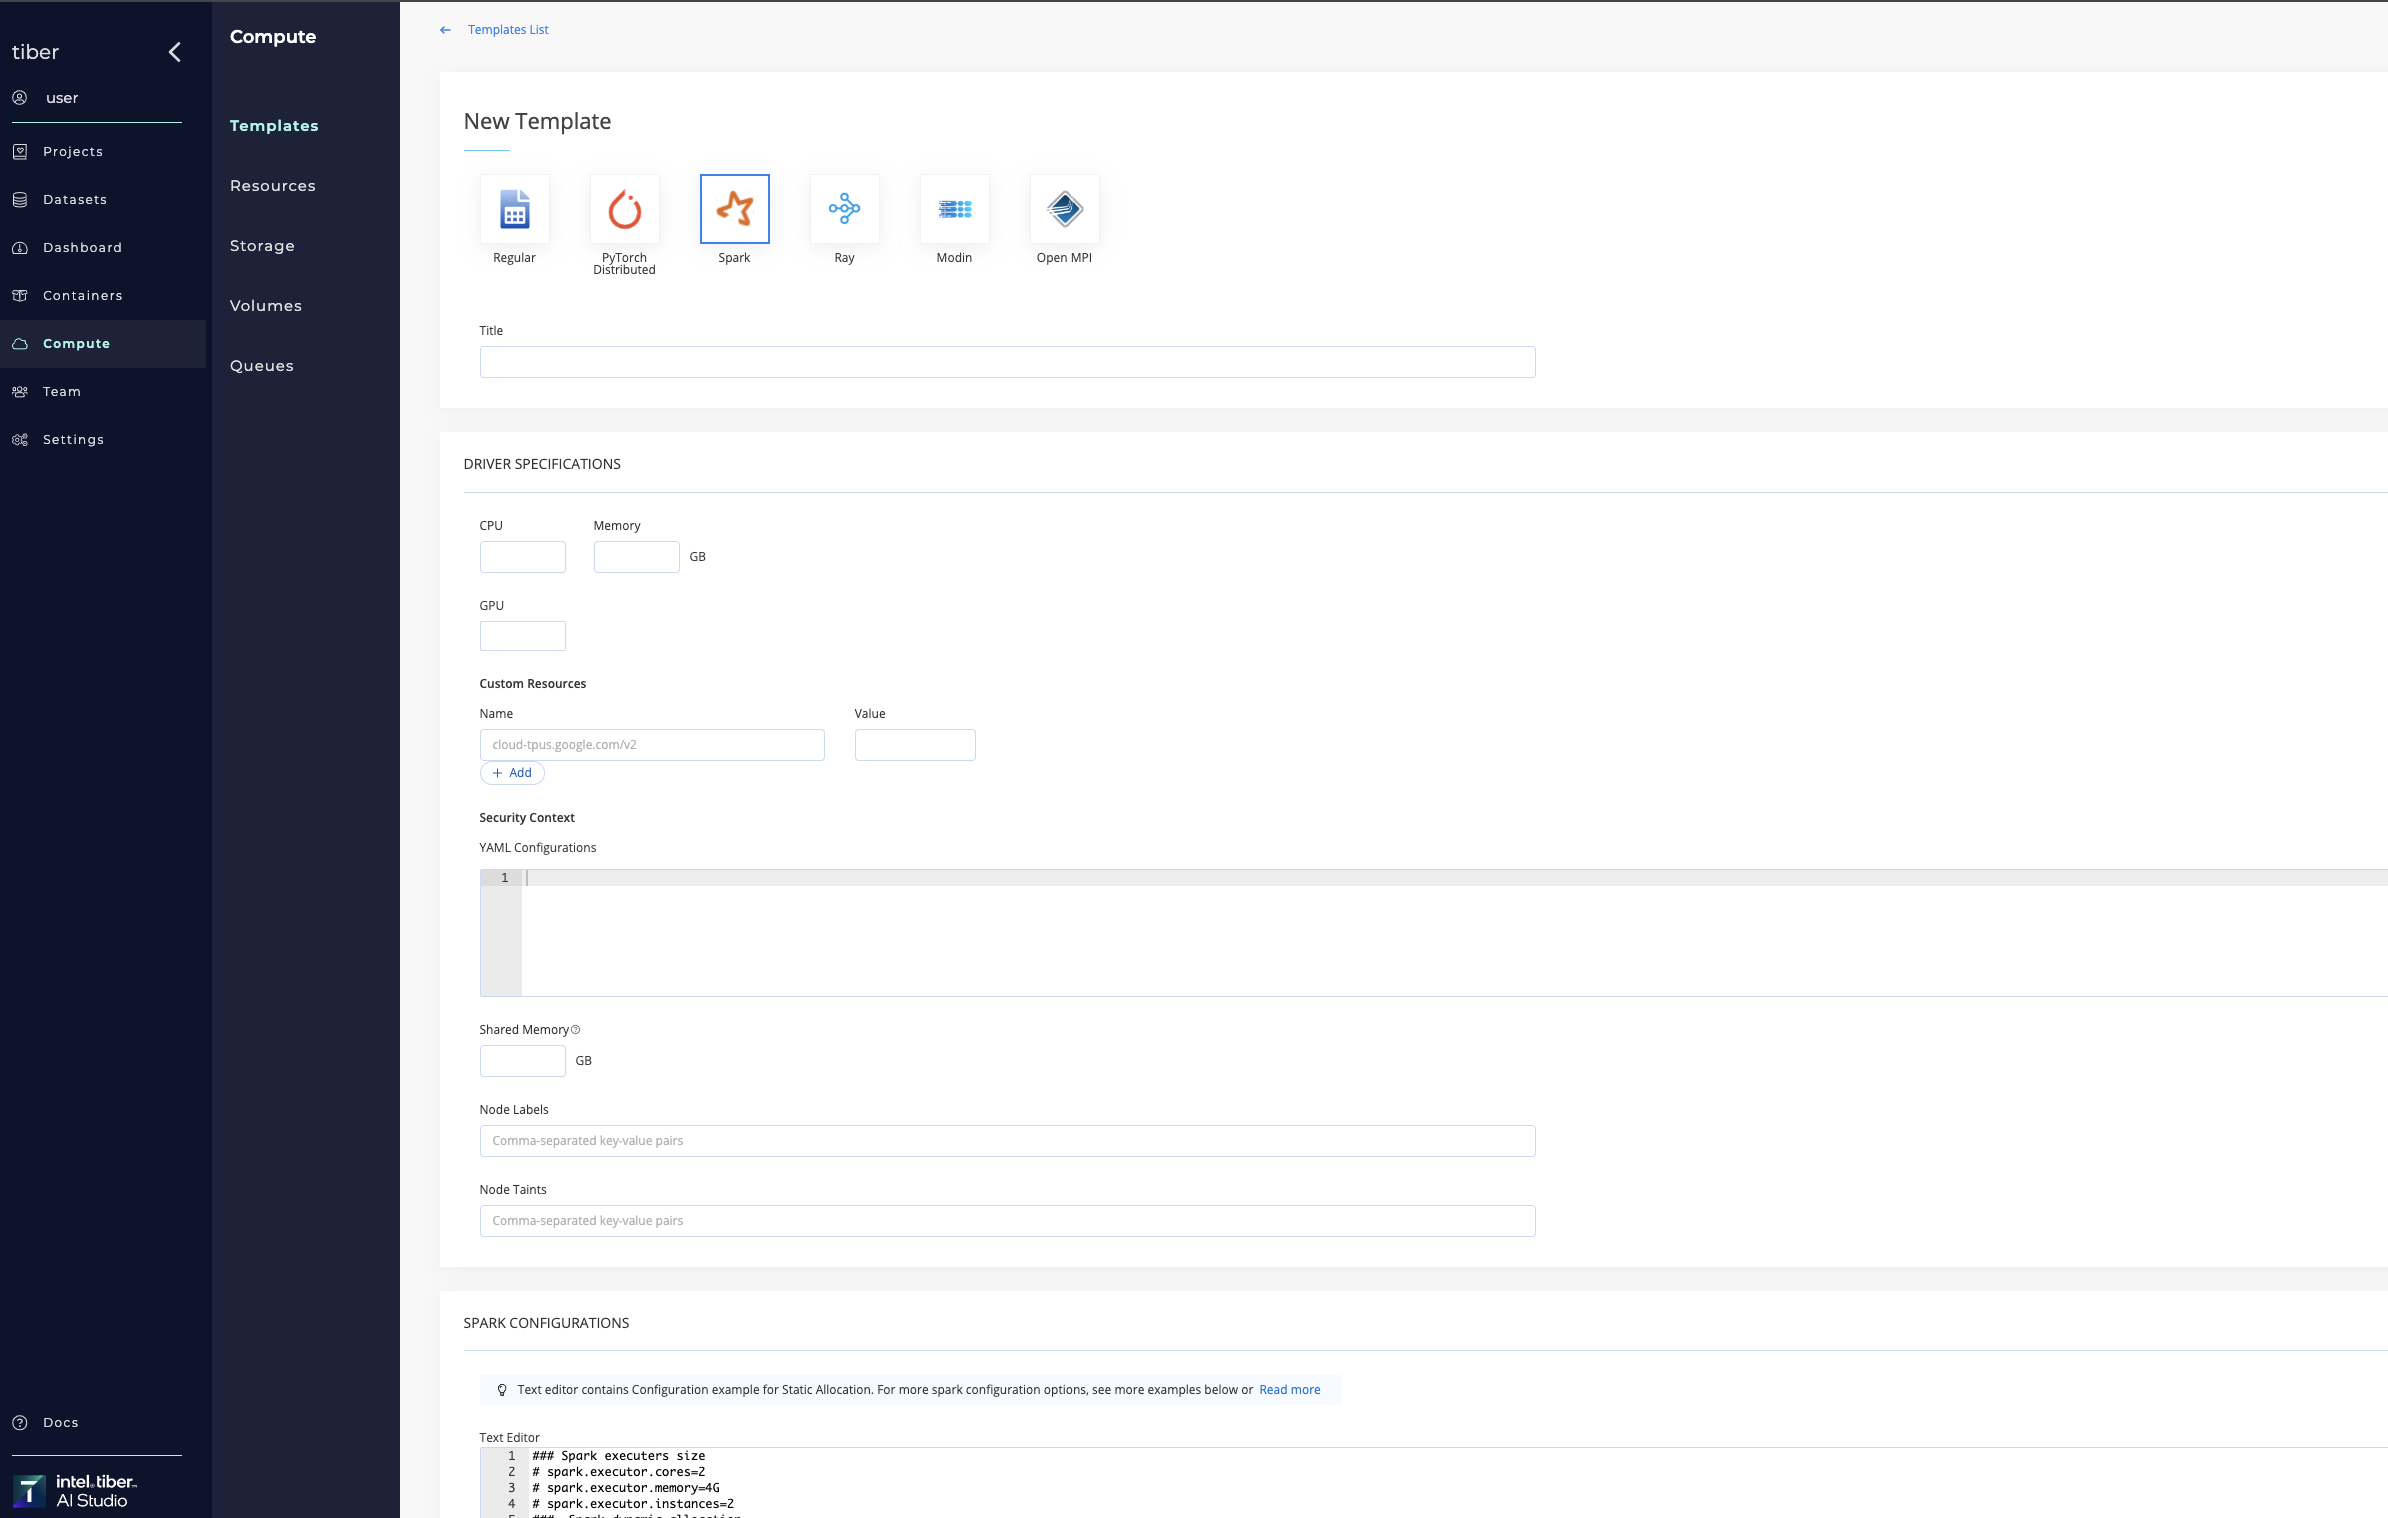
 When users create or modify an AI Studio compute template, they can configure various resource parameters, including memory, CPUs, HPUs, and GPUs, to meet their specific needs. Compute templates encompass the following configurable parameters:
# General settings:
- Title: Specifies the name or identifier of the compute template
- Type: Defines the compute template type
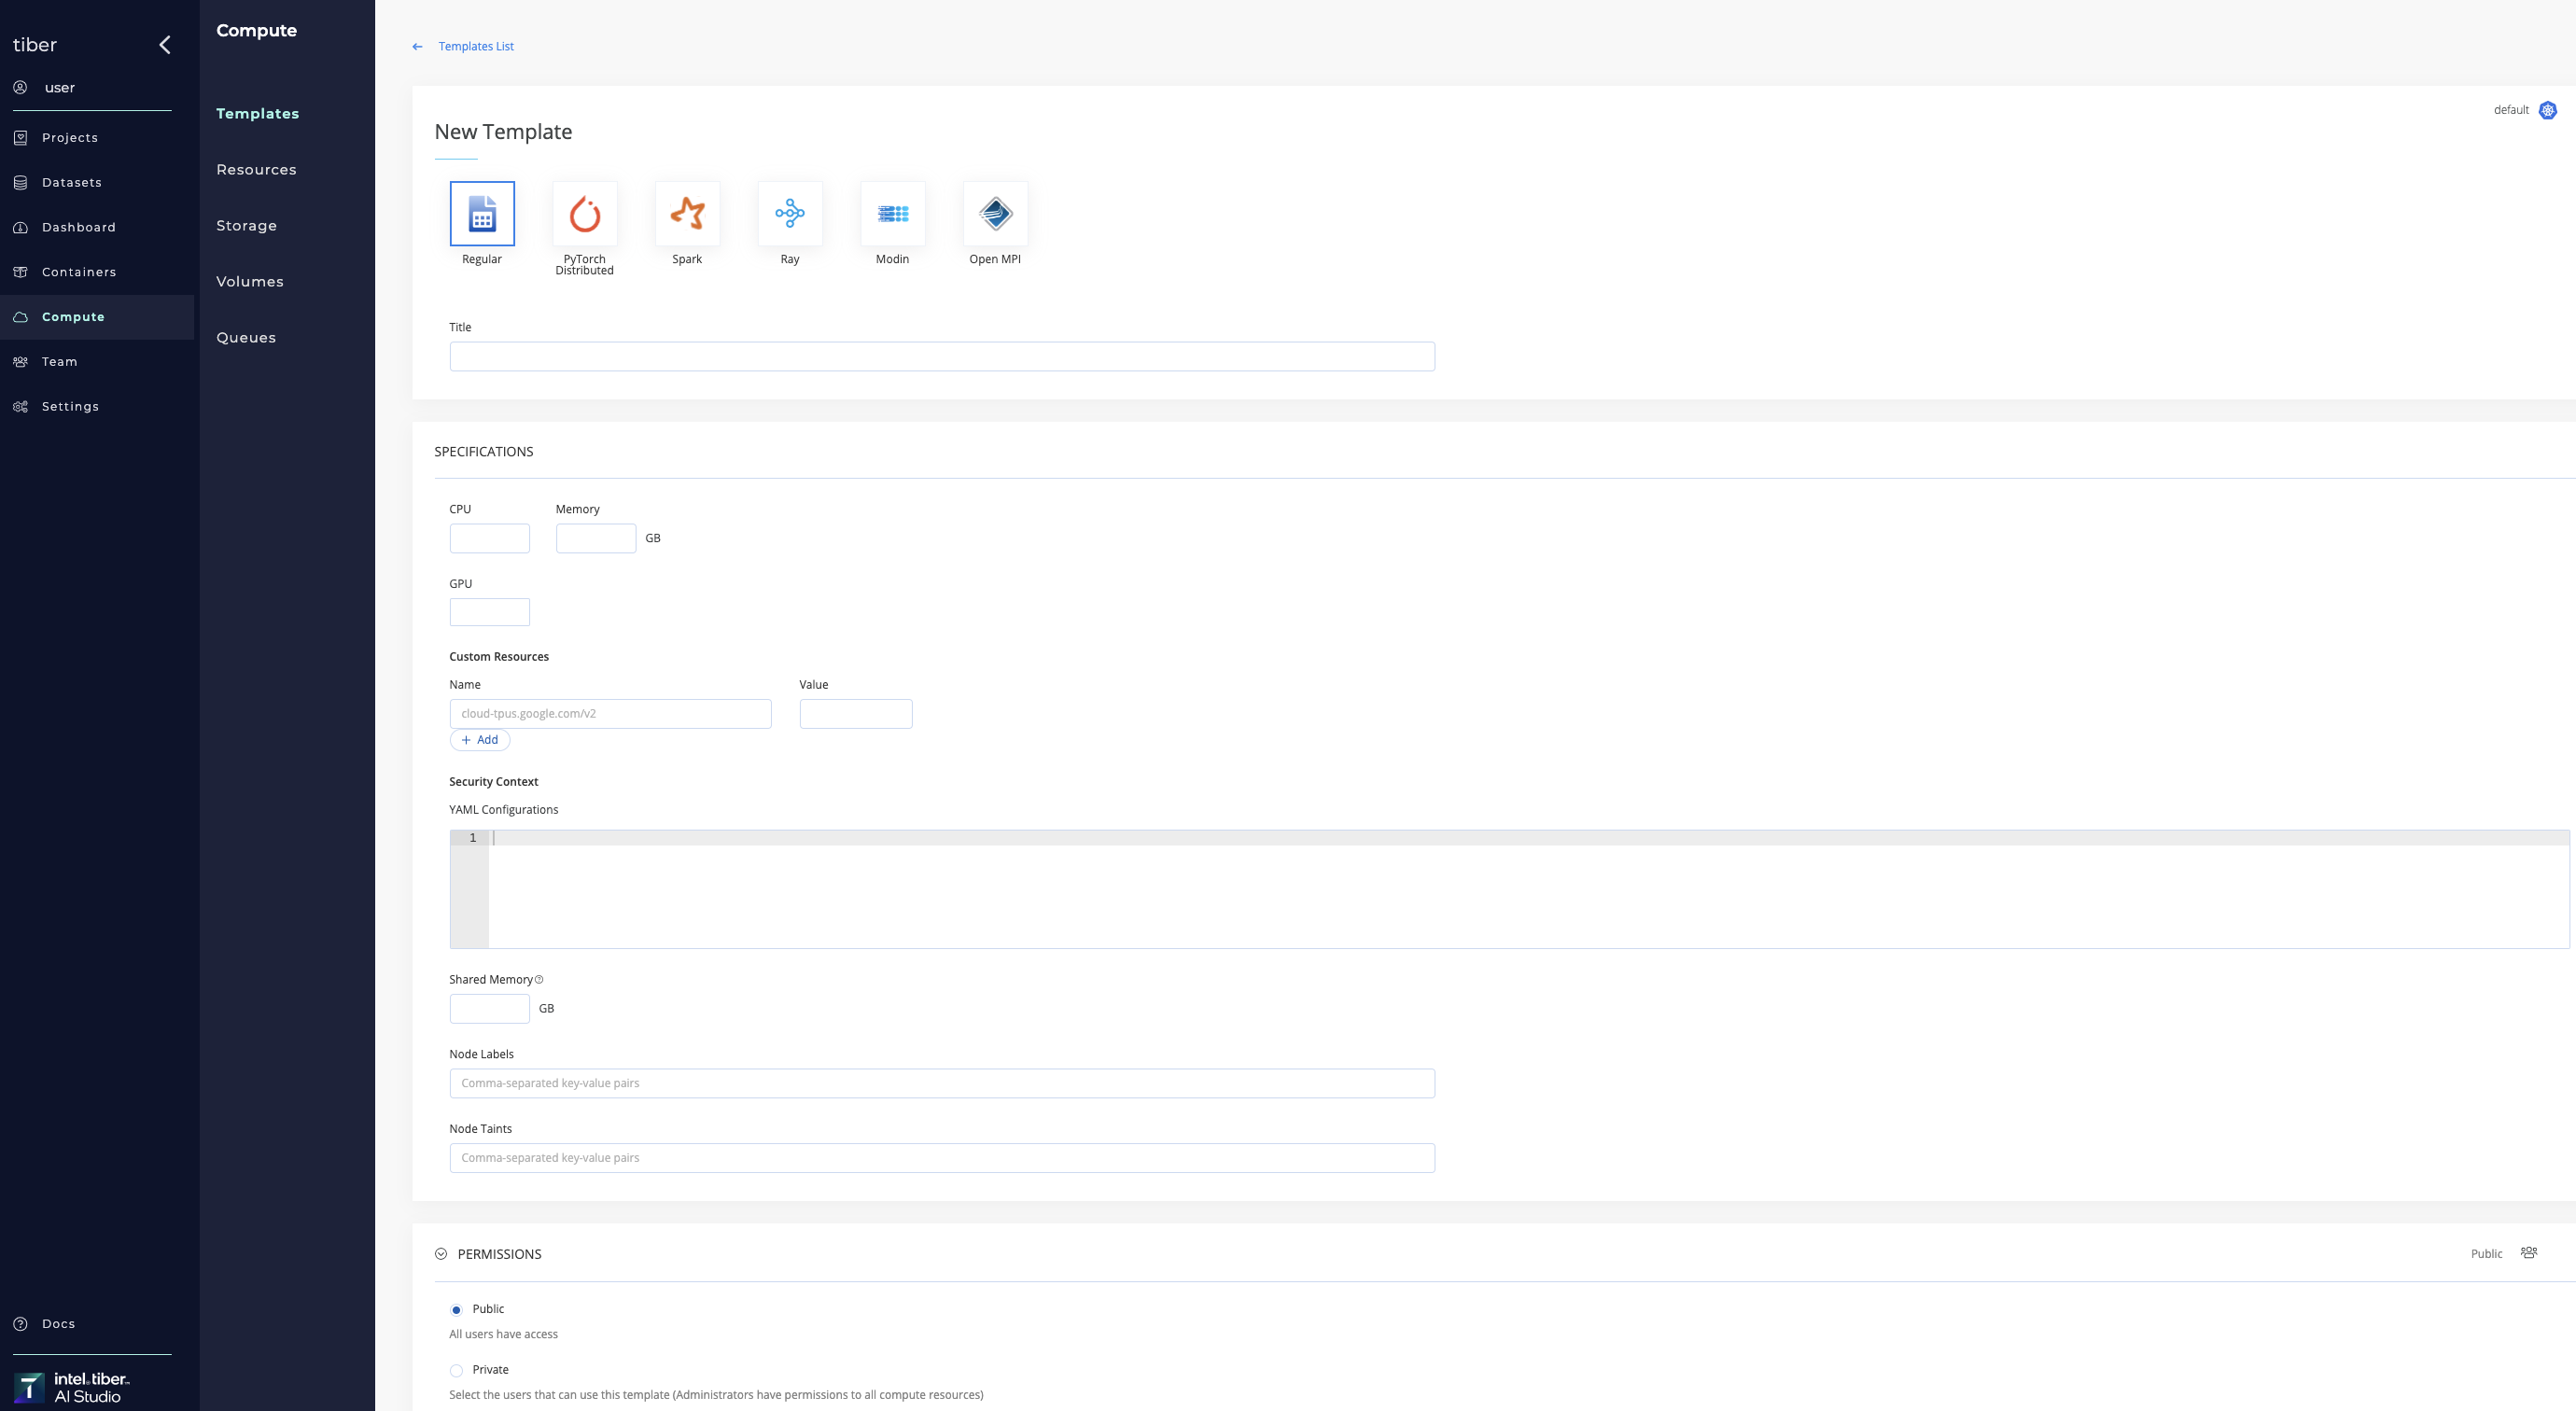
# Specifications:
- CPU: Specifies the number of central processing units (CPUs) allocated to the compute template, which may be represented as a discrete integer or a fraction depending on multi-threading and virtualized environments.
- Memory: Total system memory allocated to the compute template, expressed in gigabytes(GB), specifying the upper limit of RAM available for workloads.
- GPU: Defines the quantity of NVIDIA GPU accelerators assigned to the compute template.
- Custom Resources: To fully utilize platform capabilities, deployments must define custom resource requests (e.g., rdma/gpu_ib_fabric: 1). This ensures the necessary resources are allocated, optimizing workload performance while maintaining security and control.
- Security Context: Allows admins to configure container-level security settings. By specifying capabilities like IPC_LOCK and NET_RAW, admins control how containers interact with system resources, ensuring secure and compliant execution. *Available only for admins
- Shared Memory: Indicates the amount of RAM allocated for shared access among the compute template's CPUs and GPUs.
- Node Labels: Provides a key-value pair for node labeling. This label selector is used to assign the compute template to specific node pools. For example, use
gputype=v100to target nodes with NVIDIA V100 GPUs. Ensure that the labels specified match those in the node pool configuration. Multiple key-value pairs should be separated by commas. For additional information, refer to the section on Using Node Labels. - Node Taints: Defines a key-value pair for node tainting. This taint selector restricts the compute template to specific node pools, such as restricting GPU nodes to GPU-specific tasks (e.g., nvidia.com/gpu=present). Ensure that the taints specified match those configured in the node pool. Multiple key-value pairs should be separated by commas. For more details, see Adding Node Taints.
- HPU(Optional): Specifies the number of Gaudi AI accelerators assigned to the compute template.
- Hugepages(Optional): Configures access to memory pages larger than the default 4-KB size, allowing for more efficient memory management within the pod.
# Permissions:
- Public: Grants access to the compute template to all users within the AI Studio organization.
- Private: Restricts access to the compute template to a specified subset of users within the AI Studio organization.
# Compute template selection
If setting up a job within the AI Studio UI, users can select a compute template using the Compute drop-down list when building a flow or starting a workspace or experiment. A compute can also be set when running jobs using the CLI and SDK. When a template is selected, AI Studio checks for the availability of the required cluster resources and attempts to allocate the resources of the requested size. For more information, see Compute Usage in Jobs.
# Compute template types
The following table lists the different types of AI Studio compute templates:
| Type | Explanation |
|---|---|
| Regular | This template is a set of resources defining a single pod that is launched on a single node (i.e., non-distributed). A machine's template is also a regular template. |
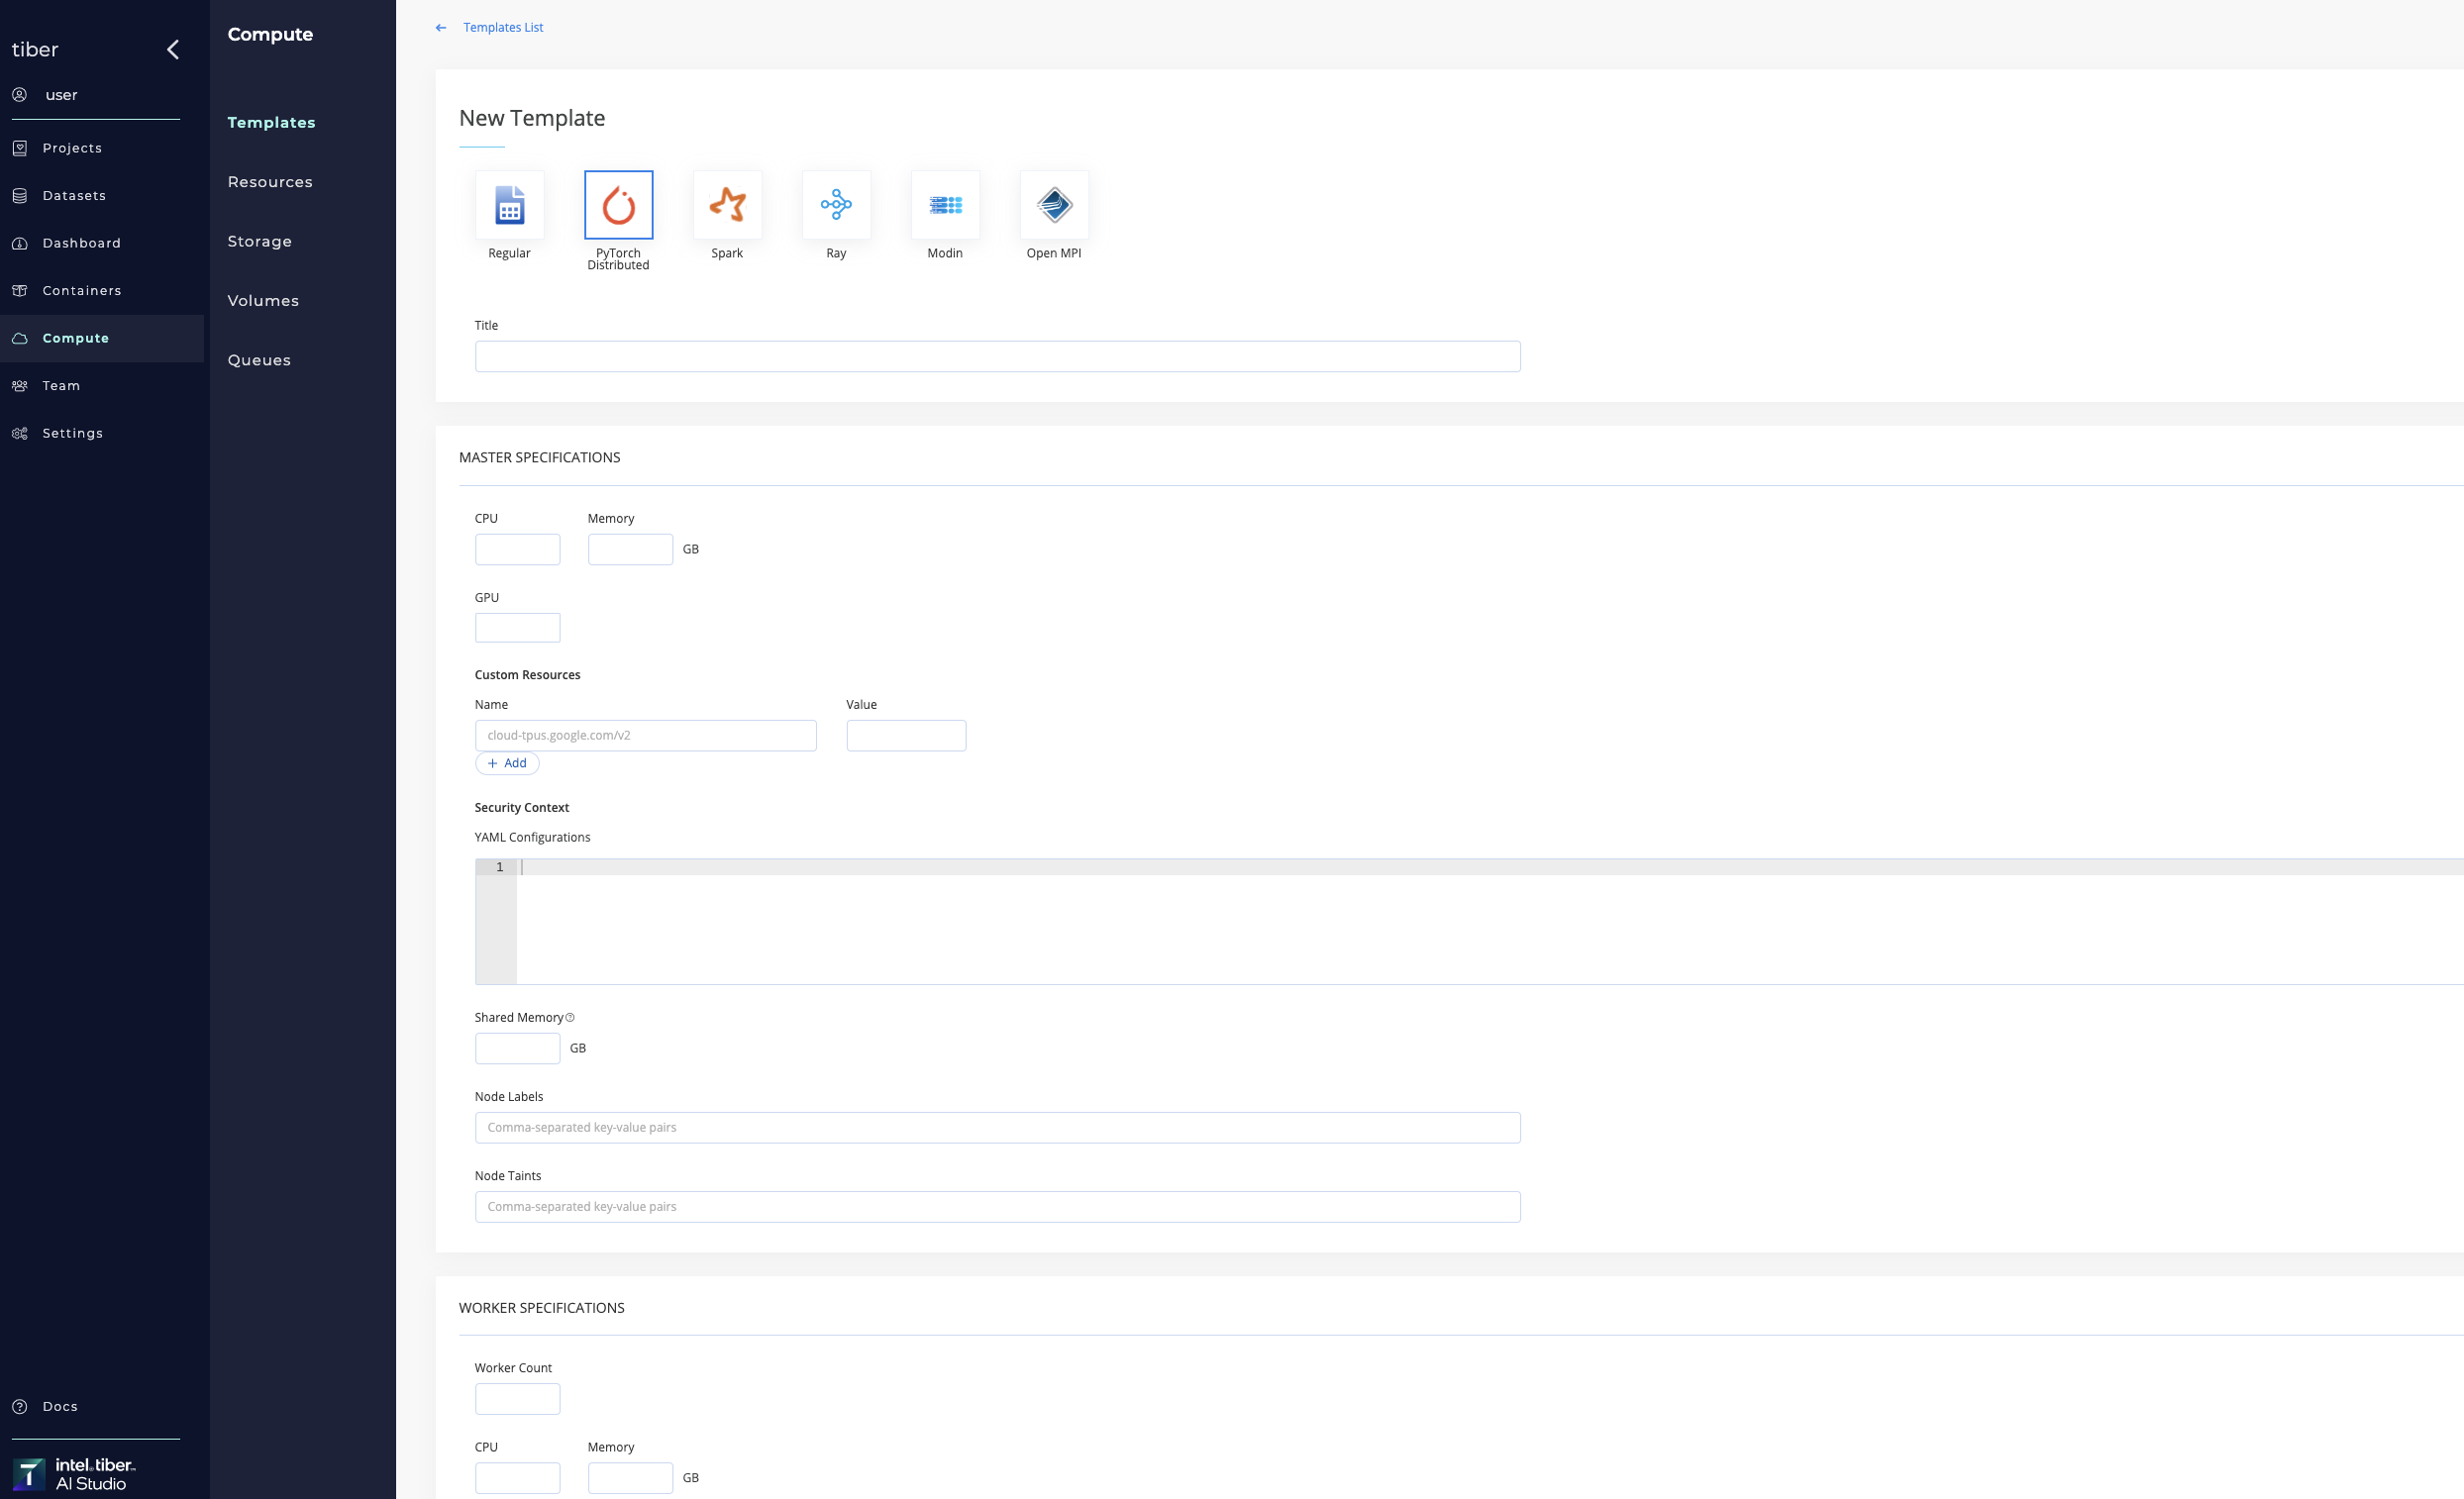
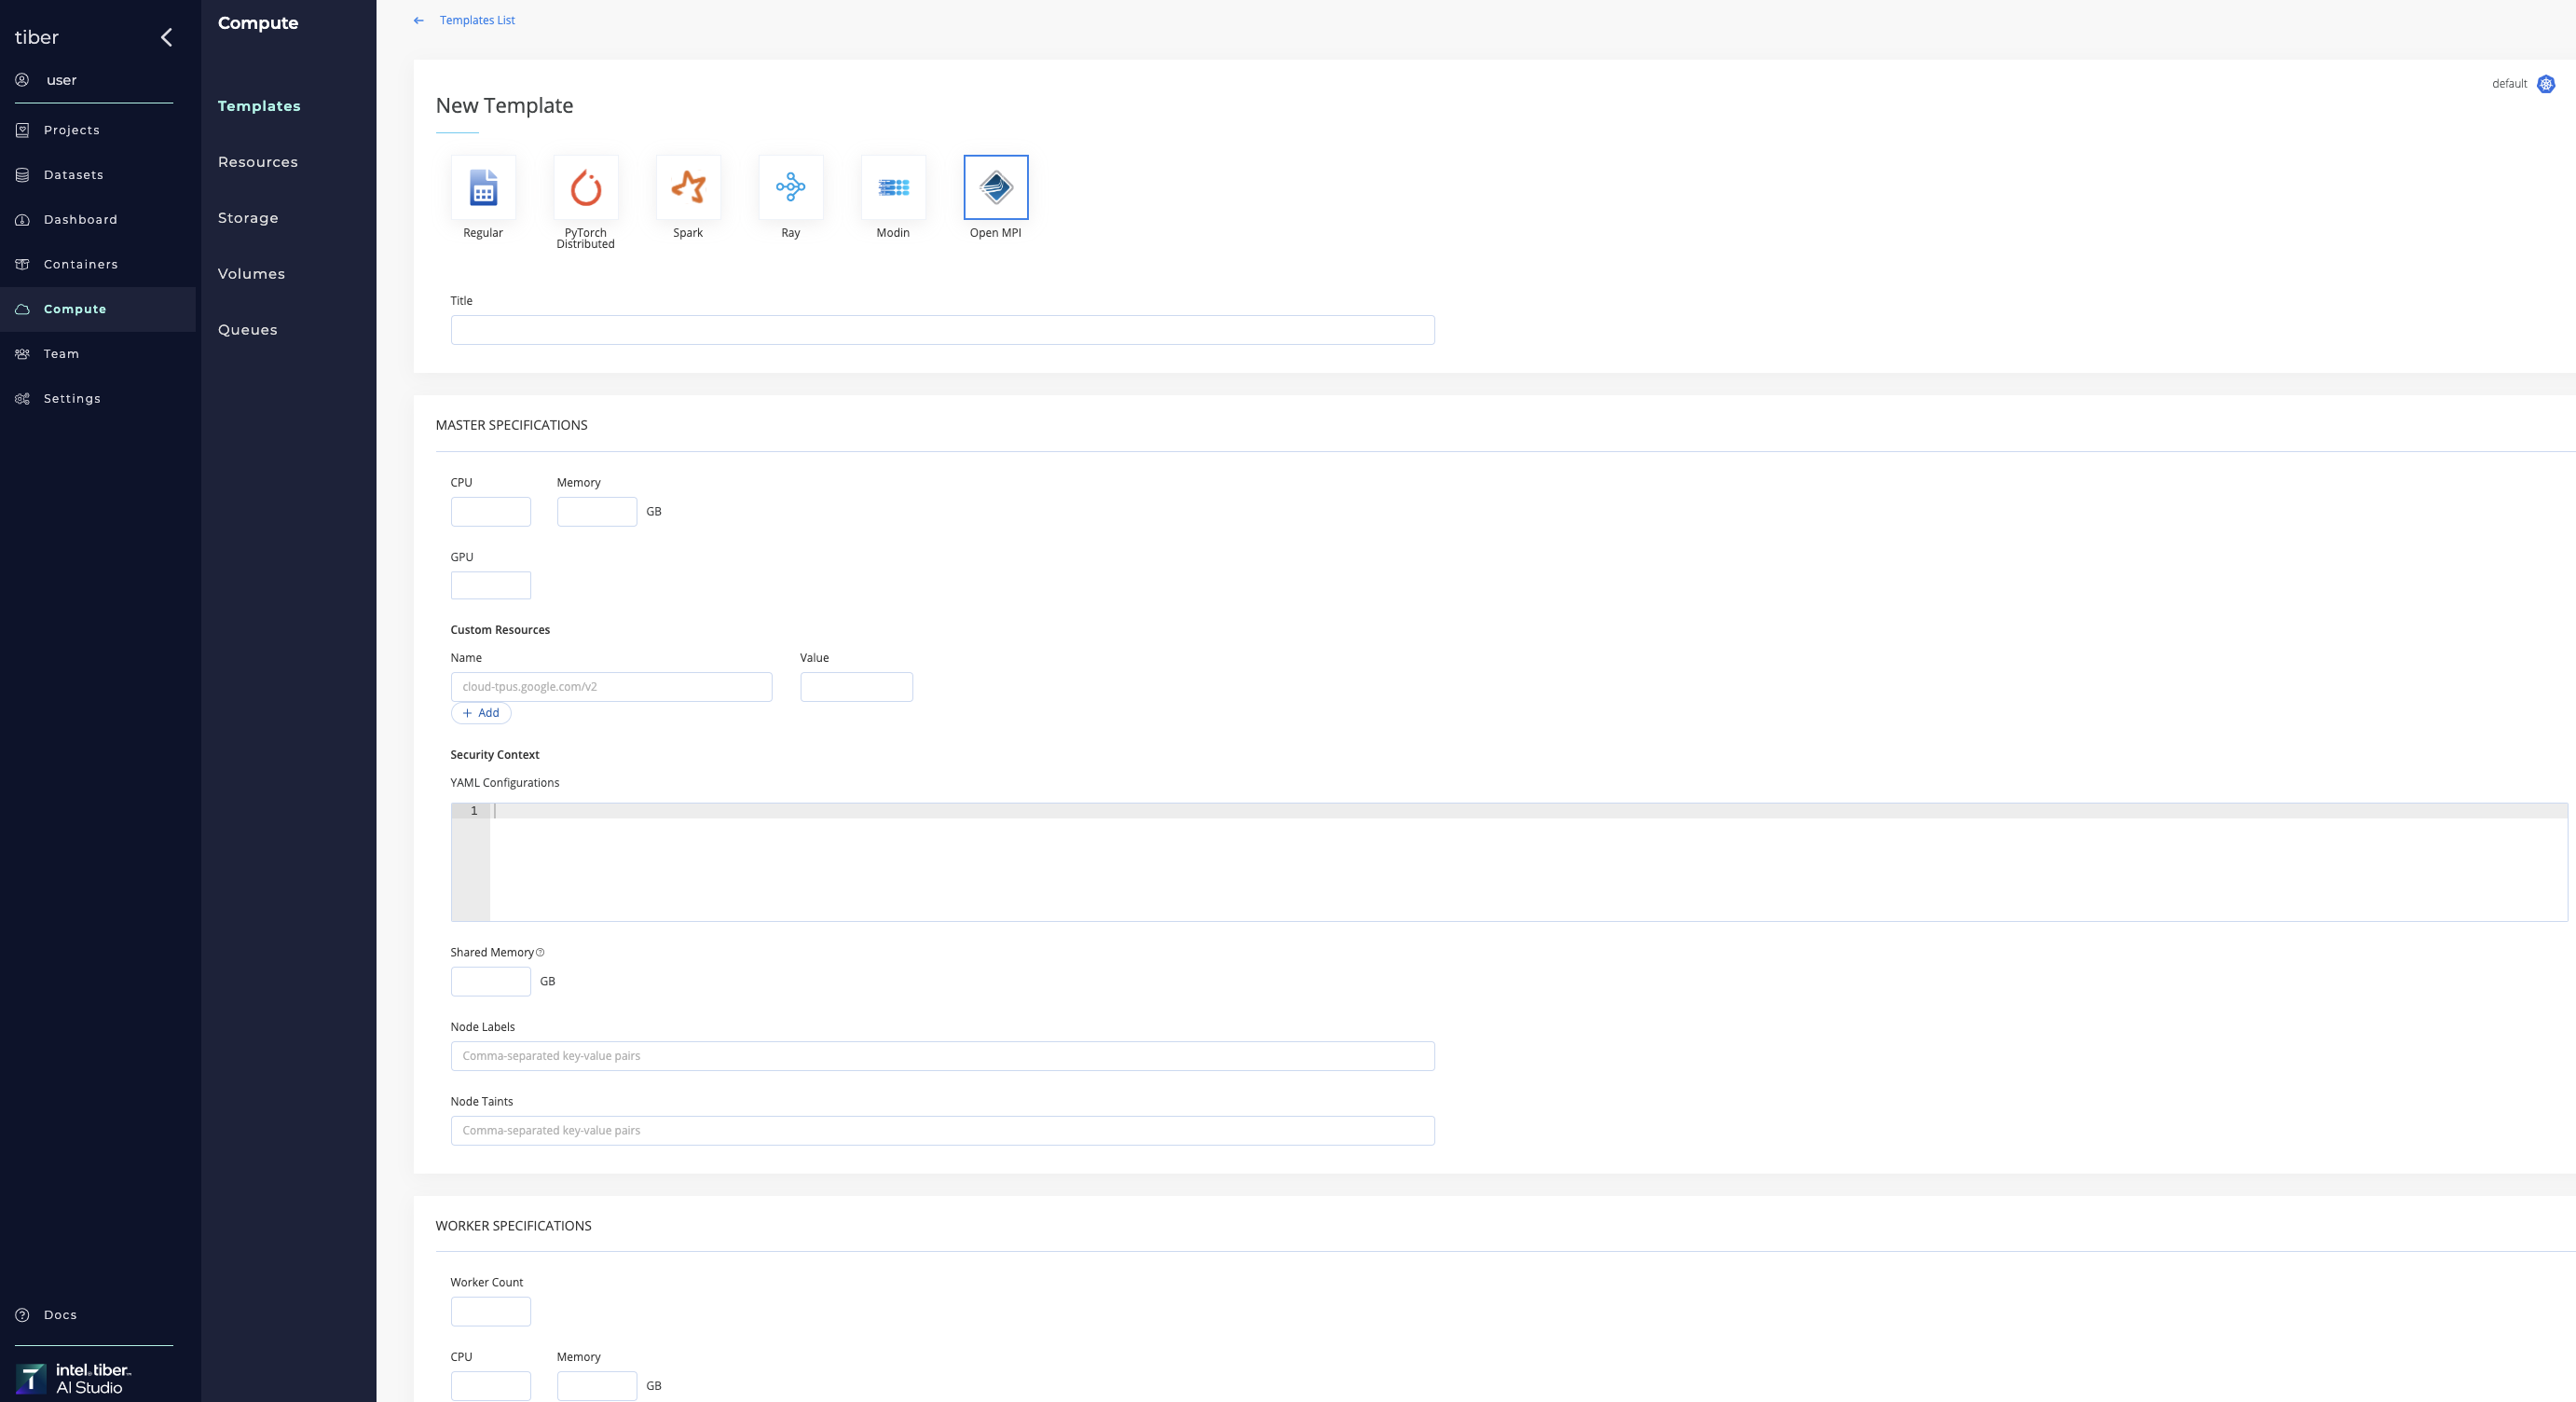
| Open MPI | This template is used for multi-node distributed jobs. It allows running any Open MPI compatible job as a distributed workload over more than one node. Define the details of the master node and worker nodes separately. |
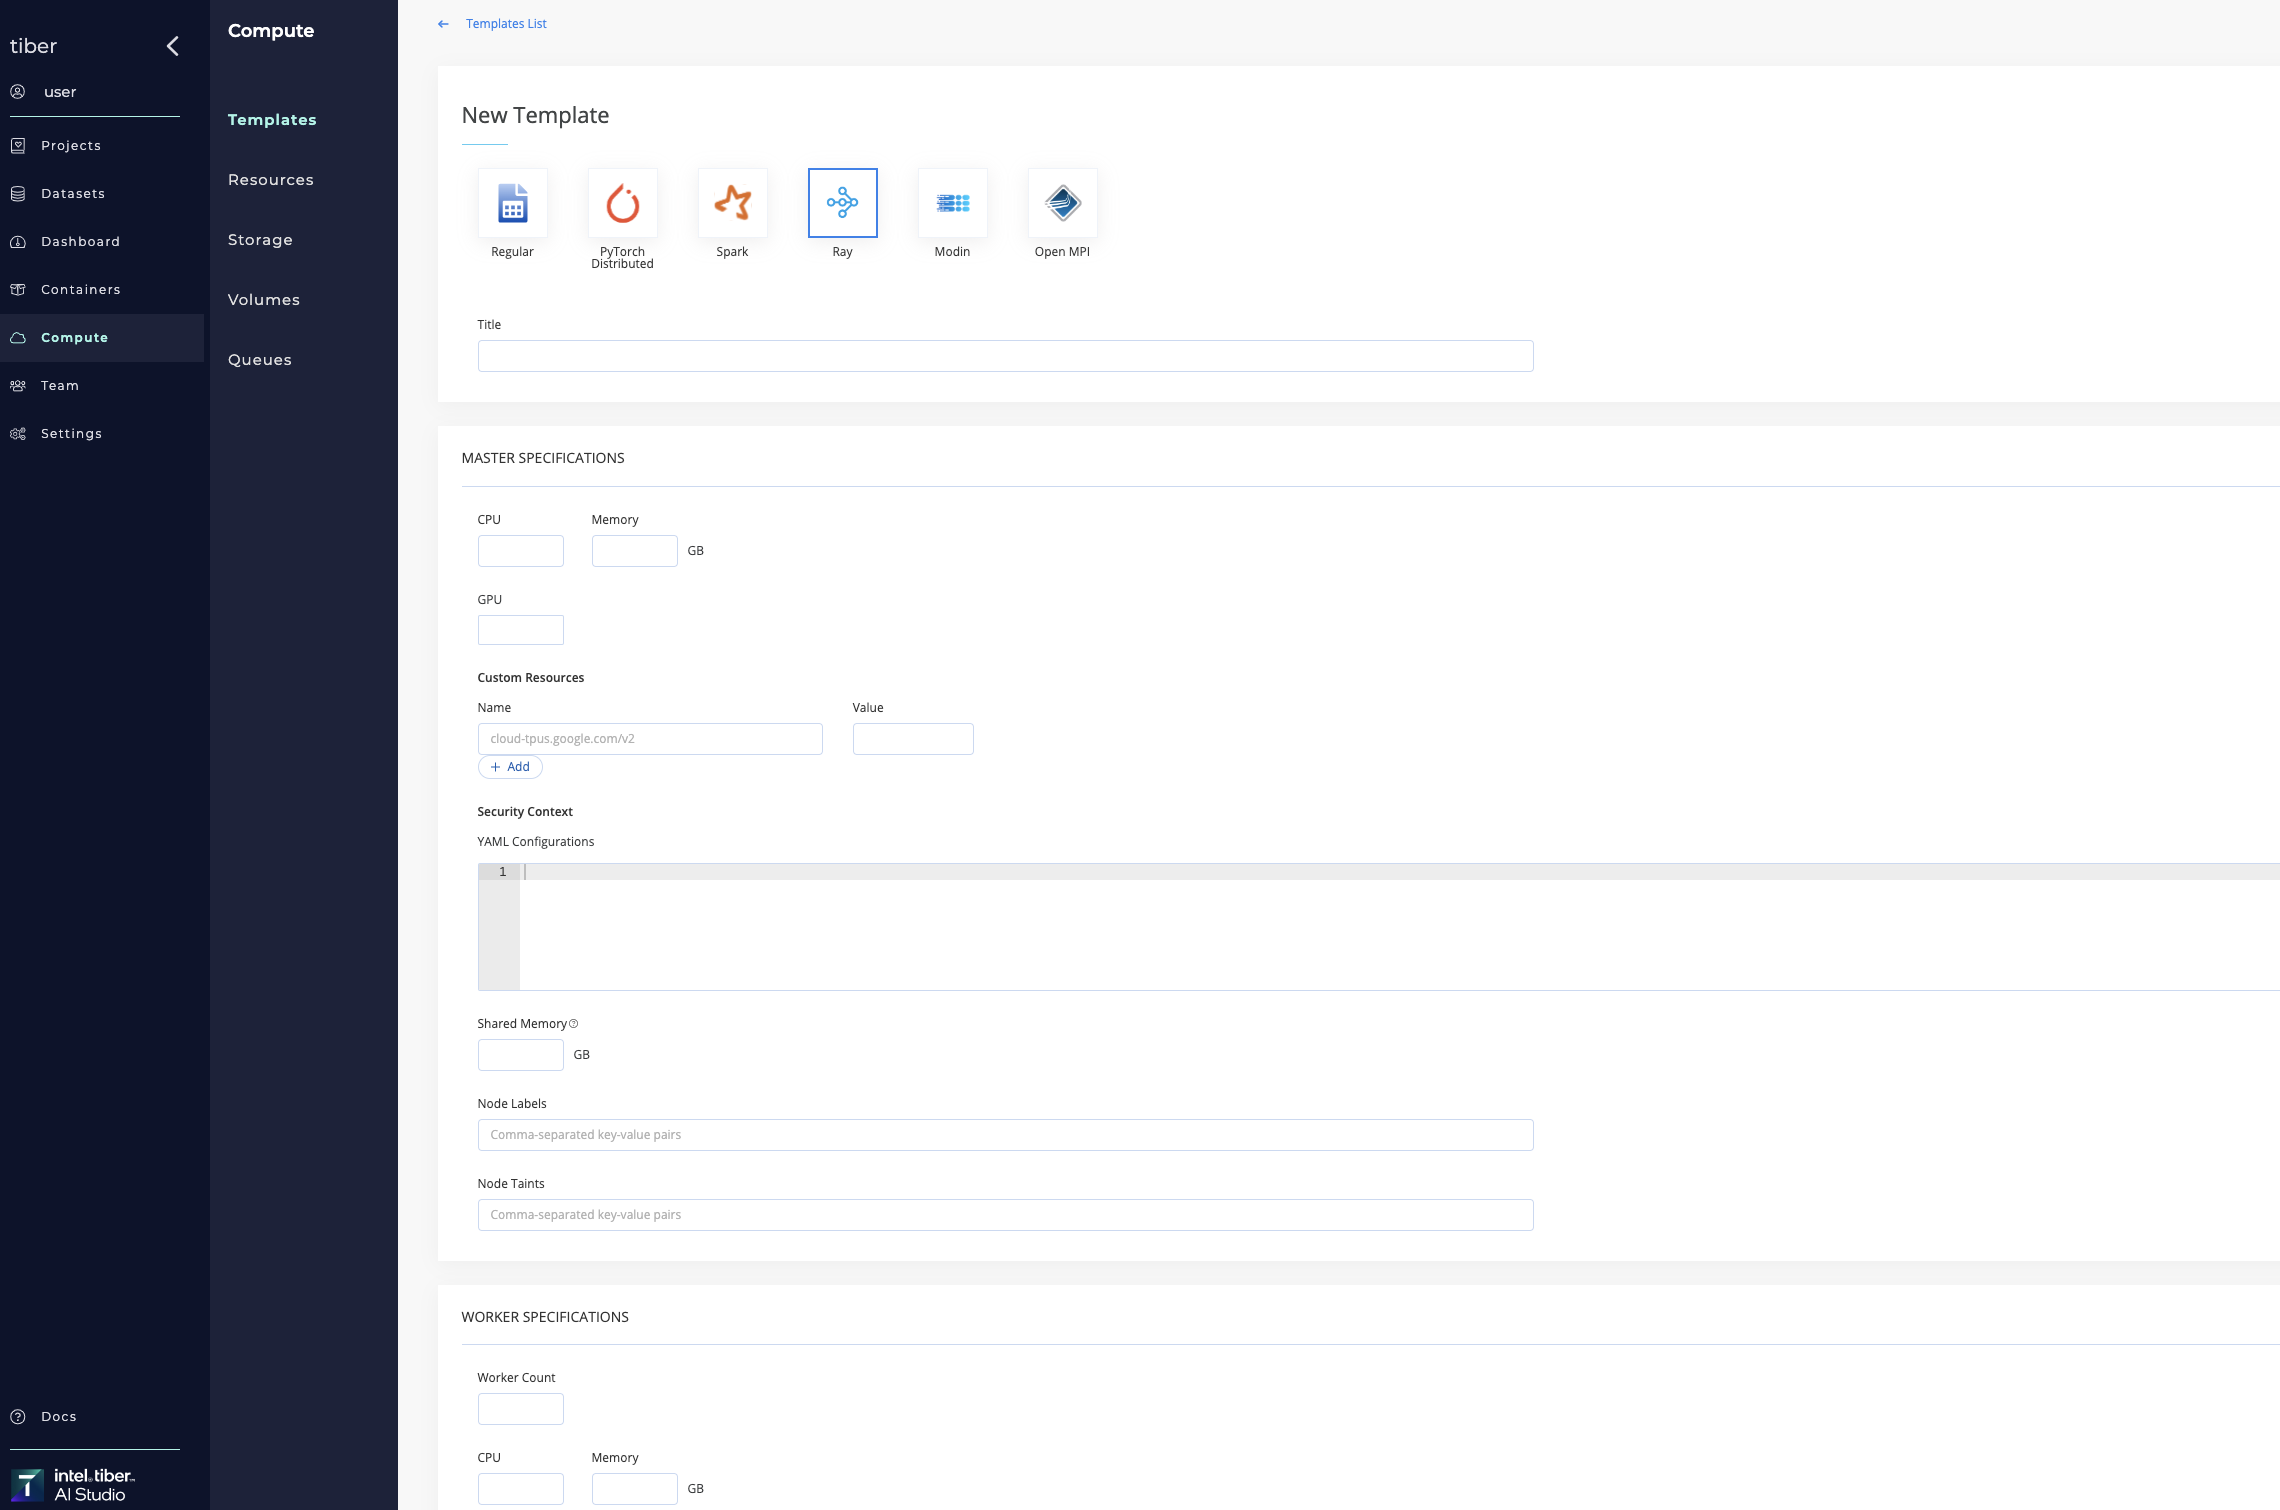
| PyTorch Distributed | This template is used for running code using the torch.distributed framework. The template defines the configuration for the worker nodes. |
| Spark | This template is used for running spark distributed processing jobs using kubernetes cluster. Configure the Spark Driver specifications and the Spark Configuration section's spark-defaults.conf properties. |
| Ray | This template is used for running Ray distributed computing. |
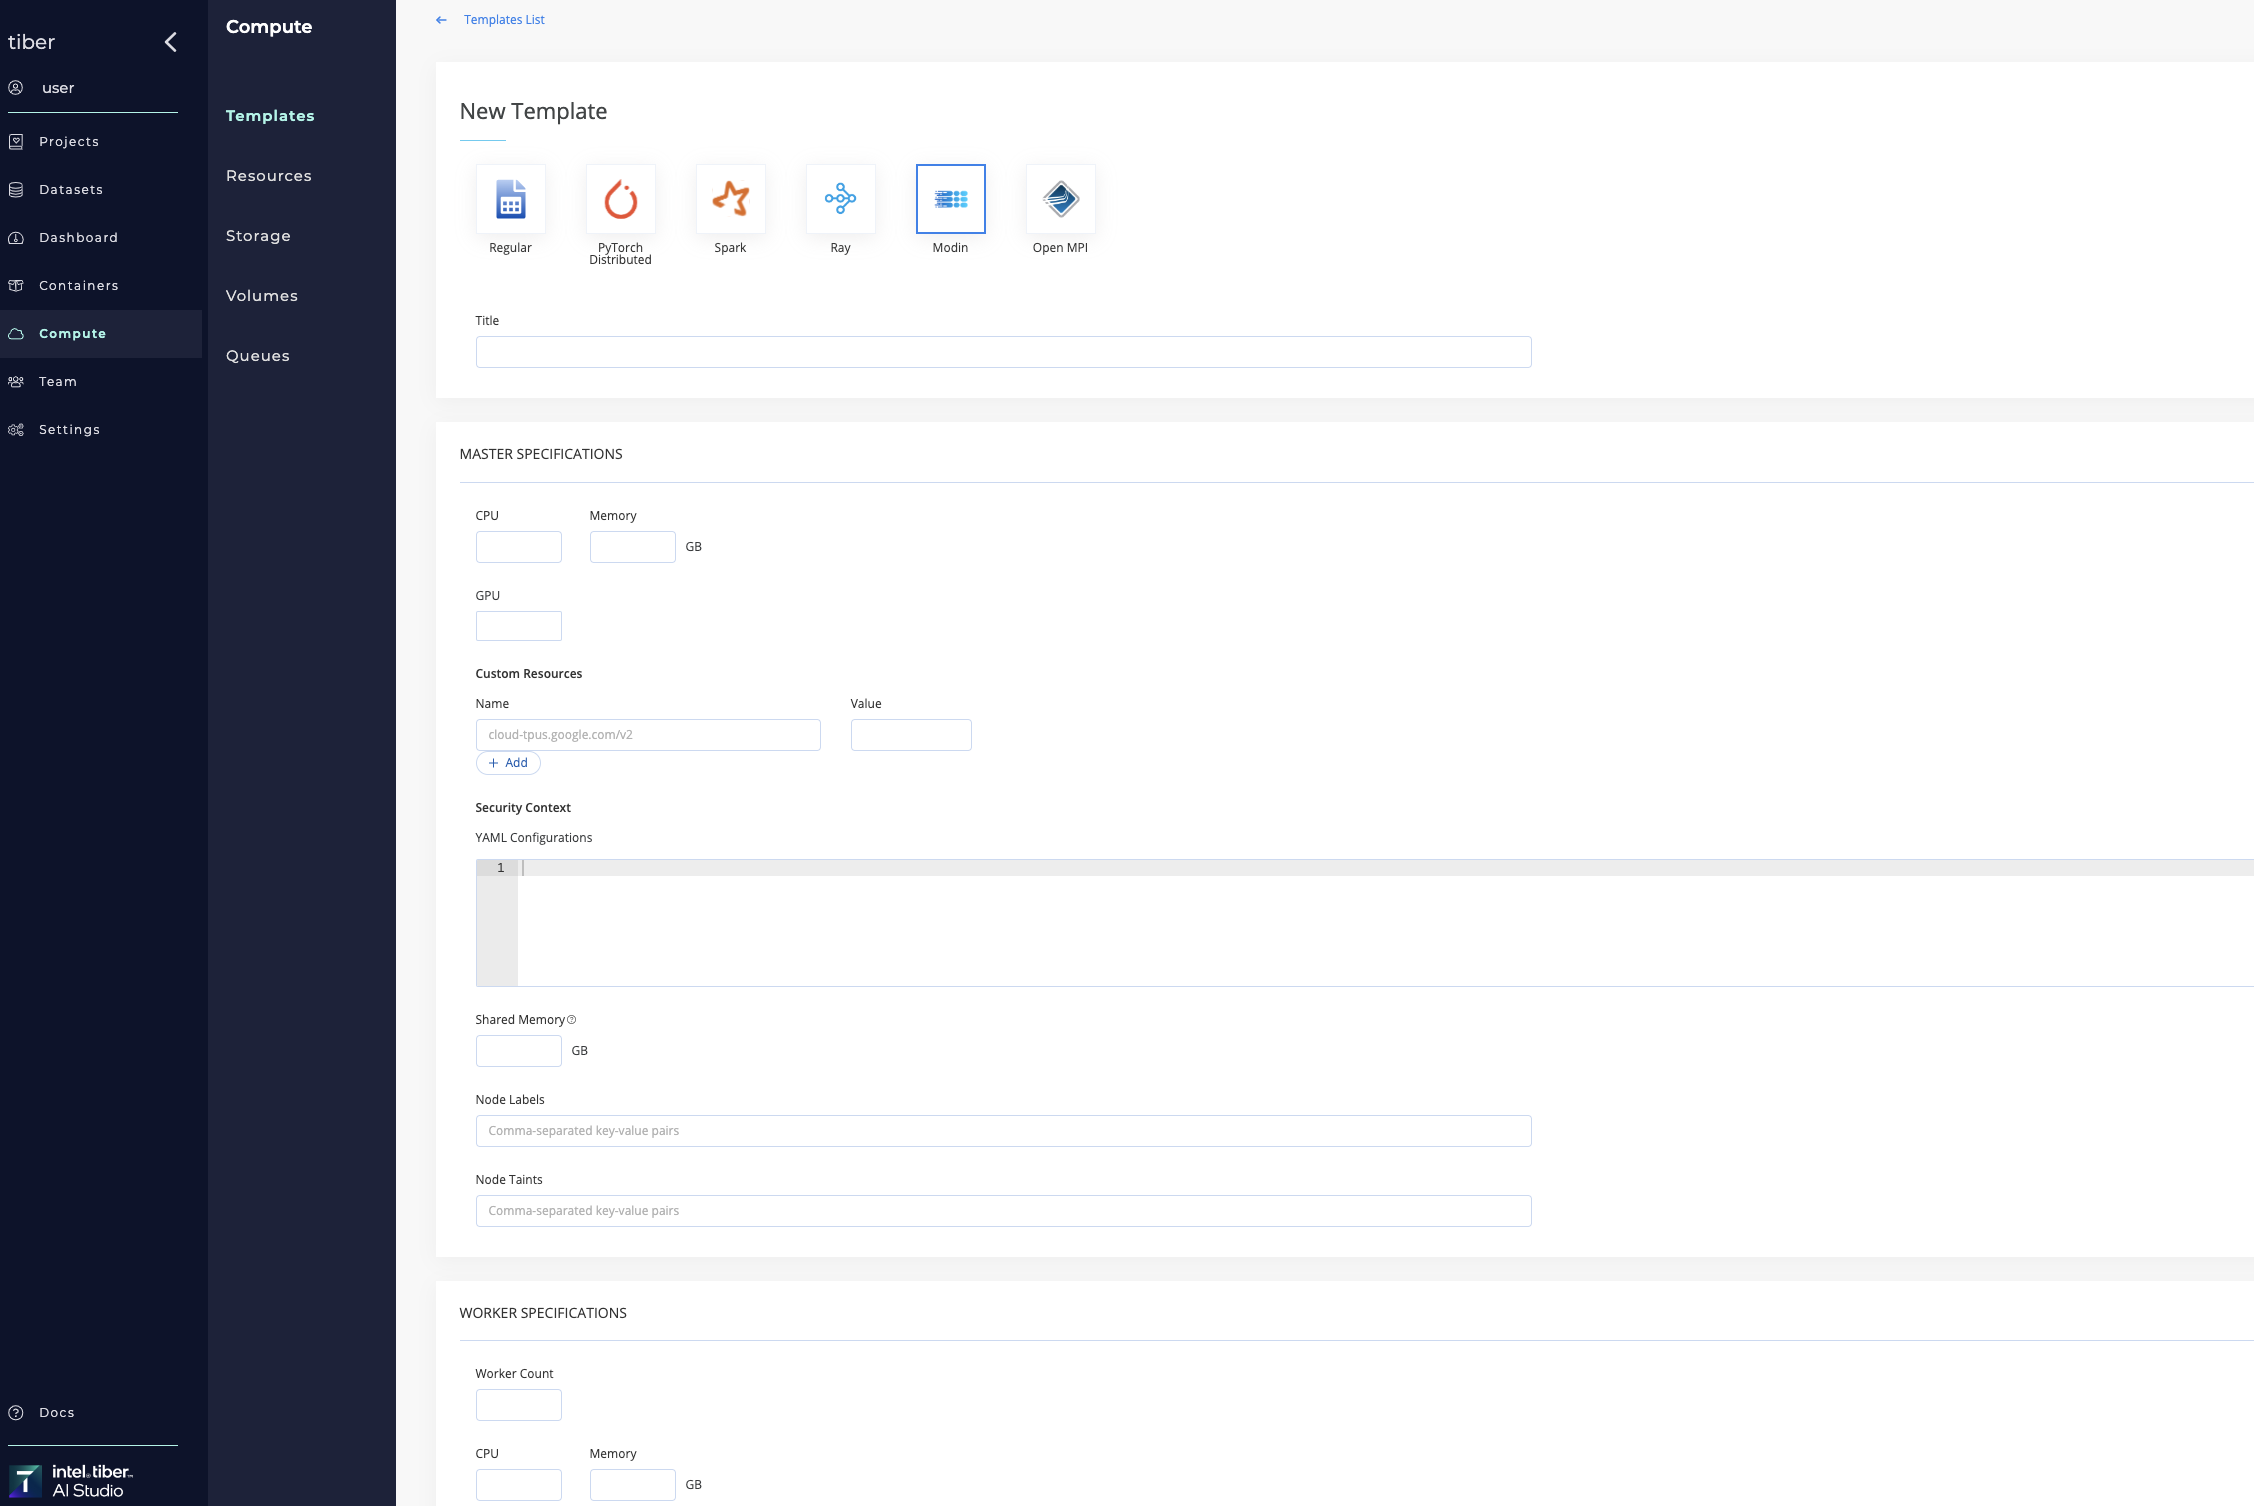
| Modin | This template is used for running Modin distributed computing. |
# Compute Template Functions
The AI Studio platform enables users to add templates, remove templates, and edit existing templates.
# Add a compute template
Compute templates can be added to Kubernetes and Spark clusters.
# Delete a compute template
Complete the following steps to delete a compute template:
- Go to Compute > Templates.
- Click the Delete button at the right end of the compute template to delete.
- Confirm the deletion.
The AI Studio software deletes the template from your organization.
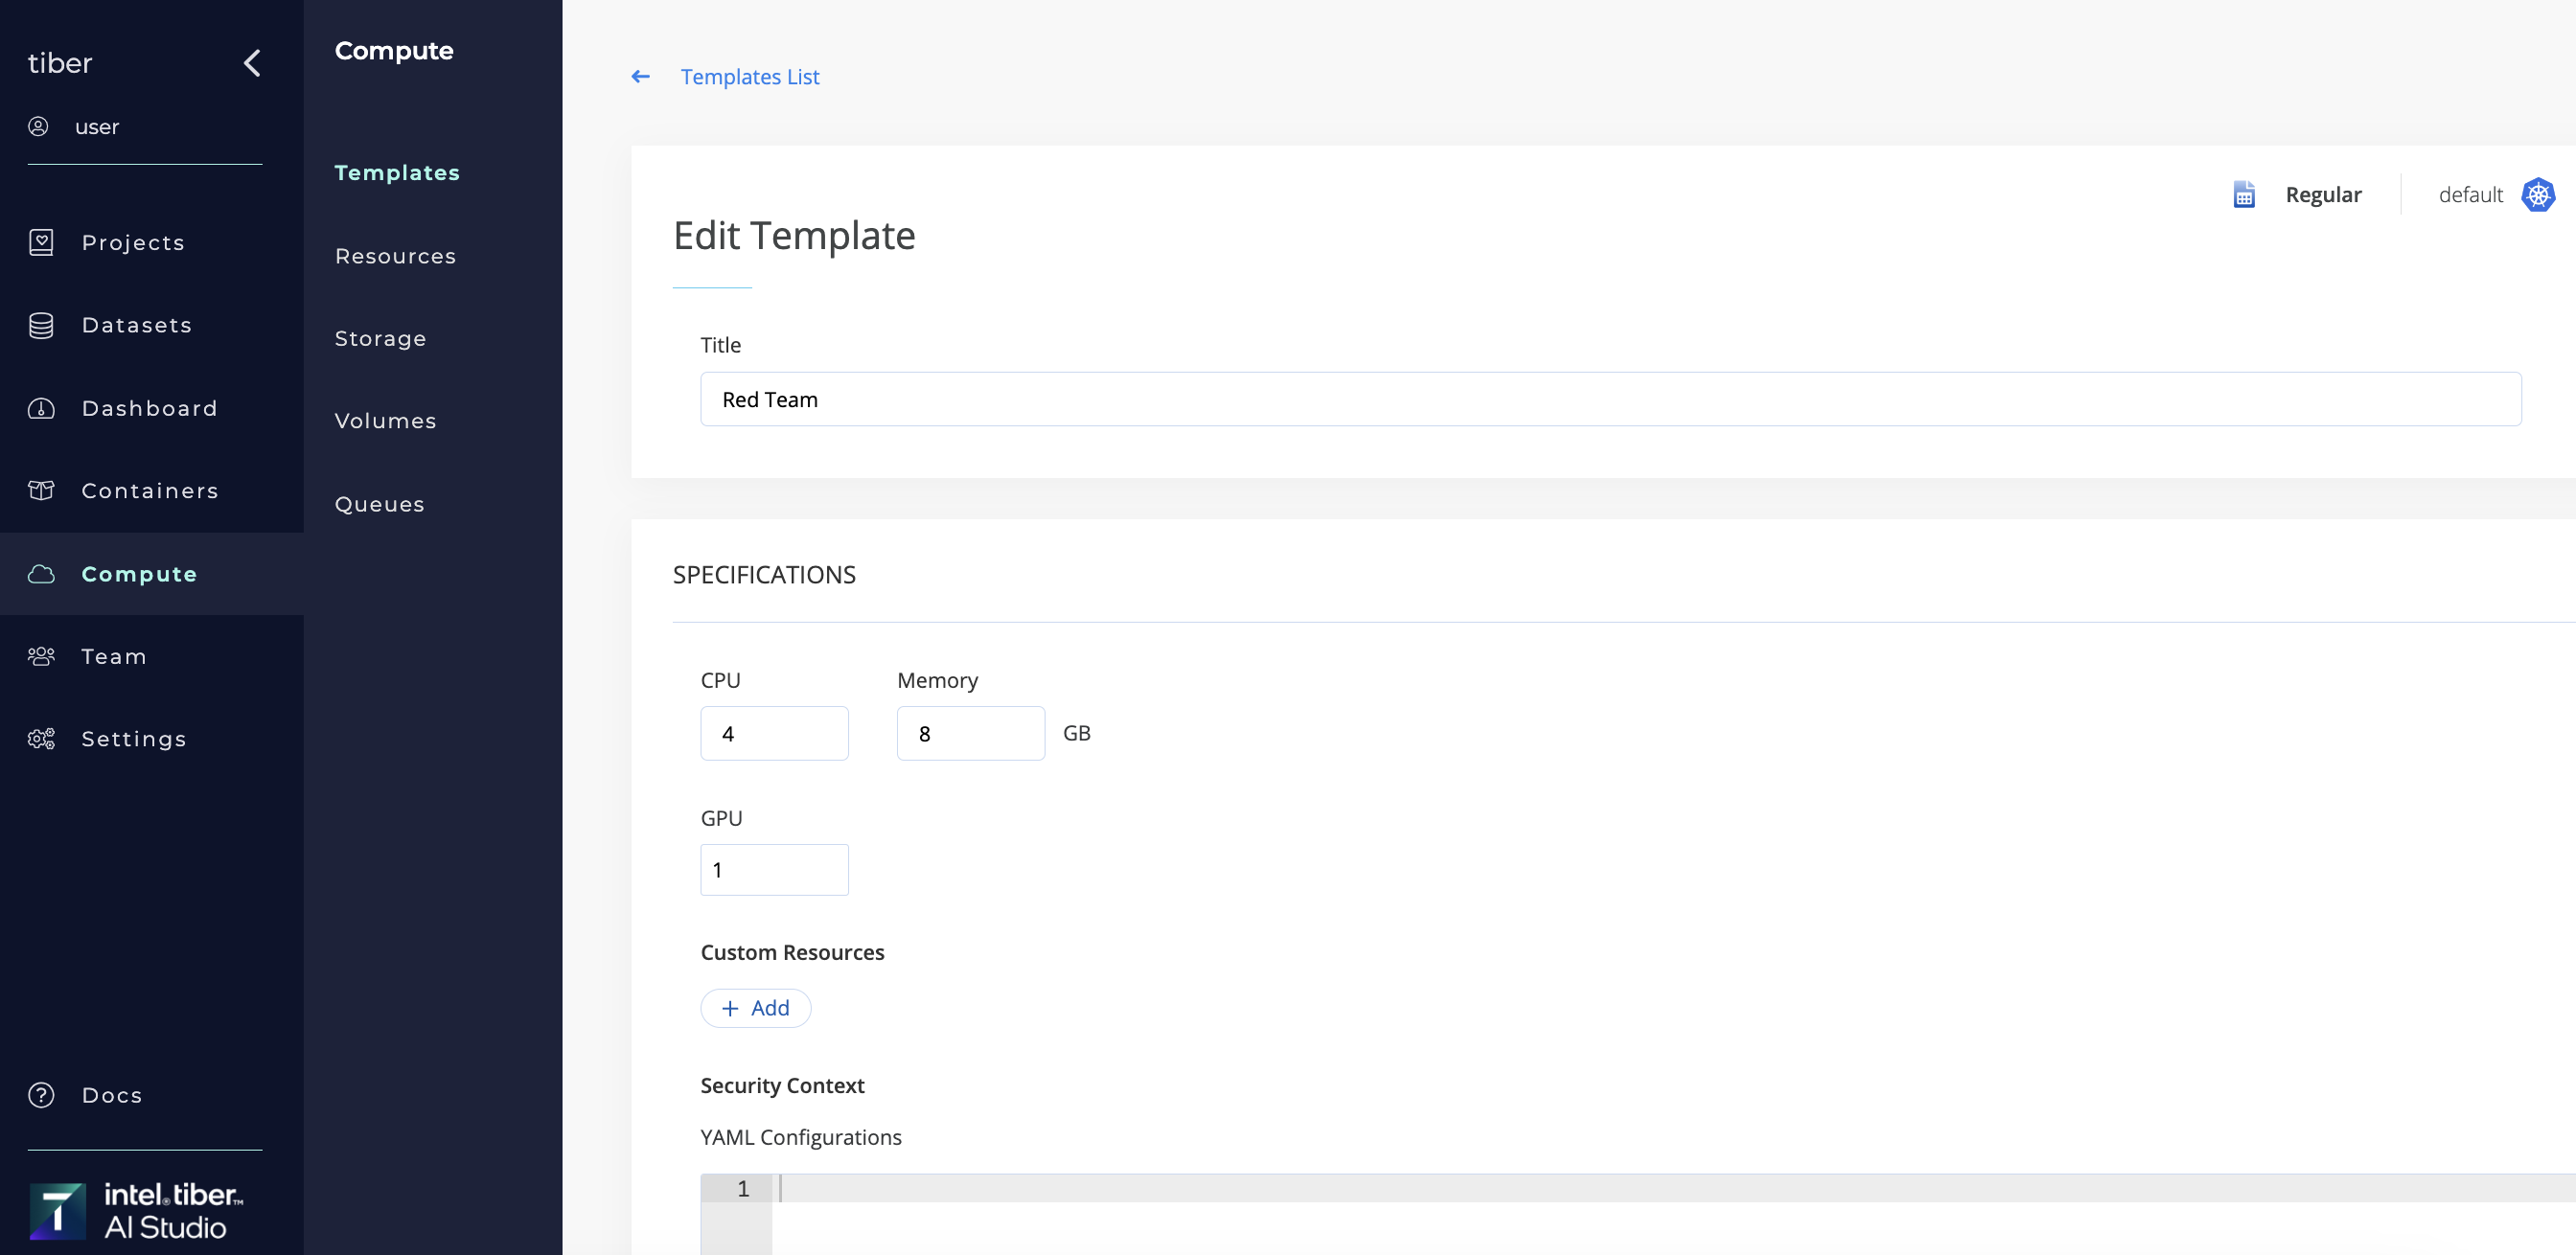
# Edit an existing template
Complete the following steps to edit a compute template:
- Go to Compute > Templates.
- Select the template to edit. A similar page to the new template page displays.
- Edit the fields as desired.
- Click Save.
The AI Studio software updates the details of the template.
# Advanced Volumes
 Workspace Volumes functionality replaced In app version v5.2.5 with Advanced Volumes, a more flexible and powerful solution for managing persistent storage in your environment. While Workspace Volumes, which were available up to AI Studio version v5.2.4, allowed for basic persistence of files and configurations, the new Advanced Volumes offer enhanced capabilities, more granular control, and better integration with modern workflows.
# Key Differences from Workspace Volumes:
- Cross-Project Usage: Unlike Workspace Volumes, which were restricted to a single project, Advanced Volumes can now be shared across multiple projects.
- Better Performance and Scalability: Advanced Volumes offer improved scalability, making them more suitable for larger datasets and distributed workloads.
- Multi-Cluster Support: Advanced Volumes can be used in multiple clusters, allowing for a more flexible environment.
- Improved Management Interface: The new interface for volume management is more intuitive and streamlined, offering better control over volume creation, attachment, and usage.
Clarification:
As long as the AI Studio version v5.2.4 or earlier used, the old Workspace Volumes feature will be available only.
# Key Features of Advanced Volumes:
Network File System (NFS) Volume Type Supported: Unlike Workspace Volumes, which were limited to ReadWriteOnce (RWO), can be either ReadWriteOnce (RWO) or ReadWriteMany (RWX), depending on your needs. Typically mounted as ReadWriteMany (RWX), are ideal for shared storage across multiple workspaces and jobs.
Cross-Project Volume Sharing: Unlike Workspace Volumes, which were limited to a single project, Advanced Volumes allow you to share the same volume across different projects. This is particularly useful for teams working on interconnected projects that require shared access to datasets and configurations.
Volume Attachments to Multiple Jobs: Advanced Volumes enable attaching the same volume to multiple Jobs, enabling easy access to shared data across various stages of your project.
Support for Multi-Cluster Environments: Whether you're working in a cloud Kubernetes environment or an on-premise Kubernetes setup, Advanced Volumes are designed to work seamlessly across multiple clusters. This provides greater flexibility in how you organize your resources and workloads.
Flexible Configuration and Performance Enhancements: Advanced Volumes support dynamic provisioning and storage class management, giving you more control over your volume’s size, type, and performance. This ensures your jobs have the necessary storage configurations to run efficiently at scale.
There are three methods to manage Advanced Volumes in the AI Studio platform: via the web UI, via the SDK, and via the CLI.
Important clarification
To utilize the Advanced Volumes feature, you must either specify an existing StorageClass or create a new one. Learn more about StorageClasses
# Storage Class Management
# Create a New NFS Storage Class
 Complete the following steps to add a New NFS Storage Class:
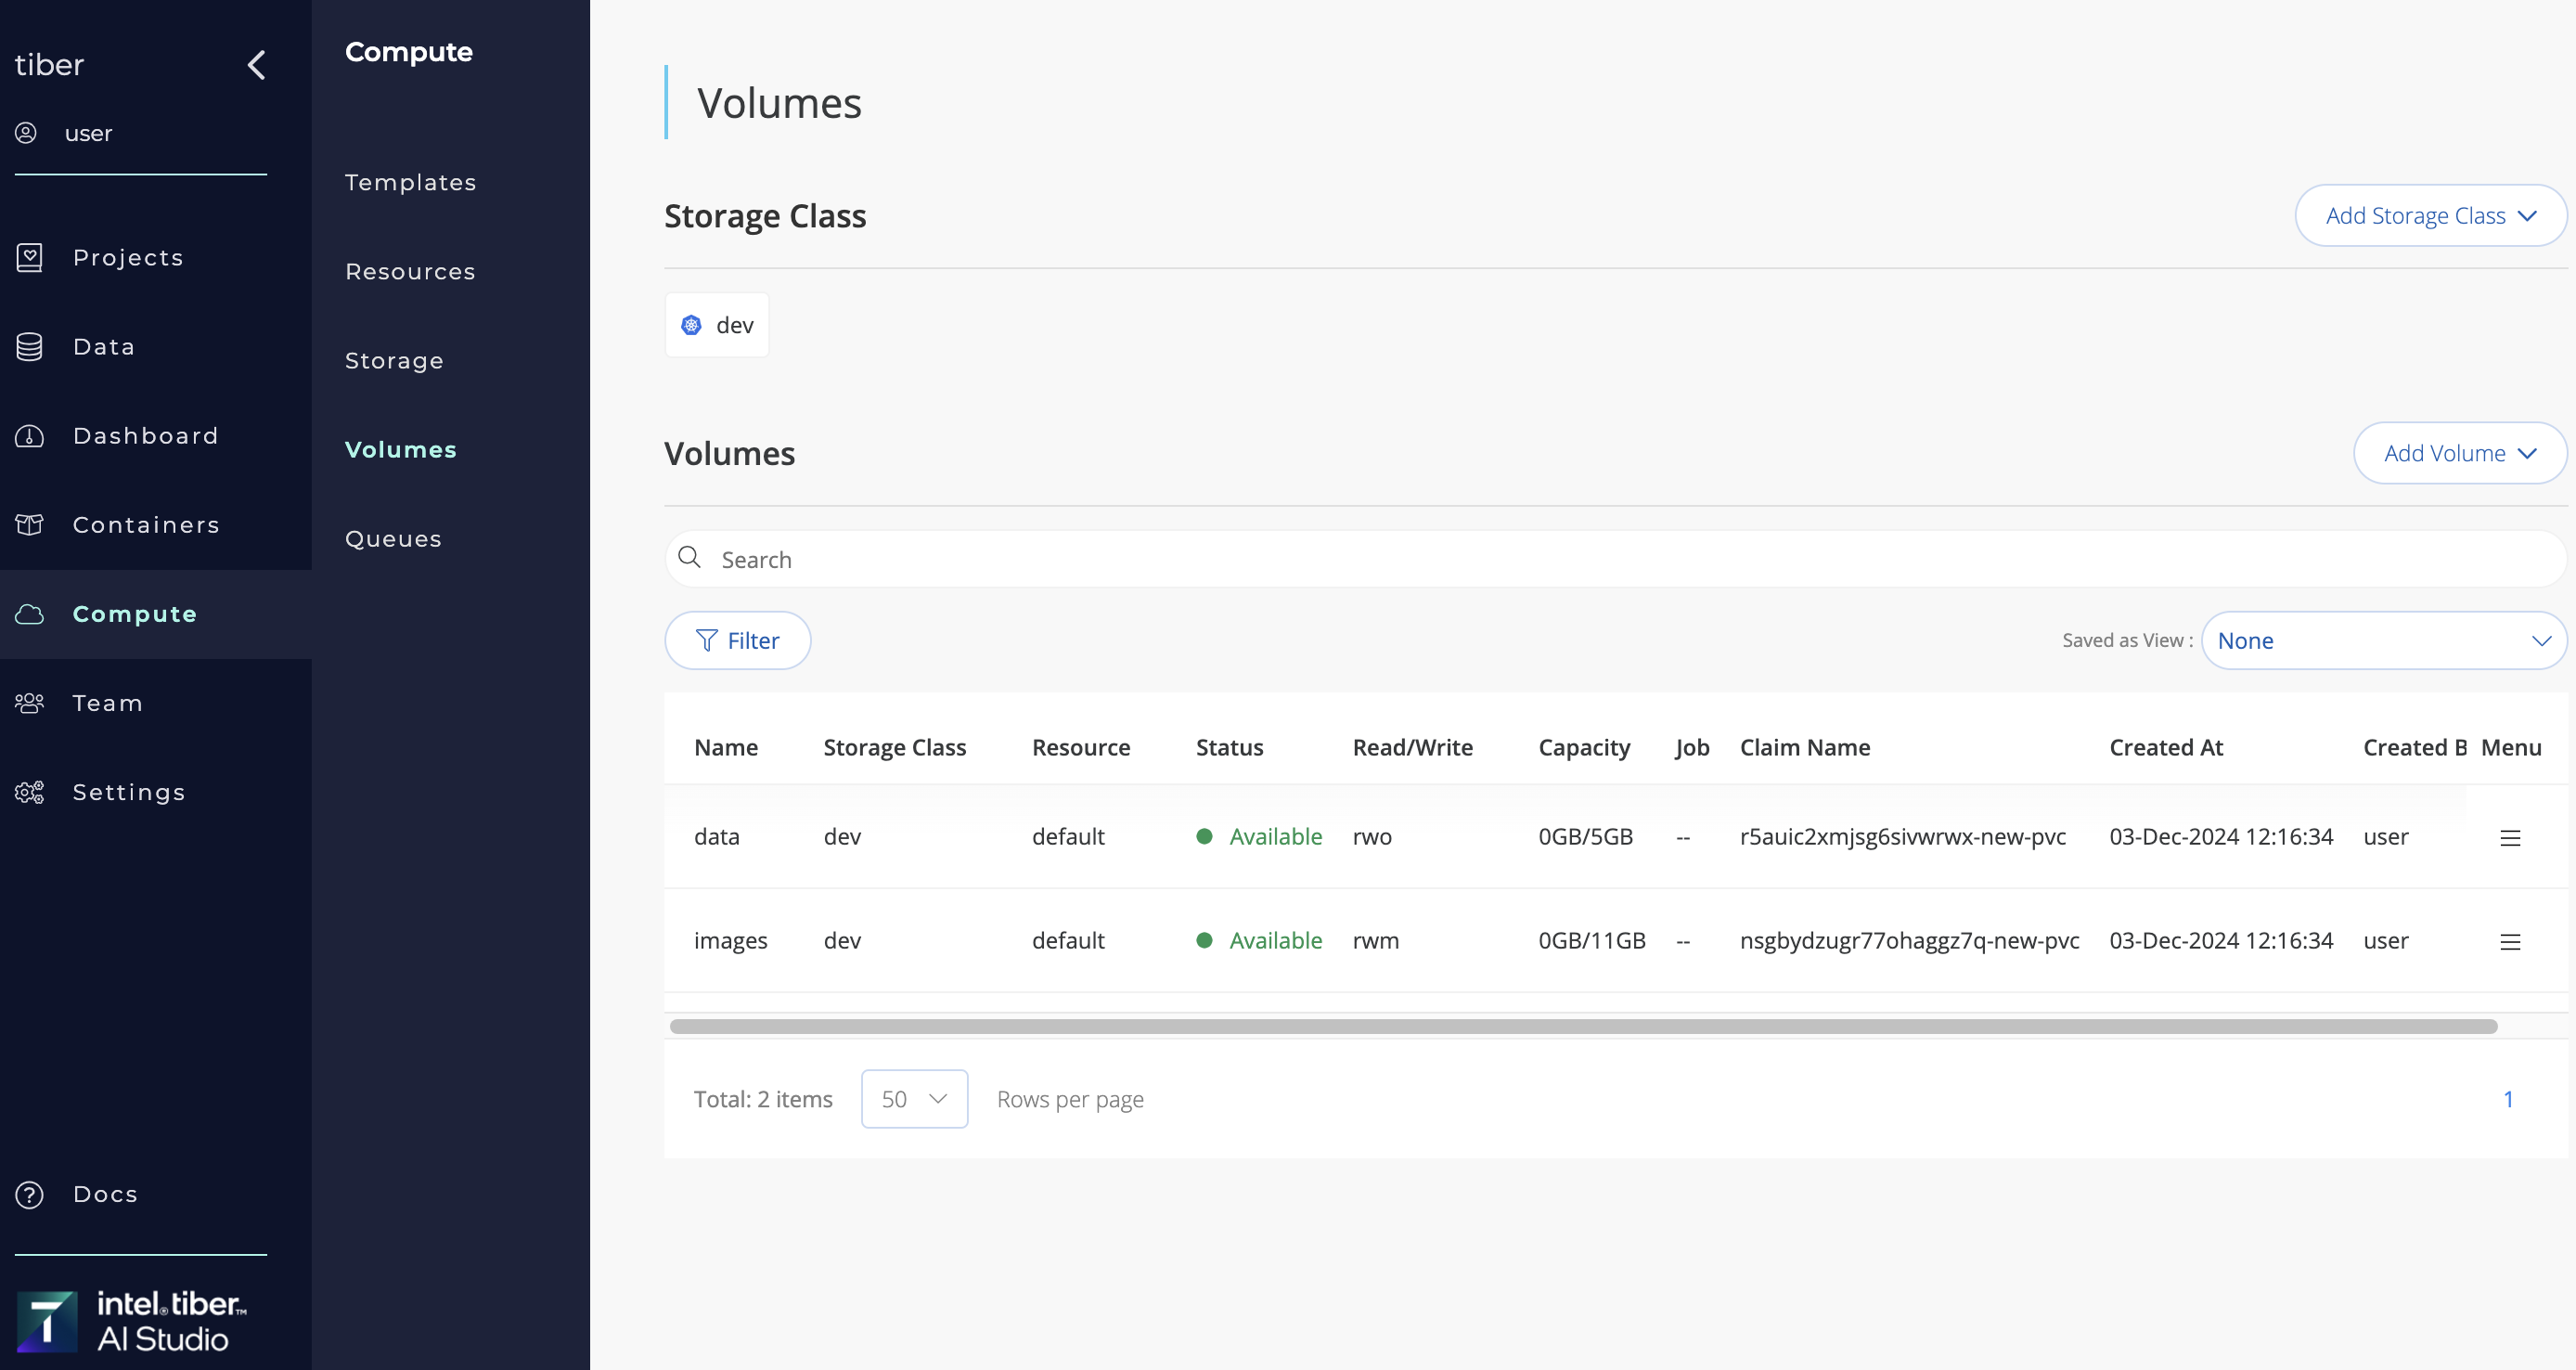
- Navigate to Compute page.
- Navigate to Volumes tab.
- Click Add Storage Class.
- Select Create Storage Classs from the drop-down list.
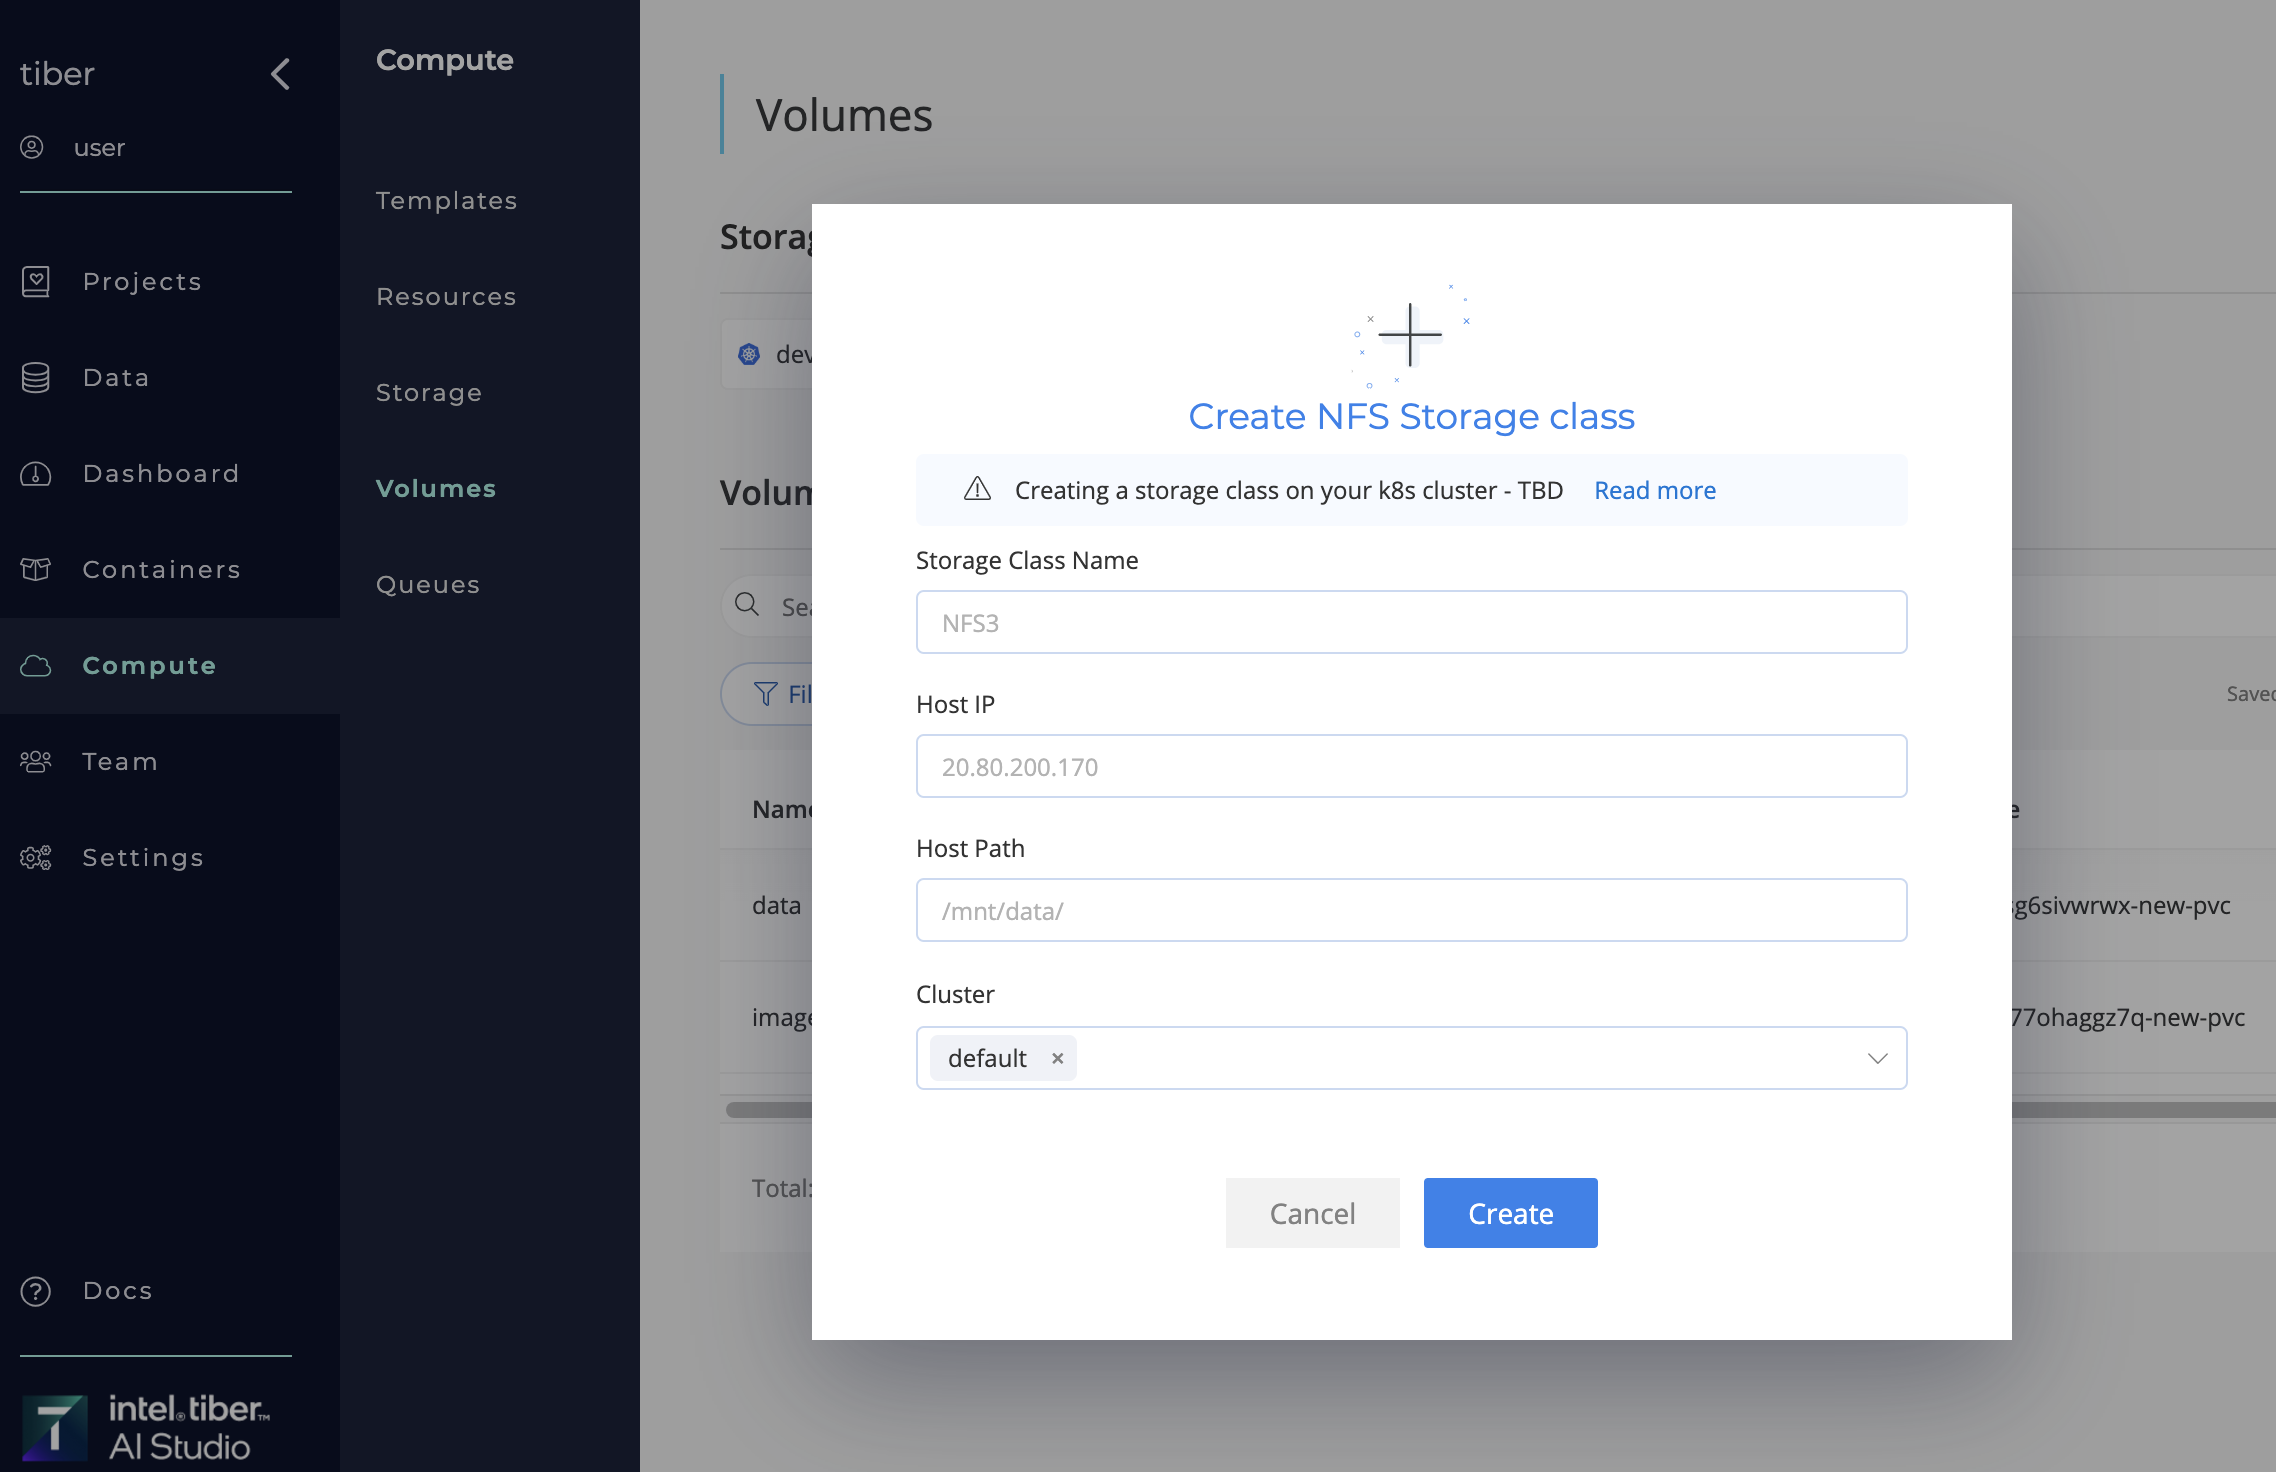
- Provide the relevant Specifications:
- Storage Class Name: Title of the storage class to create.
- Host IP: Storage class host ip.
- Host Path: Storage class host path.
- Cluster: Cluster to create Storage class on (
"Default"unless otherwise specified).
- Click the Create button.
The AI Studio software adds the new New NFS Storage Class to the selected Kubernetes cluster.
# Connect Exists NFS Storage Class
 Complete the following steps to connect exist NFS Storage Class:
- Navigate to Compute page.
- Navigate to Volumes tab.
- Click Add Storage Class.
- Select Connect Storage Classs from the drop-down list.
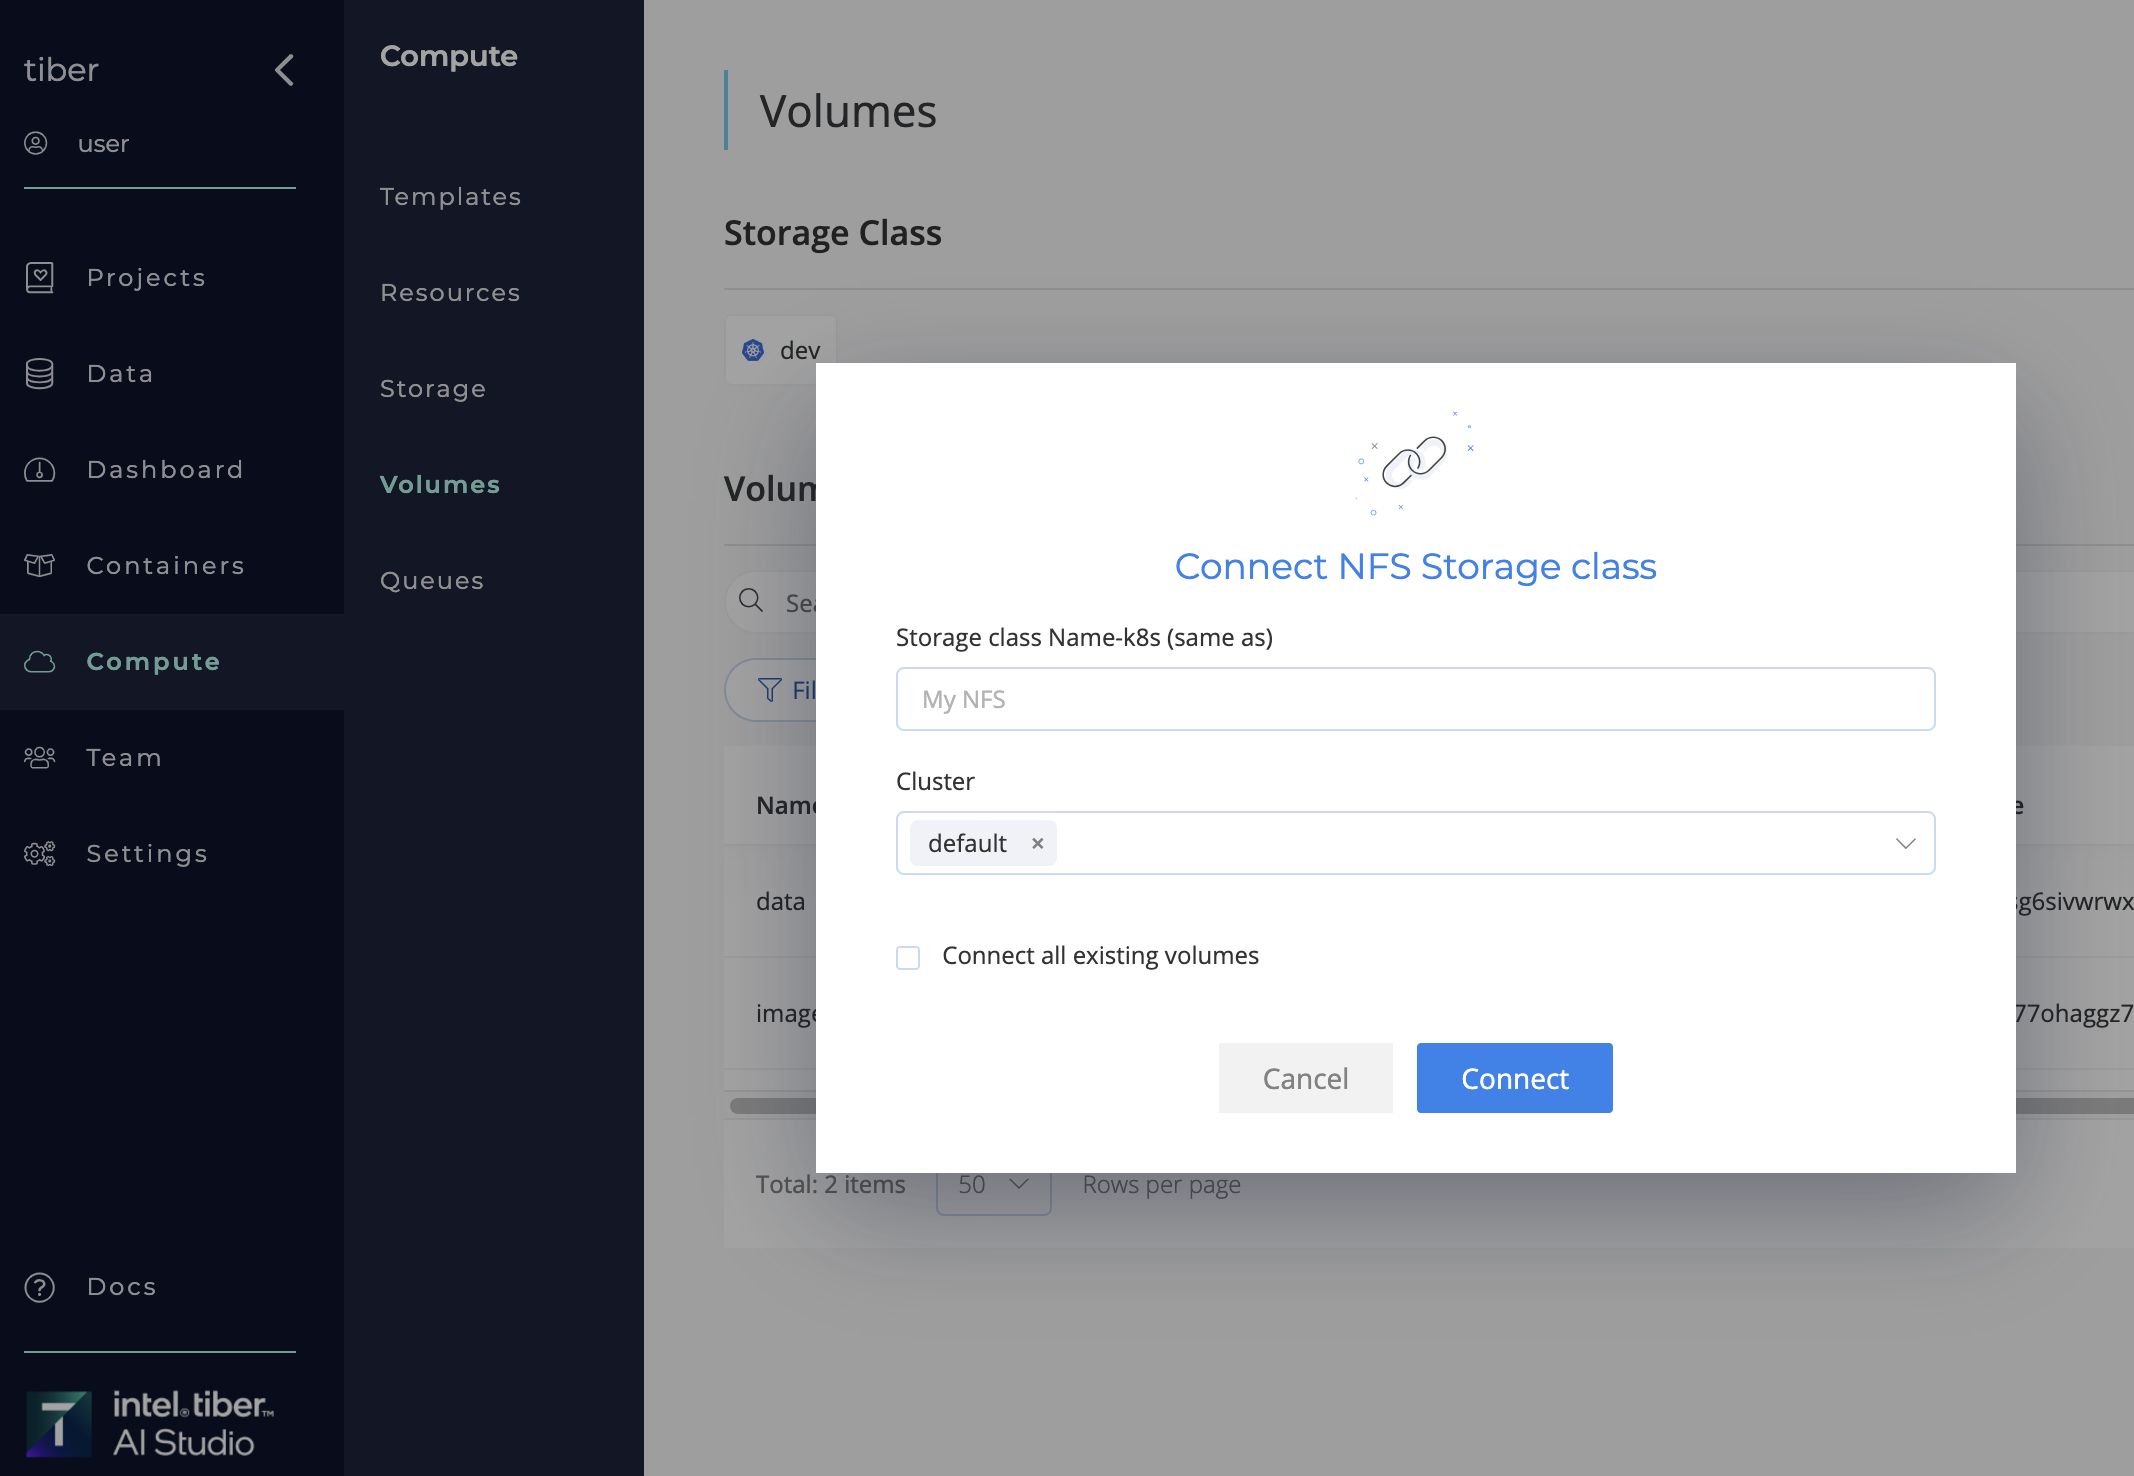
- Provide the relevant Specifications:
- Storage Class Name: Storage class Name-k8s to connect(same as).
- Cluster: Cluster to create Storage class on (
"Default"unless otherwise specified). - Connect all existing volumes(optional): Mark if necessary to connect all volumes that exist on the storage class.
- Click the Connect button.
The AI Studio software connects the exists New NFS Storage Class to the selected Kubernetes cluster.
# Volumes Management
# Create a New Volume
 Complete the following steps to create a New Volume:
- Navigate to Compute page.
- Navigate to Volumes tab.
- Click Add Volume.
- Select Create New Volume from the drop-down list.
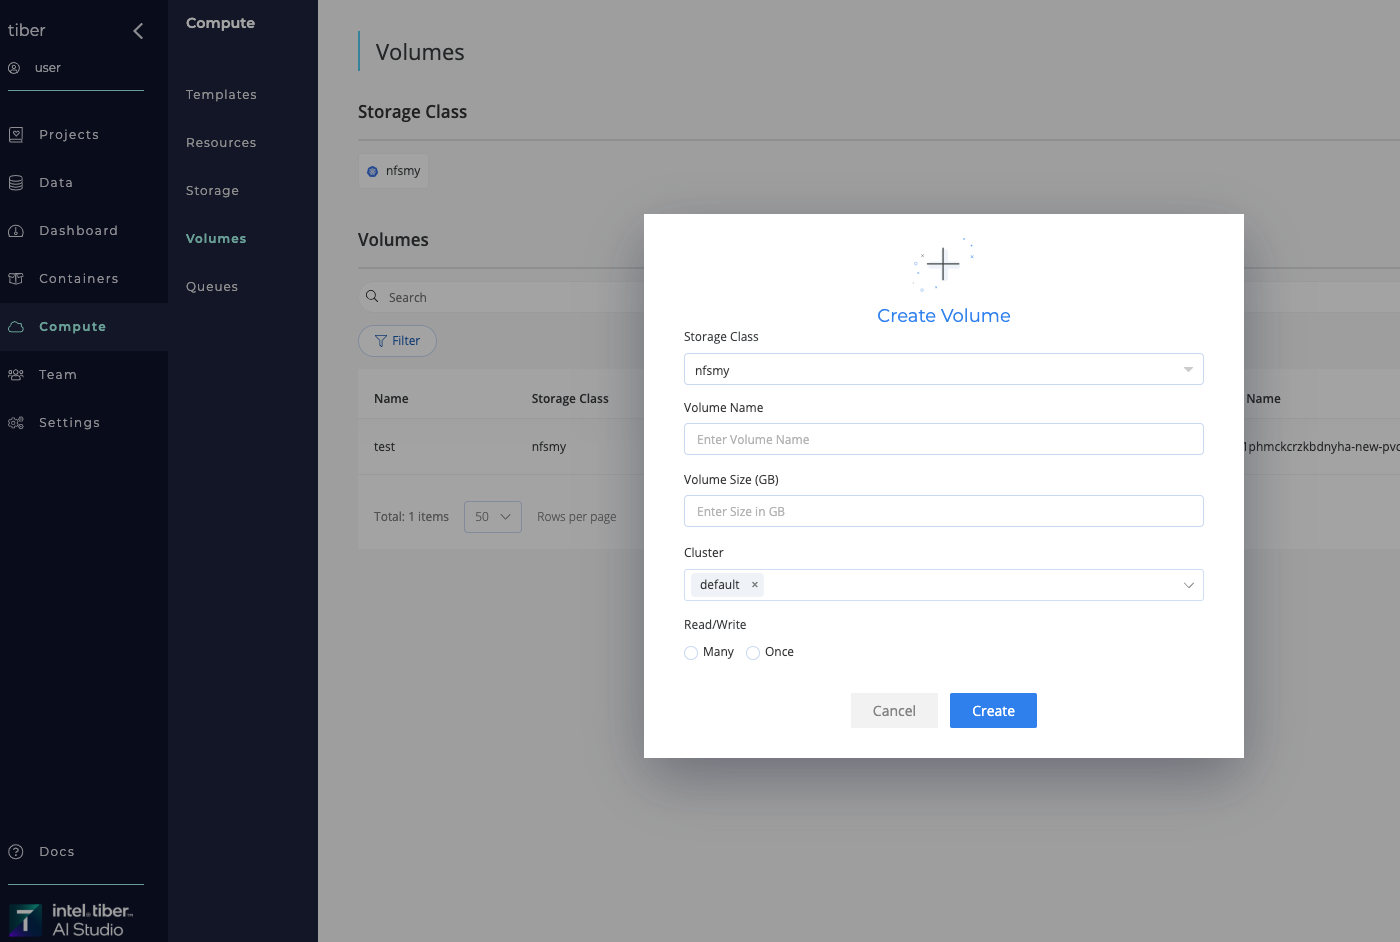
- Provide the relevant Specifications:
- Storage Class: Title of the storage class to create New Volume inside it.
- Volume Name: Name of the New Volume.
- Volume Size: Size of the New Volume (in GB).
- Cluster: Cluster to create Storage class on (
"Default"unless otherwise specified). - Read/Write Access Volume method (RWO/RWM)
- Click the Create button. The AI Studio software adds the New Volume to the selected Kubernetes cluster under specified Storage Class.
# Connect Exists Volume
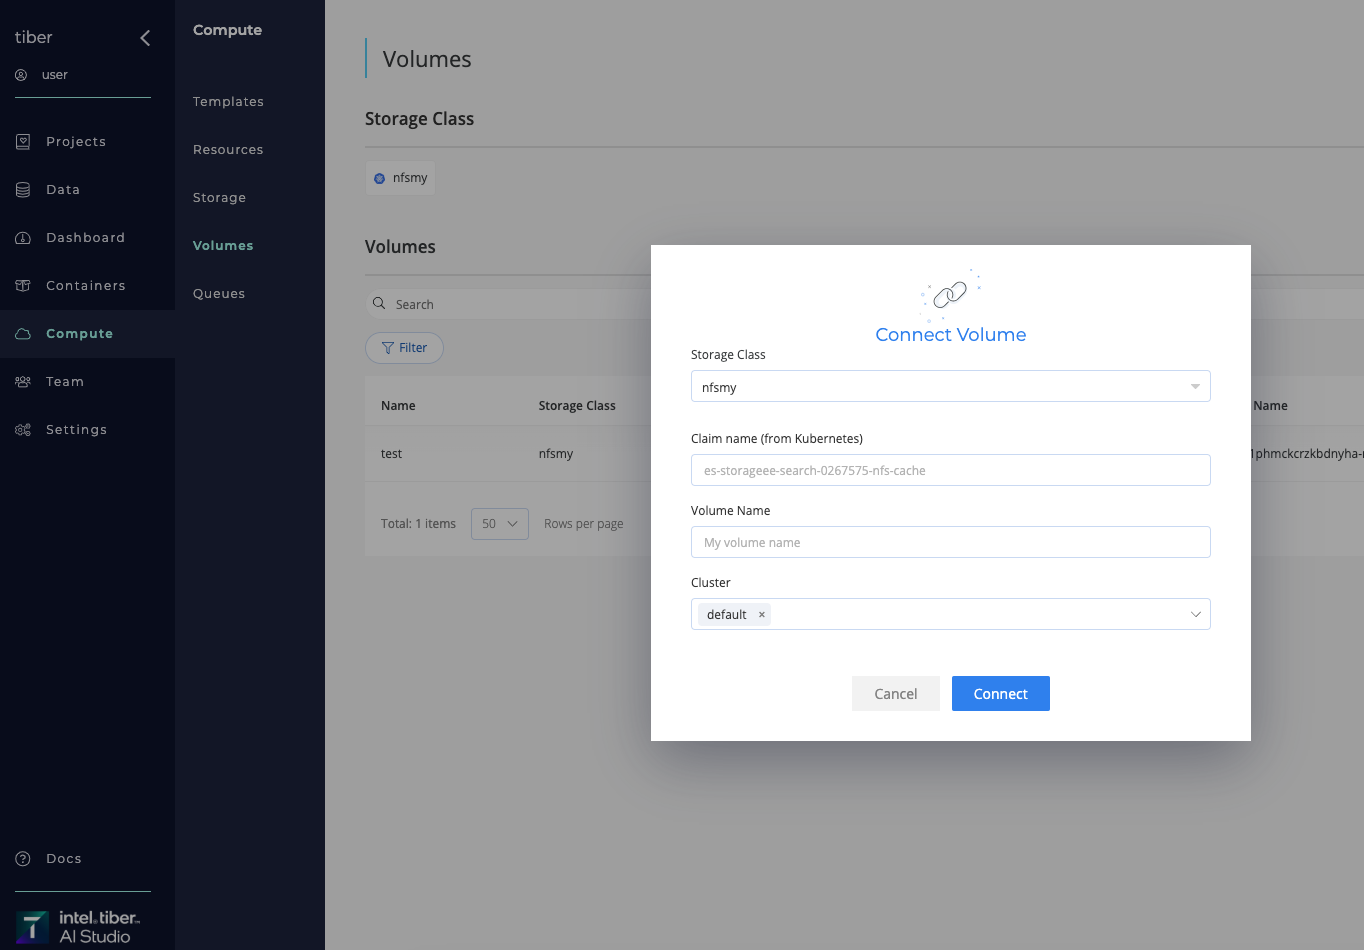 Complete the following steps to connect a Exist Volume:
- Navigate to Compute page.
- Navigate to Volumes tab.
- Click Add Volume.
- Select Connect Volume from the drop-down list.
- Provide the relevant Specifications:
- Storage Class: Title of the storage class to create New Volume inside it.
- Claim name (from Kubernetes)
- Volume Name: Name of the New Volume.
- Cluster: Cluster to create Storage class on (
"Default"unless otherwise specified).
- Click the Connect button. The AI Studio software connects the exists Volume to the selected Kubernetes cluster under specified Storage Class.
# Advanced Volumes Additions to Jobs
# At Workspace or Experiment startup
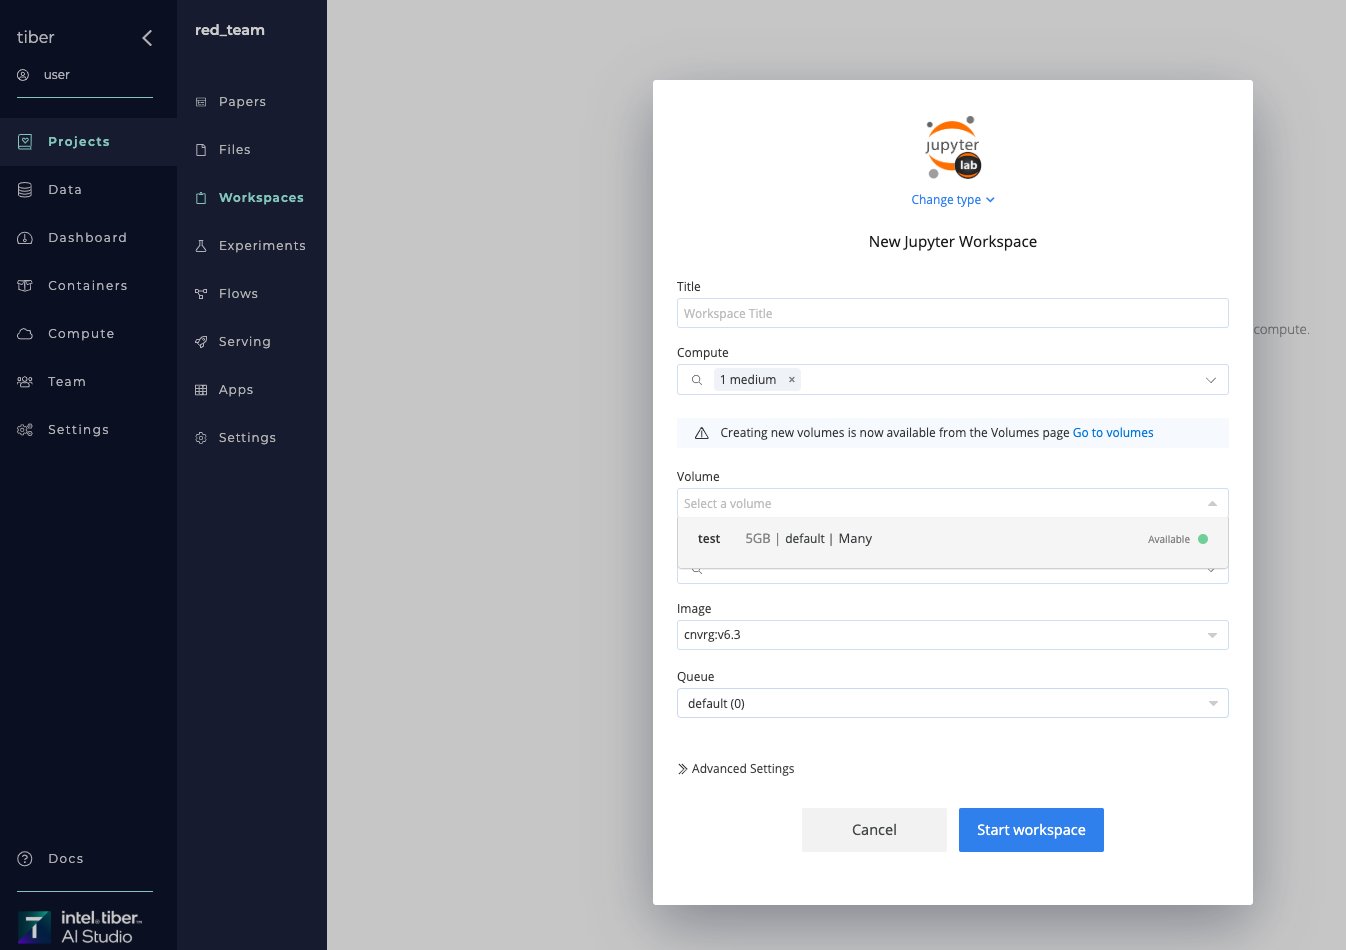 When starting a Workspace or an Experiment from the UI, use the Volume selector to add Volume:
- Click Start a Workspace or New Experiment and provide the relevant details in the displayed panel.
- Select the Volume to add it to the the Workspace or Experiment from the drop-down list.
- Click Start Workspace or Run to startup.
# Compute Resources
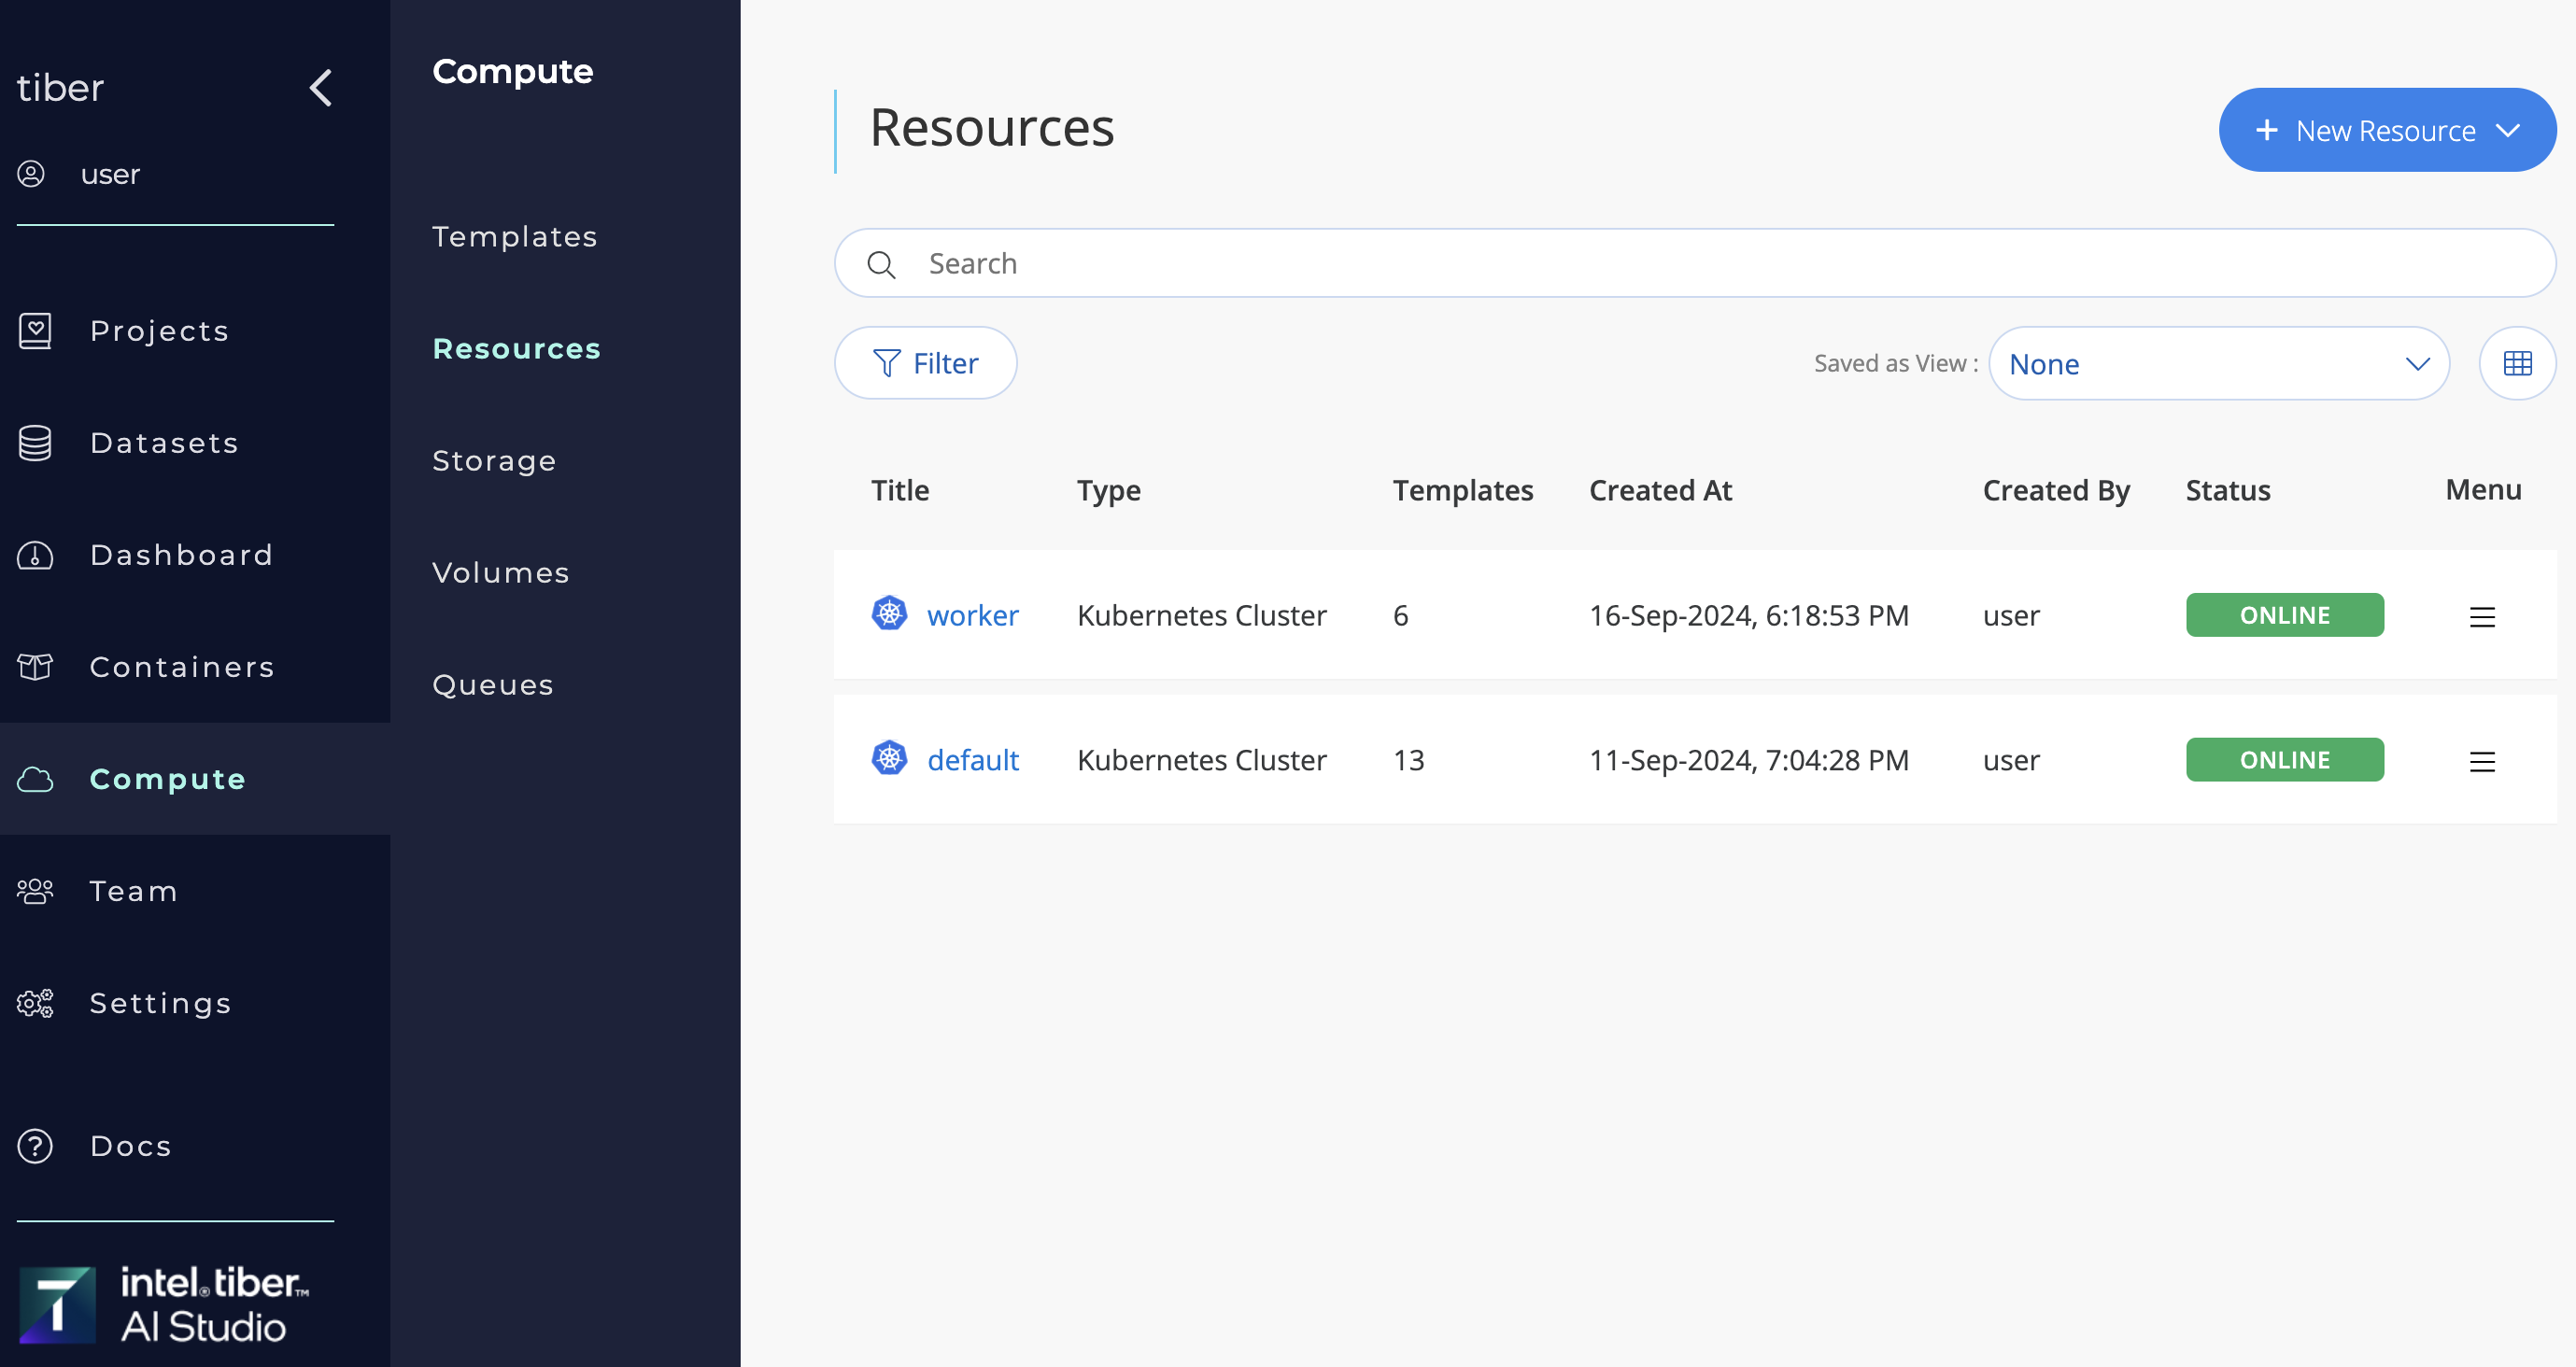
In AI Studio, Kubernetes clusters are categorized as compute resources. The platform provides seamless integration with these clusters, enabling users to efficiently utilize their nodes. An organization can connect multiple Kubernetes clusters for enhanced resource management.
To view all connected compute resources, navigate to Compute > Resources.
Within this section, you can:
- Add new Kubernetes or Spark clusters
- Edit configurations of existing clusters
- Delete clusters as needed
# Kubernetes
# Add a Kubernetes cluster
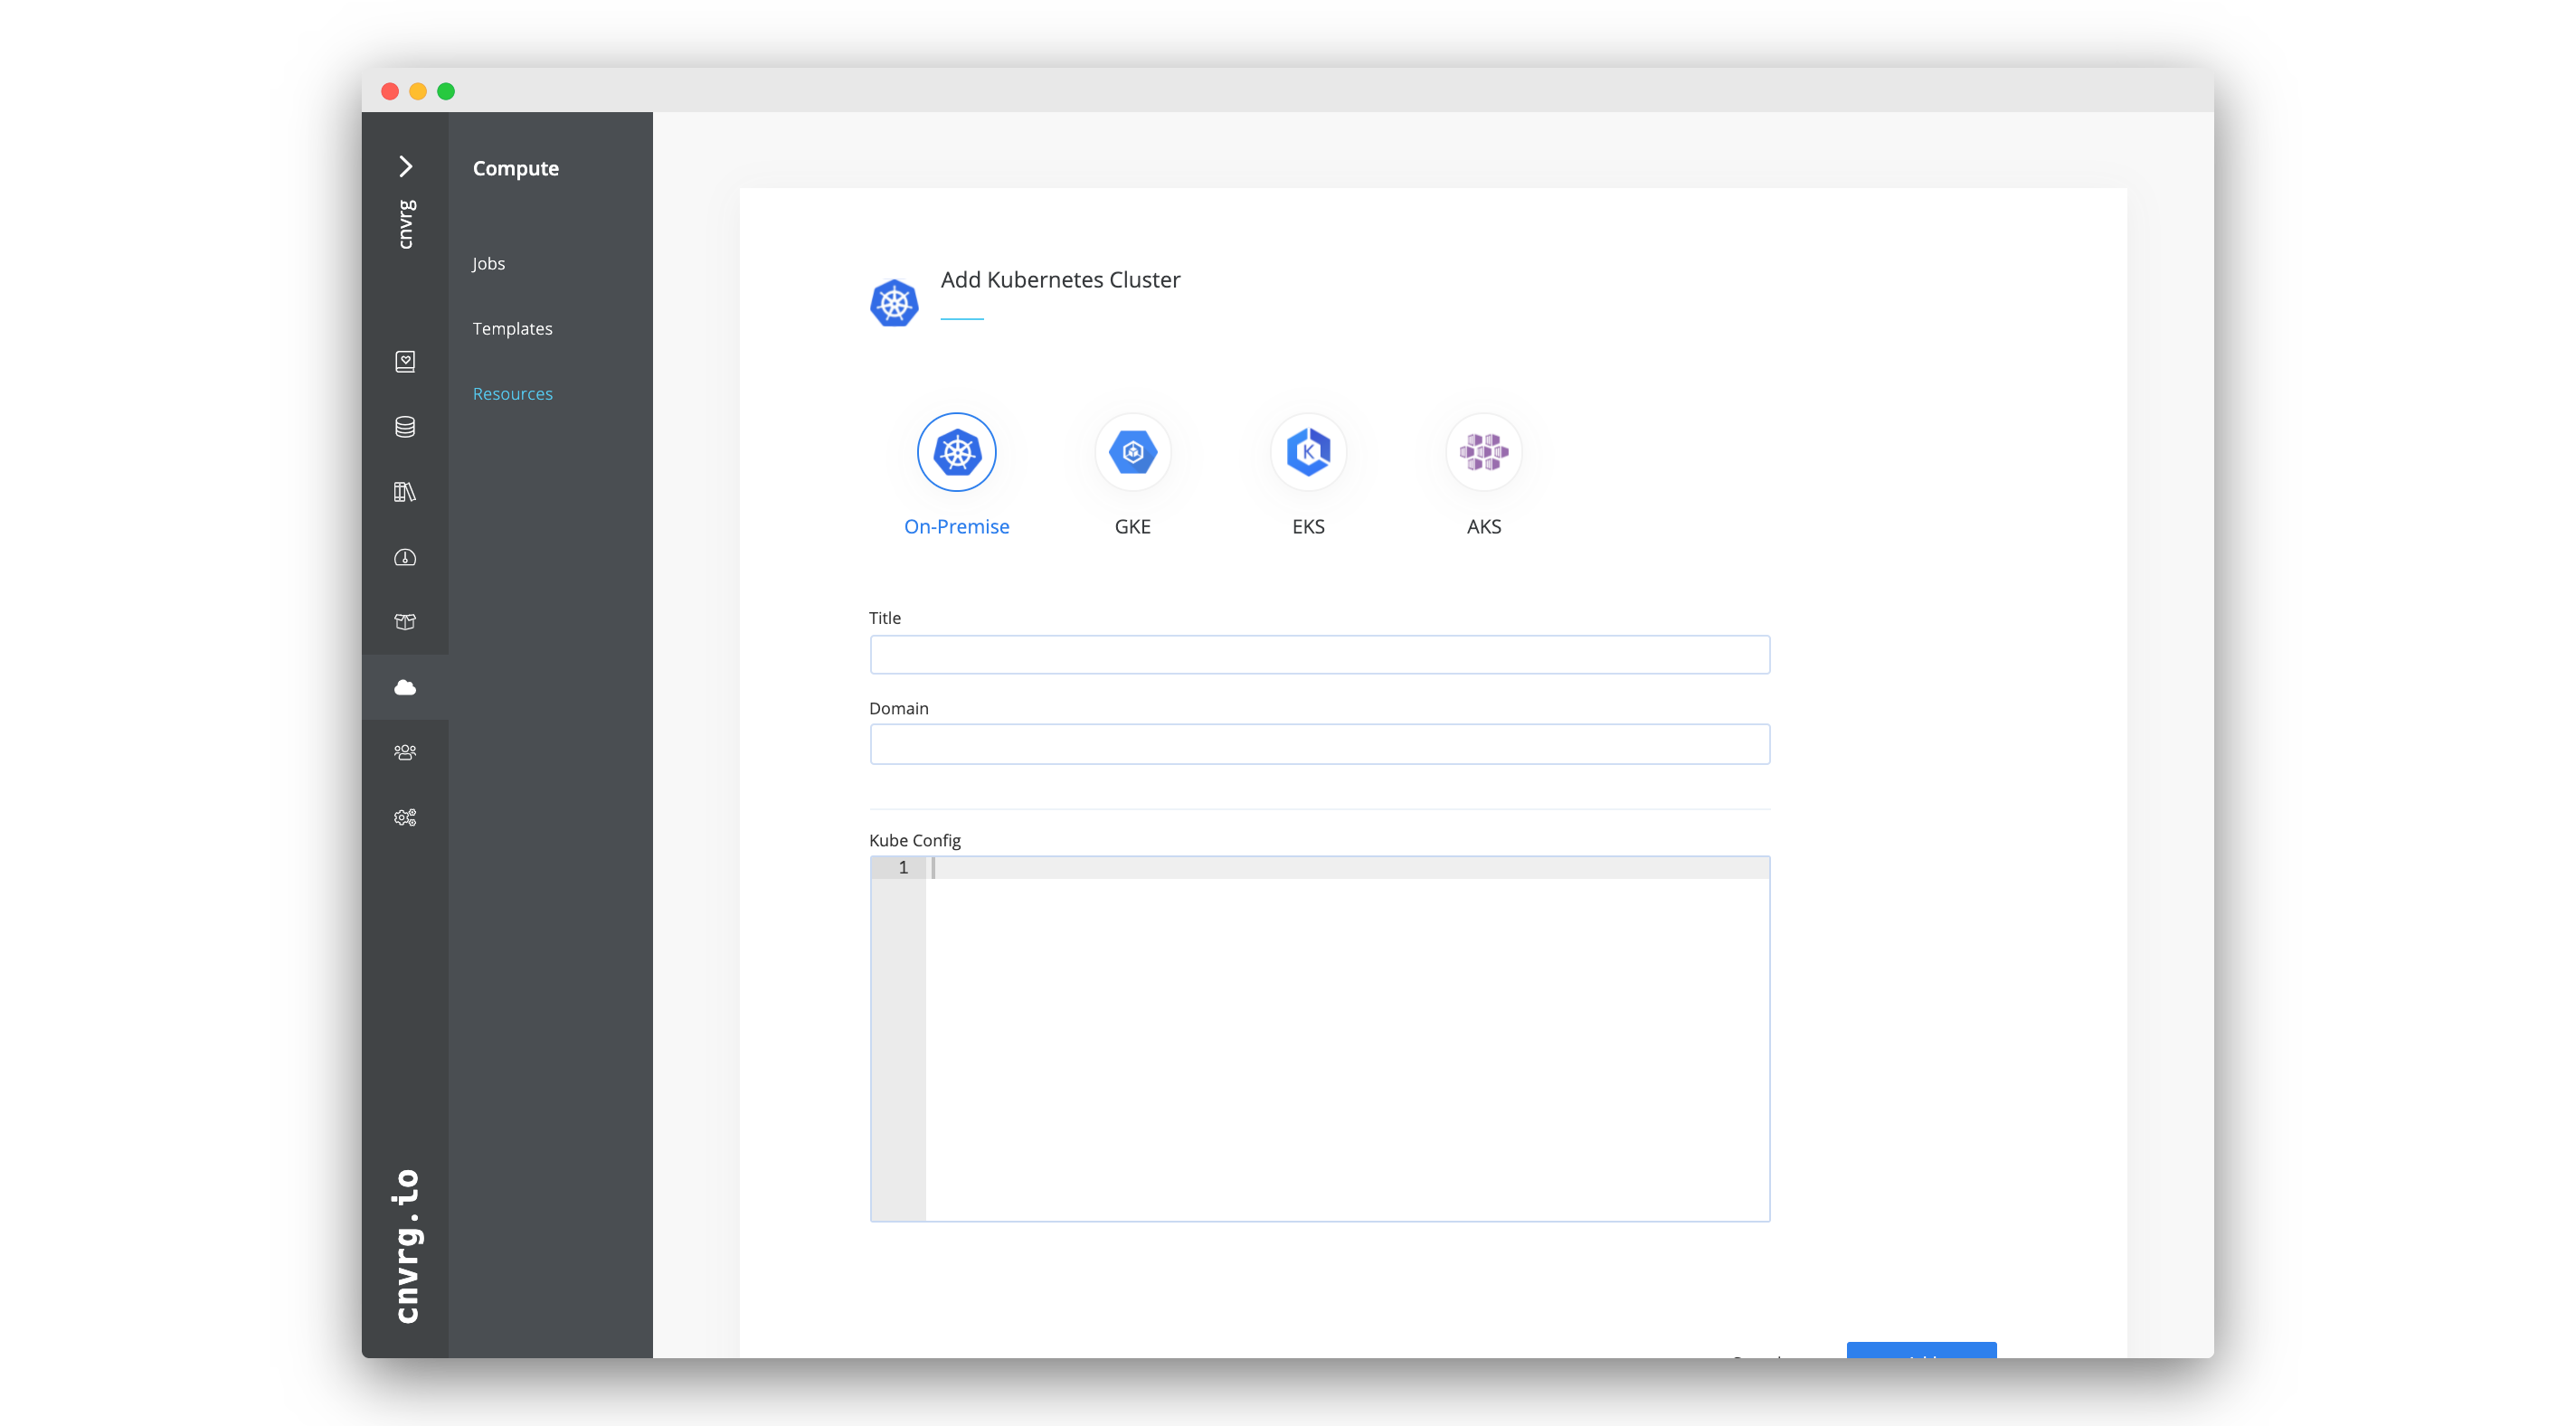
Complete the following steps to add a Kubernetes cluster:
- Go to Compute > Resources.
- Click + Add Resource and then select Kubernetes from the list.
- Enter the Resource Name of the cluster (for use within AI Studio).
- Enter the Domain for the cluster.
- Paste the Kube Config for the cluster.
- Set the Scheduler from the list.
- Define the Namespace
- Define the Prometheus url(optional)
- Check Use Persistent Volumes, if relevant.
- Check HTTPS Scheme, if relevant.
- Click Create.
- AI Studio automatically adds the cluster to your organization and generates default templates for it. These templates will be listed in the Templates tab, providing a streamlined overview of the available configurations for the newly added cluster. This allows for efficient management and deployment of resources within your organization.
TIP
To edit, remove, or add additional templates, navigate to the Compute > Templates page.
# Access Kubernetes cluster information
Each cluster added as a resource to AI Studio is accompanied with a dashboard. Users can use the cluster's page to update information about their cluster.
Go to Compute > Resources and select the cluster name to access its information page. At the top is a summary of the cluster's details including its name, its creator, its status, and the date of its last health check.
The page has the following tabs with additional information:
| Tab | Contents |
|---|---|
| Logs | The cluster's logs for health checks. |
| Kibana | The cluster's Kibana dashboard to gain insights into its logs. |
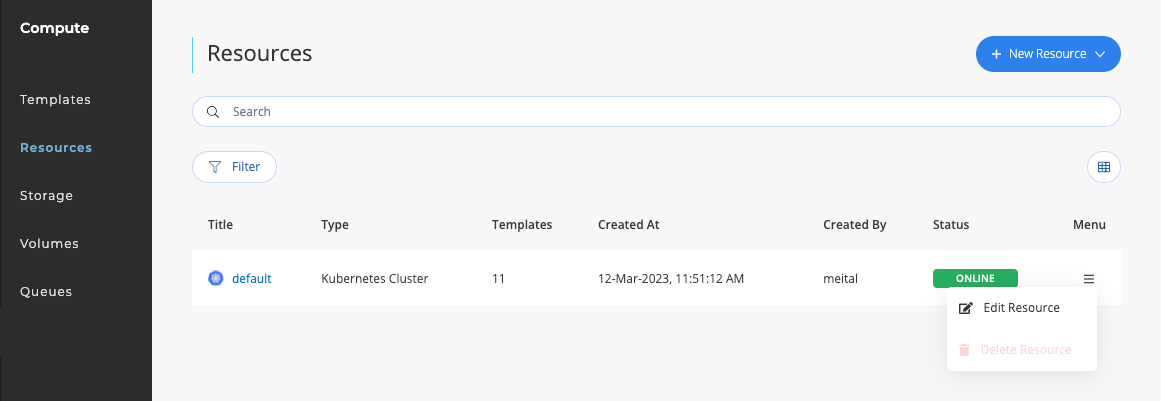
# Edit a Kubernetes cluster
Complete the following steps to edit an existing Kubernetes cluster:
- Go to Compute > Resources.
- To edit a resource, click the menu icon at the right end of the resource entry. From the dropdown menu, select Edit Resource to access the configuration settings for modification.
- Edit the fields as desired.
- Click Save.
The AI Studio software updates the details of the cluster.
# Delete a Kubernetes cluster
Complete the following steps delete a cluster from your organization:
- Go to Compute > Resources.
- To delete a resource, click the menu icon at the right end of the resource entry. From the dropdown menu, select Delete Resource.
- In the window that opens, type the word confirm to confirm.
- Click Confirm and Delete
The AI Studio software deletes the cluster from your organization.
# On-Premises machines - Deprecated on AI Studio v4.8.0
# Add an on-premises machine
 Before adding an on-premises machine, verify the following dependencies are installed on it:
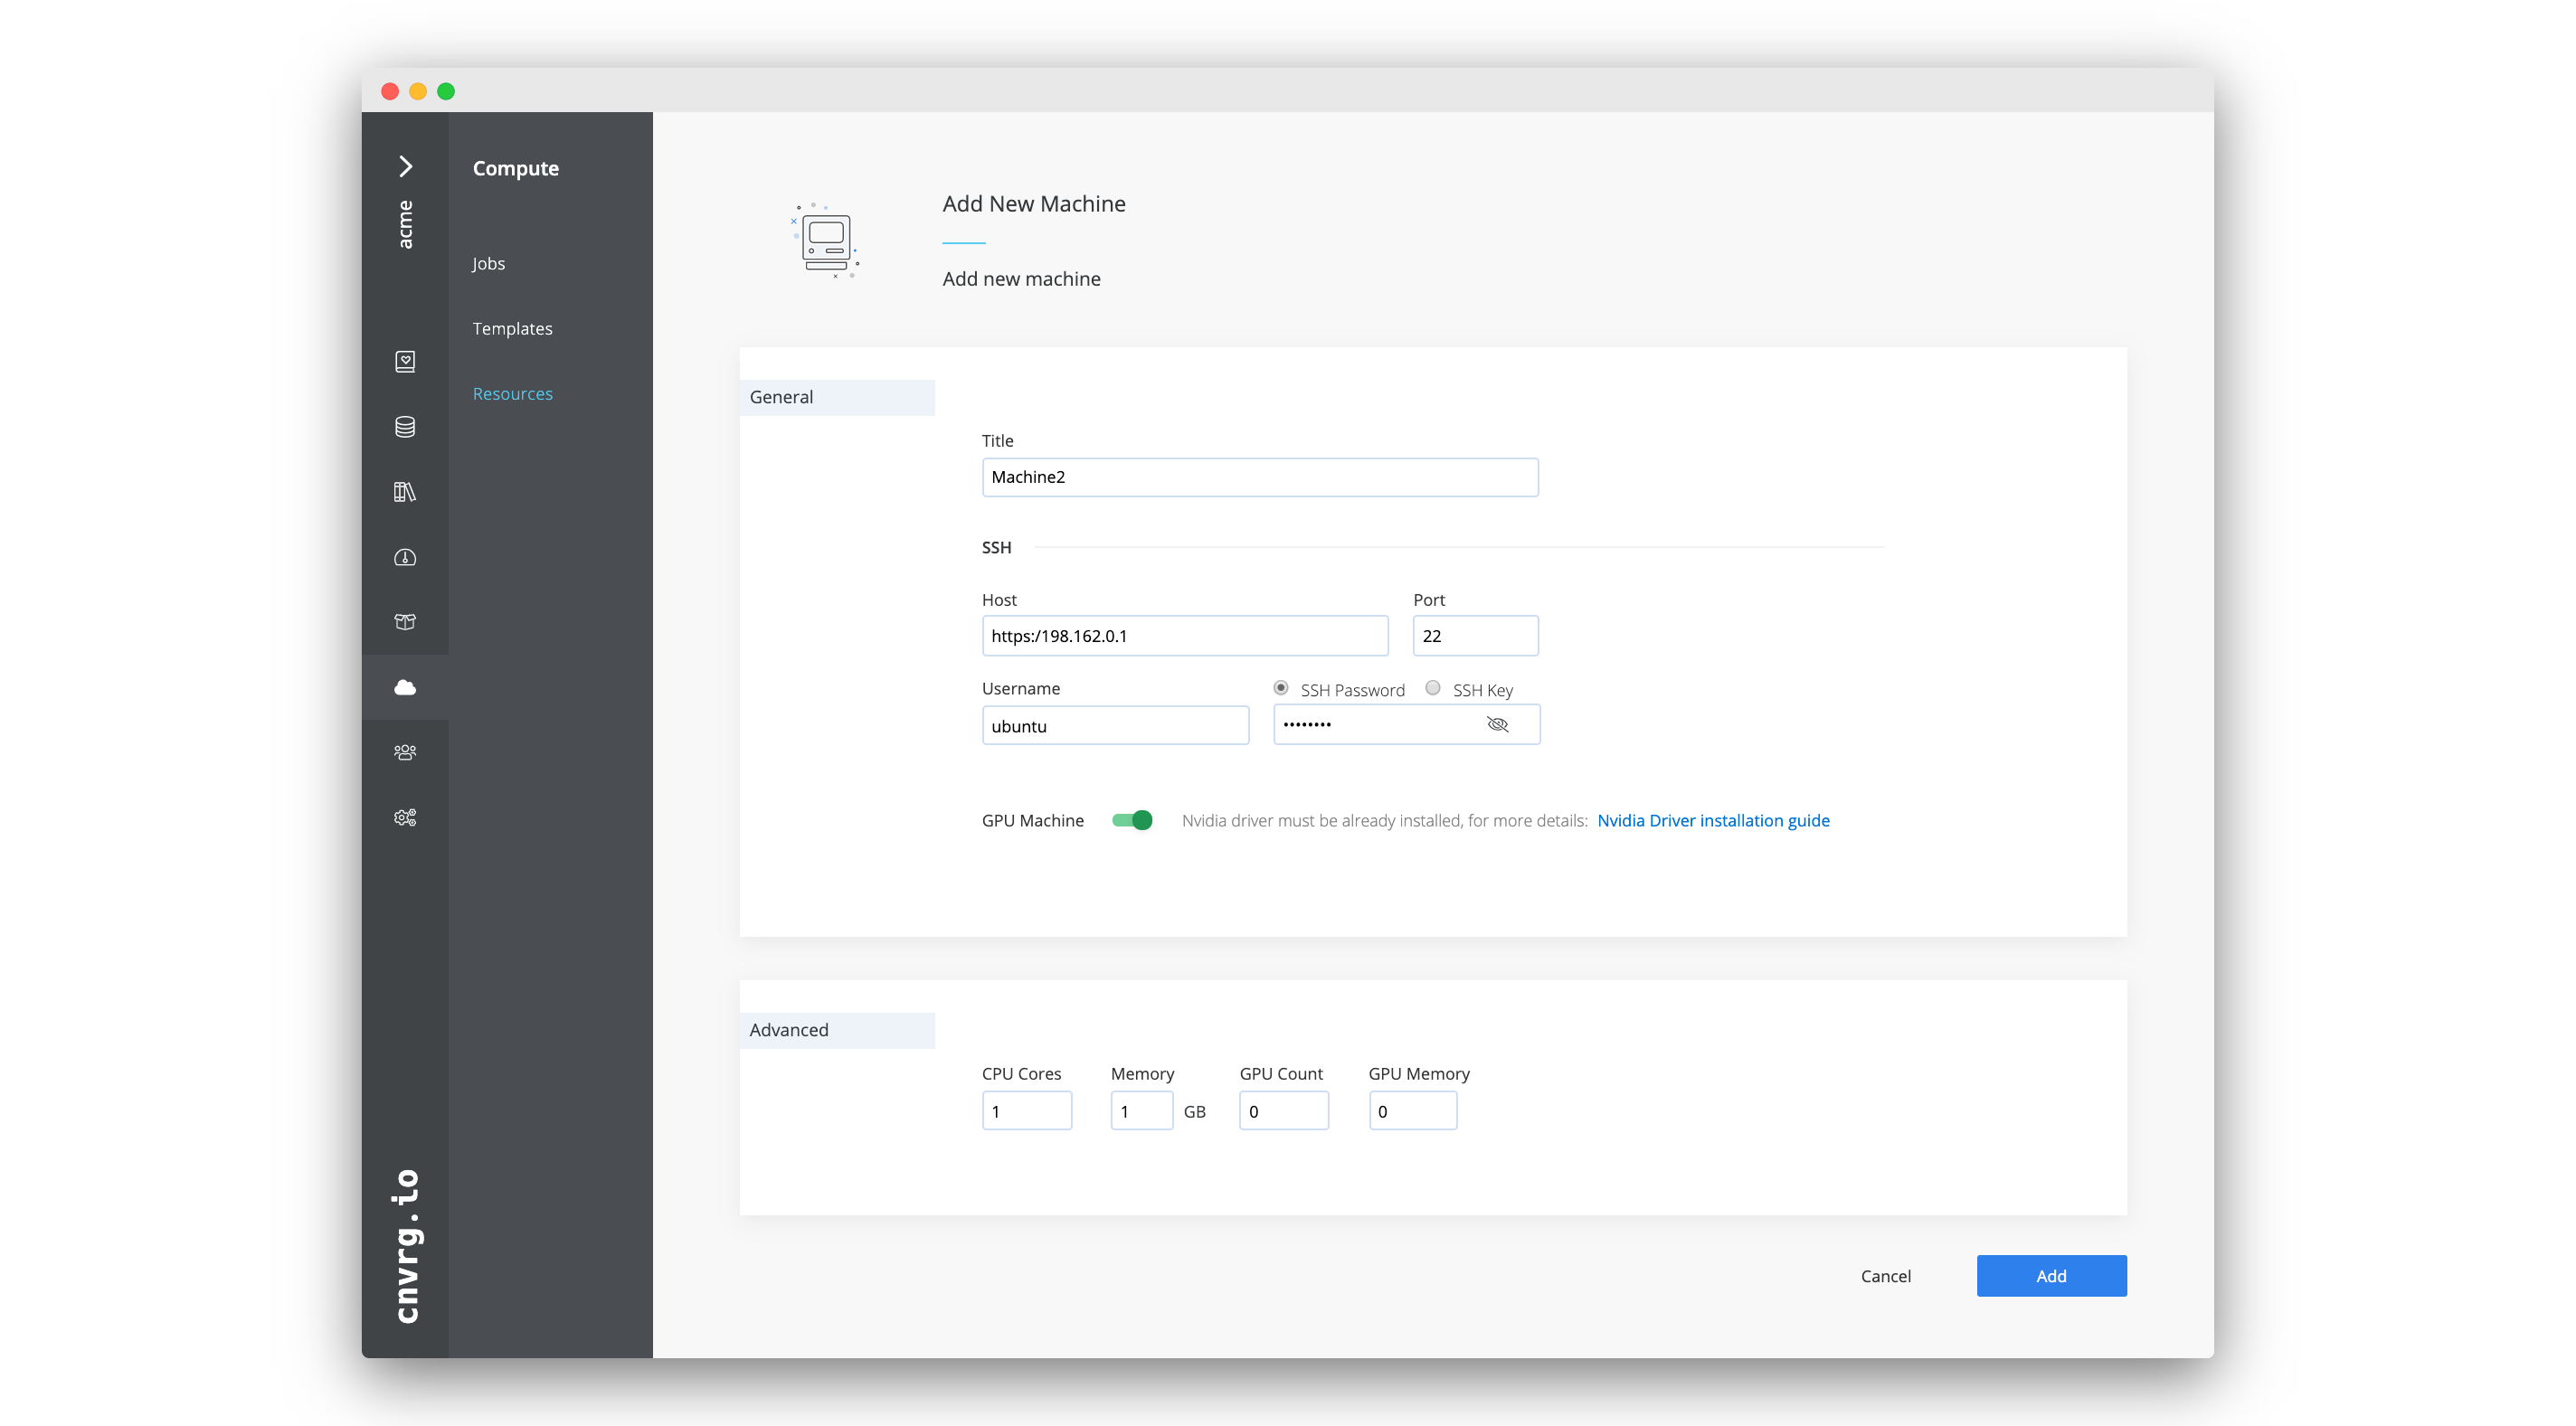
Complete the following steps to add an on-premises machine:
- Go to Compute > Resources.
- Click + Add Resource and then select Machine from the list.
- Enter the Title of the machine (for use within AI Studio).
- Provide all the SSH details for the machine:
- Username
- Host
- Port
- Choose an SSH authentication method and add the relevant authentication:
- SSH Password or
- SSH Key
- If it is a GPU machine, enable the GPU Machine toggle.
- Complete the advanced settings (optional):
- Set CPU Cores.
- Set Memory in GB.
- Set GPU Count (if relevant).
- Set GPU Memory (if relevant).
- Set the GPU Type (if relevant).
- Click Add.
The AI Studio software saves the details and adds the machine to your organization.
# Access on-premises machine information
 Each machine added as a resource to AI Studio is accompanied with a dashboard. Users can use the machine's page to update its information.
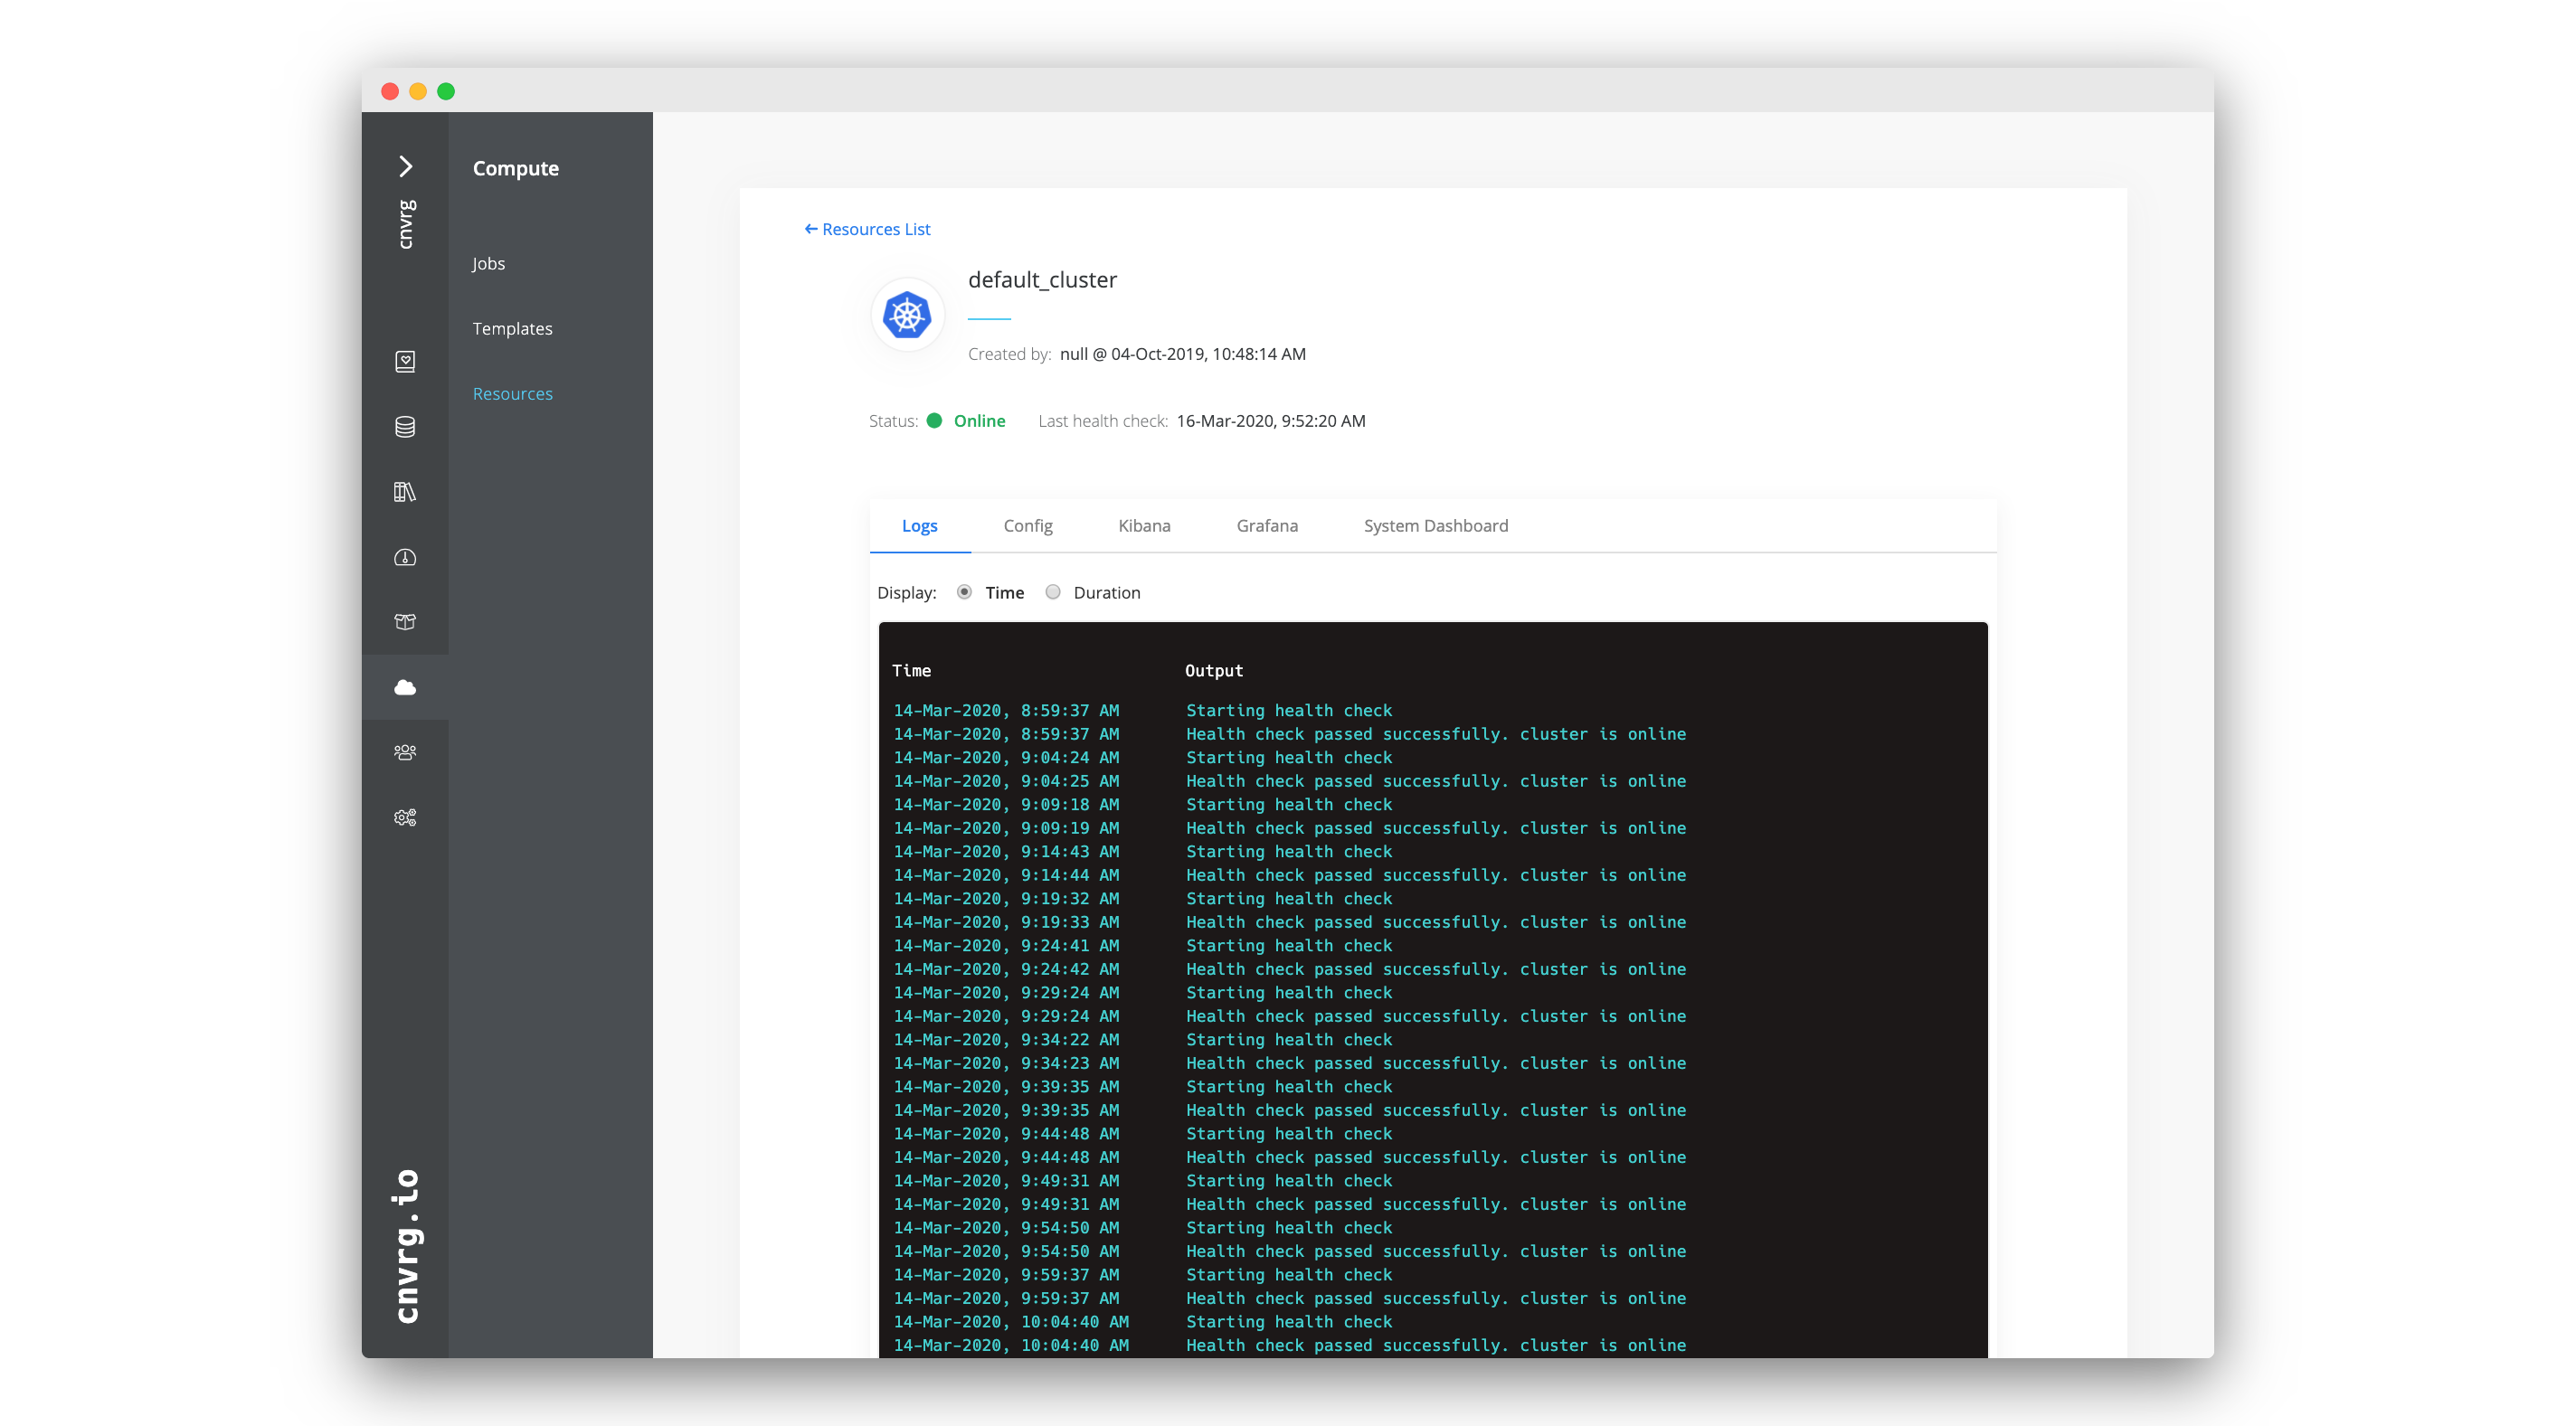
Go to Compute > Resources and select the machine name to access its information page. At the top is a summary of the machine's details including its name, its creator, its status, and the date of its last health check.
The page has the following tabs with additional information:
| Tab | Contents |
|---|---|
| Logs | The machine's logs for health checks. |
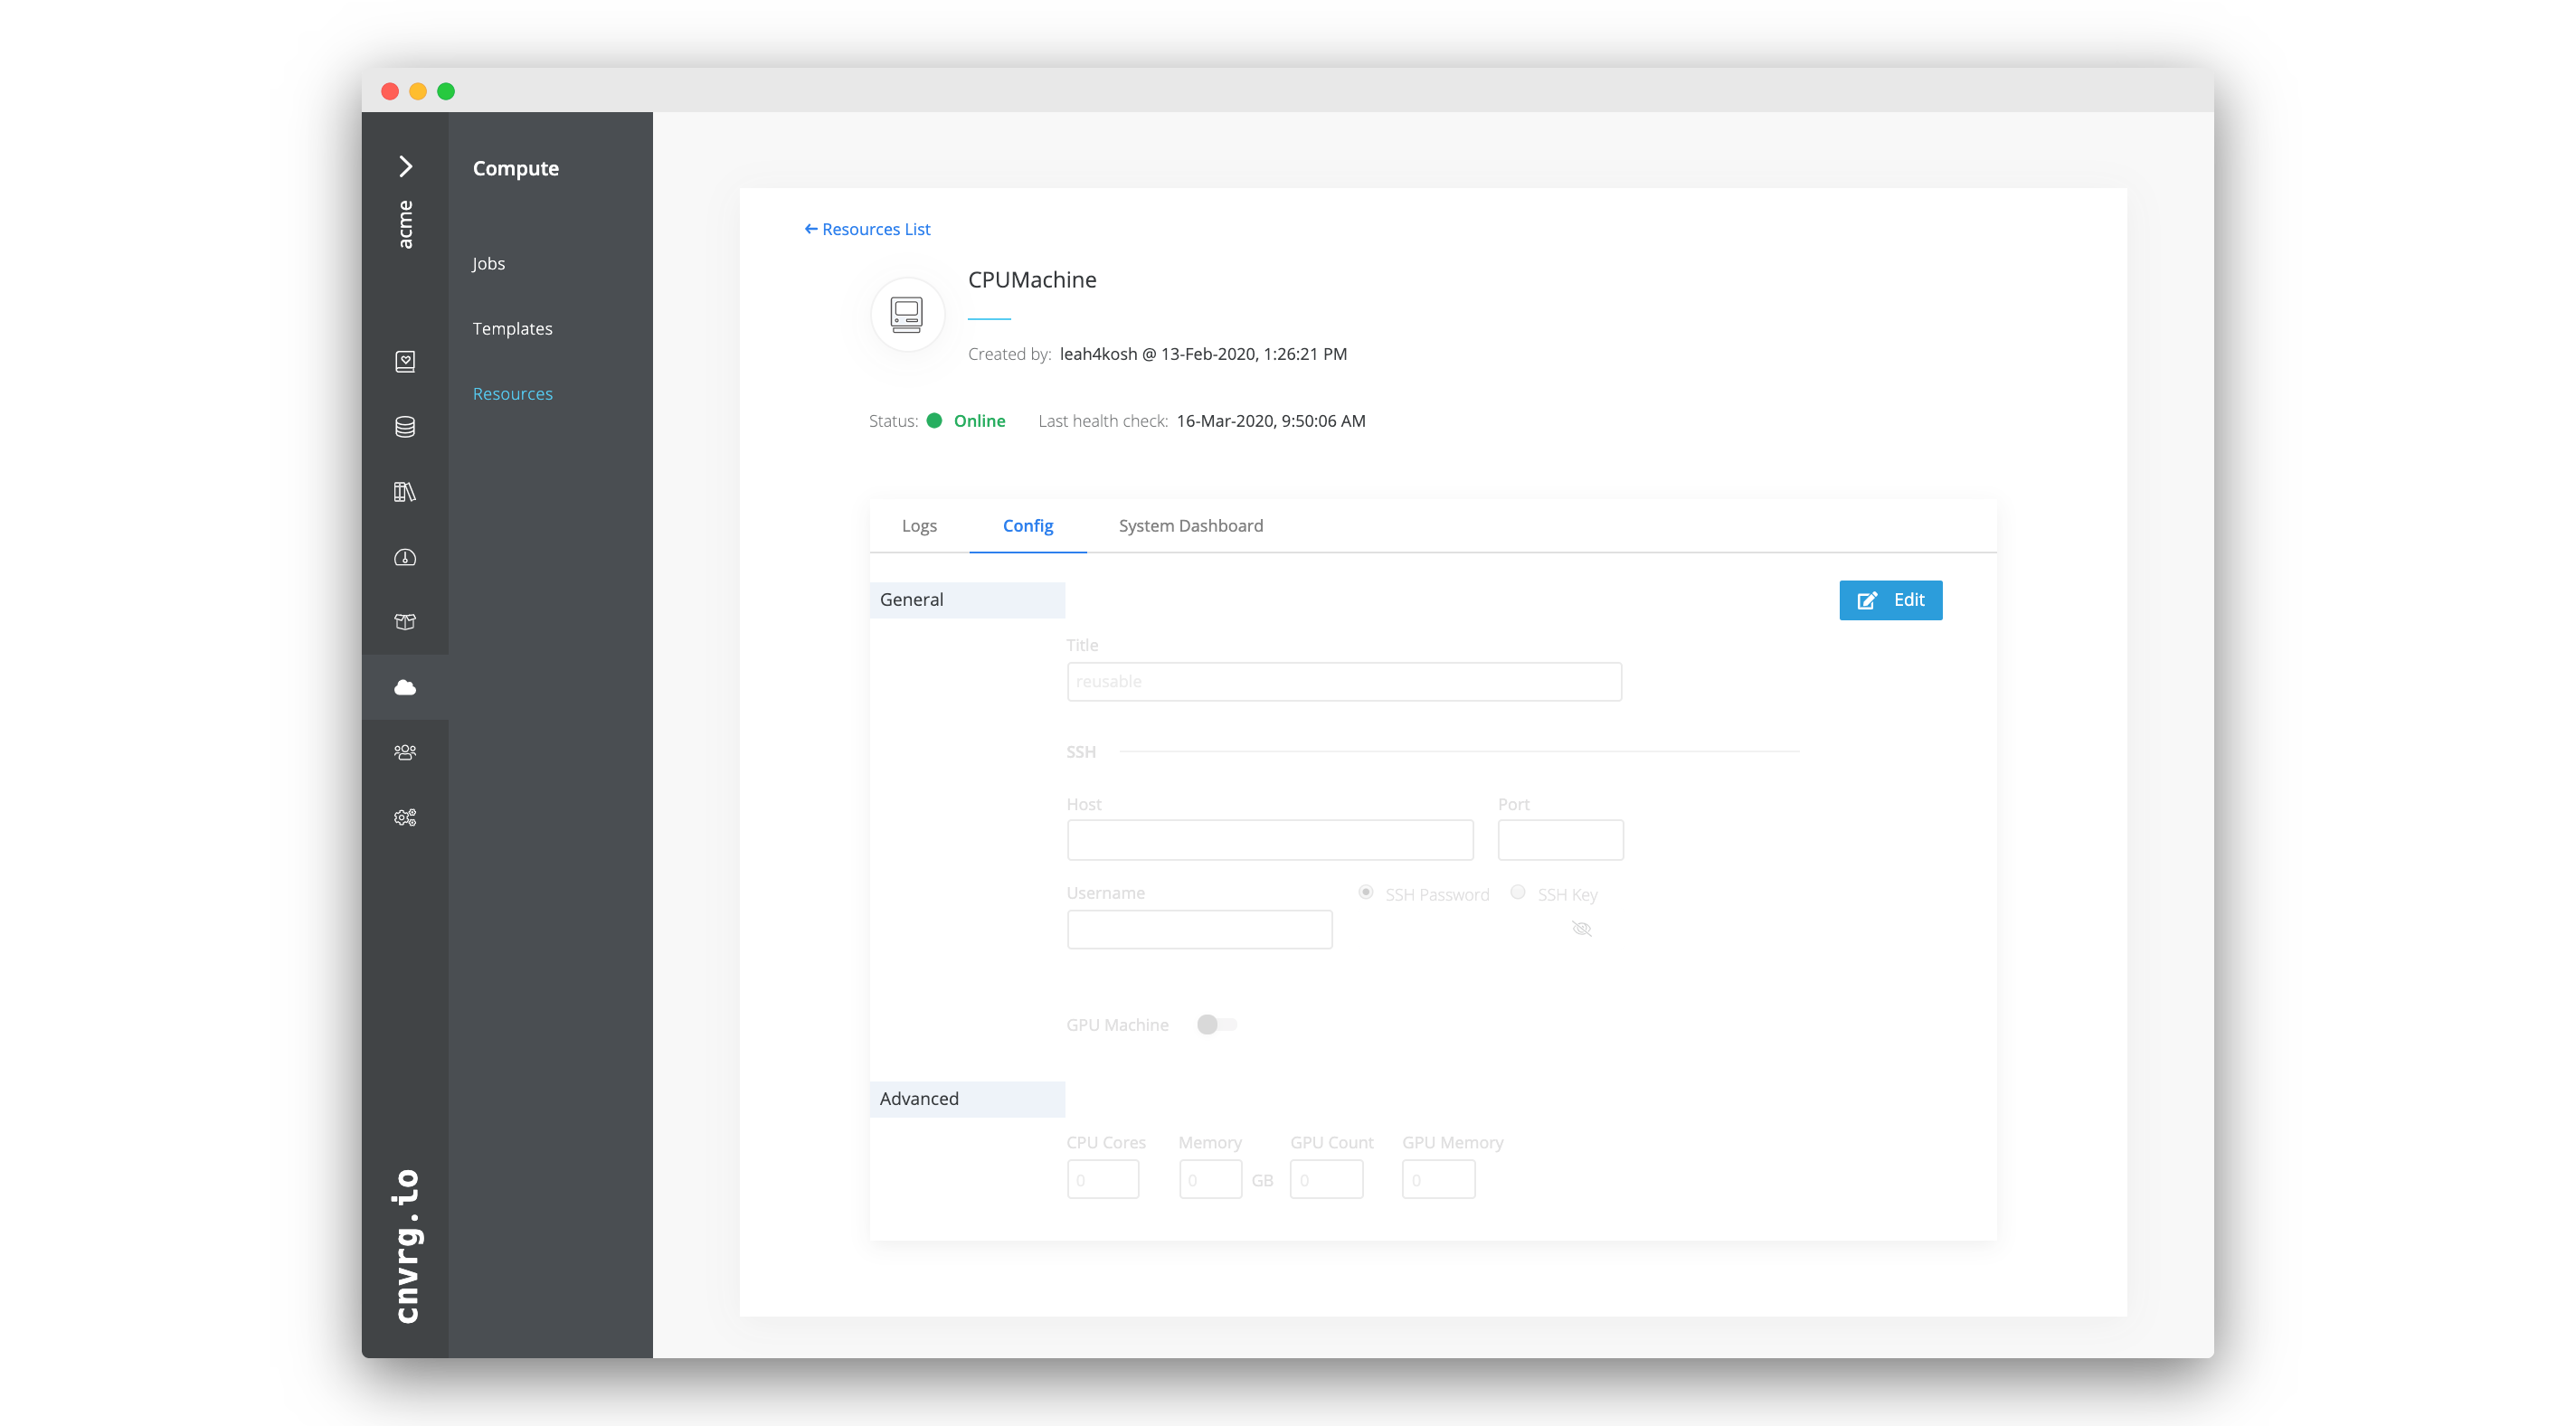
| Config | The machine's configuration details to view and edit. |
| System Dashboard | The machine's dashboard to obtain at-a-glance insights into the health and utilization of the machine. |
# Edit an on-premises machine
Complete the following steps to edit settings for an on-premises machine in your organization:
- Go to Compute > Resources.
- Select the machine to edit.
- Click the Config tab.
- Click Edit.
- Edit the fields as desired.
- Click Save.
The AI Studio software updates the details of the machine.
# Delete an on-premise machine
Complete the following steps to delete an on-premises machine from an organization:
- Go to Compute > Resources.
- Select the machine to delete.
- Click the Config tab.
- Click Delete.
- Click Delete to confirm the machine deletion.
The Ai Studio software deletes the machine from an organization.
# Kibana
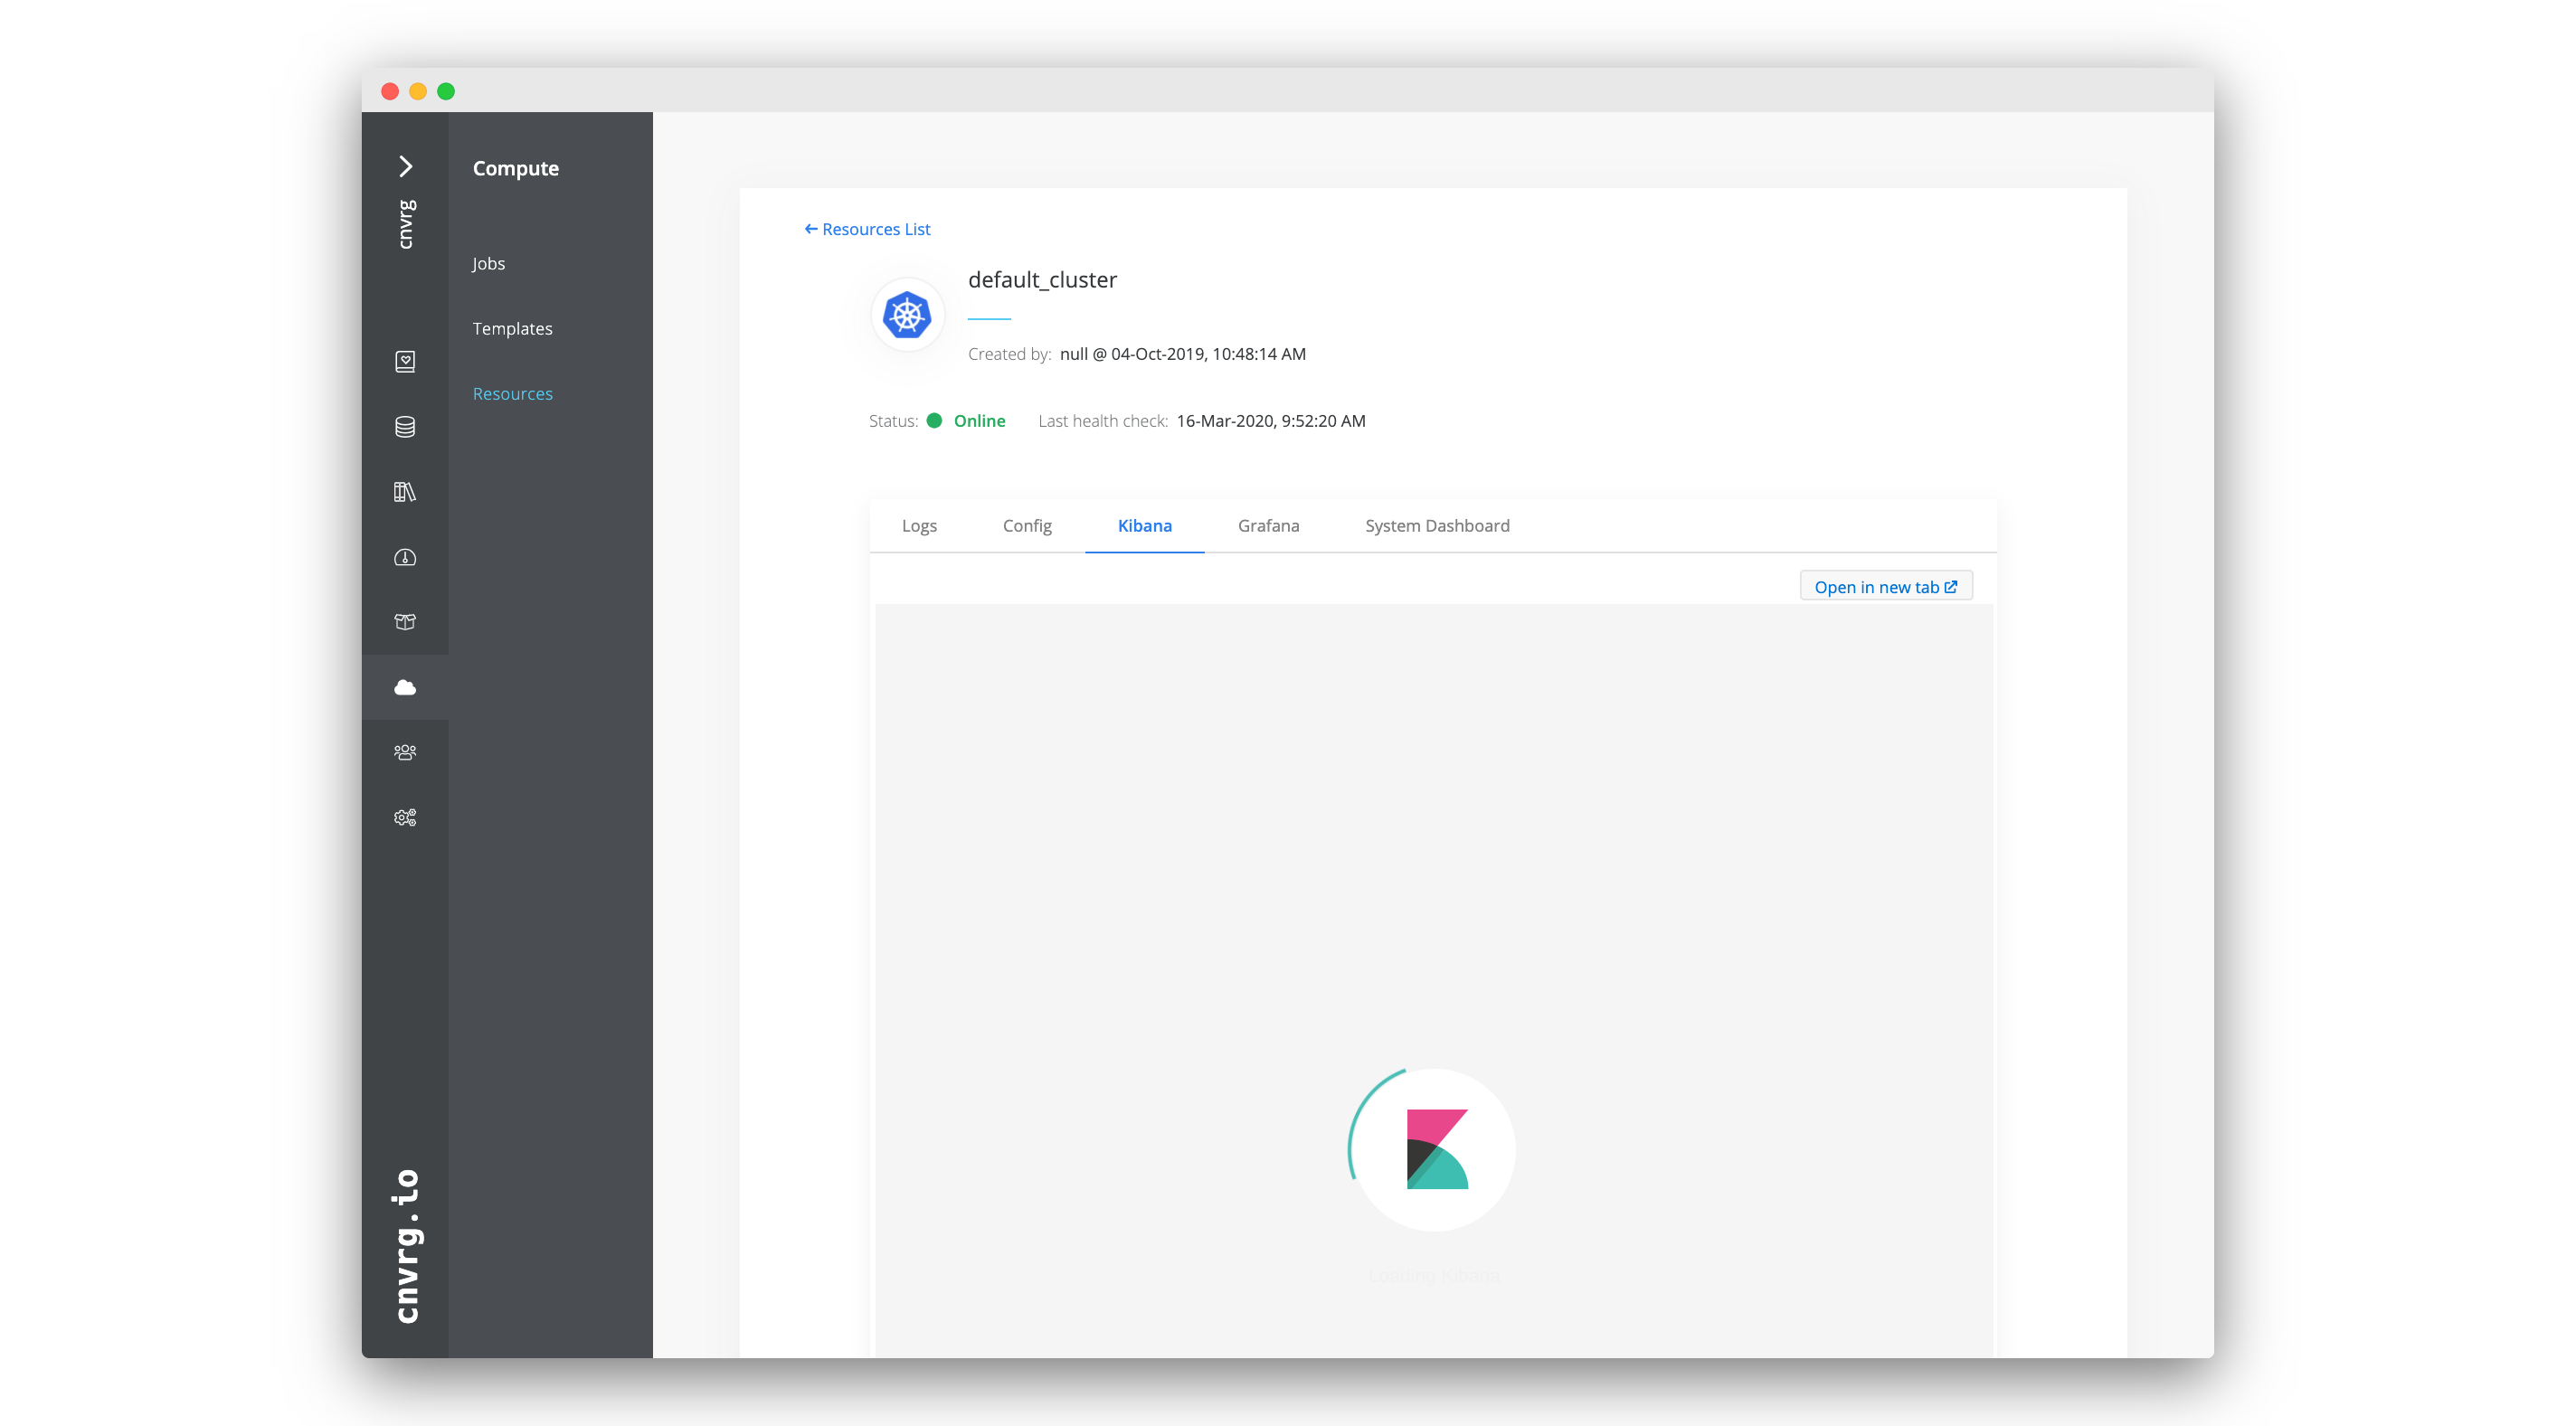
Kibana enables users to visualize their Elasticsearch data and navigate the Elastic Stack so they can perform tasks from tracking query loads to following request flows through their apps.
Kibana is natively integrated with AI Studio and can be used to dynamically visualize the logs of a Kubernetes cluster.
To display a cluster's Kibana dashboard, click the service's Kibana tab in the cluster's information page. Additionally, any endpoints created are accompanied by a specific Kibana log dashboard.
Learn more about using Kibana in the Kibana docs.
# Compute Health Checks
To help manage compute effectively, AI Studio regularly checks the health of connected machines and Kubernetes clusters.
The AI Studio software queries the resources every 5 minutes to determine if they are reachable and useable in jobs. To follow the logs for this process, click the Logs tab on the information page of each cluster and machine.
If the status is Online, the resource can be used.
If the status is Offline, AI Studio cannot connect to the resource. Troubleshoot the resource for any issues and check its configuration details to confirm their correctness.
When the status of a compute resource changes, AI Studio sends an email notification to the administrators of the organization.
# Compute Usage in Jobs
Using the web UI, select a compute when starting a workspace or experiment or when building a flow. A compute can also be set when running jobs using the CLI or SDK.
When running the job, AI Studio attempts to use the computes in the order a user sets them. If the first compute is unavailable, AI Studio attempts to use the second compute, and so on. If none of the selected computes are available, the experiment enters into a queued state. When a compute becomes available, it starts running.
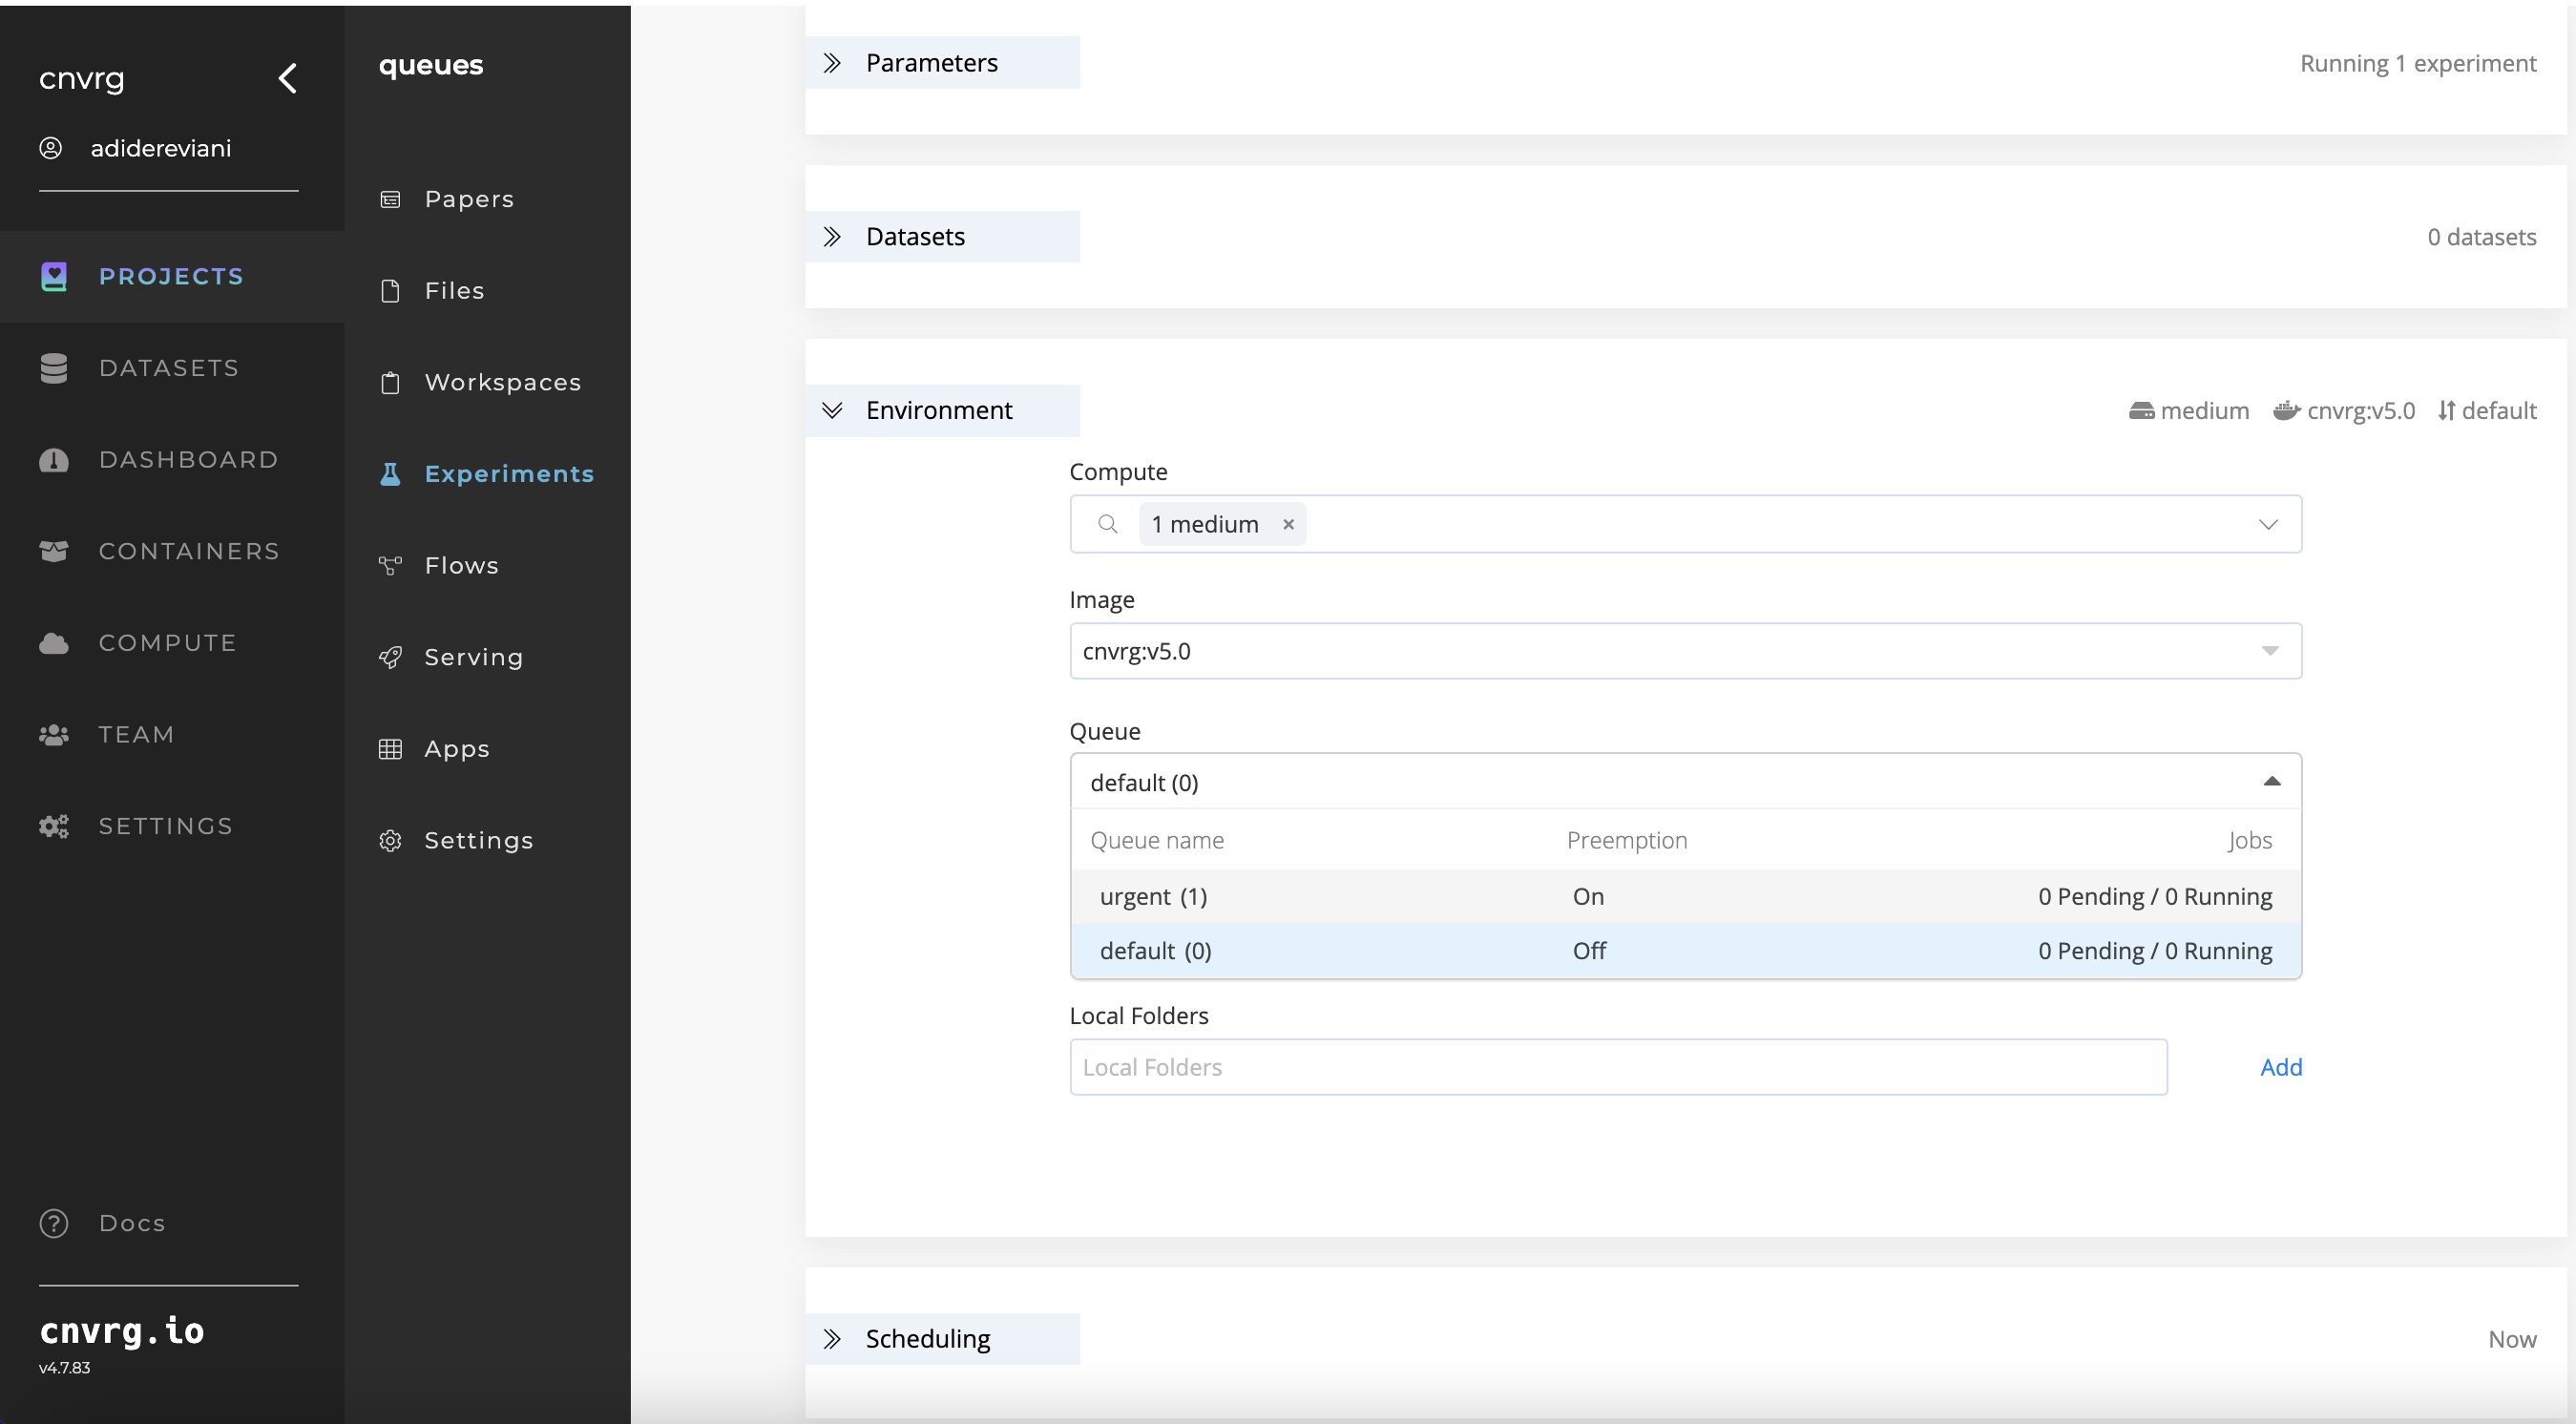
# Using the web UI when starting a workspace or experiment
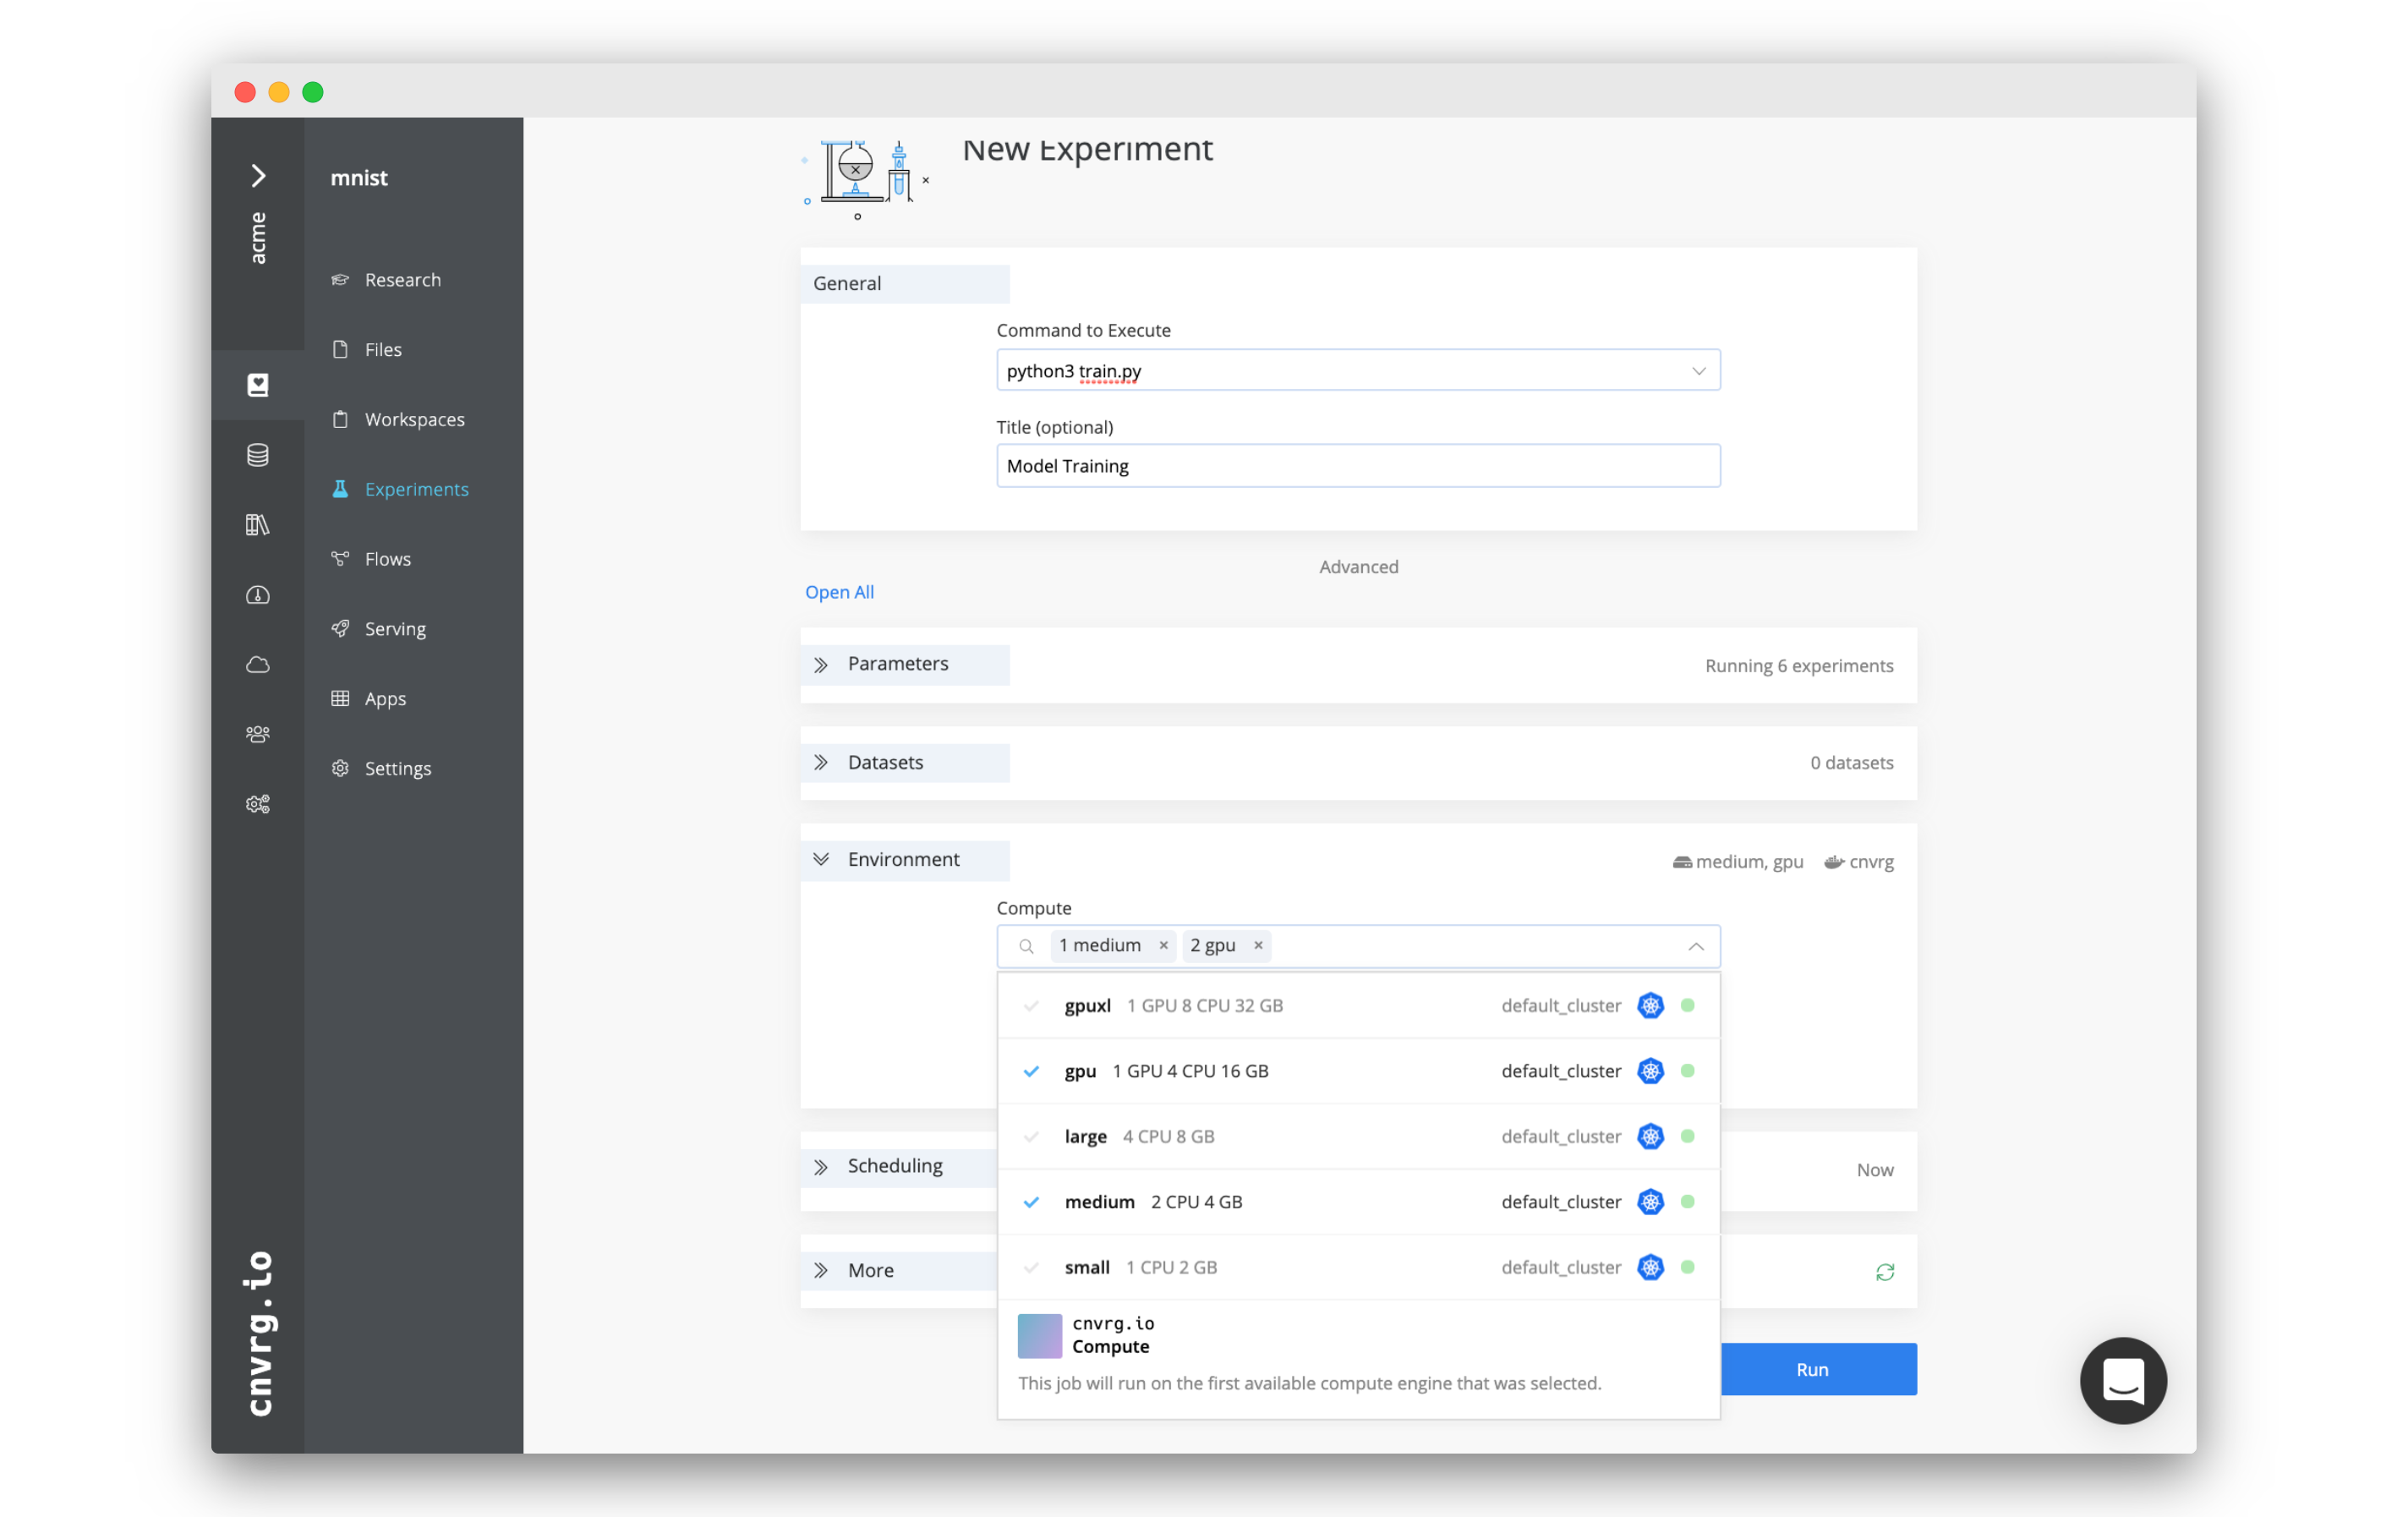
When starting a workspace or experiment from the UI, complete the following steps to select one or more computes to attempt to run on:
- Click Start Workspace or New Experiment and provide the relevant details in the displayed pane.
- To display your compute(s), complete one of the following two steps:
- For a workspace: Click the Compute drop-down list.
- For an experiment: Click the Compute drop-down list in the Environment section.
- Select each compute to attempt to use in the workspace or experiment. The numbers next to their titles (when clicked) indicate the order AI Studio will attempt to use them. You can remove a compute from the list by clicking the X next to its name.
- Click Start Workspace or Run.
# Using the web UI when building a flow
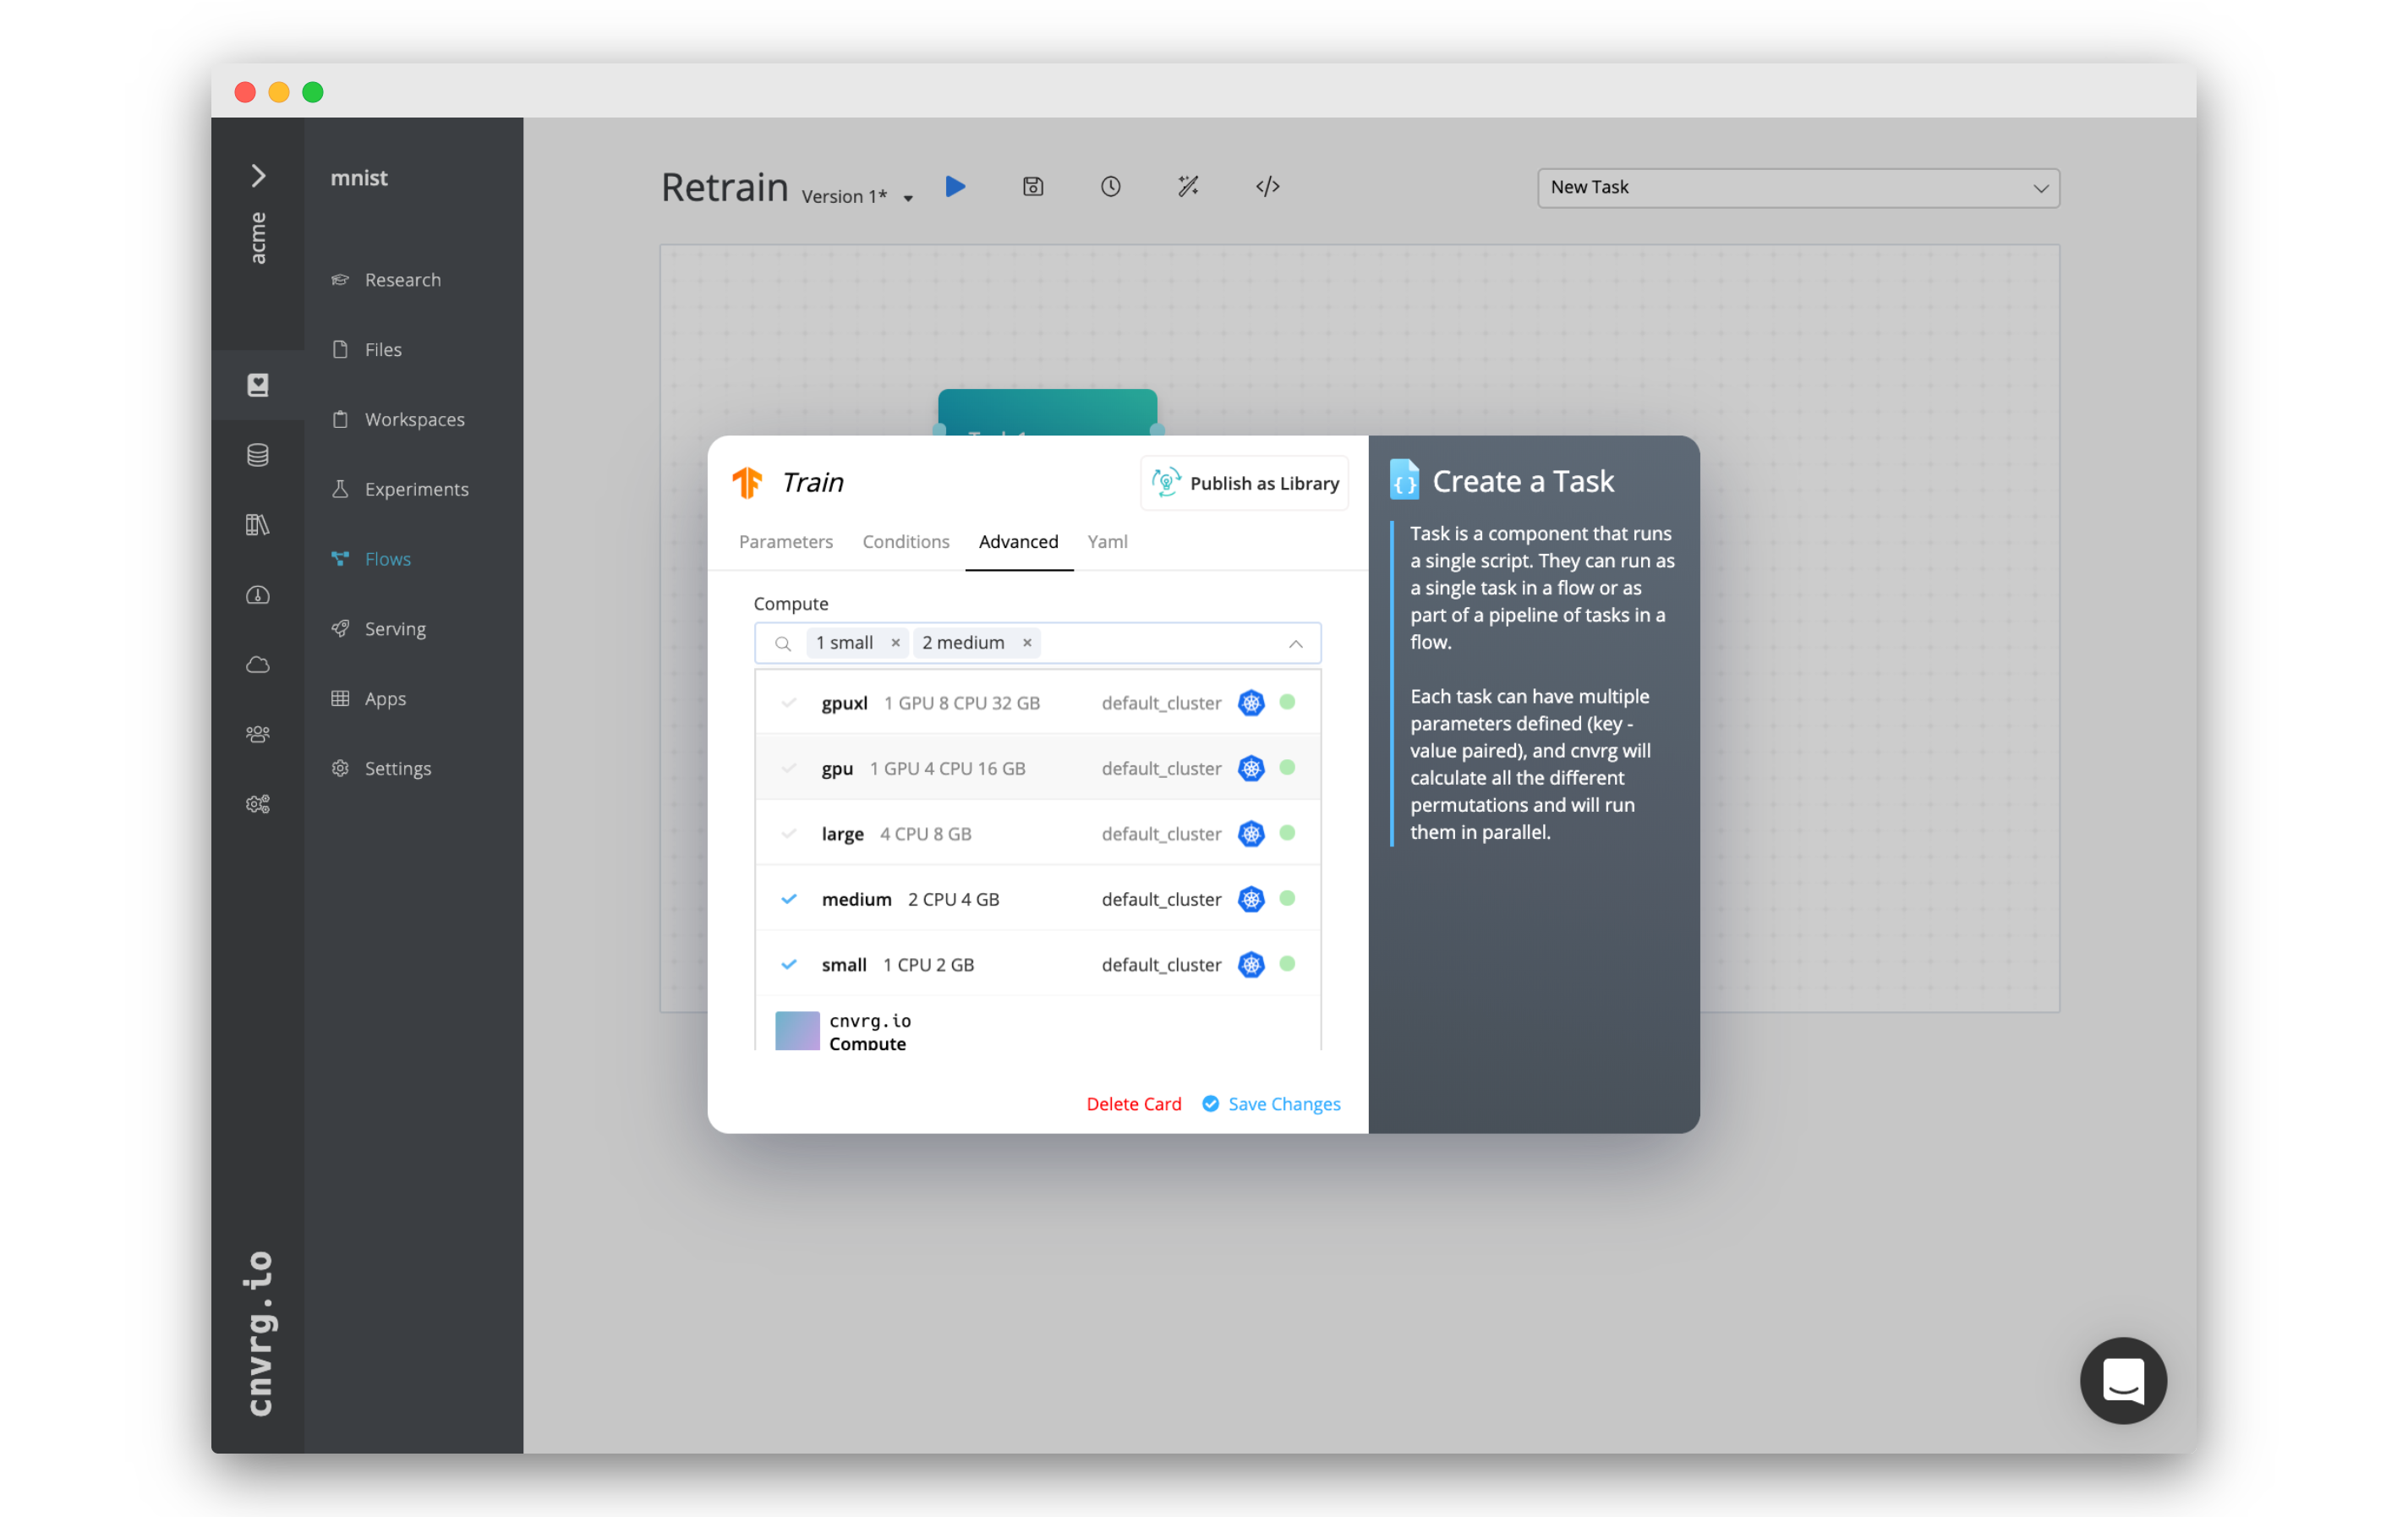
When building a flow, complete the following steps to select one or more computes:
- Open the flow to select its compute(s).
- Click the Advanced tab and then the Compute drop-down list.
- Select each compute to attempt to use in the flow. The numbers next to their titles (when clicked) indicate the order AI Studio will attempt to use them. A compute can be removed from the list by clicking the X next to its name.
- Click Save Changes.
# Using the CLI
To set a compute when running an experiment with the CLI, use the --templates flag:
cnvrgv2 experiment run --command 'python3 train.py' --templates medium
A user can include multiple computes in the array. See the full AI Studio CLI documentation for more information about running experiments using the CLI.
# Using the SDK
To set a compute when running an experiment with the Python SDK, use the templates parameter:
from cnvrgv2 import Cnvrg
cnvrg = Cnvrg()
myproj = cnvrg.projects.get("myproject")
e = myproj.experiments.create(title="my new exp",
                              templates=["medium", "small"],
                              command="python3 test.py")
A user can include multiple computes in the array. See the full AI Studio SDK documentation for more information about running experiments using the SDK.
# Job Node Usage
Kubernetes is designed to efficiently allocate and orchestrate compute. By default, all nodes can be used by any job and compute template if the requested resources exist. However, this may require that GPU nodes may be used for CPU jobs, meaning that a CPU job uses a GPU machine when needed for a GPU job. This is one example of when a user may want to limit this behavior.
A user can use Kubernetes and AI Studio to control the jobs running on specific nodes. There are three ways to enforce this:
# Adding a taint to the GPU node pool
To restrict GPU nodes to only GPU jobs, add the following taint to the node:
- key:
nvidia.com/gpu - value:
present - effect:
NoSchedule
Use the following kubectl command to set a specific node(s):
kubectl taint nodes <node_name> <taint-key>=<taint-value>:<taint-effect>
For example:
kubectl taint nodes <node_name> nvidia.com/gpu=present:NoSchedule
# Using node labels
A user can use node labels to attach specific compute jobs to specific nodes.
To label nodes with a custom label, use the following kubectl command:
kubectl label nodes <node-name> <label-key>=<label-value>
Now add the label to the compute templates to run on the labeled node.
Go to Compute > Templates and edit the template to use only on the labeled node. In Labels, add the same <label-key>=<label-value>.
Now, any jobs run on the template run only on nodes with the matching labels.
# Controlling with instance type
A user can also add a selector to a job template that uses the instance type of the desired node group. This does not require adding a label or taint to the node group.
Go to Compute > Templates and edit the template to use only a specific instance type.
In Labels, add the following: beta.kubernetes.io/instance-type: 'desired-instance-type'.
For example, to enforce the template to use an m5.xlarge, add beta.kubernetes.io/instance-type: 'm5.xlarge' to the Selector.
# Docker Compose Installation on a GPU Machine
Docker Compose is not yet officially supported for GPU machines. However, it is still possible to set up Docker Compose to work in the context of a GPU machine using NVIDIA drivers. This relies on altering the runtime for Docker Compose. Complete the following steps using the guidelines provided:
- Install Docker Compose.
- Download and install the
nvidia-container-runtime:sudo apt-get install nvidia-container-runtime - Add the NVIDIA runtime as the default Docker Compose runtime by running the following command:
sudo tee /etc/docker/daemon.json <<EOF { "default-runtime":"nvidia", "runtimes": { "nvidia": { "path": "nvidia-container-runtime", "runtimeArgs": [] } } } EOF sudo pkill -SIGHUP dockerd - Restart Docker using the following command:
sudo systemctl restart docker
# Queues for Job Scheduling
Utilizing compute resources efficiently is crucial in any organization, as it represents a significant investment. When faced with a limited amount of compute resources and multiple jobs requiring access to the same resources, it is essential to prioritize and allocate those resources in a manner that aligns with the organization's goals and priorities.
To address this challenge, AI Studio introduces "Queues" a system that enables job scheduling based on priority across resources. Through this system, users can assign a priority to a job and specify the list of compute resources required to execute it. AI Studio will then run the job on the most suitable compute resource based on its priority, optimizing resource utilization, aligned with the organization's objectives. Queues feature is build on top of AI Studio scheduler.
AI Studio schdeuler strategy aims to prioritize nodes that are already running GPU tasks for new GPU workloads. This approach consolidates GPU jobs onto fewer nodes, which can optimize GPU utilization and reduce resource fragmentation. Essentially, it's about stacking GPU tasks where GPUs are already in use, keeping some nodes focused on GPU work and others free for different tasks. This can help maintain dedicated resources for high-demand GPU workloads and improve overall efficiency.
# Enable
Before proceeding, ensure that the following prerequisites are met:
AI Studio app version > v3.10.0 It is displayed in the bottom left corner of the AI Studio UI. You can also run this command to check:
kubectl -n cnvrg get cnvrgappAI Studio operator version > 4.0.0
You can also use kubectl with access to the cluster to check the current version, by running the following command:
kubectl -n cnvrg get deploy cnvrg-operator -o yaml | grep "image: "
# Install
When meeting the prerequisites, queues will be enabled automatically.
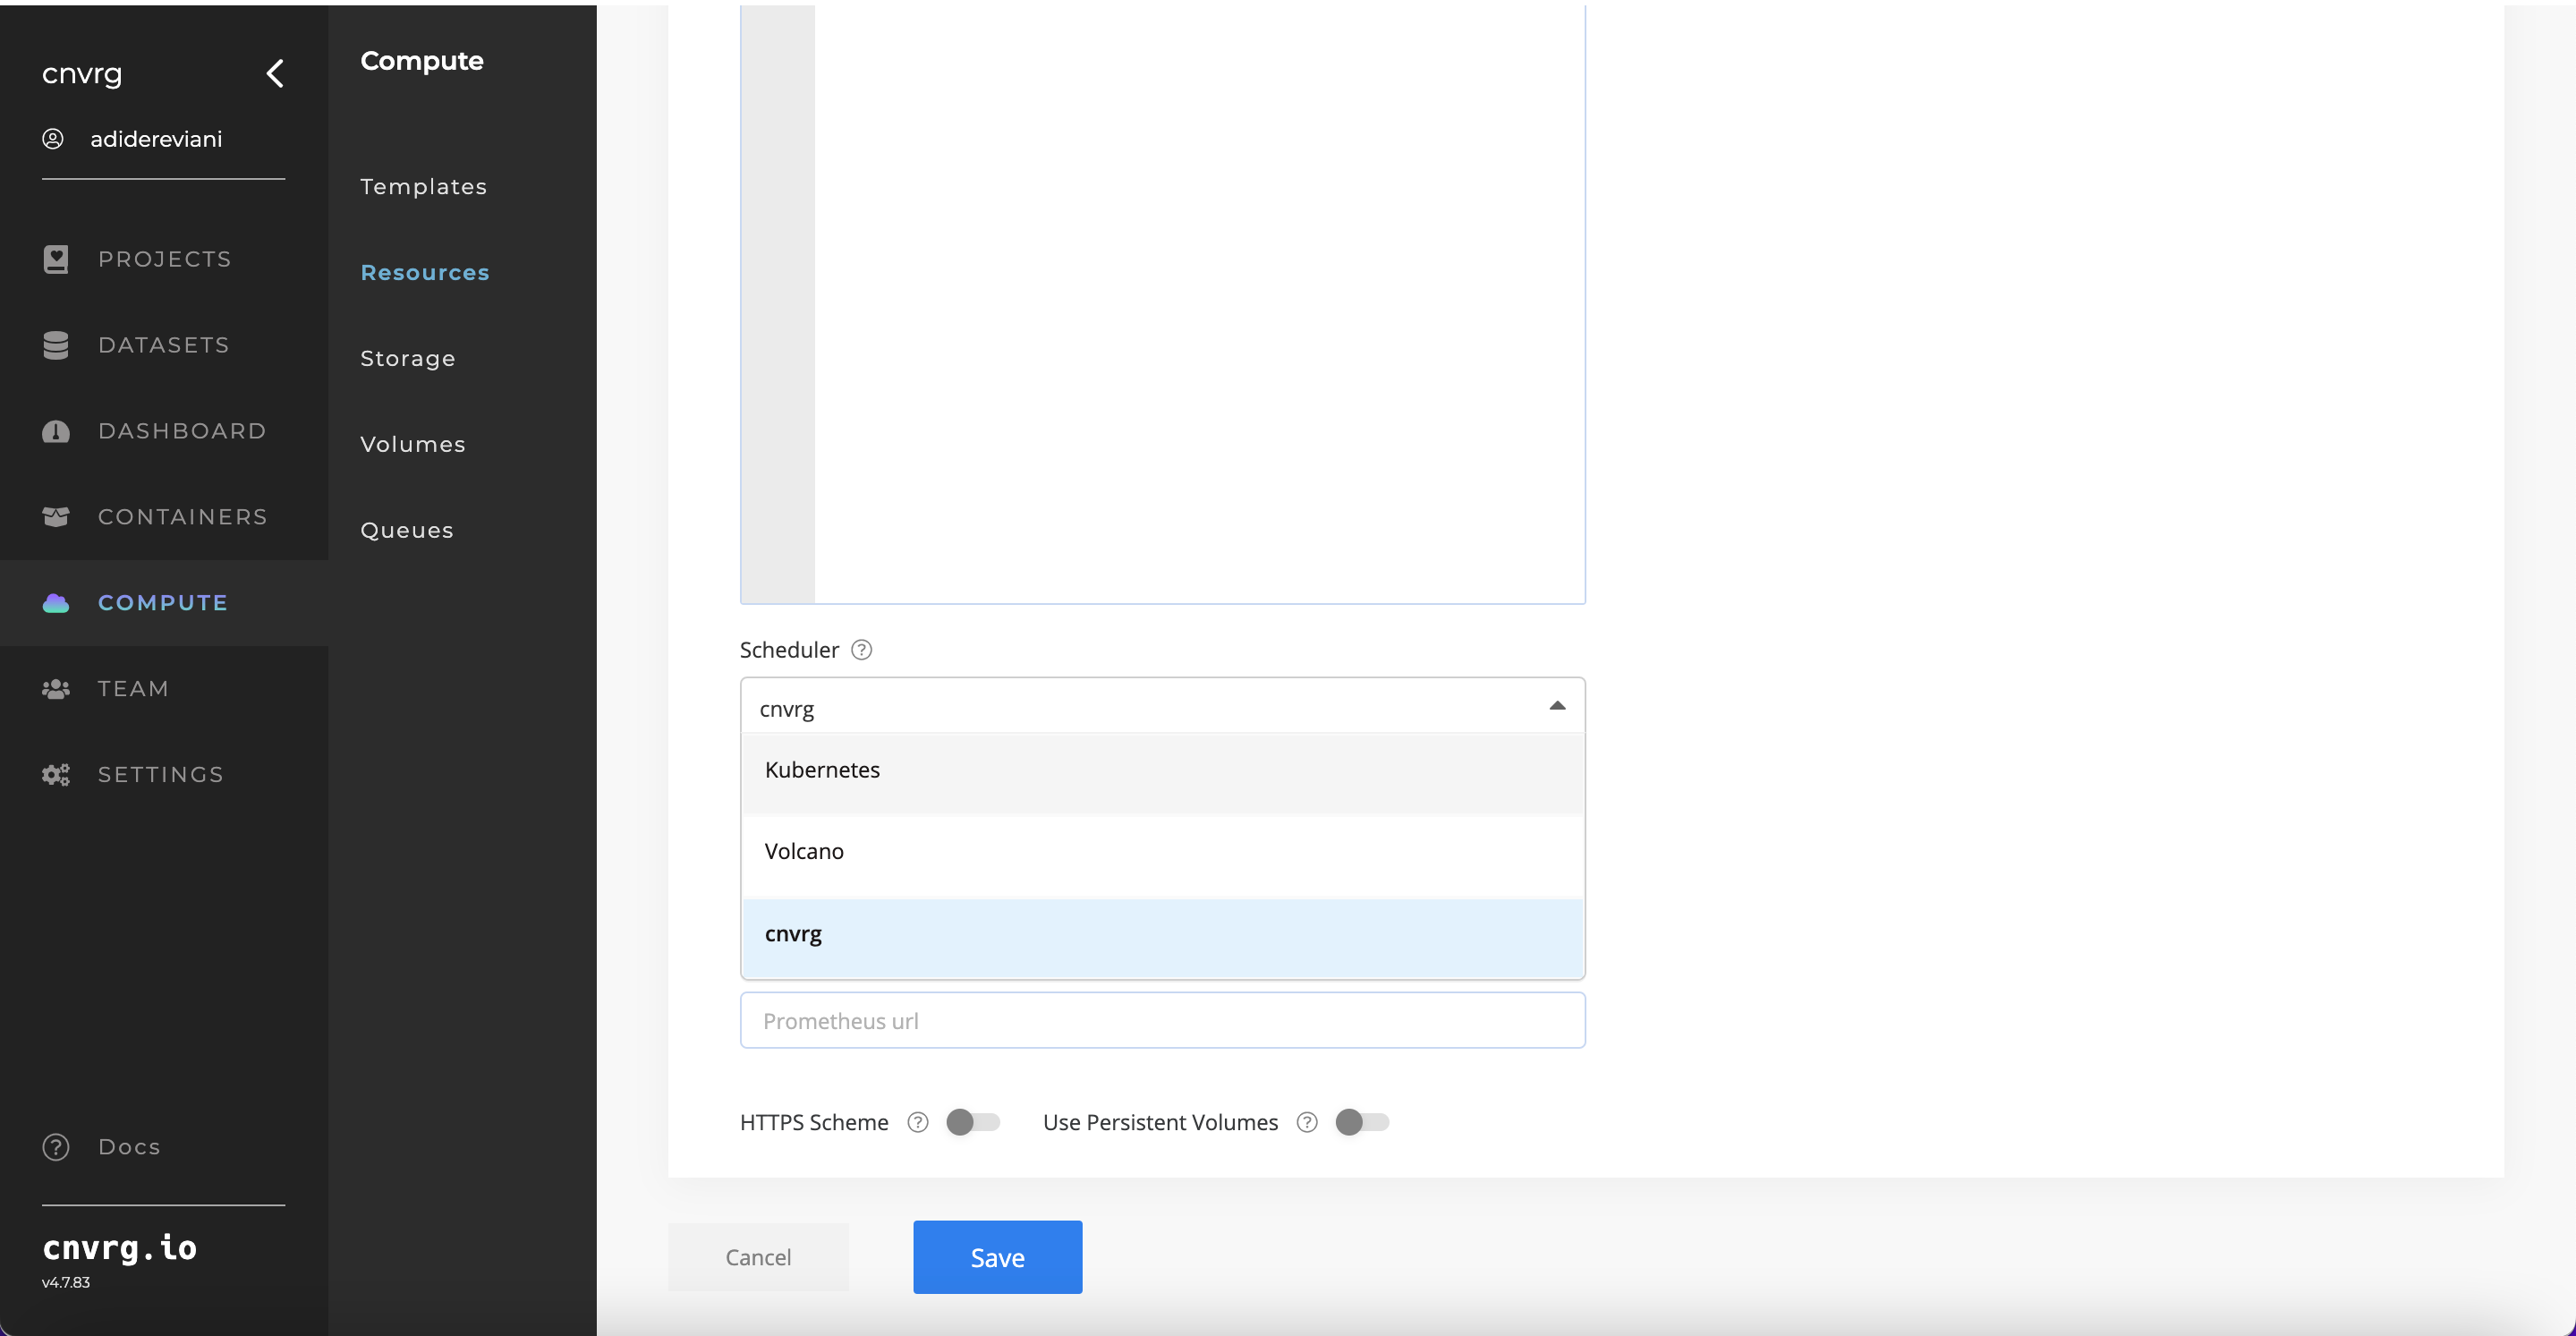
- Make sure compute resource is configured to use the AI Studio scheduler: Through the UI navigate to Compute → Resources → choose the relevant cluster’s menu → Edit Resource
- Then confirm that the
cnvrgScheduleris selected:
- Using kubectl with access to the cluster, check that cnvrg-scheduler is running:

- Using kubectl with access to the cluster, check that
cnvrgScheduleris enabled:
kubectl -n cnvrg edit cnvrgapp

## navigate to 'cnvrgScheduler', it should be enabled

cnvrgScheduler:
      enabled: true
Note: each cluster is assigned a dedicated AI Studio scheduler; however, users may opt to disable the scheduler and utilize Kubernetes as the cluster scheduler.
# How to use
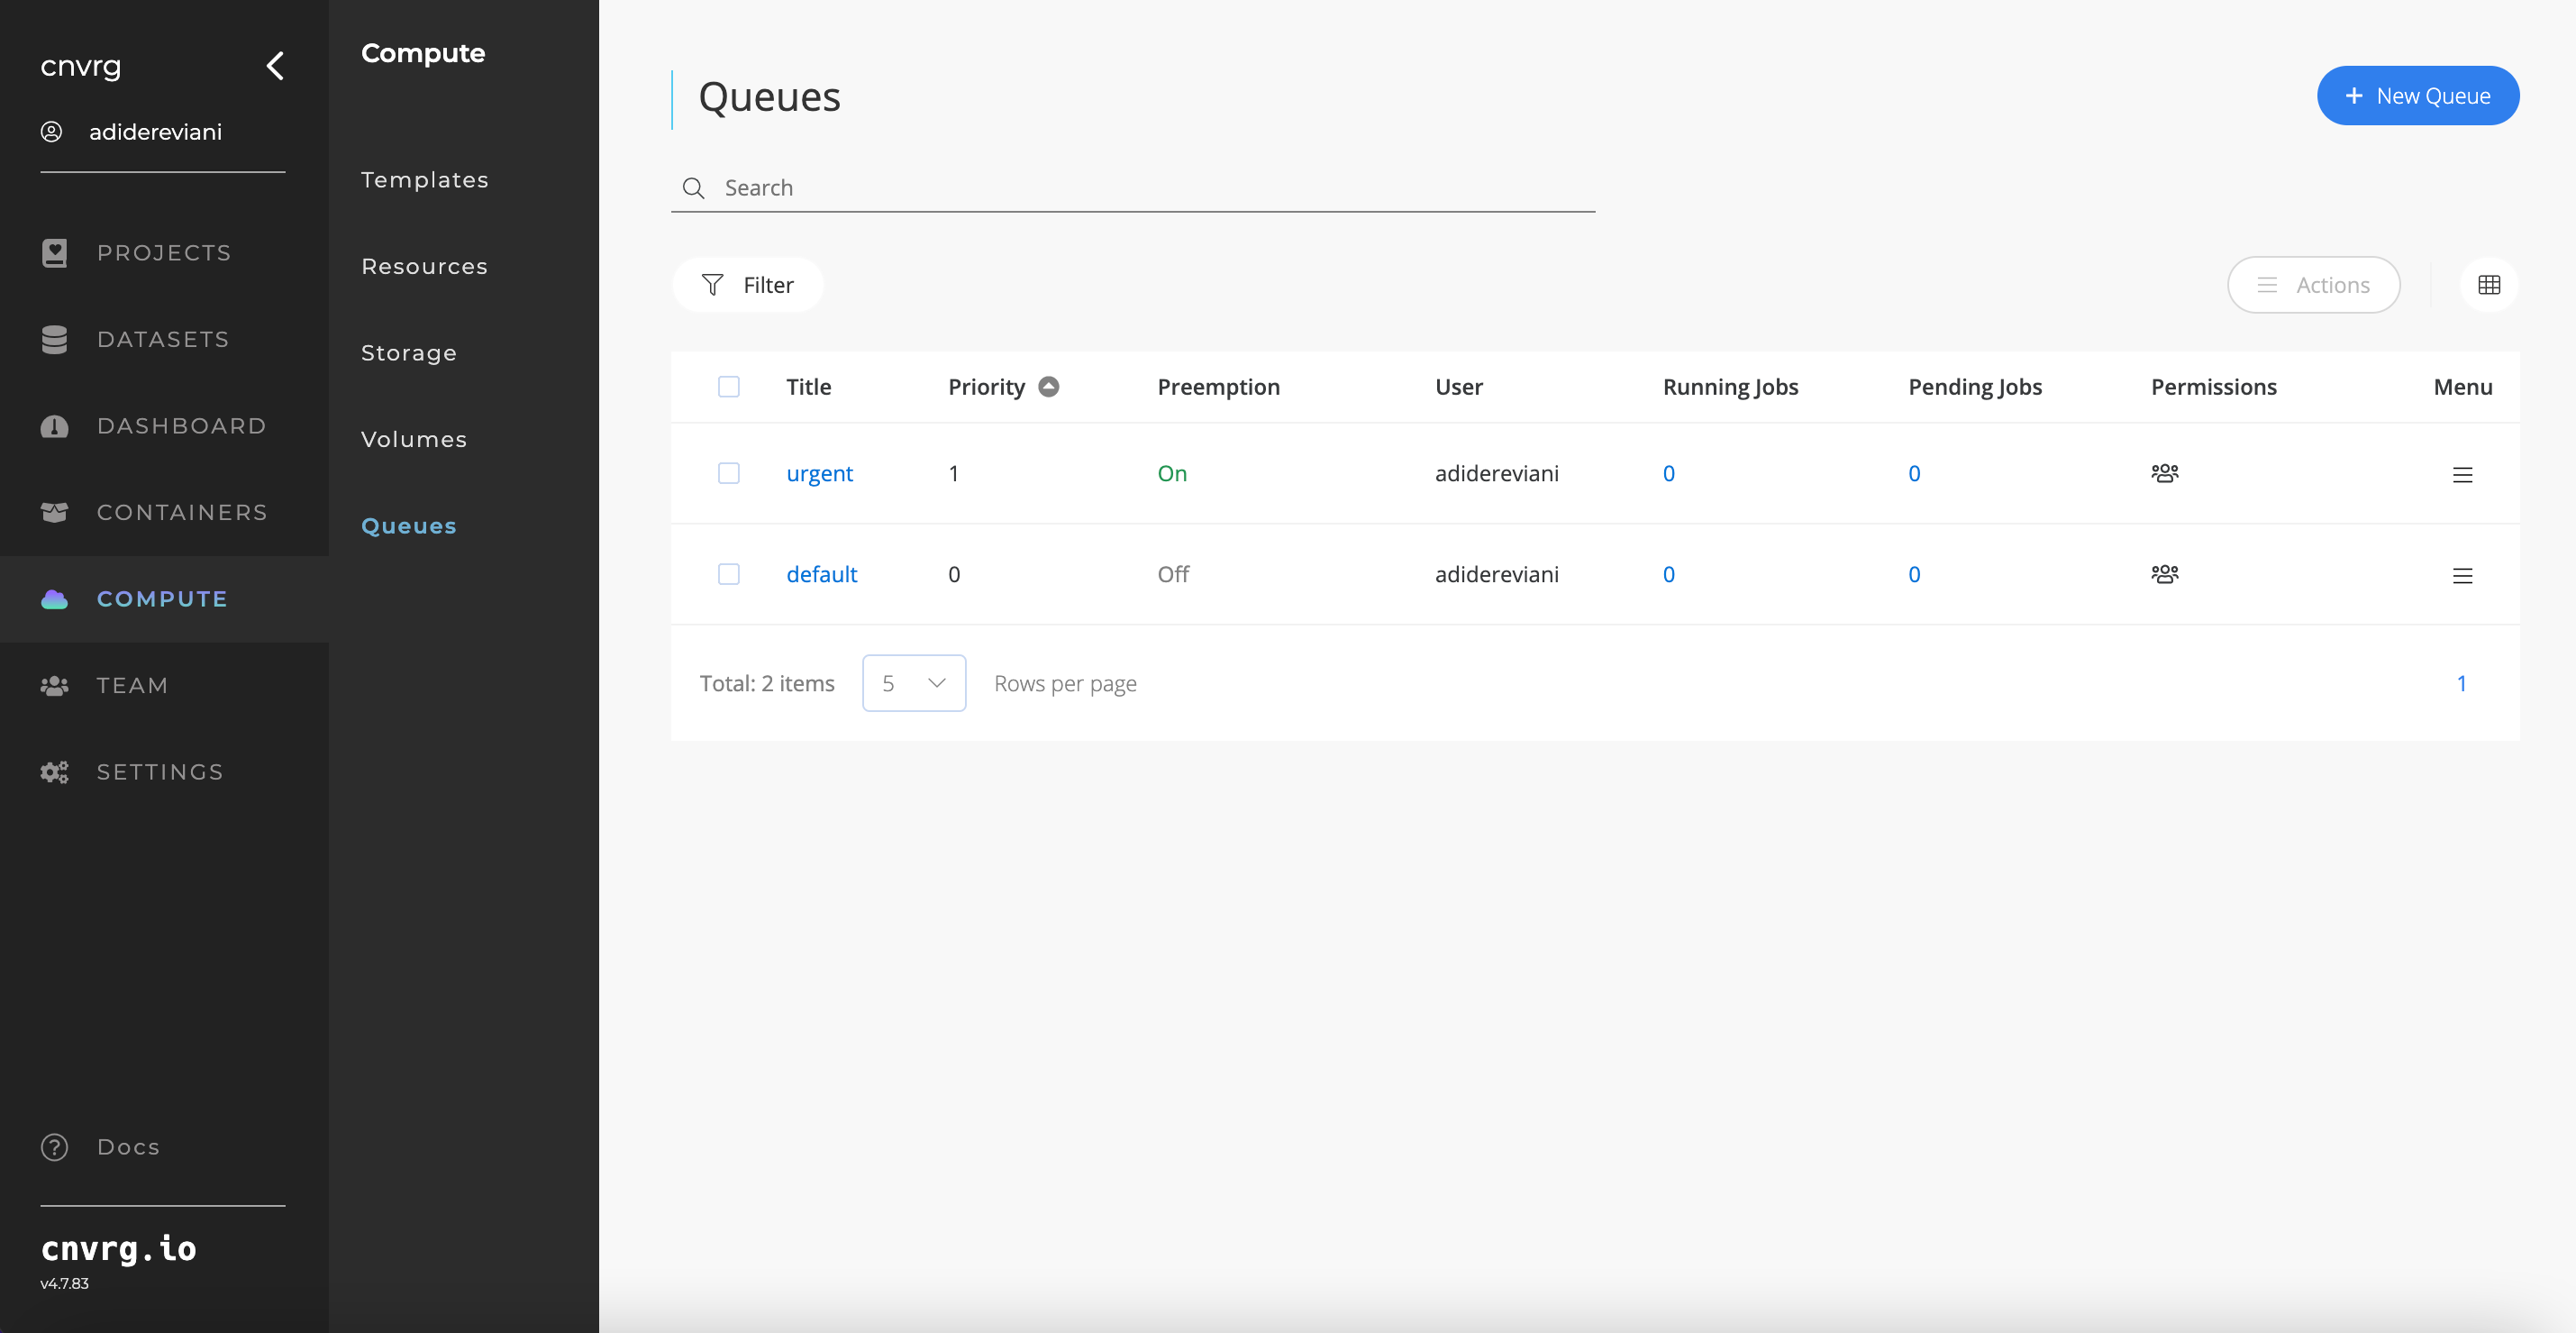
After enabling the scheduler feature, organizations can create queues to prioritize the execution of jobs.
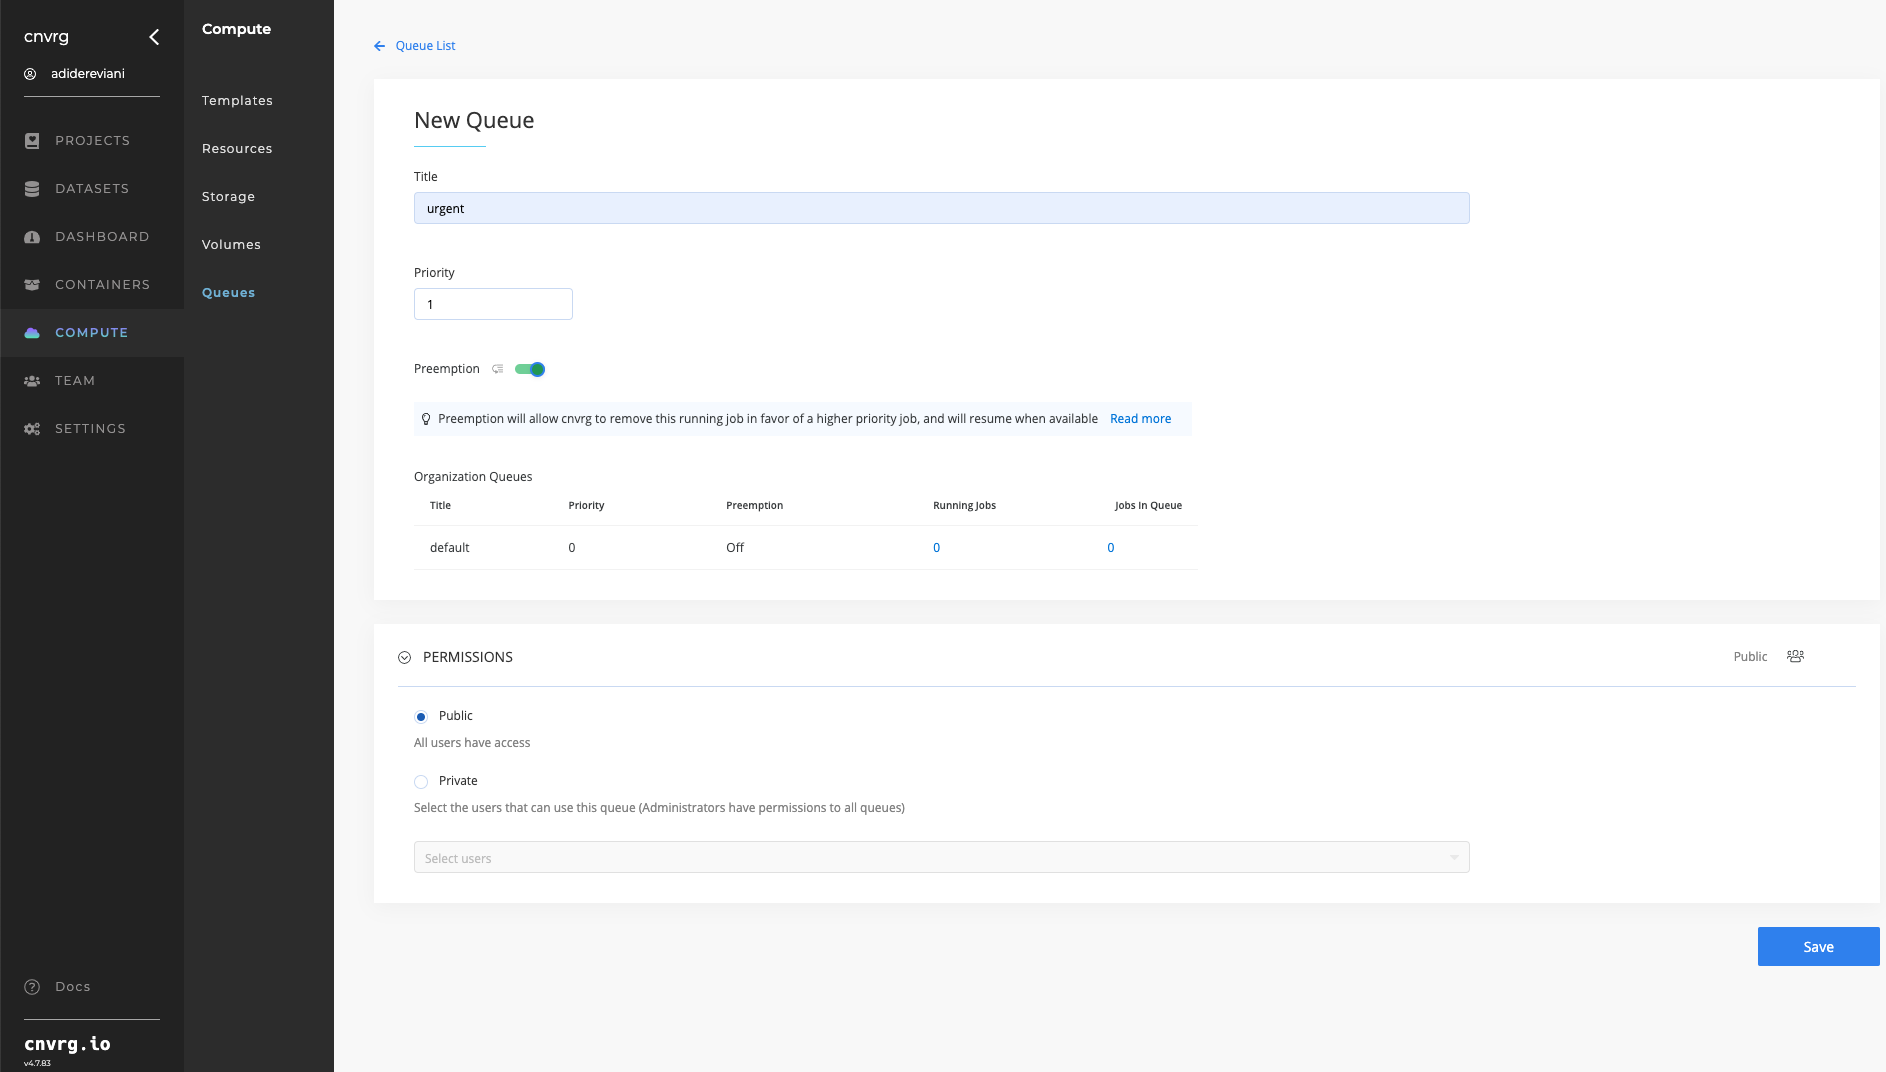
Each Queue will have:
- Title
- Value
- Preemption (On / Off) —> Can jobs running on this queue be stopped in order to allow higher priority job to be executed
- Permissions to use this queue
Once a queue is defined, users can schedule a job on it, and it will be executed according to the queue's priority relative to other jobs waiting to be executed.
For example:
Consider the following scenario where an organization maintains two queues, Urgent and Default, for executing jobs.
If a user (or multiple users) initiates the execution of two jobs simultaneously, one job is assigned to the Default queue and the other to the Urgent queue, which has a higher priority than the Default queue.
The job assigned to the Urgent queue is given priority for execution ahead of the Default queue. Only after the completion of the Urgent job, the job assigned to the Default queue will commence execution.
Additionally, if two jobs are scheduled to run on the same queue at the same time, they will be executed based on the FIFO (First In First Out) principle by default.
# Preemption
The implementation of preemption in the AI Studio platform facilitates the removal of a running job in favor of a higher priority job. As an illustration, suppose a job, running on queue with priority 1, in which preemption is enabled. In that case, if a higher priority (> 1) task is scheduled, the current lower priority job will be halted, and its resources will be reassigned to the higher priority task.
- Example workflow:
- Job A commences with priority: 1
- Job B is launched with queue with priority: 2
- When receiving a request to allocation resources for job B, job A will be stopped and and moved back to the queue (same priority, new start_commit). Then job B will be executed. Note: Job A will only be stopped if the resources it uses are sufficient to be used for job B.
- Once Job B concludes and resources are available, Job A resumes with artifacts created in previous run.
FAQ
Q: Is it possible to run this without using a queue?
A: Default queue is selected unless specifying a different one.
Q: What happens if I want to run a job on an 'urgent' priority, but the necessary resources are not available? At the same time, I also want to run a task on 'default' priority, for which the resources are available.
A: Default will run. resources will only be taken for requests that are able to allocate.