# Flows
Flows in cnvrg are production-ready machine learning (ML) pipelines, which allow users to build complex directed acyclic graph (DAG) pipelines and run ML components (tasks) with just a drag-and-drop.
Each task in a flow is a fully customizable ML component, which can be run on different computes with different Docker images. For example, feature engineering can run on a Spark cluster, followed by a training task on an AWS GPU instance.
Each DAG run produces an experiment for a fully tracked, reproducible ML pipeline. A flow's modular structure provides the ability to individually track, inspect, debug, and optimize each component.

The topics in this page:
# Flows Components
A cnvrg Flow can have an unlimited number of components. A component can be one of three tasks: data, custom, or deploy. Each task is flexible and can leverage different types of computes, environments, and frameworks.
# Data Tasks
A data task represents datasets that are hosted and accessed through the cnvrg platform. You can select any dataset, with a specific version or query. You can also add multiple data tasks.
Adding a data task to your flow automatically mounts the selected dataset to the connected task. For example, if you add the hotdogs dataset and connect it to VGG, ResNet, and InceptionV3 (as in the image above), then the dataset hotdogs is accessible in each of the tasks.
TIP
A mounted dataset is accessible at /data/dataset_name.
# Custom tasks and AI Library tasks
A cnvrg task represents an ML component. A task can be any desired component with the full flexibility to design and code it as needed.

A custom task contains the following information:
# Params tab
- Script: Enter a command, which can be a Python script or any other executable (like R, Bash, or Java). For example:
python3 train.py. - Parameters: Add hyperparameters, data paramaters, or any kind of argument to pass to your command. All parameters are automatically captured for reproducible data science.
TIP
For parameters, you can also use comma separated values (CSV) and cnvrg automatically runs an experiment for each permutation as in a grid search.
# Conditions tab
- Add a condition to dictate whether the task is executed.
- Select users who can approve the execution of the task.
# Advanced tab
- Git Branch and Git Commit: Set the Git branch and Git commit to clone when executing the task. (If the project is connected to Git.)
- Compute: Select the compute template(s) the task will attempt to run on.
- Output Folder: Identify the folder to save artifacts to. Only this folder's contents are available in the following tasks. (If the project is connected to Git.)
- Container: Select the Docker image to use for the virtual environment of the task.
# YAML tab
The YAML config representation of the task.
# Deploy tasks
A deploy task contains the following information:
# Setup tab
Provide the information for the web service to create or update.
To update an existing web service, select the name of the endpoint from the Select Endpoint menu.
To create a new web service, click + Add New from the Select Endpoint menu. Then, provide the required details for the service:
- Endpoint Title: Enter the name of the service. This is also used as part of the URL for the REST API, and as such, can only contain alphanumeric characters and hyphens.
- Compute: Select the compute the service runs on.
- Image: Select the Docker container to serve as the virtual environment for the endpoint.
- File: Select the file containing your predict function.
- Function: Enter the function name of your predict function.
Click Advanced Settings to display advanced options:
- Number of Pods: Set the lower and upper bounds for the service's auto-scaling due to demand, according to the predicted traffic to the endpoint.
- Language: Select the language of your service.
- Flask Config: Change any flask config variables for a desired configuration.
- Function accepts file as input: Enable or disable the ability for the model to accept files as an input.
# Conditions tab
- Add a condition to dictate whether the task is executed.
- Select users who can approve the execution of the task.
# Task Environment Creation
Similar to the execution of any other cnvrg ML job, when a task is executed, it constructs its environment as outlined in the following steps:
- Pulls and executes the selected container.
- Clones the selected Git branch and commit (if project connected to Git) into
/cnvrg. - Clones the latest version of your files from your projects Files tab and artifacts from preceding tasks into their respective
/inputfolders. - Installs packages from the
requirements.txtfile (if it exists). - Executes the
prerun.shscript (if it exists). Note: This prerun or setup script can be in Bash, Python, or any other language.
The task executes the given Script only after all the above steps have been completed. This means you can call or use any of the files made available by the newly created environment as the Script or from within your code.
For more information see Environment.
# Artifacts Flow
Each task in a flow has access to all artifacts of each previous connected task. The files are located and accessed from the /input/task_name/ folder for each preceding connected task. The folder contains the entire end commit of the corresponding task.
The folder name for the task is the name of the preceding task in lowercase with spaces substituted as underscores and extra symbols removed. For example, artifacts of the task named Processing the Data are loaded in /input/processing_the_data/ in the following task.
Each input path is exported as an environment variable in the task. Its naming is in uppercase and with INPUT_ prepended, but otherwise follows the above rules. The corresponding example environment variable is INPUT_PROCESSING_THE_DATA.
For example, if Task A creates a file named output.txt, that file is cloned to /input/task_a/ in the following task and accessed from the full path /input/task_a/output.txt.
When a task is run in Single mode, artifacts from preceding tasks are not cloned into the task.
TIP
If your project is connected to Git, only the files that are saved to the selected Output Folder (/output by default) are available in the following tasks. They are available in /input/task_name/PATH-OF-OUTPUT-FOLDER/.
# Tags and Parameters Flow
Each task can produce tags like hyperparameters and metrics. The parameters and tags of preceeding tasks are available as environment variables within the following tasks.
The key (name) of the environment variable is in the following format:
For tags in current task:
CNVRG_TAG_<TAGNAME>
For tags from previous tasks:
CNVRG_<TASKNAME>_<TAGNAME>
The variable is always in all uppercase (even if the original parameter is not). Spaces in task and tag names are substituted for underscores. For example, if a parameter in Task A is named model accuracy, the corresponding environment variable in following tasks is CNVRG_TASK_A_MODEL_ACCUARCY.
Use a tag from a previous experiment as a parameter by using the following format:
{ { task name.tag name } }
The tag retains the same letter case (uppercase and lower case letters) as recorded in the task where created. Spaces in task and tag names are preserved. For example, if a parameter in Task A is named model accuracy, the corresponding format is { { Task A.model accuracy } }.

# Execution and Reproducibility
Run a cnvrg Flow by clicking the Play button in the Flow bar ![]() to optimally execute its DAG using your cloud and on-premise compute resources.
to optimally execute its DAG using your cloud and on-premise compute resources.
# Experiments
Each run generates an experiment page to track in real time the progress of the flow. Using the experiment page, you can track information like metrics, hyperparameters, and algorithms. Additionally, you also have the option to stop and terminate a run midway and restart it after modifying its parameters.
A flow route on the experiments page has a tab for each task. Tasks in a flow not yet run are grayed-out before they begin executing.

TIP
You can use the experiment comparison feature to visualize different models and routes to analyze your flow's performance.
# Flow Routes
The cnvrg platform dynamically creates the flow routes for your executions. When you start running a flow, it begins by executing the first tasks (and their grid searches). After those are completed, cnvrg determines the next steps of the flow and calculates the number of new experiments to be run, and as such, the number of flow routes.
This means that when a flow starts running, the full extent of the flow routes may not be immediately evident. However, as the flow runs, more routes display on the experiments page.
Each task waits for any preceding connected tasks to complete before starting to run. This way, multiple tasks can be inputs to a single task that runs on the outputs of several previous tasks.

In the above image, Task C runs only after Task A and Task B have concluded. Task C has access to the outputs of both Task A and Task B. There is only one route.
The number of times Task C needs to be run, however, is calculated only after Task A and Task B are complete.

# Grid Searches
Each task conducts a grid search over the entered parameters. A single task runs once for each combination of parameters. Any following tasks then run once for each of the preceding task's combinations and once for each experiment in its grid search.
Specifically, each task in the graph runs N times, where N is the number of permutations in its internal grid search: X times its parent's number of permutations Y (N=X*Y).
# Two-grid search example

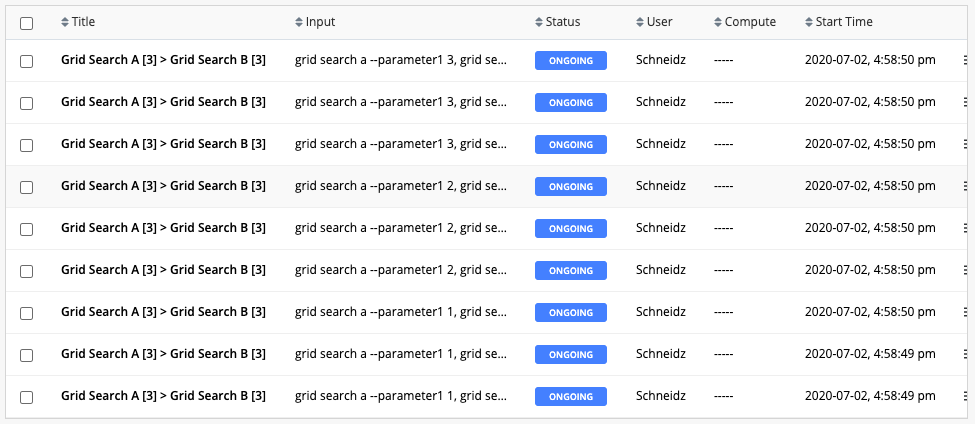
In the above example, the first task Grid Search A consists of three experiments, which is followed by a second task Grid Search B of three experiments. This results in nine (3*3) different flow routes, accommodating all the permutations.
# Three-grid search example
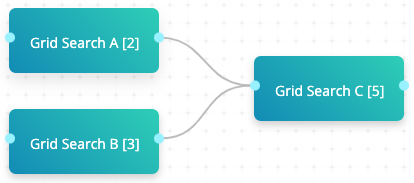
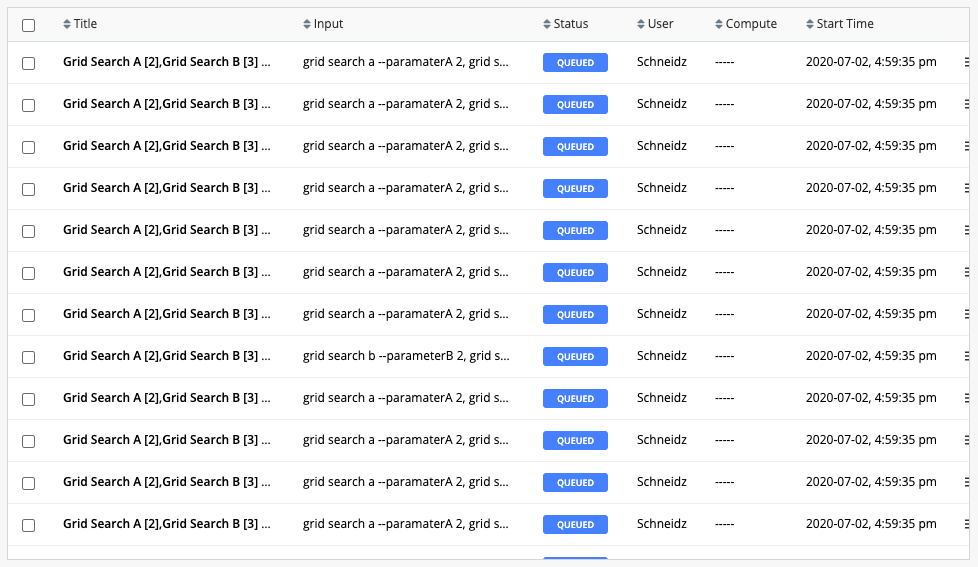
In the above example, both Grid Search A and Grid Search B are connected to Grid Search C. Grid Search A consists of two experiments, Grid Search B consists of three experiments, and Grid Search C consists of five experiments. When the flow is run, cnvrg executes 30 (2*3*5) flow routes.
# Dynamic Routes
Flow routes can be dynamically created based on the tags of a preceding task. When using this mode, the task runs once for each value in the selected tag.
To use this feature, apply the following format as a parameter in a task:
{ { task name.tag name | hyper } }:
task nameis the preceding task with the desired tagstag nameis the tag used to generate the routes

# Dynamic route example
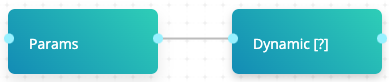
In the above example, Params creates a parameter called route with the value 1,2,3 and, Dynamic [?] has a parameter set as { { Params.route | hyper } }.
When executed, the Params task runs. Afterwards, cnvrg checks the route tag in the previous experiment and finds three values. Then, cnvrg dynamically creates three experiments for the Dynamic [?] task, each with a different value for route (1, 2 and 3)
TIP
The tag can be made using the SDK:
from cnvrg import Experiment
e = Experiment()
e.log_param("route", "1,2,3")
Or by printing to STDOUT:
print("cnvrg_tag_route: 1,2,3")
# Single mode (beta)
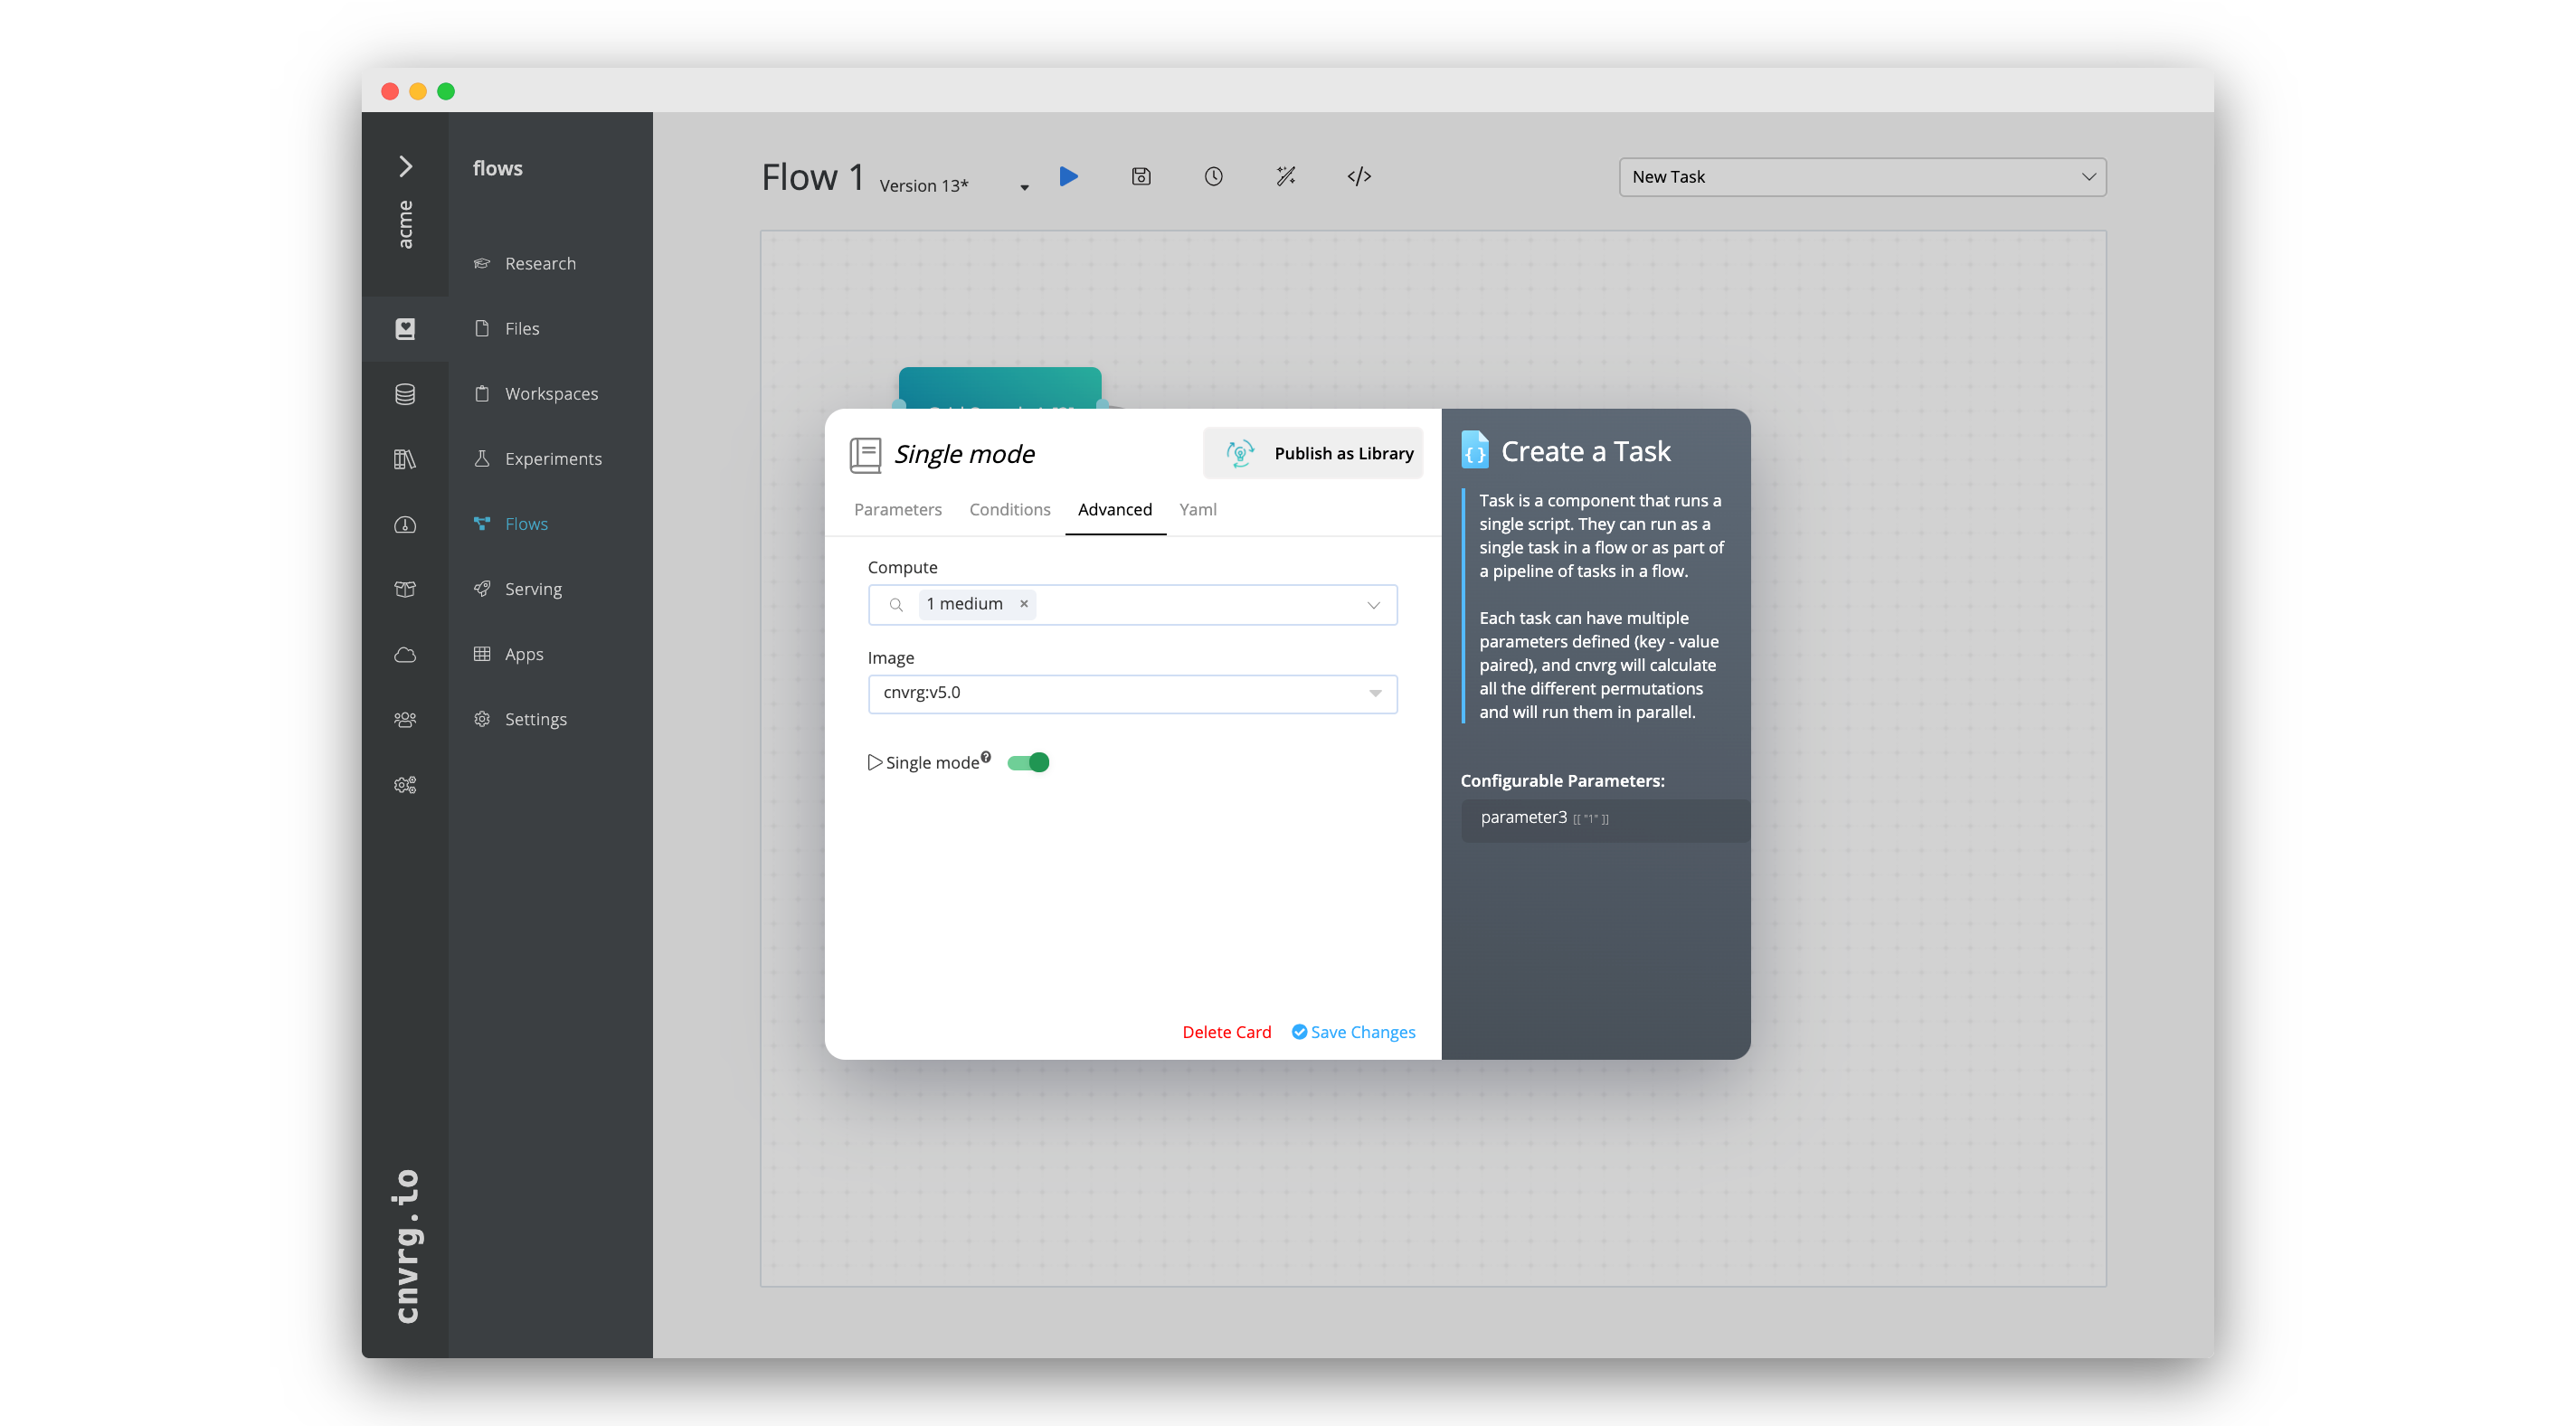
Single mode allows a task run without considering the permutations of the preceding tasks. When enabled, the task runs once or as many times as its own grid search requires.
When using single mode, the artifacts from preceding tasks are not cloned into the task's environment.
To enable single mode, go to the Advanced tab of a task and enable the Single mode toggle.
WARNING
Please note this feature is currently in beta.
# Two grid searches followed by task (single mode) example
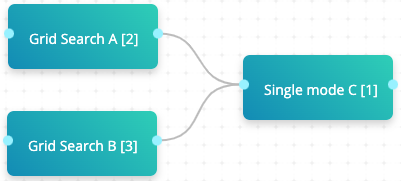
In the above example, both Grid Search A and Grid Search B are connected to Single mode C. Grid Search A consists of two experiments, Grid Search B consists of three experiments, and Single mode C is one experiment with single mode enabled. When the flow is run, cnvrg executes six (2+3+1) flow routes.
# Two grid searches followed by grid search (single mode) example

In the above example, both Grid Search A and Grid Search B are connected to Single mode C. Grid Search A consists of two experiments, Grid Search B consists of three experiments, and Single mode C is a grid search that consists of five experiments with single mode enabled. When the flow is run, cnvrg executes 10 (2+3+5) flow routes.
# Conditions
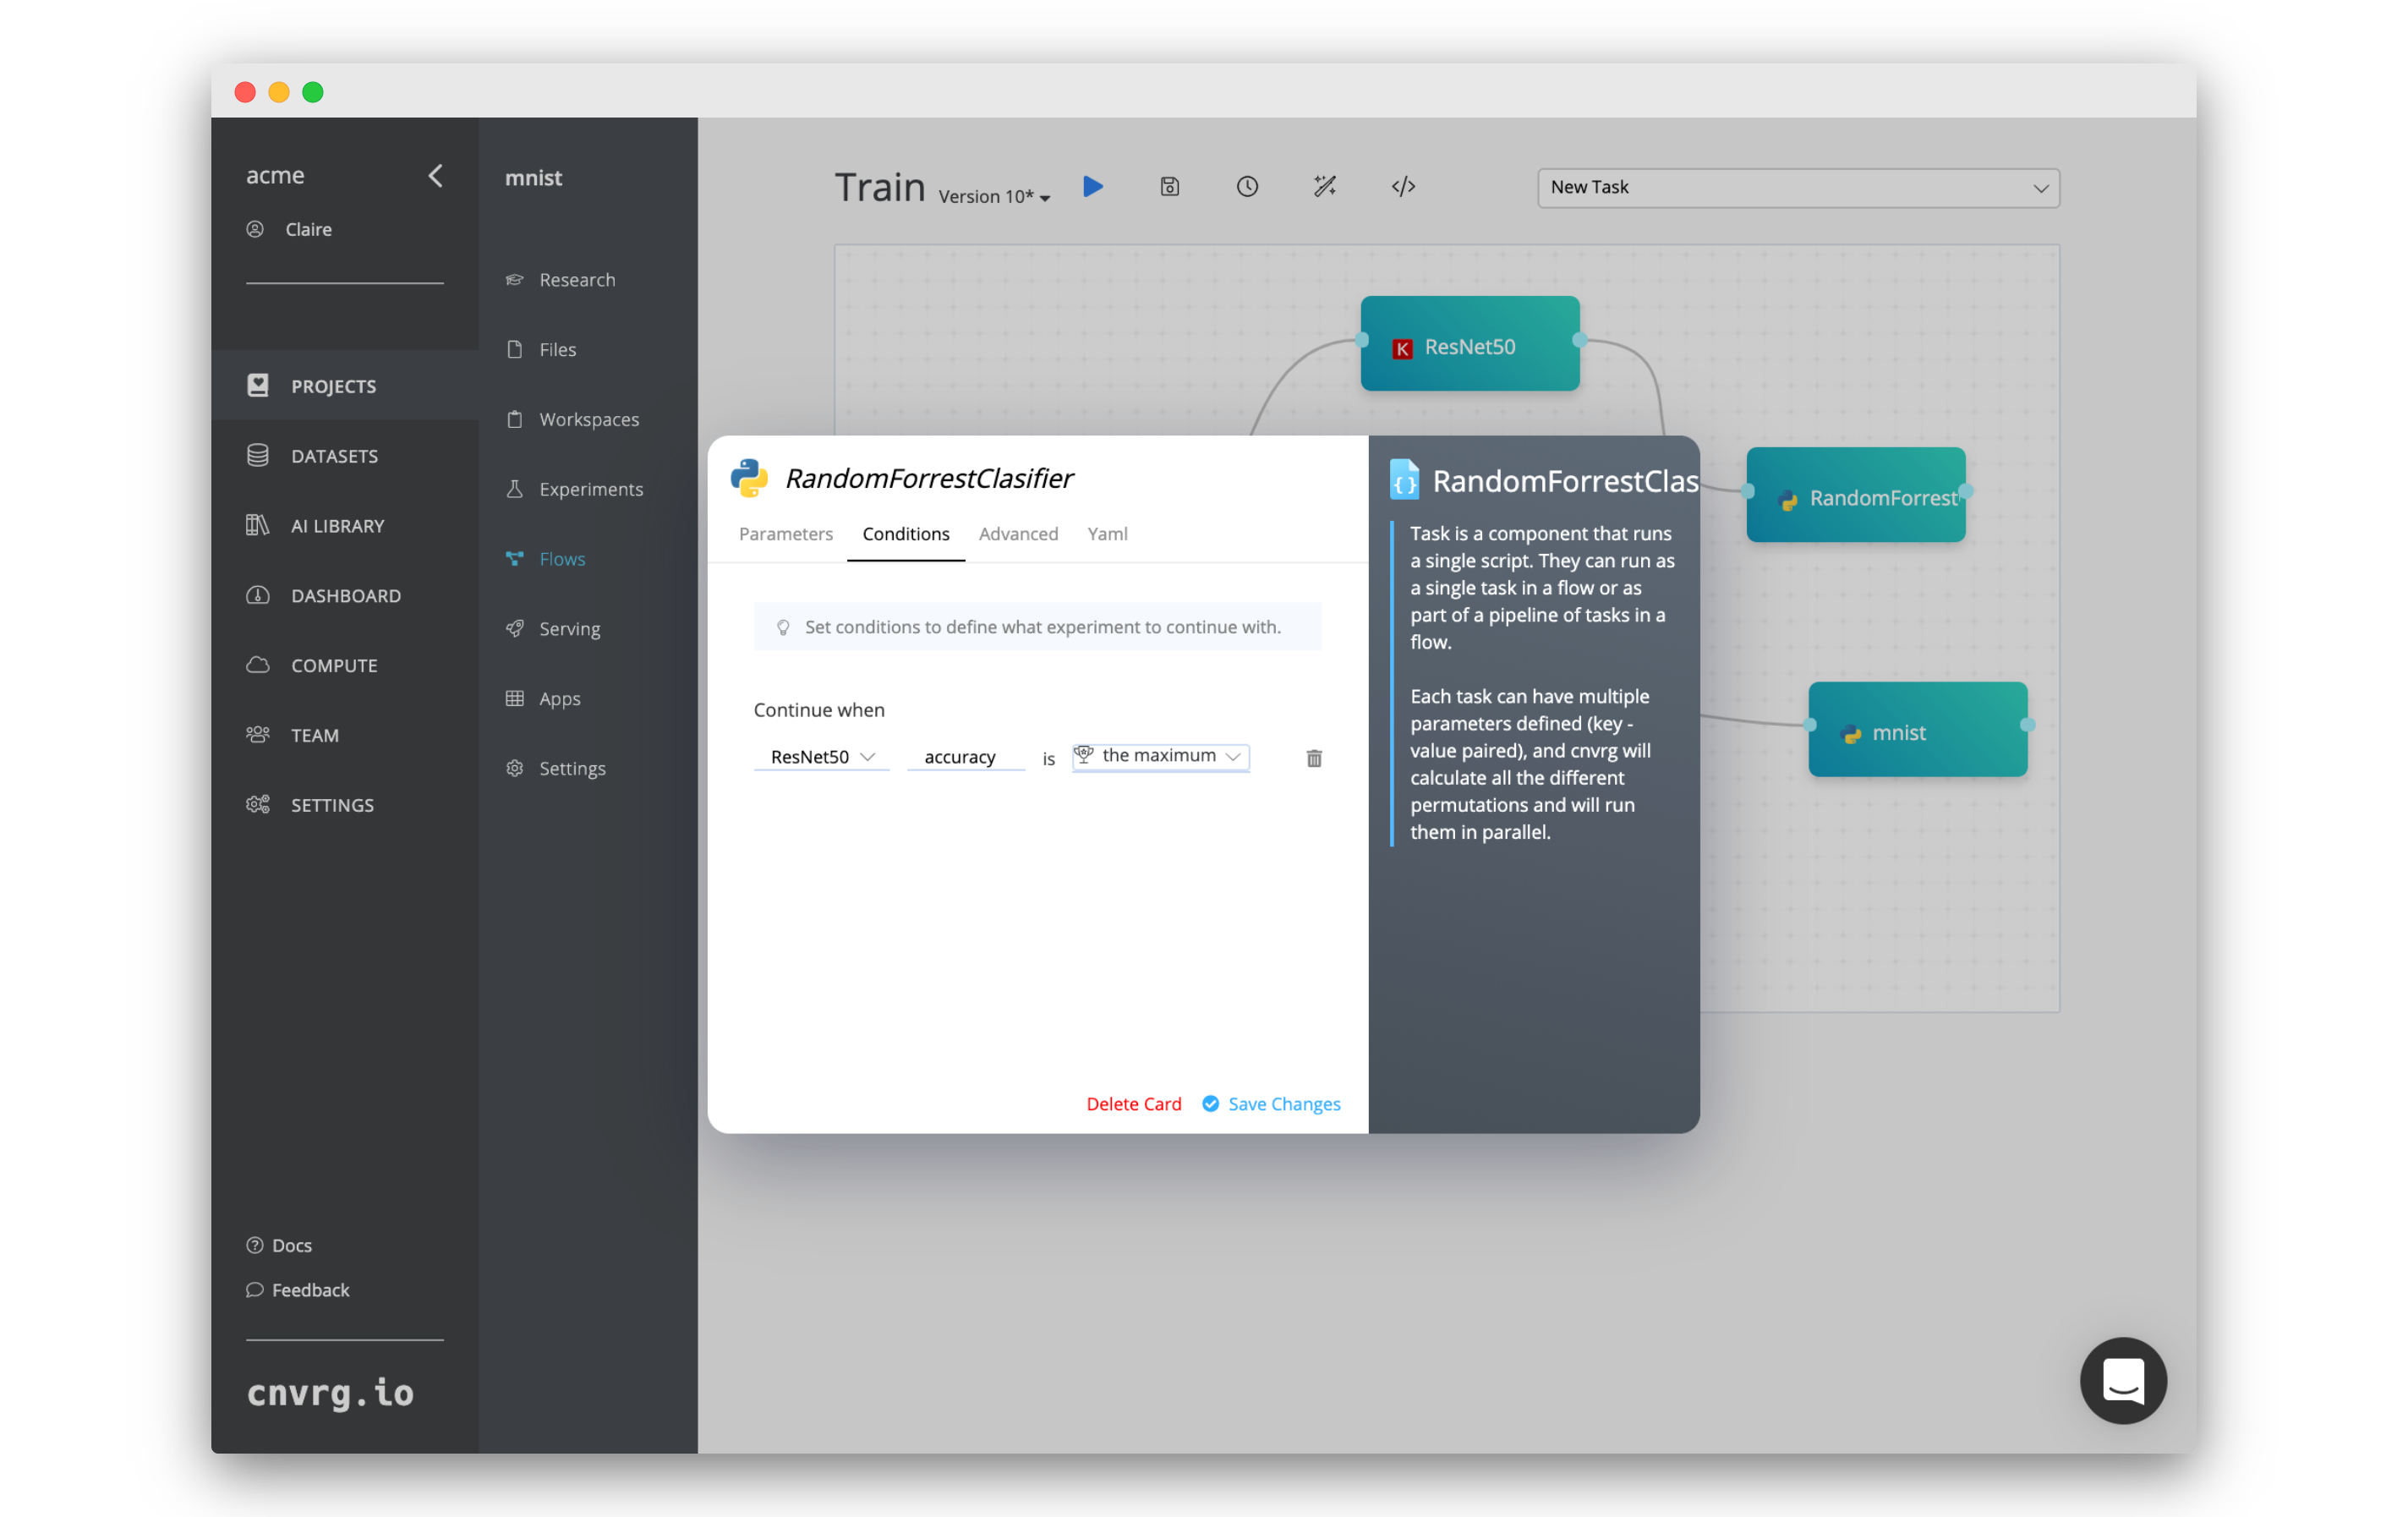
Conditions can be added to custom tasks, deploy tasks, and AI Library tasks within a flow, which control the specific previous experiments that continue to a new task (the ones on which the conditions are added). A condition can be set for any of the cnvrg Research Assistant Tags within your experiments.
To set a new condition, click the desired task, then click the Conditions tab in displayed dialog, and complete the following steps:
- Select the flow's previous tasks to have the conditioning tested.
- Enter the name of the cnvrg Research Assistant tag to be tested.
- Select the type of test (see the list below).
- Select the value (if applicable) that must be passed in the condition.
A condition can be any of the following:
- Greater than (>): any experiments with the matching tags value greater than the value will continue.
- Less than (<): any experiments with the matching tags value less than the value will continue.
- Equal (=): any experiments with the matching tags value equaling the value will continue.
- The Maximum: the experiment with the highest value for the matching tag will continue.
- The Minimum: the experiment with the lowest value for the matching tag will continue.
# Identify experiments that passed the condition
In order to identify which experiments passed the condition, the "CNVRG_TASKS_PASSED_CONDITION" environment variable will be created in the following task which will include the paths to all parent experiment that have passed the condition. Any artifacts created in the tasks will be available on the specified paths.
# single experiment passed the condition
CNVRG_TASKS_PASSED_CONDITION=/input/winning_task

# multiple experiments passed the condition
CNVRG_TASKS_PASSED_CONDITION=/input/winning_task_1,/input/winning_task_2
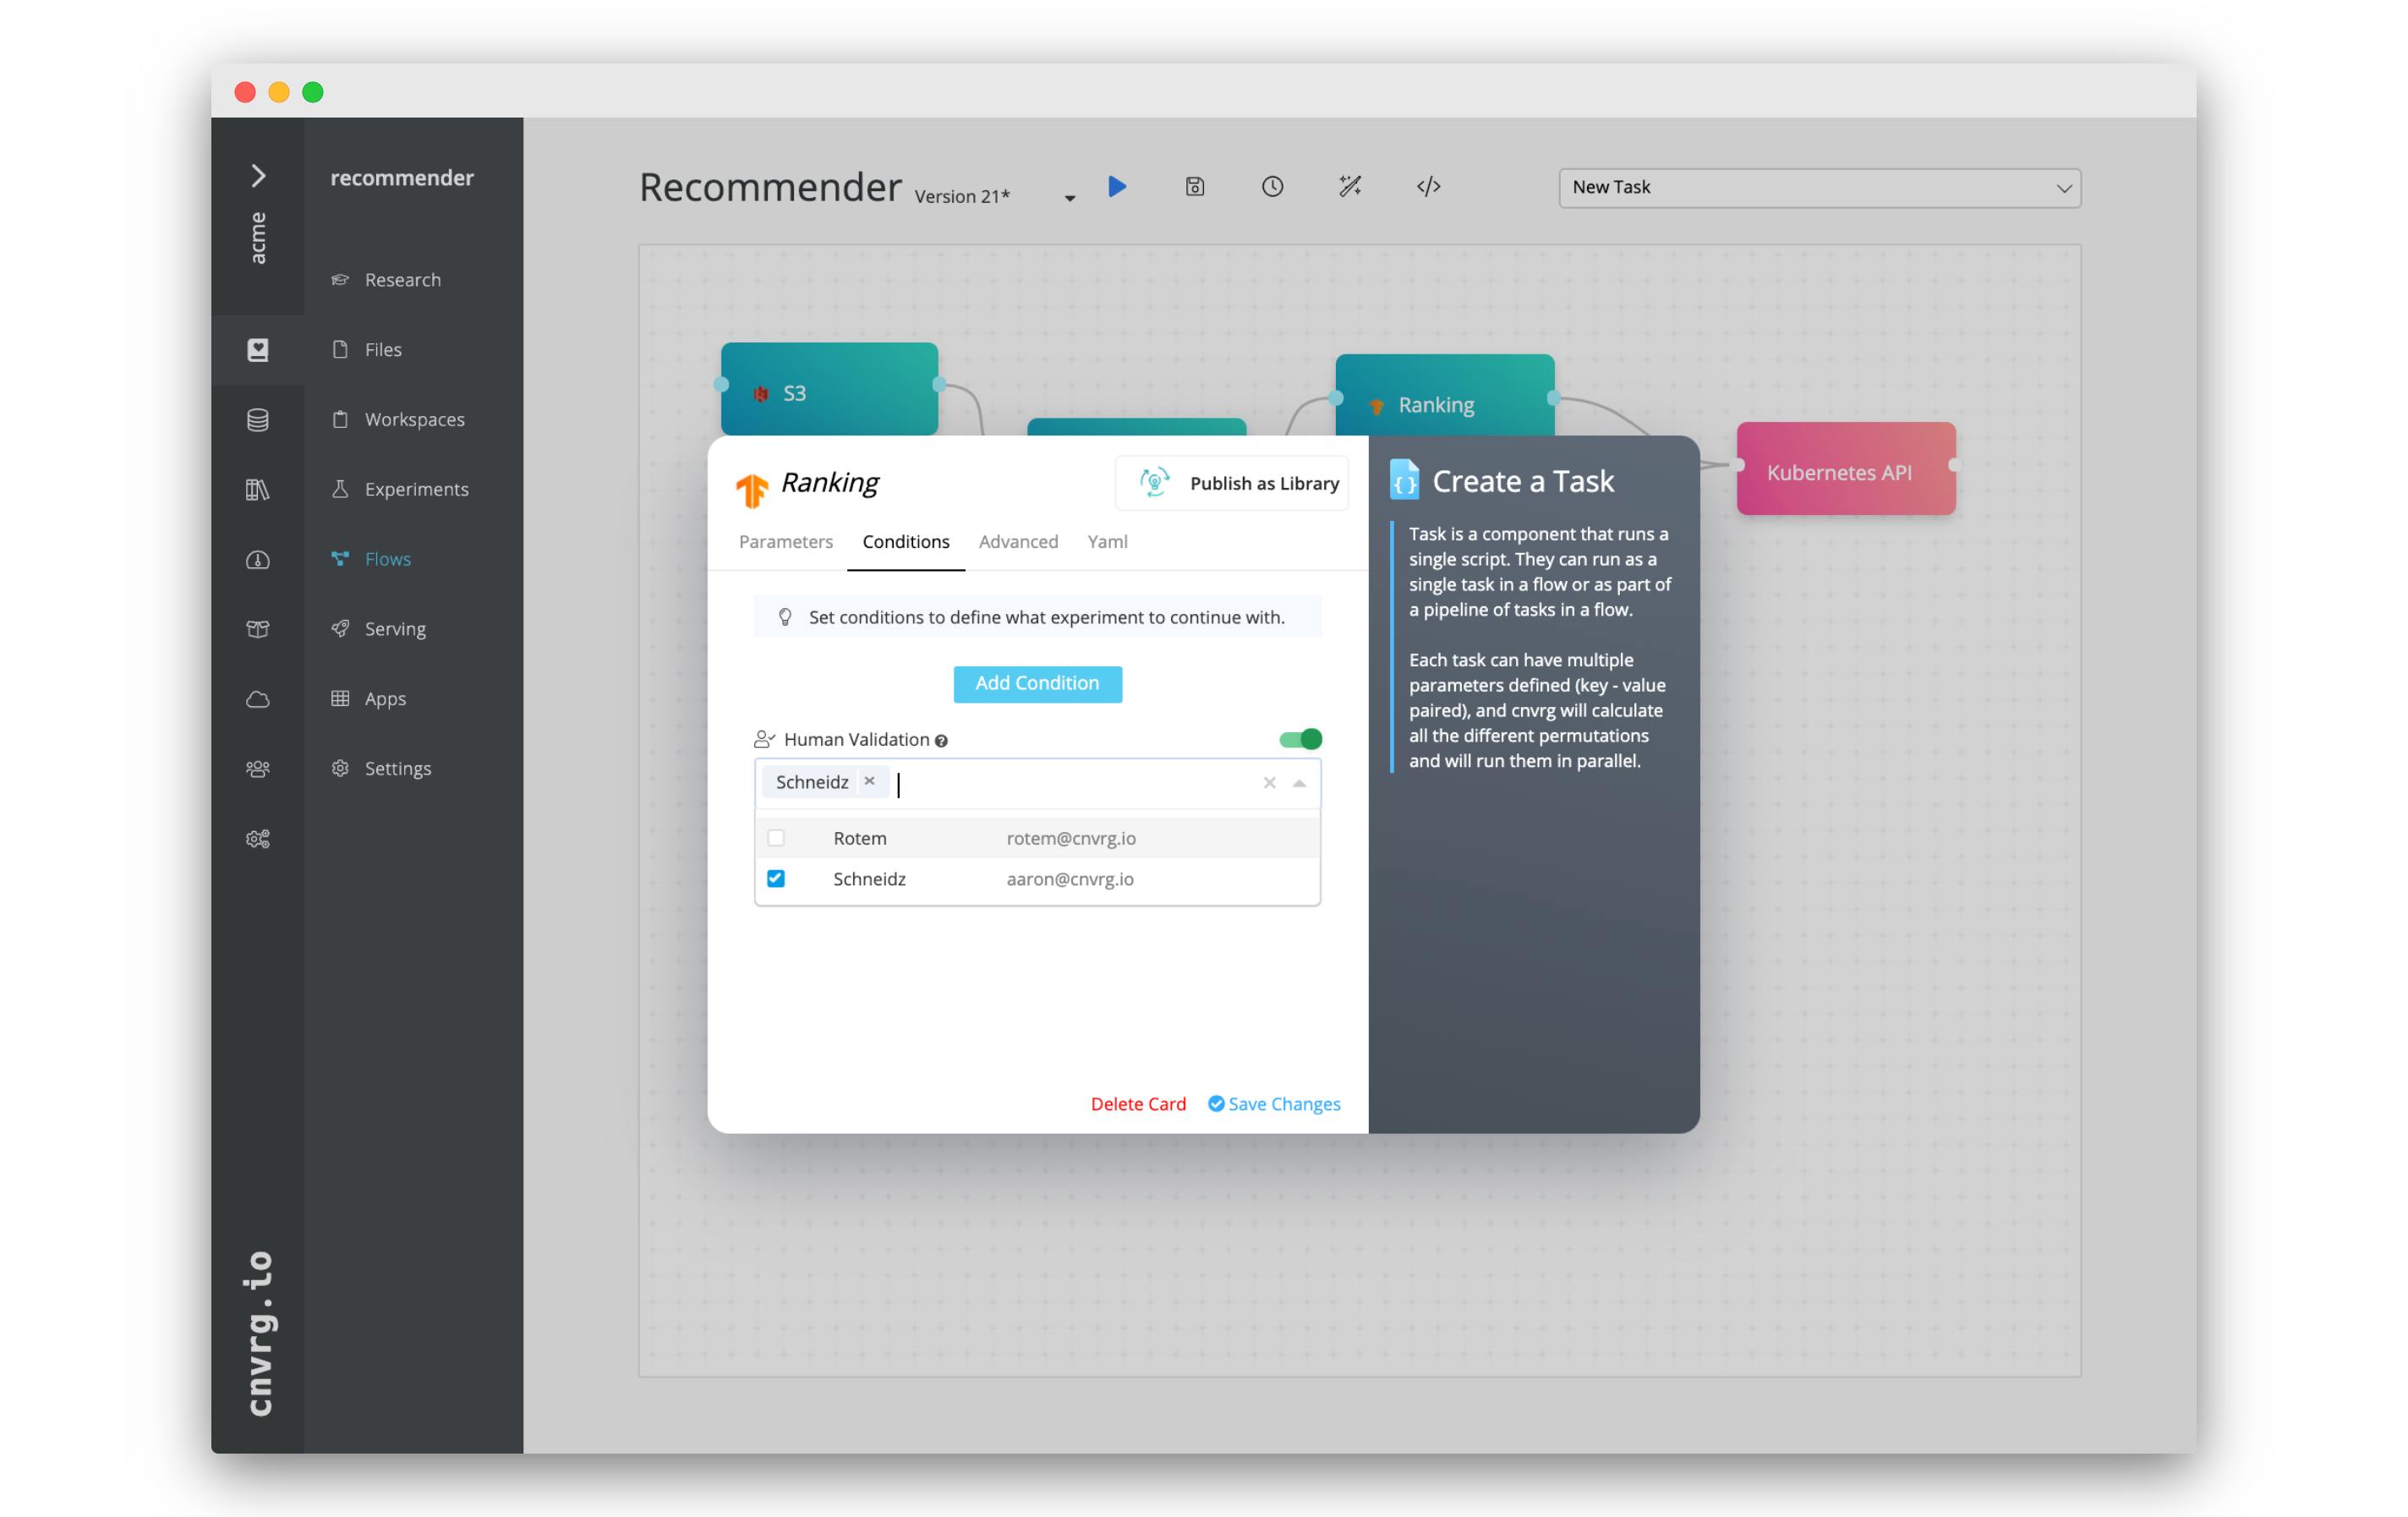
# Human Validation
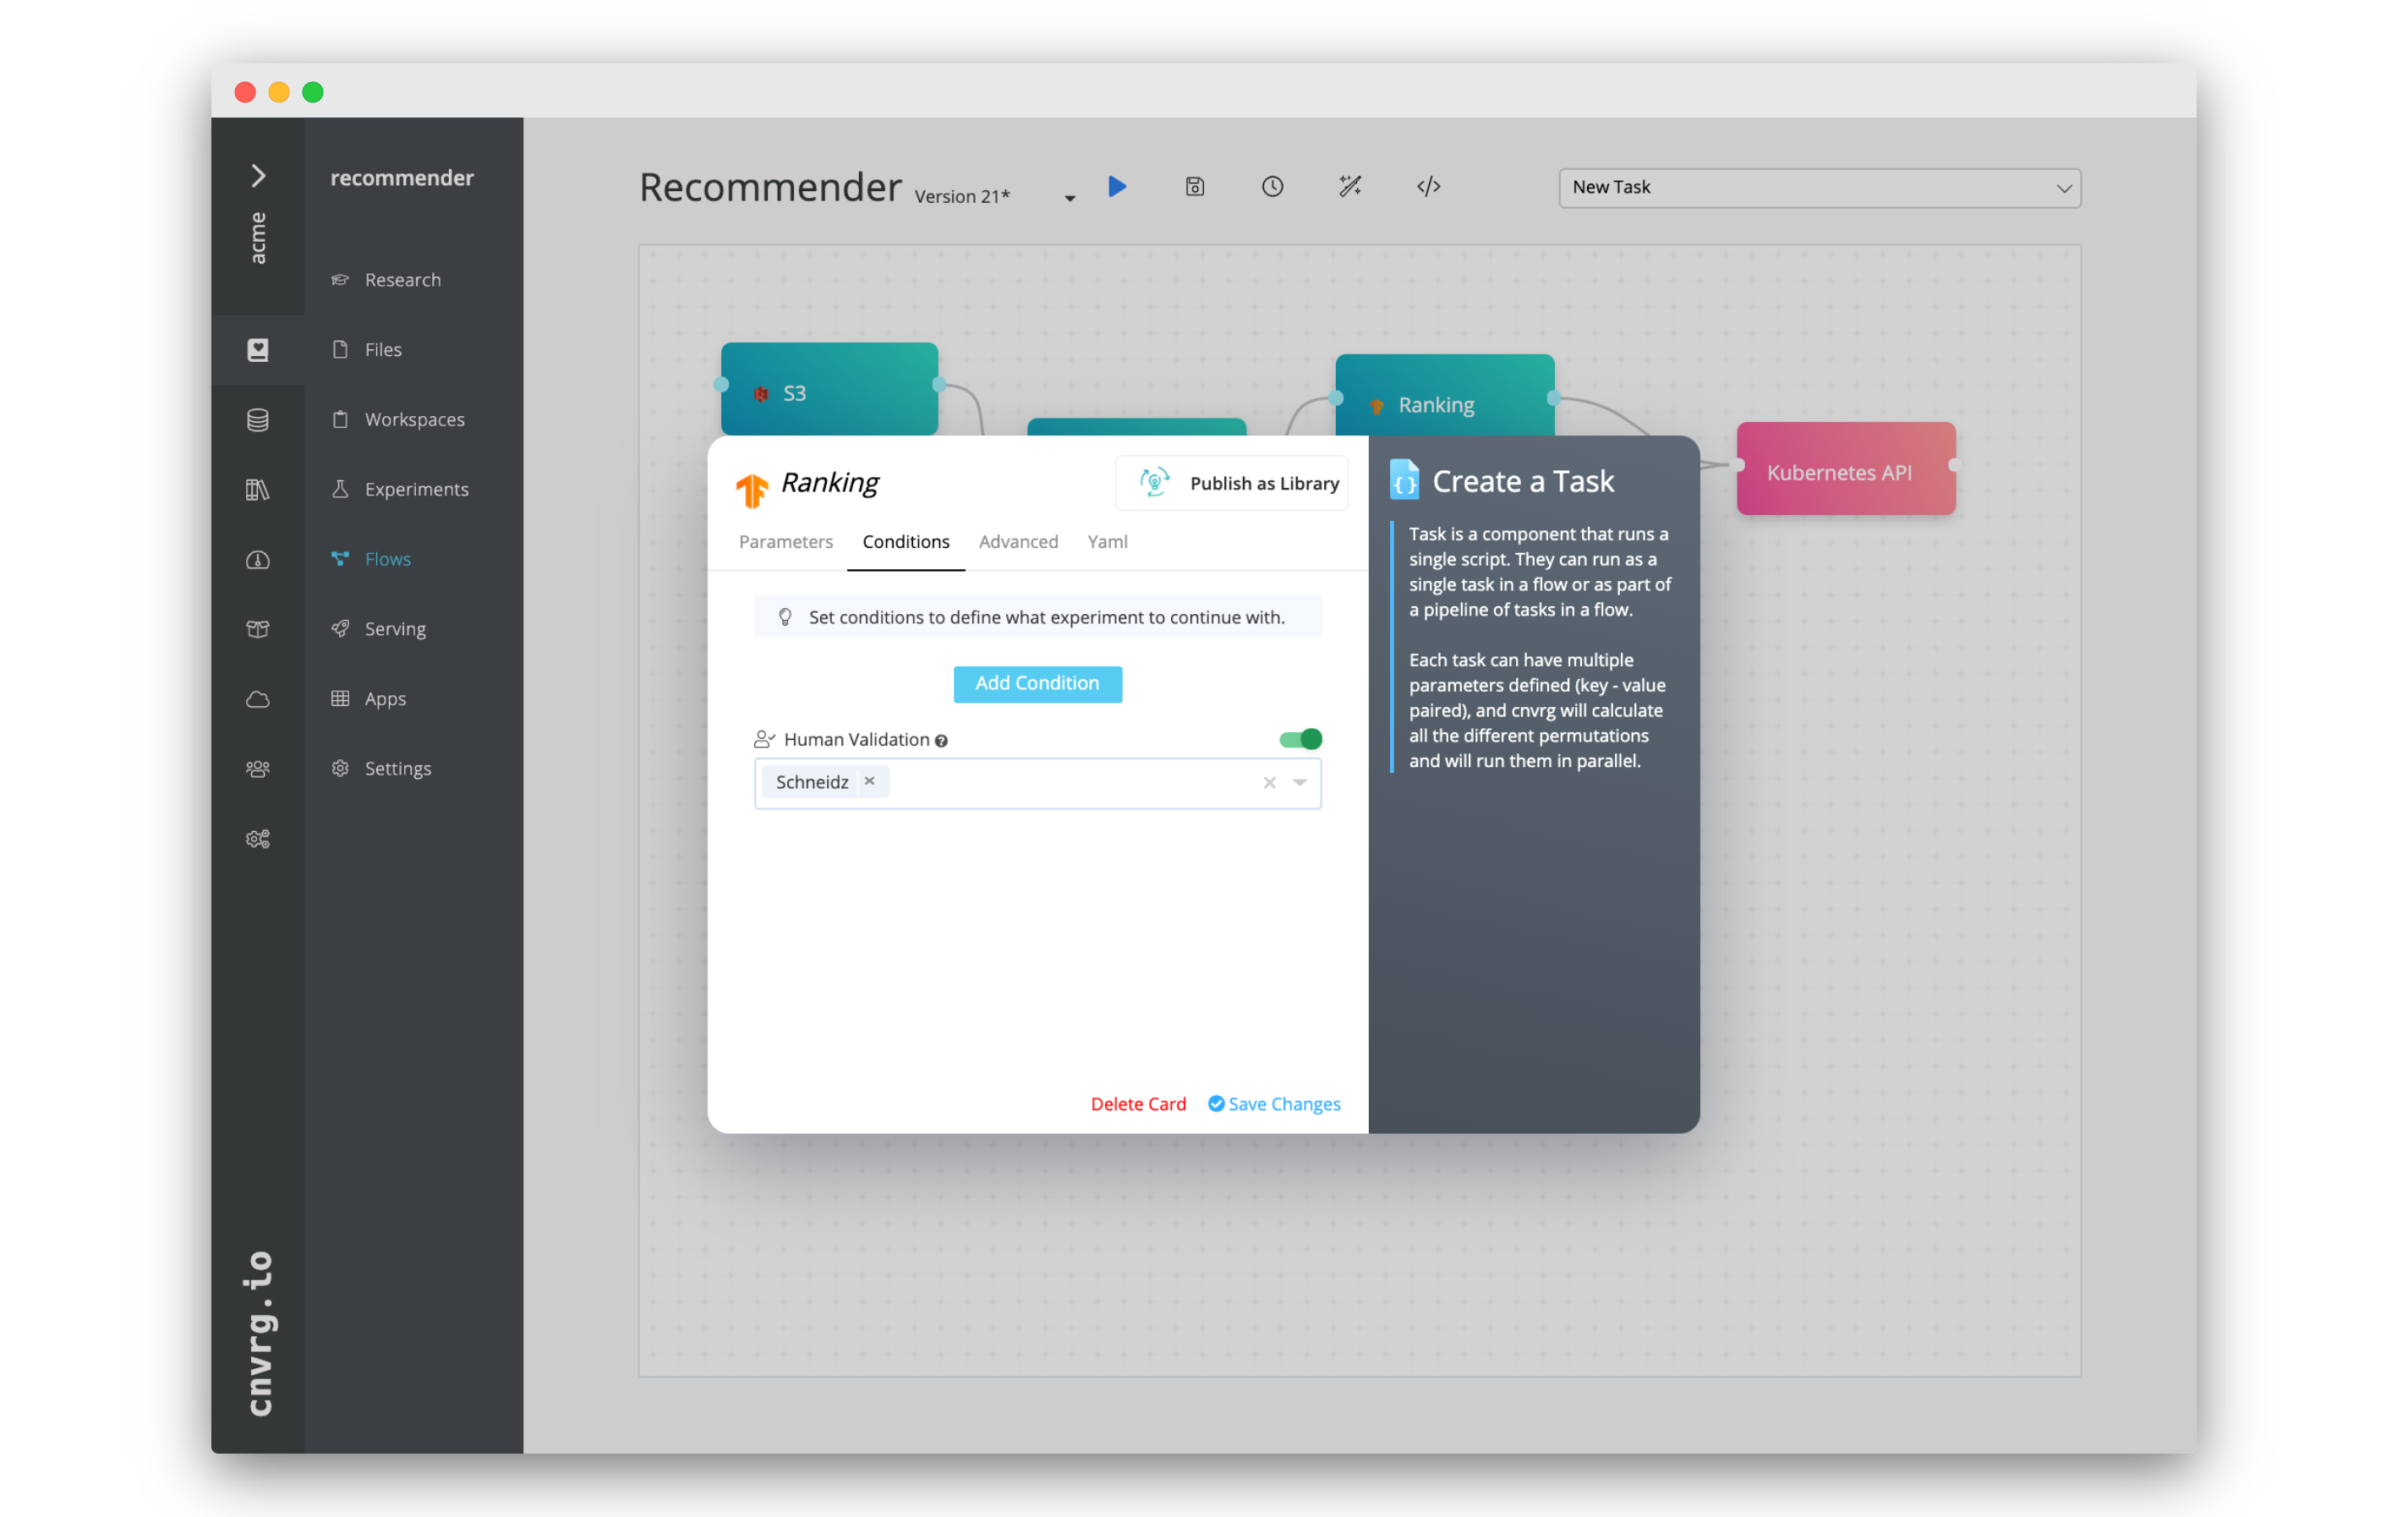 Mandatory approvals on exec tasks, deploy tasks, and AI Library tasks can be set within a flow. If Human Validation is enabled for a task, the task cannot begin executing until the approval is received from one of the selected users.
When the flow reaches a task with Human Validation enabled, the selected users receive an email notification alerting them the task is awaiting their confirmation. The email contains a link to the flow and its pending task. Clicking the link displays the flows page, where one can view information about the previous tasks and approve (or not) the next task to run. If the task is approved, the flow continues, otherwise the flow aborts.
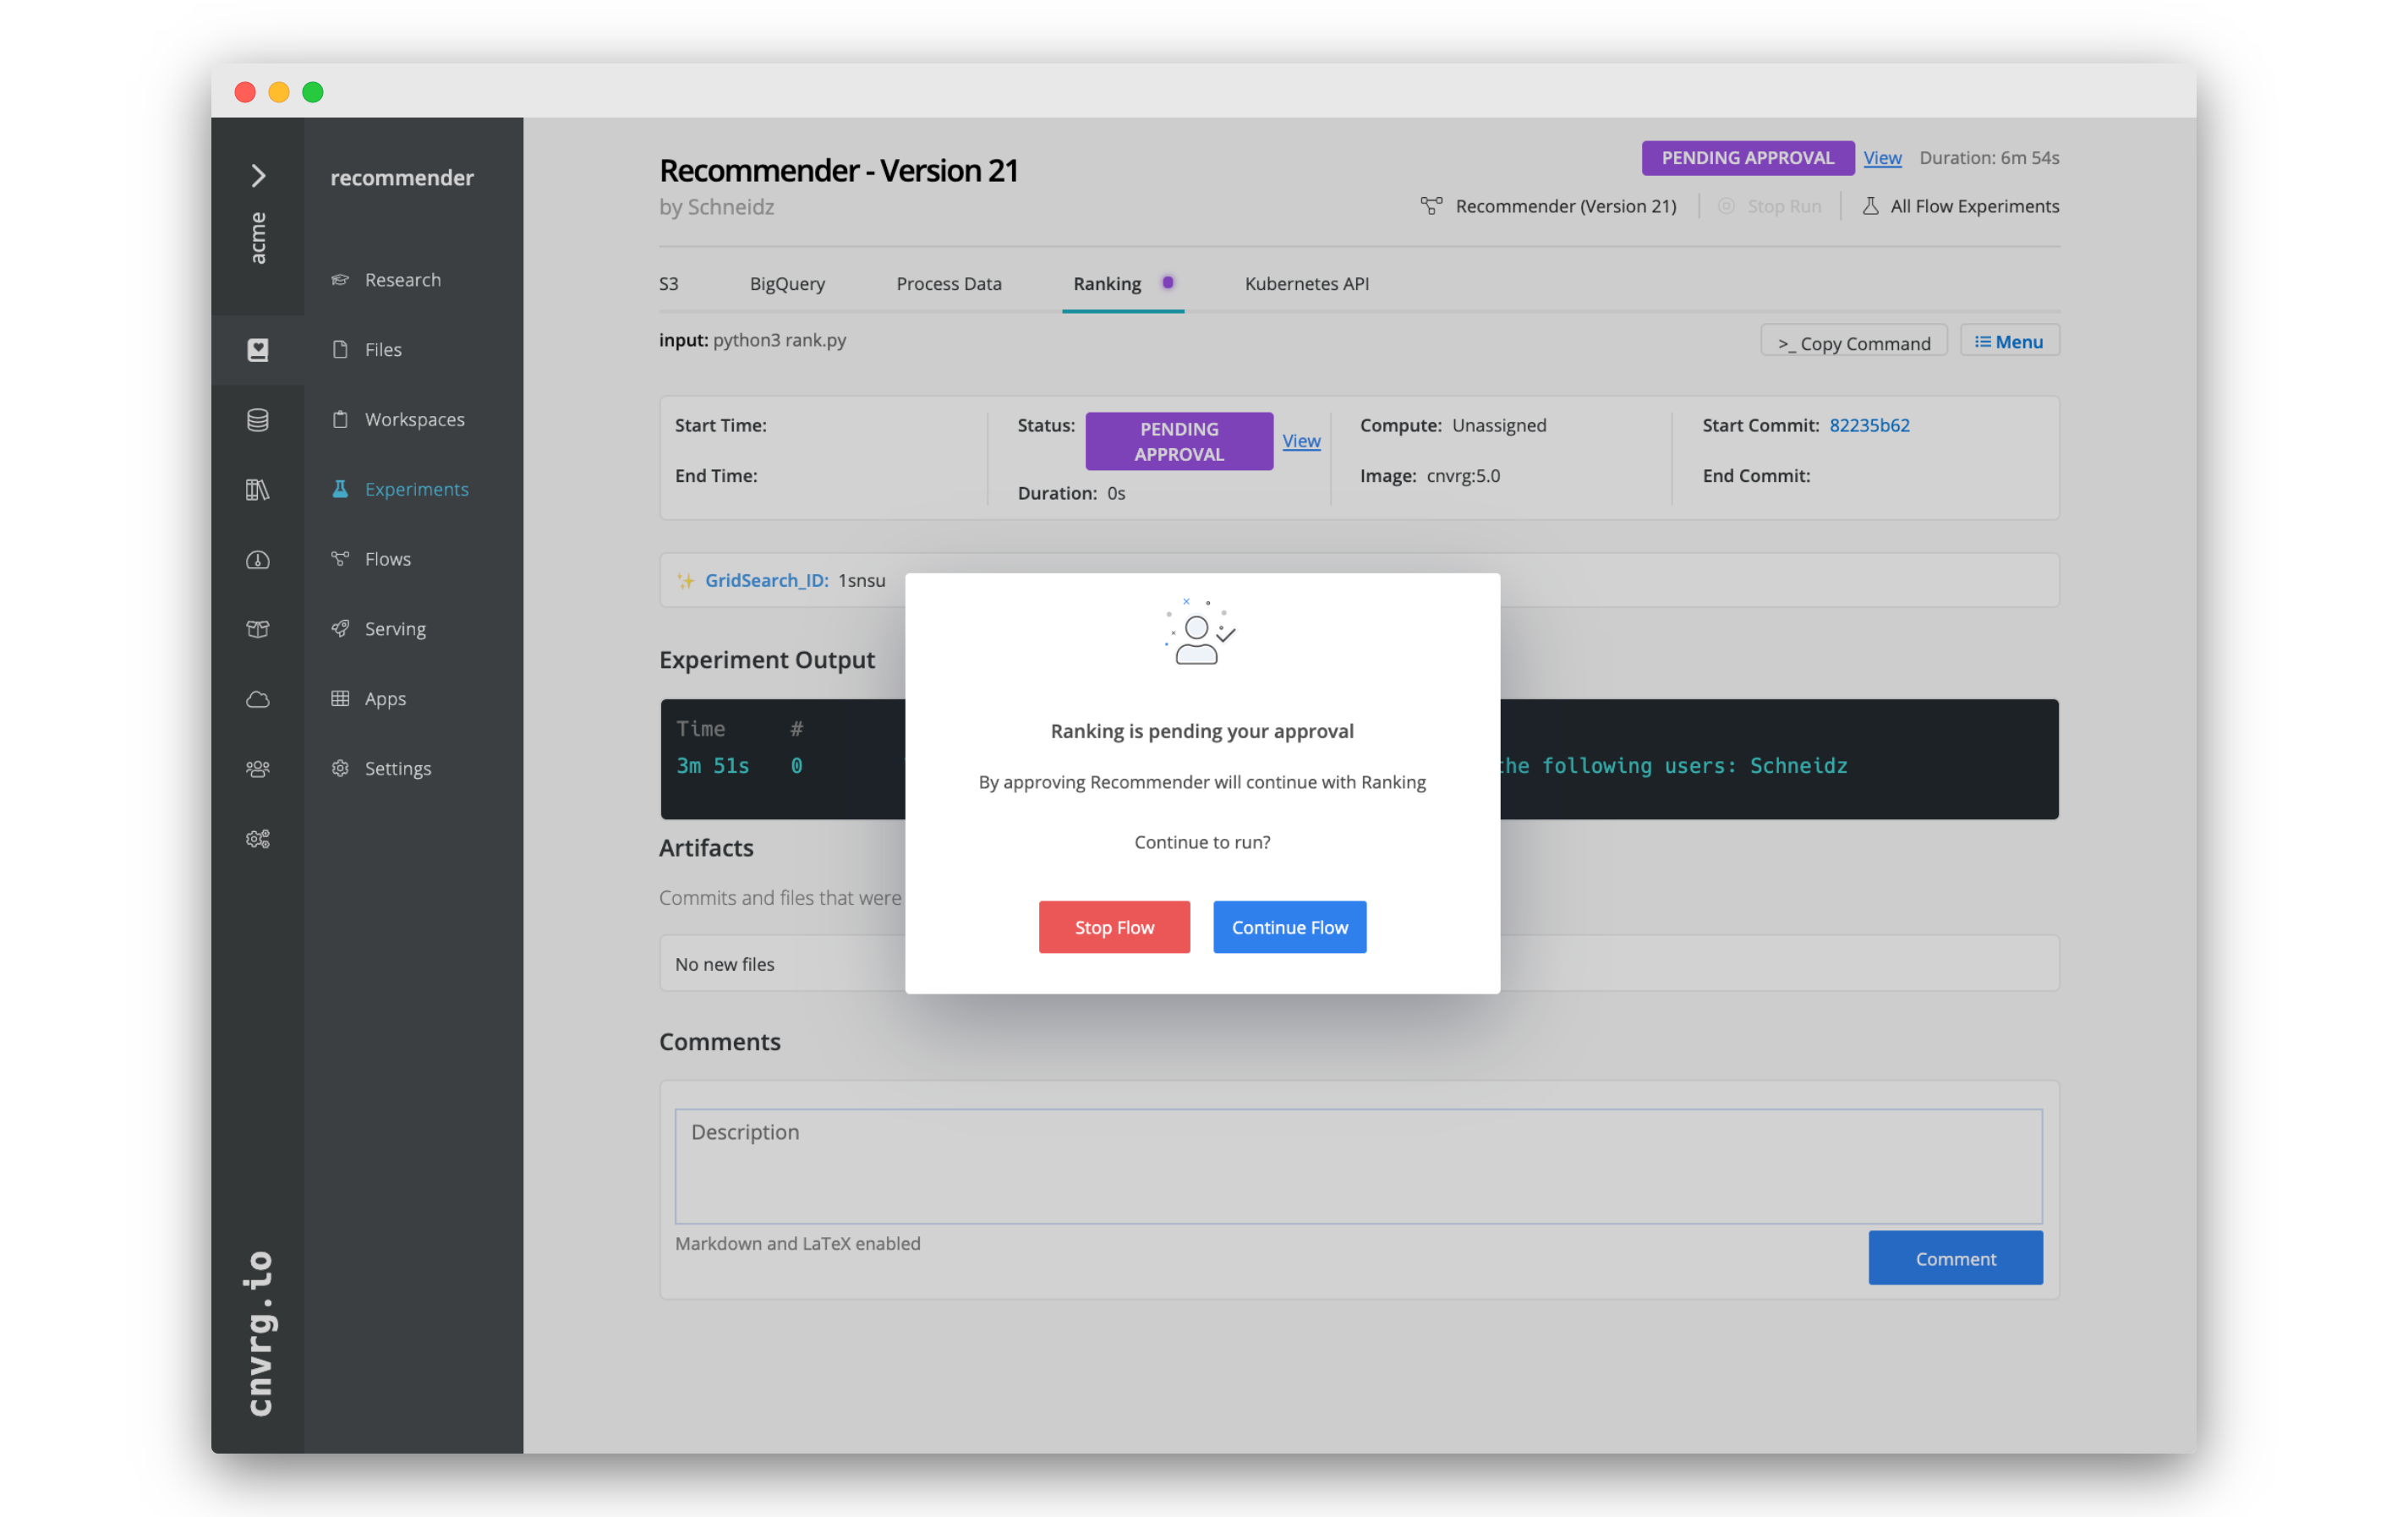
A flow that contains a task pending approval has the status Pending Approval, which displays on the experiment's table and within the flow's page. The individual task awaiting approval has the status Pending Approval.
# Enable mandatory approvals on a task
 To enable approvals for a task, complete the following steps:
- Click the desired task and then click the Conditions tab in the displayed dialog.
- Toggle on Human Validation to enable approvals.
- Use the selector to grant specific users the authority to approve the task.
# Approve or reject a task
 If a task is awaiting approval, the selected users receive an email notification.
To approve or reject the task, complete the following steps:
If a task is awaiting approval, the selected users receive an email notification.
To approve or reject the task, complete the following steps:
- Click the email's link to open the flows page for task awaiting approval. The approval dialog displays automatically.
- Select either Approve or Cancel as desired.
To view more information about the previous tasks, click away from the dialog to remove it. When ready to approve or reject the task, complete the following steps:
- Click View next to the status Pending Approval.
- In the displayed dialog, select either Continue Flow or Stop Flow.
The flow continues to run or aborts according to the selection.
# Settings
Flow Settings provide editing, versioning, continual learning, and scheduling capability.
NOTE
Environment variables defined in Project Settings can also be used in cnvrg Flows. Refer to Project Settings.
# Flow title editing
Easily edit a flow title by clicking its display on the top left of the flow canvas and making the desired changes.

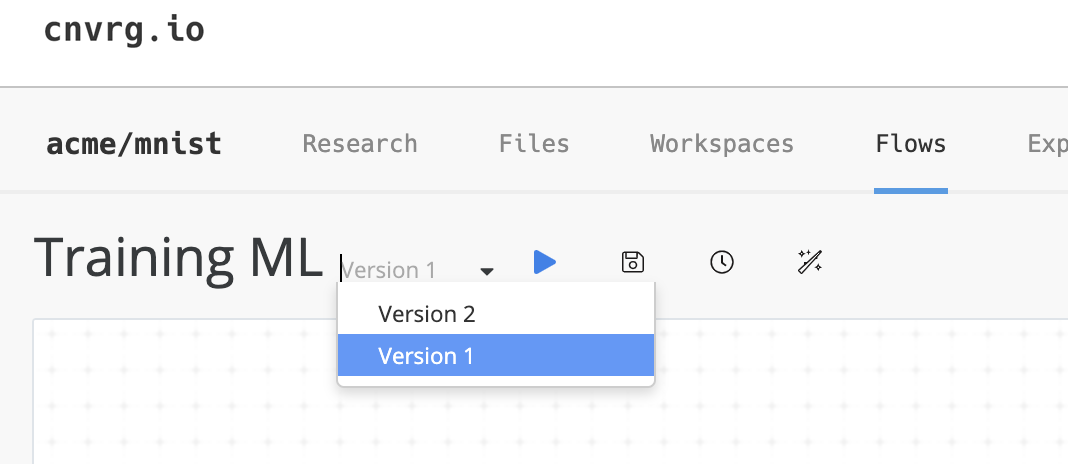
# Versioning
The cnvrg platform allows users to manage and create versions of their flows. They can save a flow and revert back to previous versions. To do so, click the Version drop-down next to the flow title.
# Continual Learning
Continual learning is an ML method, in which input data is continuously used to extend a model's knowledge and further train the model.
To set a flow's Continual Learning, click the Magic-Wand icon
![]() in the flow bar to display the Continual Learning dialog.
in the flow bar to display the Continual Learning dialog.

Enable one or both of the cnvrg Continual Learning triggers, as desired:
- Dataset updates: The flow is triggered whenever there's a new version of the selected dataset.
- Webhook: The flow is triggered when the Webhook URL is set.
TIP
Your latest version of the flow runs when triggered.
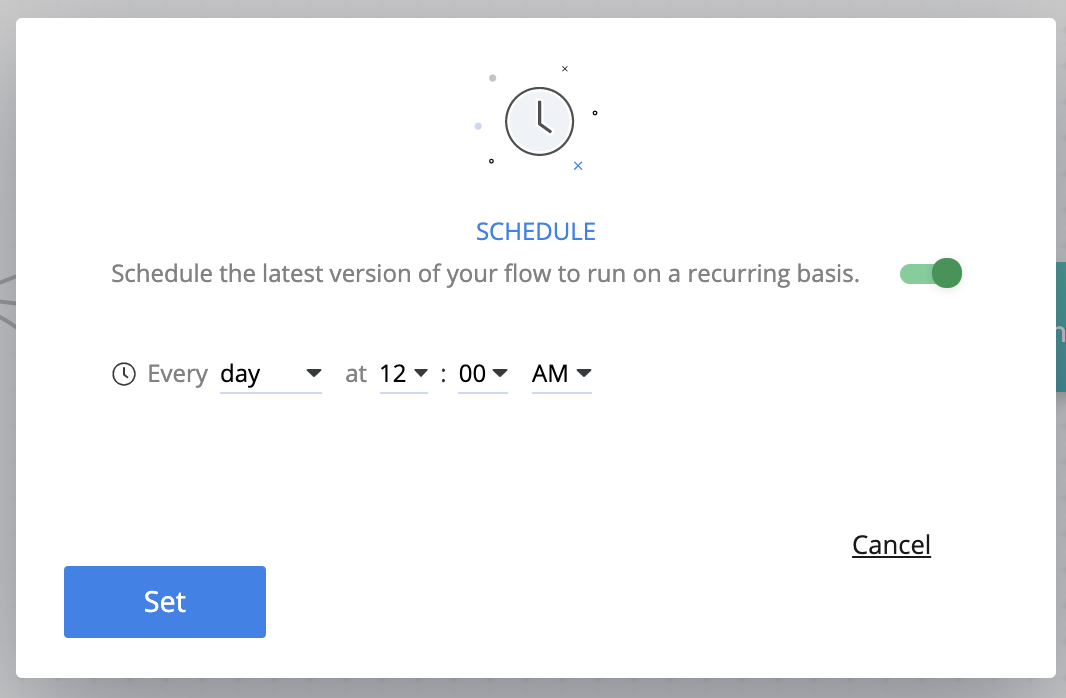
# Scheduling
Flows can be scheduled to run periodically. To do so, click the Clock icon in the flow bar ![]() . In the displayed dialog, select the schedule and click the Set button.
. In the displayed dialog, select the schedule and click the Set button.
# YAML Files
A YAML file can be used to create or edit a flow. Flow YAML files store the flow title, all task parameters, and relationships among tasks.
To create (or edit) a flow using a YAML file, click the ![]() icon to display an editor dialog. Make the required changes to the file and click Save.
icon to display an editor dialog. Make the required changes to the file and click Save.
Alternatively, import a flow to the project using the CLI:
cnvrg flow import --file=MY_FILE.yaml
NOTE
A flow import can also be performed using the SDK.
To run a flow directly from a YAML file, use the following command:
cnvrg flow run --file=MY_FILE.yaml
# YAML file sections
The following table lists the sections in a flow YAML file:
| Key | Value | Required | Description |
|---|---|---|---|
| flow: | TITLE | Yes | The title of the flow. |
| tasks: | LIST_OF_TASKS | Yes | The tasks that exist in the flow. |
| relations: | -RELATION | Yes | A list of the relationships between tasks. A relationship consists of from: (input) and to: (output). |
| schedule: | DATE TIME | No* | The time to run the flow, specified using either a 24- or 12-hour clock format. For example, to specify 4:25 PM on 31 January 2012, use any of these: 31.01.2021 16:25, 31.01.2021 4:25PM, 2021.01.31 16:25, 2021.01.31 4:25PM. |
| recurring: | CRON | No* | The schedule for a recurring flow execution, specified using Cron format. For example, to execute the flow at 30 minutes past every hour, specify: "30 * * * *" |
NOTE
schedule: and recurring: cannot be used together. If neither are used, the flow runs immediately when triggered.
The following tabs provide example flow YAML files:
# Tasks
Each task includes both required and optional fields. Some are unique according to task type while others are general for all tasks.
# General fields for all tasks
The following table lists general fields relevant for each of the types of flow tasks:
| Key | Value | Required | Description |
|---|---|---|---|
| title: | TASK_TITLE | Yes | The name for the task. |
| type: | data OR exec OR deploy | Yes | The type of task being defined, either data, exec, or deploy. |
| description: | "task description" | No | The description of the task in its documentation. |
| top: | int | No | The position of task card in the UI, relative to the top. |
| left: | int | No | The position of task card in the UI, relative to the left. |
NOTE
If top and left keys aren't specified, corresponding task blobs display at the top left corner.
# Condition fields for custom and deploy tasks
This field for a custom or deploy task contains a condition that must be reached for the flow to advance. Each condition consists of a target:, task:, objective:, tag_key:, and value:. This format is used both for regular conditions (where a metric is checked automatically) and approval conditions (where a user's approval is required). Note the following guidelines:
- For regular conditions, only
target:,task:,objective:, andtag_key:are used. - For approval conditions, only
objective:andvalue:are used.
The following table lists conditions fields relevant for custom and deploy flow tasks:
| Key | Value | Description |
|---|---|---|
| target: | float | The value the metric is checked against. Leave this field blank for human validation conditions. |
| task: | name_of_previous_task | The previous task this condition is run on. If blank, all tasks are subjected to the condition. Leave this field blank for human validation conditions. |
| objective: | min/max/gt/lt/eq/human_validation | The form of comparison, either min (minimum), max (maximum), gt (greater than), lt (less than), eq (equals), or human_validation (human validation) |
| tag_key: | KEY | The metric to be checked in the condition. Must be a tracked metric in the experiment. Leave this field blank for human validation conditions. |
| value: | USERNAME1,USERNAME2,... | The comma-separated usernames who are approvers of this task. Leave this field blank for normal conditions. |
The following tabs provide examples for clarification:
# Data task fields
The following table lists the fields that can be specified for a data task. Ensure to also include the required tasks from the general table:
| Key | Value | Required | Description |
|---|---|---|---|
| dataset: | DATASET_NAME | Yes | The name of the dataset to use. |
| data_commit: | COMMIT_SHA1 | No | The commit of the dataset to use. If blank, the latest version is used. Leave blank if using data_query. |
| data_query: | QUERY_NAME | No | The query of the dataset to use. Leave blank if using data_commit. |
| use_cached: | boolean | No | The cache of the selected commit to use. |
# Custom task fields
The following table lists the fields that can be specified for a custom task. Ensure to also include the required tasks from the general table:
| Key | Value | Required | Description |
|---|---|---|---|
| input: | COMMAND | Yes | The command to run for this task. For example, python3 train.py. |
| computes: | -TEMPLATE | Yes | The list of compute templates to try and use. The compute templates must listed be under the computes: heading, each typed on their own line, and preceded by a -. See the examples for clarification. You must include at least one entry. |
| image: | REPO:TAG | No | The container to use for the task. If left empty, the project's default container is used. |
| conditions: | CONDITION | No | The condition on which the task is executed. See here for information. |
| params: | PARAMETERS | No | The parameters the task uses. See here for information. |
| git_branch: | BRANCH | No | The Git branch to clone. If empty, the master is used. Only relevant when project is connected to Git. |
| git_commit: | COMMIT | No | The Git commit to clone. If empty, the latest is used. Only relevant when project is connected to Git. |
| mount_folders: | MOUNT_STRINGS | No | The folders where to mount network drives in the pod. Each must be in the format: <ip_of_network_drive>:/<name_of_folder>. |
| periodic_sync: | BOOLEAN | No | To enable (or not) periodic sync for the task. |
| restart_if_stuck: | BOOLEAN | No | To restart (or not) if the experiment has an error. |
| prerun: | BOOLEAN | No | To run (or not) the prerun.sh script if it exists. |
| requirements: | BOOLEAN | No | To use (or not) the requirements.txt list if it exists. |
| notify_on_error: | BOOLEAN | No | To send (or not) an email notification if the experiment has an error. |
| notify_on_success: | BOOLEAN | No | To send (or not) an email notification if the experiment finishes successfully. |
| emails: | EMAILS | No | To list (or not) additional email recipients for this experiment's notifications. |
# Parameter fields
A custom task's parameter field can contain multiple parameters. Each parameter consists of two fields: key: and value:. There can be one key for each parameter, but each parameter can have multiple values.
Cnvrg automatically calculates the different permutations of parameters and runs a grid search. Each possible combination of parameters is its own experiment and flow run.
The following YAML file provides parameter examples for clarification:
  params:
  - key: data
    value: "data.csv" # single value example
  - key: epochs
    value: [3,5,12]   # array example
  - key: batch_size
    value:            # list example
    - '128'
    - '256'
# Deploy Task Keys
The following table lists deploy task keys:
| Key | Value | Required | Description |
|---|---|---|---|
| endpoint_title: | ENDPOINT_NAME | Yes* | The desired name for a new endpoint. A new endpoint is created with this name. |
| endpoint_id: | ENDPOINT_SLUG | Yes* | The ID of an existing endpoint to update the service. |
| computes: | -TEMPLATE | Yes | The list of compute templates to try and use. The compute templates must be listed under the computes: heading, each typed on their own line, and preceded by a -. See the examples for clarification. You must include at least one entry. |
| image: | REPO:TAG | No | The container to use for the task. If left empty, the project's default container is used. |
| conditions: | CONDITION | No | The condition for whether the task is executed. See here for information. |
| file_name: | FILE_NAME | Yes | The file that contains the function to use for the service. |
| function_name: | FUNCTION_NAME | Yes | The function used to manage the input and output of the service. |
| env_setup: | python_3 OR r_endpoint | No | The endpoint's language is Python or R based. The default is python_3. |
| min_replica: | int | Yes | The minimum number of pods to use for auto-scaling. |
| max_replica: | int | Yes | The maximum number of pods to use for auto-scaling. |
| config_vars: | [key1=val1,...,key=val] | No | The different key value pairs for the Flask config of the endpoint. |
| accept_files: | boolean | No | To accept (or not) files as an input. Default is False. |
| git_branch: | BRANCH | No | The Git branch to clone. If empty, the master is used. Only relevant when project is connected to Git. |
| git_commit: | COMMIT | No | The Git commit to clone. If empty, the latest is used. Only relevant when project is connected to Git. |
Note
Use either endpoint_title or endpoint_id, not both!
# Example YAMLs
The following tabs provide several examples of different YAML tasks and files: