# cnvrg SDK V1 (Deprecated)
SDK v1 is deprecated on cnvrg v4.8.0 Please use SDK v2 instead.
The topics in this page:
# Download and Install the cnvrg SDK
To install the cnvrg SDK simply use the following pip command.
pip install cnvrg
Or if you're using pip for Python 3, use the following:
pip3 install cnvrg
WARNING
The cnvrg SDK requires Python 3.5 or later.
# SDK Operations
# Authenticating the cnvrg SDK
# Inside a cnvrg workspace or experiment
The cnvrg SDK will already be initialized and authenticated with cnvrg using the account that is logged in. You can start using cnvrg SDK functions immediately.
# Authenticate using the SDK
You can authenticate with the SDK Cnvrg Class inside any scripts that you want to run locally. Authentication using this method does not persist after the script has finished running.
Import the Cnvrg submodule and then initialize a Cnvrg object with the correct API, username and password.
from cnvrg import Cnvrg
Cnvrg(url='If you are on cnvrg metacloud environment you need to use your API KET that can be found in your Account page:
NOTE
Your API KEY can be found in your account settings
from cnvrg import Cnvrg
Cnvrg(url='The above code snippet should contain your API link as required. If you are still not sure what your unique Web URL is, log on via the Web and copy the URL from your browser, or contact support for additional help.
# Authenticate using the CLI
If you are running an experiment on your local machine or in another environment, you can authenticate your local workspace using the cnvrg CLI.
Finally, ensure you are working in a folder that is linked with cnvrg (you can link using either the cnvrg link or cnvrg clone command).
# Project Operations
# Create a new project
To create a new project:
from cnvrg import Project
p = Project.create('Project_Name')
# Upload files and artifacts to a project
To upload a list of files stored locally to the project. The list contains the absolute file paths for the files to be uploaded:
from cnvrg import Project
# set a project object from existing project or create a new one.
p = Project.create('Project_Name')
p.put_files(['/cnvrg/notebook.ipynb','/cnvrg/model.h5'])
NOTE
If you are using python on Windows OS, when putting the file path
make sure it is formatted correctly either by putting it as an r string (example:r'C:\User\cnvrg\notebook.ipynb')
or writing it with double slashes (example:'C:\\User\\cnvrg\\notebook.ipynb')
# Get a list of existing projects
To return a list of existing projects:
from cnvrg import Project
Project.list()
# Experiment Operations
# Experiment ID
In many commands, you will need to use an experiment ID. The experiment ID can be found in the URL for the experiment.
For example, if you have an experiment that lives at: https://app.cnvrg.io/my_org/projects/my_project/experiments/kxdjsuvfdcpqkjma5ppq, the experiment ID is kxdjsuvfdcpqkjma5ppq.
Then to use e=Experiment(), the command would be e=Experiment('kxdjsuvfdcpqkjma5ppq').
# Run an experiment
If you have a function or file that you would like to run as an experiment, use the Experiment.run() command. The code can be run locally (on your own machine or in a cnvrg workspace) or on remote compute (using the compute parameter).
A function can only be run as an experiment locally (if compute="local").
To create a new experiment and run specific code locally or on a remote machine:
from cnvrg import Experiment
e = Experiment.run(command,title='my title', compute='small')
| Parameter | type | description |
|---|---|---|
| command | string | The command to run. Can be a shell command or function. For example, python3 train.py or main. |
| title | string | The title for the experiment. |
| image | string | The image to use for the experiment. |
| compute | string | The compute to run the experiment on, default is None (will run local). For Kubernetes compute it should be in the format: cluster_name.template_name. For example, workers.medium. You can leave out cluster_name to use the default cluster. For an on-premise machine, simply write the name of the machine. For example, worker1. |
| datasets | array of dictionaries | A list of datasets and commits/queries (that is: [{"id": "dataset_id-1", "commit": "commit_sha1-1", "query": "query_name-1", "tree_only": true, "use_cached": true}, {dataset_dict_2}, ...]) to attach to the experiment. You can use either commit or query and not both. use_cached is only relevant when integrated to NFS and is true by default. |
| callable | callable object | specify a function to run as experiment, instead of command |
| arguments | dictionary | Include parameters to be parsed on the command line (for example, parameters for grid search) |
| schedule | string | Set a time to execute the experiment. The time is relative to the timezone defined for the current user. You can specify the time using either a 24- or 12-hour clock format. You can specify time in the format dd.mm.yyyy hh:mm<PM/AM> or yyyy.dd.mm hh:mm<PM/AM>. For example: To specify 4:25 PM on the 31st of January 2012, you can specify any of these: 31.01.2021 16:25, 31.01.2021 4:25PM, 2021.01.31 16:25, 2021.01.31 4:25PM. |
| recurring | string | Set a schedule for executing a recurring experiment. Specify the schedule using Cron format. For example, to execute the experiment at 30 minutes past every hour, specify: "30 * * * *" |
| notify_on_success | boolean | Receive an email when the experiment ends successfully. Default is False. |
| notify_on_error | boolean | Receive an email if an error occurs while your experiment is running. Default is False. |
| emails | string | Add extra recipients for email notifications for the experiment. The string should be a list of comma-separated emails. For example, "person1@email.com,person2@email.com". |
| git_branch | string | (When project is connected to git) - Which git branch to clone. (Default is project's default) |
| git_commit | string | (When project is connected to git) - Which commit of the git branch to clone. (Default is project's default) |
| commit | string | (When project is connected to git) - Which commit of the cnvrg project files to clone. (Default is project's default) |
| output_dir | string | (When project is connected to git) - The path of the folder with experiment artifacts to be synced as the commit for the experiment. (Default is project's default) |
| git_diff | boolean | (When project is connected to git) - Wether to additionally sync the files that are in the git diff. (Default is False) |
NOTE
The git_diff parameter is useful when developing in a workspace. With it, you can fiddle with your code and run experiments without first syncing to git. The code you run with will still be synced so you can eventually push back the code that your are most happy with.
# Examples
Run an experiment on a remote
smallcompute, using a script with a dataset and a query:from cnvrg import Experiment e = Experiment.run('python3 train.py', title='my title', compute='small', datasets=['dogscats.only_dogs'])Run a grid search:
from cnvrg import Experiment
e = Experiment.run('python3 train.py',
                    title='grid search'
                    arguments={"epochs": [10,15,20], "batch_size": [128,256]})
Run a grid search using a YAML file:
You can also run a grid search using the SDK by including the parameter information in a YAML file. To use the YAML file, you must first load it.
from cnvrg import Experiment
import yaml
with open('/path/parameters.yaml') as f:
    grid = yaml.full_load(f)
e = Experiment.run('python3 train.py', grid=grid)
TIP
Learn more about running grid searches and hyperparameter optimization here.
Run an experiment locally:
from cnvrg import Experiment
e = Experiment.run('python3 train.py',title='my title')
Run an experiment on a remote compute:
from cnvrg import Experiment
e = Experiment.run('python3 train.py',title='my title',compute='gpu')
Run an experiment using a specific Docker image:
from cnvrg import Experiment
e=Experiment()
e.run('command', compute='medium', image="tensorflow:19.07")
Run a local experiment using a function:
from cnvrg import Experiment
def main(experiment):
    [print(i) for i in range(100)]
e = Experiment.run(main,title='my function')
Load an existing experiment object from inside a running experiment:
from cnvrg import Experiment
e = Experiment()
# run commands on the experiment object:
e.log_param("tag_key", "tag_value")
Use email notifications for your experiment:
from cnvrg import Experiment
e = Experiment.run('python3 train.py', notify_on_success=True, notify_on_error=True)
# Initialize an experiment object
You can also create an Experiment object with the Experiment.init() command. This allows you to easily add SDK tracking into code you will run. Simply initialize the object and then run your code. Use the metadata operations to control what will be tracked by cnvrg.
To create a new experiment object that can track logs, metrics and artifacts:
from cnvrg import Experiment
e = Experiment.init()
# Then run your code and track it using the sdk, for example:
e.log("Starting my experiment")
You can also use the project parameter to tell cnvrg which project the experiment should be part of. If you use Experiment.init() in a cnvrg project folder linked with the CLI (either online or locally) you do not need to set this parameter.
from cnvrg import Experiment
e = Experiment.init(project=Project(‘slug’))
# Finish an experiment object
If you have initialized an Experiment object using the .init() command, you should conclude the experiment with the .finish() command.
To conclude an experiment object:
from cnvrg import Experiment
e.finish(exit_status=exit_status)
The default exit_status is aborted (exit_status=-1).
# Examples


# Metadata operations on experiments
# Add logs to an experiment:
from cnvrg import Experiment
e = Experiment()
e.log("my first log")
e.log(["my first log","my second log"]
# Get logs of an experiment:
from cnvrg import Experiment
e = Experiment()
e.logs() ### prints the logs of the experiment
         ### until the status of the experiment
         ### is error/aborted/success
# Get the title of an experiment and set a new one:
from cnvrg import Experiment
e = Experiment("EXPERIMENT_SLUG")
e.title # get title
e.title = "dogs-and-cats" # set new title
# Get various other metadata:
from cnvrg import Experiment
e = Experiment("EXPERIMENT_SLUG")
e['status'] # get current status of experiment
e['full_href'] # get full URL of the experiment
e['commit'] # get the start commit of the experiment
e['end_commit'] # get the end commit of the experiment
# Create a tag:
from cnvrg import Experiment
e = Experiment()
e.log_param("my_tag", "my_value")
# Create a line chart:
Single line:
from cnvrg import Experiment
e = Experiment()
e.log_metric("chart_name",
        Ys=[0.1, 0.2, 0.3],
        Xs=[1,2,3])
Multiple lines:
from cnvrg import Experiment
e = Experiment()
e.log_metric("chart_name",
        Ys=[0.1, 0.2, 0.3],
        Xs=[1,1,1],
        grouping=["loss", "val_loss", "acc"])
Xs and grouping are optional. When Xs is set, you can control the corresponding X value for the Y values. When grouping is set, multiple lines will be created: the first grouping, x and y value will be matched as a point on a single line. Xs and Ys can be of type float, integer, numpy single value, list, floats, list of numpy values or a numpy array.
WARNING
chart_name can't include "/"
# Create a bar chart:
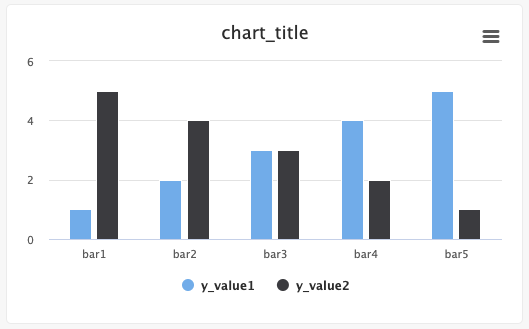
Single bar:
from cnvrg import Experiment
from cnvrg.charts import Bar
e = Experiment()
x_value=["bar1","bar2",...,"barN"]
y_value=[1,2,...,n]
e.log_chart("chart_key", title="chart_title",
    data=Bar(x=x_value, y=y_value, name="y_value"))
Multiple bars:
from cnvrg import Experiment
from cnvrg.charts import Bar
e = Experiment()
x_value=["bar1","bar2",...,"barN"]
y_value1=[1,2...n]
y_value2=[n, n-1,...,1]
e.log_chart("chart_key", title="chart_title",
    data=[Bar(x=x_value, y=y_value1, name="y_value1", min_val=0, max_val=10),
          Bar(x=x_value, y=y_value2, name="y_value2", colors=['#FF0000', '#00FF00', '#0000FF',...])])
Typing information: x must be a List and y must be an Array, np.ndarry, pd.array or pd.series.
The x list will populate the labels for the bars, and the corresponding y value will dictate the value of the bar for that category. The name of the y array will be the name of the set/category in the graph. min_val and max_val are optional and are numbers that correspond the lower and upper bounds for the y values. Optionally, you can set each bar to be a specific color using the colors list of hex values, with each hex value corresponding to each x value.
Steps and groups:
Using steps and groups allow you to submit bar charts across different steps and visualize it in a single chart with a slider to easily move between the steps. steps should be an integer and group. Multiple steps should be grouped with a single group.
NOTE
e.log_chart() creates a new graph or overwrites an existing graph. It will not append new bars to the previous version of the graph (unlike e.log_metric()).
You must therefore include all bars in the single e.log_chart() method every time you update it or use a different chart_key.
# Create a heat map/confusion matrix:
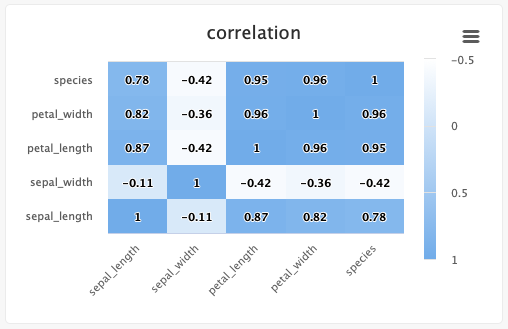
from cnvrg import Experiment
from cnvrg.charts import MatrixHeatmap
e = Experiment()
e.log_chart("chart_key", title="Heatmap", x_ticks=['x', 'y'], y_ticks=['a', 'b'],
    data=MatrixHeatmap(matrix=[(0,5), (1,1)],
                       color_stops=[[0,'#000000'],[1, '#7EB4EB']],
                       min_val=0,
                       max_val=10))
Typing information: x_ticks and y_ticks must be a List and matrix is a list of tuples in struct (x,y,z). color_stops is optional and is a List of Lists with size 2, where the nested first value is a float 0 <= X <= 1, and the second value is the hex value for the color to represent matrix values at that point of the scale. min and max are optional and should be numbers corresponding to the minimum and a maximum values for the key (scaling will be done automatically when these values are not submitted).
Each struct corresponds to a row in the matrix and to a label from the y_ticks list. The matrix is built from the bottom up, with the first struct and y_tick at the bottom edge. Each value inside the struct corresponds to each x_tick.
Using steps and groups allow you to submit the same heatmap across different steps and visualize it in a single chart with a slider to easily switch between the charts. steps should be an integer and group should be a string.
Steps and groups:
Using steps and groups allow you to submit heatmaps across different steps and visualize it in a single chart with a slider to easily move between the steps. steps should be an integer and group. Multiple steps should be grouped with a single group.
TIP
When using the group parameter, make sure the chart's key is unique across the different steps
NOTE
When using e.log_chart() you are are creating or overwriting an existing graph. It will not append new bars to the previous version (unlike e.log_metric()).
You must therefore include all values in the single e.log_chart() method every time you update it or use a different chart_key.
# Create a scatter plot:
- Single set of points:
from cnvrg import Experiment from cnvrg.charts import Scatterplot e=Experiment() x_values=[1,2,3,4,5] y_values=[5,4,3,2,1] e.log_chart("chart_key", title="chart_title", data=Scatterplot(x=x_values, y=y_values, name="name") - Multiple sets of points:
from cnvrg import Experiment
from cnvrg.charts import Scatterplot
e=Experiment()
x1_values=[1,2,3,4,5]
x2_values=[1,2,3,4,5]
y1_values=[5,4,3,2,1]
y2_values=[1,2,3,4,5]
e.log_chart("chart_key", title="chart_title",
    data=[Scatterplot(x=x1_values, y=y1_values, name="name"),
          Scatterplot(x=x2_values, y=y2_values, name="name2")]
Typing information: x and y must be an Array, np.ndarry, pd.array or pd.series. x is the list of x values and y is the list of y values.
NOTE
When using e.log_chart() you are are creating or overwriting an existing graph. It will not append new bars to the previous version (unlike e.log_metric()).
You must therefore include all values in the single e.log_chart() method every time you update it or use a different chart_key.
# Log artifacts for your experiment:
from cnvrg import Experiment
e = Experiment()
e.log_artifacts(['path/file.png','path/file2.png'], 'target_dir/')
| Parameter | type | description |
|---|---|---|
| files | list of strings | List of files to upload (using relative path). |
| target_dir | string | Path in the experiment file system to upload the files. |
# Show a line chart:
from cnvrg import Experiment
e = Experiment("experiment_id")
e.show_chart("chart_name") ## will open a matplotlib chart
# Operations on experiments
- Sync during a running experiment:
from cnvrg import Experiment
e = Experiment()
e.sync(message="my commit")
- Set the title of an experiment:
from cnvrg import Experiment
e = Experiment()
e.set_title("my new title")
- Send an email alert during an experiment:
from cnvrg import Experiment
e = Experiment()
e.alert(message="Alert: Accuracy is less than 0.5", subject="Accuracy alert", recipients=["jp@myorg.com"])
- Get a list of commits per experiment
from cnvrg import Experiment
e = Experiment()
e.commits()
- Get the latest commit per experiment
from cnvrg import Experiment
e = Experiment()
e.commits(latest=True)
# Experiment artifacts
- Retrieve a list of artifacts for a specific experiment:
from cnvrg import Experiment
e = Experiment("experiment_id")
e.artifacts()
- Retrieve a list of artifacts after running an experiment:
from cnvrg import Experiment
e = Experiment.run('python3 train.py',title='my title',compute='gpu')
e.artifacts()
Response:
[{'name': 'artifact.txt',
  'url': 'URL LINK',
  'type': 'blob',
  'size': '121 Bytes',
  'fullpath': 'artifact.txt',
  'updated': '14 minutes ago'}]
- Pull artifacts of a specific experiment:
from cnvrg import Experiment
e = Experiment("experiment_id")
e.pull_artifacts()
| Parameter | type | description |
|---|---|---|
| commit | string | set a specific commit to list artifacts from. Default is the latest experiment's commit. |
| wait_until_success | boolean | wait until experiment has finished successfully and then pull the artifacts |
- Pull artifacts to a specific path:
from cnvrg import Experiment
e = Experiment("experiment_id")
e.pull_artifacts("path_to_folder")
- Wait until the experiment has finished running successfully and then pull the artifacts from the end commit:
from cnvrg import Experiment
e = Experiment.run("experiment_id")
e.pull_artifacts(wait_until_success=True)
- Pull artifacts after running an experiment:
from cnvrg import Experiment
e = Experiment.run('python3 train.py',title='my title',compute='gpu')
e.pull_artifacts()
# Flow Operations
Flows can be created and run from any environment using the SDK. Creating flows requires using a flow configuration YAML file.
# Create a flow
You can use a flow YAML to create a flow inside a project. You can use either the absolute path to a YAML file or include the YAML content directly. Use the Flow.create command:
from cnvrg import Flow
f = Flow.create(yaml_content=string, project=Project('Project_Name'))
#OR
f = Flow.create(file=path_to_YAML, project=Project('Project_Name'))
| Parameter | type | description |
|---|---|---|
| yaml_content | string | Required (if not using file). A string with the contents of the YAML configuration. |
| file | path | Required (if not using yaml_content). A path to the YAML configuration file. |
| project | Project object | A cnvrg Project object for the project to create the flow in. This can be left out if you are in a cnvrg project (linked with the CLI). |
# Examples
Using path:
from cnvrg import Flow
from cnvrg import Project
f = Flow.create(file='/local_path/flow.yaml', project=Project('Project_Name'))
Using YAML directly:
## Define your flow
example_yaml = '''---
flow: Flow Example
recurring:
tasks:
- title: Training Task
  type: exec
  input: python3 train.py
  computes:
  - medium
  image: cnvrg:v5.0
relations: []'''

from cnvrg import Flow
from cnvrg import Project
f = Flow.create(yaml_content=example_yaml, project=Project('Project_Name'))
# Run a flow
To trigger a flow and run it as described in the YAML file or as constructed using the online flow builder:
from cnvrg import Flow
fv = f.run()
# Monitor the status of a running flow
To check the status of a running flow:
from cnvrg import Flow
fv = f.run()
fv.info()
# Pull latest task artifacts
Pull latest task artifacts. This command will pull the artifacts that were created in the experiment, from the last version that ran.
NOTE
You can only pull artifacts from a task that runs only a single experiment
from cnvrg import Flow
flow = Flow("training") # provide the name of the flow
flow.pull_artifacts(task="SVM")
NOTE
If running outside cnvrg project directory, you can provide the project name when defining the flow:
flow = Flow("training",project="mnist") # for example, if using 'mnist' project
| Parameter | type | description |
|---|---|---|
| task | string | Required The name of the task of the flow you want too pull artifacts |
# Endpoint Operations
# Endpoint ID
In many commands, you will need to use an endpoint ID. The endpoint ID can be found in the URL for the endpoint.
For example, if you have an endpoint that lives at: https://app.cnvrg.io/my_org/projects/my_project/endpoints/show/j46mbomoyyqj4xx5f53f, the endpoint ID is j46mbomoyyqj4xx5f53f.
Then to use e=Endpoint(), the command would be e=Endpoint('j46mbomoyyqj4xx5f53f').
# Load an endpoint
To load an endpoint and use it with the SDK:
from cnvrg import Endpoint
e = Endpoint("endpoint_id")
# Query an endpoint
- Send a single prediction to endpoint:
from cnvrg import Endpoint
e = Endpoint("endpoint_id")
e.predict("my_predict")
- Send batch predictions to endpoint:
from cnvrg import Endpoint
e = Endpoint("endpoint_id")
e.batch_predict(["my_predict1", "my_predict2",...,"my_predictn"], pool_size=100)
# Endpoint tracking and visualizing
To log a metric in your endpoint, use the log_metric() method in your code:
from cnvrg import Endpoint
e = Endpoint()
e.log_metric(k,v)
k is the name of the metric, v is value.
For example: e.log_metric(‘confidence’, 0.8)
The triggers in your endpoint leverage the metrics you log using this command. To set a trigger for confidence, you would have to be logging that metric using the cnvrg SDK. Tracked metrics will also be used for creating live graphs on the Charts tab.
WARNING
e.log_metric() currently only supports logging numbers.
# Get predictions
To get the previous 1000 predictions made by a model, use the get_predictions() method:
from cnvrg import Endpoint
e = Endpoint("endpoint_id")
predictions_list = e.get_predictions()
This method will return a list with the last 1000 predictions made by the endpoint.
# Rollback to previous model
To rollback a model that is in production use the rollback() method. This will rollback the latest model that was deployed and the endpoint will serve 100% of the traffic using the previous model:
from cnvrg import Endpoint
e = Endpoint("endpoint_id")
e.rollback()
# Miscellaneous
- Log a prediction in your endpoint:
from cnvrg import Endpoint
e = Endpoint("endpoint_id")
e.log_request(input, output, start time (in ms))
- Disable logging input in logs:
from cnvrg import Endpoint
e = Endpoint("endpoint_id")
e.disable_log_input()
- Disable logging output in logs:
from cnvrg import Endpoint
e = Endpoint("endpoint_id")
e.disable_log_output()
# Dataset Operations
# Dataset ID
In many methods, you will need to use a dataset ID. The dataset ID is the name used for the dataset in its URL.
For example, if you have a dataset that lives at: https://app.cnvrg.io/my_org/datasets/dataset_name, the dataset ID is dataset_name.
Then to use ds=Dataset(), the command would be ds=Dataset(dataset_name).
# Load a dataset
To load a dataset with the SDK use the Dataset module.
from cnvrg import Dataset
ds = Dataset('dataset_id')
Ensure that the dataset slug is the url of the dataset inside cnvrg.
# List dataset query files
from cnvrg import Dataset
ds = Dataset('dataset_id') # Initializing dataset
query_files = ds.get_query("query_slug")
# [{'name': 'create_tags.rb',
#  'fullpath': 'create_tags.rb',
#  'url': 'https://object_storage_url...',
#  'metadata': {'color': 'blue', 'animal': 'dino'}
#  },
# {'name': 'dataset_tags.rb',
#  'fullpath': 'dataset_tags.rb',
#  'url': 'https://object_storage_url...',
#  'metadata': {'color': 'white', 'animal': 'dog'}
#  }]
Ensure that the dataset slug is the url of the dataset inside cnvrg and the query slug is the url of the query in cnvrg.
# Parameters
| Parameter | type | description |
|---|---|---|
| data_dir | string | dataset local directory, if files exist in a local directory |
| filter | string | filter results (comma separated): fullpath, name, metadata, url |
# Examples
Using the data_dir parameter:
from cnvrg import Dataset
ds = Dataset('dataset_id') # Initializing dataset
query_files = ds.get_query("query_slug",data_dir="/home/my_data")
# [{'name': 'create_tags.rb',
#  'fullpath': '/home/my_data/create_tags.rb',
#  'url': 'https://object_storage_url...',
#  'metadata': {'color': 'blue', 'animal': 'dino'}
#  },
# {'name': 'dataset_tags.rb',
#  'fullpath': '/home/my_data/dataset_tags.rb',
#  'url': 'https://object_storage_url...',
#  'metadata': {'color': 'white', 'animal': 'dog'}
#  }]
Using a filter:
from cnvrg import Dataset
ds = Dataset('dataset_id') # Initializing dataset
query_files = ds.get_query("query_slug",data_dir="/home/my_data",filter="name, fullpath")
# [{'name': 'create_tags.rb',
#  'fullpath': '/home/my_data/create_tags.rb',}
#  },
# {'name': 'dataset_tags.rb',
#  'fullpath': '/home/my_data/dataset_tags.rb',}
#  }]
# Search dataset using a query
from cnvrg import Dataset
ds = Dataset('dataset_id') # Initializing dataset
query_files = ds.search("{'type':'dog'}")
# [{'name': 'create_tags.rb',
#  'fullpath': 'create_tags.rb',
#  'url': 'https://object_storage_url...',
#  'metadata': {'color': 'blue', 'animal': 'dino'}
#  },
# {'name': 'dataset_tags.rb',
#  'fullpath': 'dataset_tags.rb',
#  'url': 'https://object_storage_url...',
#  'metadata': {'color': 'white', 'animal': 'dog'}
#  }]
Ensure that the dataset slug is the url of the dataset inside cnvrg and the query slug is the url of the query in cnvrg.
# Parameters
| Parameter | type | description |
|---|---|---|
| data_dir | string | dataset local directory, if files exist in a local directory |
| filter | string | filter results (comma separated): fullpath, name, metadata, url |
# Examples
Using the data_dir parameter:
ds = Dataset('dataset_id') # Initializing dataset
query_files = ds.search("{'type':'dog'}",data_dir="/home/my_data")
# [{'name': 'create_tags.rb',
#  'fullpath': '/home/my_data/create_tags.rb',
#  'url': 'https://object_storage_url...',
#  'metadata': {'color': 'blue', 'animal': 'dino'}
#  },
# {'name': 'dataset_tags.rb',
#  'fullpath': '/home/my_data/dataset_tags.rb',
#  'url': 'https://object_storage_url...',
#  'metadata': {'color': 'white', 'animal': 'dog'}
#  }]
Using a filter:
ds = Dataset('dataset_id') # Initializing dataset
query_files = ds.search("{'type':'dog'}",data_dir="/home/my_data",filter="name, fullpath")
# [{'name': 'create_tags.rb',
#  'fullpath': '/home/my_data/create_tags.rb',}
#  },
# {'name': 'dataset_tags.rb',
#  'fullpath': '/home/my_data/dataset_tags.rb',}
#  }]
# Fetch the metadata of dataset files
from cnvrg import Dataset
ds = Dataset("dataset_id")
metadata = ds.get_metadata(["dogs/black_dog.png", "cats/black_cat.png", "cats/white_cat.png", "non_existent_file", "file_without_metadata"])
# {
#     "dogs/black_dog.png": {
#                     "color": "black",
#                     "animal": "dog"
#                  },
#     "cats/black_cat.png": {
#                     "color": "black",
#                     "animal": "cat"
#                  }
#     "cats/white_cat.png": {
#                     "color": "white",
#                     "animal": "cat"
#                  }
#     "file_without_metadata": {}
# }
Ensure that the dataset slug is the url of the dataset inside cnvrg.
# Cache and clear commits
To cache a commit to an external NFS disk:
from cnvrg import Dataset
ds = Dataset('dataset_id')
ds.cache_commit(commit_sha1='sha1', external_disk_slug='disk_slug')
To clear a commit from an external NFS disk:
from cnvrg import Dataset
ds = Dataset('dataset_id')
ds.cache_clear(commit_sha1='sha1', external_disk_slug='disk_slug')
| Parameter | type | description |
|---|---|---|
| commit_sha1 | sha1 (string) | The sha1 of the commit. |
| external_disk_slug | string | The slug of the external disk. |
# Dataset metadata (commits and external disks)
To return the current commit:
from cnvrg import Dataset
ds = Dataset('dataset_id')
ds.get_current_commit()
To return a tree-structured dictionary containing the current project files commits:
from cnvrg import Dataset
ds = Dataset('dataset_id')
ds.get_current_tree()
# AI Library Operations
You can run a component from the AI Library using the following method:
from cnvrg import Library
library = Library('/cnvrg_libraries/library_name')
experiment = library.run(arg1="val1",arg2="val2",...)
You can also run a grid search by using an array for an argument. cnvrg will identify how many experiments need to be run for each permutation of the library and starting them all. Use thw following format:
from cnvrg import Library
library = Library('/cnvrg_libraries/library_name')
experiment = library.run(arg=["val1","val2"])
All of the components arguments can be included in the library.run() method. If there is mo default value, the argument must be provided in the method call.
You can also set environmental conditions for the experiment using with the following arguments:
command
arguments
grid
title
project
computes
datasets
local
library
working_directory
sync_before
sync_after
prerun
requirements
image
For example, to run a library locally:
from cnvrg import Library
library = Library('/cnvrg_libraries/library_name')
experiment = library.run(computes='local')
# Troubleshooting the cnvrg SDK
If you experience issues running or installing the cnvrg SDK, troubleshoot by performing the following checks:
# Update the cnvrg SDK
Sometimes updating the SDK can help resolve the issue.
To update the SDK, run the command:
pip install cnvrg -U
Or if you're using pip for Python 3, use the following:
pip3 install cnvrg -U
If you do not have the latest version, the newest version will be downloaded and installed.
After updating the SDK, check if your issue persists.
# Install Xcode Command Line Tools (MacOS)
If you are having repeated errors installing pip or installing the SDK, you may not have the Xcode Command Line Tools installed on your MacOS machine. Run the following command and then try again:
xcode-select --install
NOTE
Sometimes, updating your version of MacOS requires a reinstallation of the Xcode Command Line Tools to fix common command line issues.
# Update or remove the snowflake-connector-python
If you are using the python package: snowflake-connector-python in your experiment, please upgrade it to version 2.2.7 or above using the following command:
pip3 install --upgrade 'snowflake-connector-python>=2.2.7'
If you no longer need the package at all, you can delete it with the following command:
pip3 uninstall snowflake-connector-python