# Migrate cnvrg databses to a new cnvrg instance
# Overview
The following guide describes the required steps for migrating cnvrg data from one environment to a new cnvrg instance.
# Requirements
- kubectl and access to the Kubernetes cluster hosting cnvrg
# Preparation
When Migrating cnvrg as part of an upgrade, prepare a new cnvrg instance.
NOTE
cnvrg suggested upgrade strategy is active/active migration. Where the user deploys a new cnvrg instance using a new cluster domain that will be replaced once the migration were successful and validated. This reduces the maintenance window and the downtime for the users and will offer a rollback option.
# Databases Backup
The first step will be to scale down cnvrg, this step guaranty that no other operations or new writes will occur during the backups.
kubectl -n cnvrg scale deploy/cnvrg-operator --replicas 0;
kubectl -n cnvrg scale deploy/sidekiq --replicas 0;
kubectl -n cnvrg scale deploy/searchkiq --replicas 0;
kubectl -n cnvrg scale deploy/systemkiq --replicas 0;
kubectl -n cnvrg scale deploy/app --replicas 0
# Postgres Backup
Connect to the Postgre pod
kubectl -n cnvrg exec -it deploy/postgres -- bash
Export Postgresql password - not sure if relevant
export PGPASSWORD=$POSTGRESQL_PASSWORD
echo $POSTGRESQL_PASSWORD
Backup Postgresql database using the pg_dump command
pg_dump -h postgres -U cnvrg -d cnvrg_production -Fc > cnvrg-db-backup.sql
Copy the database dump to the local machine
POSTGRES_POD=$(kubectl get pods -l=app=postgres -ncnvrg -o jsonpath='{.items[0].metadata.name}');
kubectl -n cnvrg cp ${POSTGRES_POD}:/opt/app-root/src/cnvrg-db-backup.sql cnvrg-db-backup.sql
# Redis Backup
Retrieve Redis password from the redis-creds secret
kubectl -n cnvrg get secret redis-creds -o yaml |grep CNVRG_REDIS_PASSWORD| awk '{print $2}'
Use kubectl exec command to connect to Redis pod shell
kubectl -n cnvrg exec -it deploy/redis -- bash
Use redis-cli command to dump Redis database
redis-cli -a <redis-password> save;
ls /data/dump.rdb
Copy Redis dump to the local machine
REDIS_POD=$(kubectl get pods -l=app=redis -ncnvrg -o jsonpath='{.items[0].metadata.name}');
kubectl -n cnvrg cp $REDIS_POD:/data/dump.rdb dump.rdb
Now that we backed up both databases we can scale the applications up.
kubectl -n cnvrg scale deploy/cnvrg-operator --replicas 1;
kubectl -n cnvrg scale deploy/sidekiq --replicas 1;
kubectl -n cnvrg scale deploy/searchkiq --replicas 1;
kubectl -n cnvrg scale deploy/systemkiq --replicas 1;
kubectl -n cnvrg scale deploy/app --replicas 1
# Migrating The Backups To The New cnvrg Instance
In the following steps, we will restore the data to the new cnvrg instance using the backup taken in the previous steps.
First, let's scale down the control plane of the new cnvrg instance:
kubectl -n cnvrg scale deploy/cnvrg-operator --replicas 0;
kubectl -n cnvrg scale deploy/sidekiq --replicas 0;
kubectl -n cnvrg scale deploy/searchkiq --replicas 0;
kubectl -n cnvrg scale deploy/systemkiq --replicas 0;
kubectl -n cnvrg scale deploy/app --replicas 0
# Postgres Database Restore
Copy the dump to the Postgres pod
POSTGRES=$(kubectl get pods -l=app=postgres -ncnvrg -o jsonpath='{.items[0].metadata.name}')
kubectl -n cnvrg cp ./cnvrg-db-backup.sql ${POSTGRES}:/opt/app-root/src/
Connect to Postgres pod using kubectl exec
kubectl -n cnvrg exec -it deploy/postgres -- bash
Drop and Create cnvrg_production database in "psql"
psql
UPDATE pg_database SET datallowconn = 'false' WHERE datname = 'cnvrg_production';
ALTER DATABASE cnvrg_production CONNECTION LIMIT 0;
SELECT pg_terminate_backend(pid) FROM pg_stat_activity WHERE datname = 'cnvrg_production';
DROP DATABASE cnvrg_production;
create database cnvrg_production;
exit
Use the pg_restore command to restore the database from the dump. The command will ask for a PostgreSQL password which can be found in the environment variable
echo $POSTGRESQL_PASSWORD
pg_restore -h postgres -p 5432 -U cnvrg -d cnvrg_production -j 8 --verbose cnvrg-db-backup.sql
Exit Postgres pod
exit
# Redis Database Restore
Copy Redis dump.rdb to Redis pod
REDIS_POD=$(kubectl get pods -l=app=redis -ncnvrg -o jsonpath='{.items[0].metadata.name}');
kubectl cp ./dump.rdb cnvrg/$REDIS_POD:/data/dump.rdb
Change the name of the AOL file to .old using "mv" command
kubectl -n cnvrg exec -it deploy/redis -- mv /data/appendonly.aof /data/appendonly.aof.old
Redis config is loaded from a secret named redis-creds. Edit the value of “appendonly” from “yes” to "no".
kubectl -n cnvrg get secret redis-creds -o yaml |grep "redis.conf"|awk '{print $2}'|base64 -d |sed -e 's/yes/no/g' > /tmp/redis-secret;
cat /tmp/redis-secret|base64;
kubectl -n cnvrg patch secret redis-creds --type=merge -p '{"data": {"redis.conf": "<encoded-value>"}}'
Verify the change in the secret
kubectl -n cnvrg get secret redis-creds -o yaml |grep "redis.conf"|awk '{print $2}'|base64 -d
Delete Redis pod to trigger a restore:
REDIS_POD=$(kubectl get pods -l=app=redis -ncnvrg -o jsonpath='{.items[0].metadata.name}');
kubectl -n cnvrg delete pod $REDIS_POD
Once Redis pod is running again, retrieve the list of cron jobs that were scheduled in the old cnvrg instance.
REDIS_PASSWORD=$(kubectl -n cnvrg get secret redis-creds -o yaml |grep CNVRG_REDIS_PASSWORD| awk '{print $2}')
REDIS_POD=$(kubectl get pods -l=app=redis -ncnvrg -o jsonpath='{.items[0].metadata.name}');
kubectl -n cnvrg exec -it $REDIS_POD -- redis-cli -a $REDIS_PASSWORD --scan --pattern '*'
Now that we migrated both databases we can scale the applications up.
kubectl -n cnvrg scale deploy/cnvrg-operator --replicas 1;
kubectl -n cnvrg scale deploy/sidekiq --replicas 1;
kubectl -n cnvrg scale deploy/searchkiq --replicas 1;
kubectl -n cnvrg scale deploy/systemkiq --replicas 1;
kubectl -n cnvrg scale deploy/app --replicas 1
# Modify The Cluster Domain Of The New cnvrg Instance
Lastly, if the migration strategy was Active/Active we will need to modify the cluster domain to match the old cnvrg environment. During this process, we will want to redirect the DNS to the new cluster endpoint. We will use the Kubectl "patch" command to edit the CRDs of cnvrg
kubectl -n cnvrg patch cnvrgapps.mlops.cnvrg.io/cnvrg-app --type=merge -p '{"spec": {"clusterDomain": "new.cnvrg.example.com"}}'
kubectl -n cnvrg patch cnvrginfra.mlops.cnvrg.io/cnvrg-infra --type=merge -p '{"spec": {"clusterDomain": "new.cnvrg.example.com"}}'
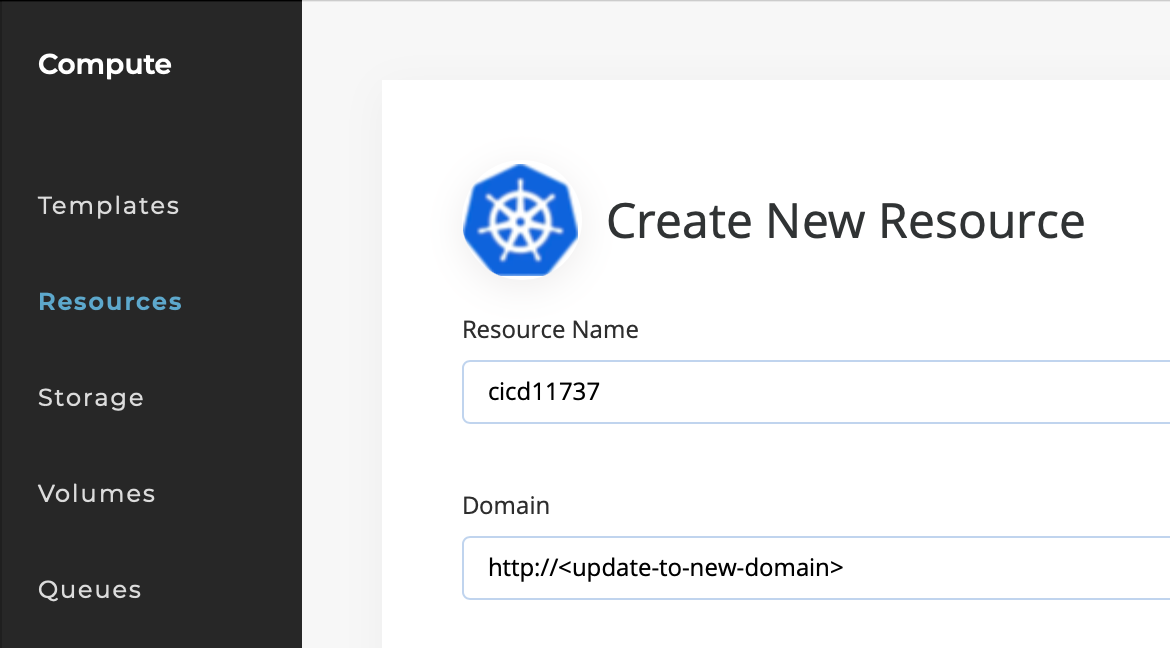
Click on the Compute tab on the left side. Select Resources and click on your default cluster. In the upper right hand corner select Edit. Update your domain with your new DNS entry as shown below and then click Save.
WARNING
When performing the above, Istio/NGINX objects will change and the environment will not recognize the previous DNS subdomain. Make sure to update your DNS records.
Validate the change using the following commands
kubectl -n cnvrg get vs
NAME                                                              GATEWAYS             HOSTS                                                                                 AGE
app                                                               ["istio-gw-cnvrg"]   ["app.new.cnvrg.example.com"]                                                            51m
elastalert                                                        ["istio-gw-cnvrg"]   ["elastalert.new.cnvrg.example.com"]                                                     51m
elasticsearch                                                     ["istio-gw-cnvrg"]   ["elasticsearch.new.cnvrg.example.com"]                                                  51m
grafana                                                           ["istio-gw-cnvrg"]   ["grafana.new.cnvrg.example.com"]                                                        51m
kibana                                                            ["istio-gw-cnvrg"]   ["kibana.new.cnvrg.example.com"]                                                         51m
prometheus                                                        ["istio-gw-cnvrg"]   ["prometheus.new.cnvrg.example.com"]                                                     51m
NOTE
The output list might be longer and will show running jobs and workspaces based on your workloads
Verify that all pods are in Running status.
kubectl -n cnvrg get pods
NAME                                                              READY   STATUS    RESTARTS   AGE
app-55dfbc7c55-bsfzm                                              1/1     Running   0          4m25s
capsule-6cbcf5c55c-dm8cc                                          1/1     Running   0          53m
cnvrg-fluentbit-585bs                                             1/1     Running   0          51m
cnvrg-fluentbit-rgn8q                                             1/1     Running   0          51m
cnvrg-fluentbit-t9prn                                             1/1     Running   0          51m
cnvrg-fluentbit-xqpj4                                             1/1     Running   0          51m
cnvrg-ingressgateway-7c6457d7dc-bln55                             1/1     Running   0          52m
cnvrg-job-notebooksession-mxyeavsysvykpzledlcw-2-7684587d-g4t8j   2/2     Running   0          19m
cnvrg-operator-577ccc7f47-dchtw                                   1/1     Running   0          4m19s
cnvrg-prometheus-operator-d4fb97f64-87l5d                         2/2     Running   0          53m
config-reloader-79c5567f9b-lpzv9                                  1/1     Running   0          53m
elastalert-64fbfbdd9d-zlrxd                                       2/2     Running   0          52m
elasticsearch-0                                                   1/1     Running   0          53m
grafana-6548f4b57b-vfwcm                                          1/1     Running   0          52m
hyper-5dcdbd58b7-7ktgq                                            1/1     Running   0          4m25s
istio-operator-665d449fb9-hnfvz                                   1/1     Running   0          53m
istiod-869957f45d-9jfqk                                           1/1     Running   0          52m
kibana-84455b84dd-tz4zf                                           1/1     Running   0          52m
kube-state-metrics-66489d8b8b-t4xp4                               3/3     Running   0          52m
mpi-operator-8556d7bdbf-dg2wv                                     1/1     Running   0          52m
node-exporter-mfj2r                                               2/2     Running   0          52m
node-exporter-v2pl4                                               2/2     Running   0          52m
node-exporter-xsbf6                                               2/2     Running   0          52m
node-exporter-xsd98                                               2/2     Running   0          52m
postgres-59ccbf9c9-dzkkl                                          1/1     Running   0          53m
prometheus-cnvrg-infra-prometheus-0                               3/3     Running   1          53m
redis-5ccb6788b6-5w77v                                            1/1     Running   0          25m
scheduler-7fd6c88857-lnvxv                                        1/1     Running   0          4m25s
searchkiq-5b9cfdfc7d-9vpk2                                        1/1     Running   0          4m24s
sidekiq-6bf757dd65-jkppz                                          1/1     Running   0          4m19s
sidekiq-6bf757dd65-kt628                                          1/1     Running   0          4m25s
systemkiq-6ff89476b7-42qlm                                        1/1     Running   0          4m24s
NOTE
The output list might be longer and will show running jobs and workspaces based on your workloads
# Migrate PV from one workspace to another cluster workspace
# Note: Before you start migrating the PV please follow the steps listed above to migrate the Redis and Postgres database;
- Go into the Project. Select Workspaces from the left side. Shut down the workspaces involved in the migration.
To create a snapshot using the AWS portal, complete these steps:
Take a snapshot of the volumes in EC2 to ensure no data is lost. The name of the PV is appended with "new-pvc"
In the EC2 Console in AWS, go to Volumes. Find your volume in the table and select it. Click Actions → Create Snapshot
How to find the EBS Volume associated with the pv in AWS.

kubectl get pv cnvrg
kubectl get pv <name> -o jsonpath='{.spec.awsElasticBlockStore.volumeID}'
To create a snapshot using the Azure portal, complete these steps:
a) In the Azure portal, select Create a resource.
b) Search for and select Snapshot.
c) In the Snapshot window, select Create. The Create snapshot window appears.
d) For Resource group, select an existing resource group or enter the name of a new one.
e) Enter a Name, then select a Region and Snapshot type for the new snapshot. If you would like to store your snapshot in zone-resilient storage, you need to select a region that supports availability zones. For a list of supporting regions, see Azure regions with availability zones.
f) For Source subscription, select the subscription that contains the managed disk to be backed up.
g) For Source disk, select the managed disk to snapshot.
h) For Storage type, select Standard HDD, unless you require zone-redundant storage or high-performance storage for your snapshot.
i) If needed, configure settings on the Encryption, Networking, and Tags tabs. Otherwise, default settings are used for your snapshot.
j) Select Review + create.
To create a snapshot in GCP using the glcoud cli tool, complete these steps:
Create a VolumeSnapshot
A VolumeSnapshot object is a request for a snapshot of an existing PersistentVolumeClaim object. When you create a VolumeSnapshot object, GKE automatically creates and binds it with a VolumeSnapshotContent object, which is a resource in your cluster like a PersistentVolume object.
Save the following manifest as volumesnapshot.yaml.
Use the v1 API version for clusters running versions 1.21 or later.
apiVersion: snapshot.storage.k8s.io/v1
kind: VolumeSnapshot
metadata:
  name: my-snapshot
spec:
  volumeSnapshotClassName: my-snapshotclass
  source:
    persistentVolumeClaimName: my-pvc
Apply the manifest:
kubectl apply -f volumesnapshot.yaml
After you create a volume snapshot, GKE creates a corresponding VolumeSnapshotContent object in the cluster. This object stores the snapshot and bindings of VolumeSnapshot objects. You do not interact with VolumeSnapshotContents objects directly.
Confirm that GKE created the VolumeSnapshotContents object:
kubectl get volumesnapshotcontents
The output is similar to the following:
NAME                                               AGE
snapcontent-cee5fb1f-5427-11ea-a53c-42010a1000da   55s
After the volume snapshot content is created, the CSI driver you specified in the VolumeSnapshotClass creates a snapshot on the corresponding storage system. After GKE creates a snapshot on the storage system and binds it to a VolumeSnapshot object on the cluster, the snapshot is ready to use. You can check the status by running the following command:
kubectl get volumesnapshot \
  -o custom-columns='NAME:.metadata.name,READY:.status.readyToUse'
If the snapshot is ready to use, the output is similar to the following:
NAME               READY
my-snapshot        true
- Now that you have a snapshot as a backup. Set the pv RECLAIM POLICY to "Retain". This ensures if you delete the pvc the pv isn't deleted as well.
kubectl patch pv <name> -p '{"spec":{"persistentVolumeReclaimPolicy":"Retain"}}'
- Capture the pv and pvc information for the migration. This is the volume you want to move from the original cluster.
kubectl get pv <name> -o yaml > original-cluster-pv.yaml
kubectl get pvc <name> -n cnvrg -o yaml > original-cluster-pvc.yaml
- Get the name of the pv we want to migrate.
cat original-cluster-pv.yaml | grep name
  name: pvc-6446fdd0-be22-49a5-b72c-a52ee27ba932
- Apply the original pvc yaml to the new cluster.
kubectl apply -f original-cluster-pvc.yaml
- Grab the uid of the pvc in the new cluster. This is needed when applying the pv to the cluster. #####Hint, the pvc should show "lost" as a status.
PVC_UID=$(kubectl get pvc <name> -n cnvrg -o jsonpath='{.metadata.uid}')
- Now we can apply the pv. We will additionally set the claimRef to the uid found in the previous step from the pvc.
kubectl apply -f original-cluster-pv.yaml
kubectl patch pv <name> -p '{"spec":{"claimRef":{"uid":"${PVC_UID}"}}}'
- Check to see if the pvc is bound to the PV.
kubectl get pvc -n cnvrg
- Start the workspace in AWS under the EBS volume you should see the volume mount to the node in the new cluster. You can also see if the pvc is bound.
kubectl get pvc -n cnvg
- Click on the Compute tab on the left side. Select Resources and click on your default cluster. In the upper right hand corner select Edit. Update your domain with your new DNS entry as shown below and then click Save. #####Note: you need to select an icon or the save will fail.
# Troubleshooting:
If the pvc continues to show the status "lost". There are 2 items to check.
- In the pv under claimRef: ensure the uid is the uid of the pvc.
  claimRef:
    apiVersion: v1
    kind: PersistentVolumeClaim
    uid: a362fd64-30af-4fca-9b2e-3332652a111a
- In the pvc ensure that you are pointing to the pv volume by name and the resources.requests.storage matches the size of the pv.
spec:
  accessModes:
  - ReadWriteOnce
  resources:
    requests:
      storage: 11Gi
  storageClassName: gp2
  volumeMode: Filesystem
  volumeName: pvc-a362fd64-30af-4fca-9b2e-3332652a111a
# Environment Validation
Once the Migration is finished, and the cnvrg pods are up and running. Login to cnvrg Web UI and perform the following validation test.
First, let's validate that all of the user-created objects are present, navigate through the different windows and validate that the following objects are present:
- Projects - All user's projects are present and workspaces as well.
- Datasets - All managed Datasets are available.
- Containers - All the registries that were added by the users are configured as well are the container images that are associated with them.
- Compute - All Custom compute templates are listed.
Second, we will launch a workspace to test the scheduling. This is to validate the basic functionality of cnvrg. From the main page, navigate to Project and create a new Workspace. On the current page, click the Start New Workspace.
Now let’s fill in this form to get our R Studio notebook up and running. By default, the workspace type is Jupyter lab, so we will need to select R Studio.
For "Title", give a meaningful name. For Compute, select medium (running on Kubernetes). Leave Datasets empty. For Image, click cnvrg:v5.0 and choose the latest cnrvg R image. Click Start workspace.
cnvrg will now put everything into motion and get a Jupyter Lab workspace up and running for us to use. It may take a few moments but soon enough, everything will be ready to go.
# Troubleshooting
# Cannot Create Workspaces, Flows or Experiments
During the Migration, the default queue inside the database might have changed or have been deleted. This results in the following errors when trying to run different workloads.
"Failed saving: Cannot read properties of undefined (reading 'data')"
"Got error during validation flow: Can't validate recipe"\
Connect to the app pod using kubectl exec command
kubectl -n cnvrg exec -it deploy/app -- bash
Run rails migrate, it will runs the change or up method for all the migrations that have not yet been run. If there are no such migrations, it exits. It will run these migrations in order based on the date of the migration.
rails db:migrate
Create the "default" queue for each organization within cnvrg
rails c
Organization.all.each do |org|
        if org.job_queues.blank?
          org.job_queues.create(name: "default", default: true, priority: 0, user: org.user, color: "#000000")
        end
      rescue => e
        puts(e)
      end